ASTM E716-94(1998)
(Practice)Standard Practices for Sampling Aluminum and Aluminum Alloys for Spectrochemical Analysis
Standard Practices for Sampling Aluminum and Aluminum Alloys for Spectrochemical Analysis
SCOPE
1.1 These practices describe the sampling of aluminum and aluminum-base alloys to obtain a chill-cast disk suitable for quantitative optical emission spectrochemical analysis. The disk in the region to be excited is representative of the melt or product and gives a repeatability of results which approaches that of the reference materials used.
1.2 These practices describe procedures for representative sampling of molten metal, from fabricated or cast products which can be melted, and from other forms which cannot be melted.
1.3 This standard does not purport to address all of the safety problems, if any, associated with its use. It is the responsibility of the user of this standard to establish appropriate safety and health practices and determine the applicability of regulatory limitations prior to use. Specific precautionary statements are given in 5.1 and 6.2.
General Information
Relations
Standards Content (Sample)
NOTICE: This standard has either been superseded and replaced by a new version or discontinued.
Contact ASTM International (www.astm.org) for the latest information.
Designation: E 716 – 94 (Reapproved 1998)
Standard Practices for
Sampling Aluminum and Aluminum Alloys for
Spectrochemical Analysis
This standard is issued under the fixed designation E 716; the number immediately following the designation indicates the year of
original adoption or, in the case of revision, the year of last revision. A number in parentheses indicates the year of last reapproval. A
superscript epsilon (e) indicates an editorial change since the last revision or reapproval.
1. Scope 3. Summary of Practices
1.1 These practices describe the sampling of aluminum and 3.1 Molten metal representative of the furnace melt is
aluminum-base alloys to obtain a chill-cast disk suitable for poured into a specified mold to produce a chill-cast disk. The
quantitative optical emission spectrochemical analysis. The disk is machined to a specified depth that represents the
disk in the region to be excited is representative of the melt or average composition and produces an acceptable surface for
product and gives a repeatability of results which approaches excitation.
that of the reference materials used. 3.2 Fabricated, cast, or wrought products are remelted and
1.2 These practices describe procedures for representative cast into molds, briquetted and remelted, bonded to more
sampling of molten metal, from fabricated or cast products massive material, or excited directly without remelting.
which can be melted, and from other forms which cannot be 3.3 Special practices are included for the sampling and
melted. analysis of aluminum-silicon alloys, containing greater than
1.3 This standard does not purport to address all of the 14 % silicon.
safety problems, if any, associated with its use. It is the
4. Significance and Use
responsibility of the user of this standard to establish appro-
4.1 These practices, used in conjunction with the following
priate safety and health practices and determine the applica-
bility of regulatory limitations prior to use. Specific precau- appropriate quantitative optical emission spectrochemical
methods, Test Methods E 101, E 227, E 607, and E 1251, are
tionary statements are given in 5.1 and 6.2.
suitable for use in manufacturing control, material or product
2. Referenced Documents
acceptance, and research and development.
2.1 ASTM Standards:
5. Apparatus
E 101 Test Method for Spectrographic Analysis of Alumi-
5.1 Ladle, capable of holding a minimum of 250 g (8.8 oz)
num and Aluminum Alloys by the Point-to-Plane Tech-
nique of molten metal, with a handle of sufficient length to reach into
a furnace, trough, or crucible. The ladle should be lightly
E 227 Test Method for Optical Emission Spectrometric
Analysis of Aluminum and Aluminum Alloys by the coated with a tightly adhering ladle wash that will not
contaminate the sample (Note 1).
Point-to-Plane Technique
E 401 Practice for Bonding Thin Spectrochemical Samples
NOTE 1—Caution: Traces of moisture in the coating may cause dan-
and Standards to a Greater Mass of Material
gerous spattering.
E 607 Test Method for Optical Emission Spectrometric
NOTE 2—A suitable ladle wash may be prepared as follows: Mix 255 g
Analysis of Aluminum and Aluminum Alloys by the (9 oz) of fine whiting (CaCO ) with 3.8 L (1 gal) of water and boil for 20
min. Add 127 g (4.5 oz) of sodium silicate solution (40 to 42°Bé) and boil
Point-to-Plane Technique, Nitrogen Atmosphere
for 30 min. Stir well before using.
E 1251 Test Method for Optical Emission Spectrometric
Analysis of Aluminum and Aluminum Alloys by the Argon 5.2 Sample Molds, capable of producing homogenous chill-
Atmosphere, Point-to-Plane, Unipolar Self-Initiating Ca-
cast disks having smooth surfaces, free of surface pockets and
pacitor Discharge porosity. These castings should have a spectrochemical re-
sponse similar to the reference materials used in preparing the
analytical curves and must have a repeatability from excitation-
to-excitation of no more than 2 % relative on major elements.
These practices are under the jurisdiction of ASTM Committee E-1 on
They must be representative of the melt in the region excited.
Analytical Chemistry for Metals, Ores, and Related Materials and are the direct
responsibility of Subcommittee E01.04 on Aluminum and Magnesium.
Current edition approved Jan. 15, 1994. Published March 1994. Originally
published as E 716 – 80. Last previous edition E 716 – 85 (1989).
Other proprietary ladle washes such as Dycote, available from Foseco, Inc., P.
Annual Book of ASTM Standards, Vol 03.05.
O. Box 8728, Cleveland, OH 44135; and Zirconite, available from Titanium Alloy
Annual Book of ASTM Standards, Vol 03.06.
Mfg. Co., 111 Broadway, New York, NY 10006, have been found suitable for this
purpose.
Copyright © ASTM, 100 Barr Harbor Drive, West Conshohocken, PA 19428-2959, United States.
NOTICE: This standard has either been superseded and replaced by a new version or discontinued.
Contact ASTM International (www.astm.org) for the latest information.
E 716
Several types of molds have been found acceptable: 5.2.3 Vacuum Mold is shown in Fig. 4. This mold pro-
5.2.1 Type A, book mold, is shown in Fig. 1. The advantage duces disks that are 38 mm (1.5 in.) in diameter and 13 mm
of this mold is simplicity and low cost. This mold produces a (0.5 in.) thick and weigh approximately 40 g (1.4 oz). The
vertically cast disk with the sprue on its edge. The mold mold consists of a solid copper base and a porous bronze wall
dimensions are such as to produce a disk approximately 64 mm in the form of a composite mold insert which is located in a
(2.5 in.) in diameter by 6 to 8 mm (0.24 to 0.32 in.) in steel mold body. A graphite coated cast iron tip is attached to
thickness. A circular central recess 15 to 25 mm (0.6 to 1.0 in.) the mold body by a spring clamp assembly. The vacuum source
in diameter on one side of the disk facilitates machining of that can be either a small battery-operated vacuum pump or a
side in preparation for excitation. It also promotes more rubber syringe connected to the mold body.
uniform freezing of the raised peripheral area. The mold 5.2.4 Other Types of Molds—Other molds of different types,
material should be steel or cast iron and should weigh materials, and dimensions may be substituted provided that the
approximately 2 to 3 kg (5 to 7 lb). uniformity of the samples so obtained is comparable to the
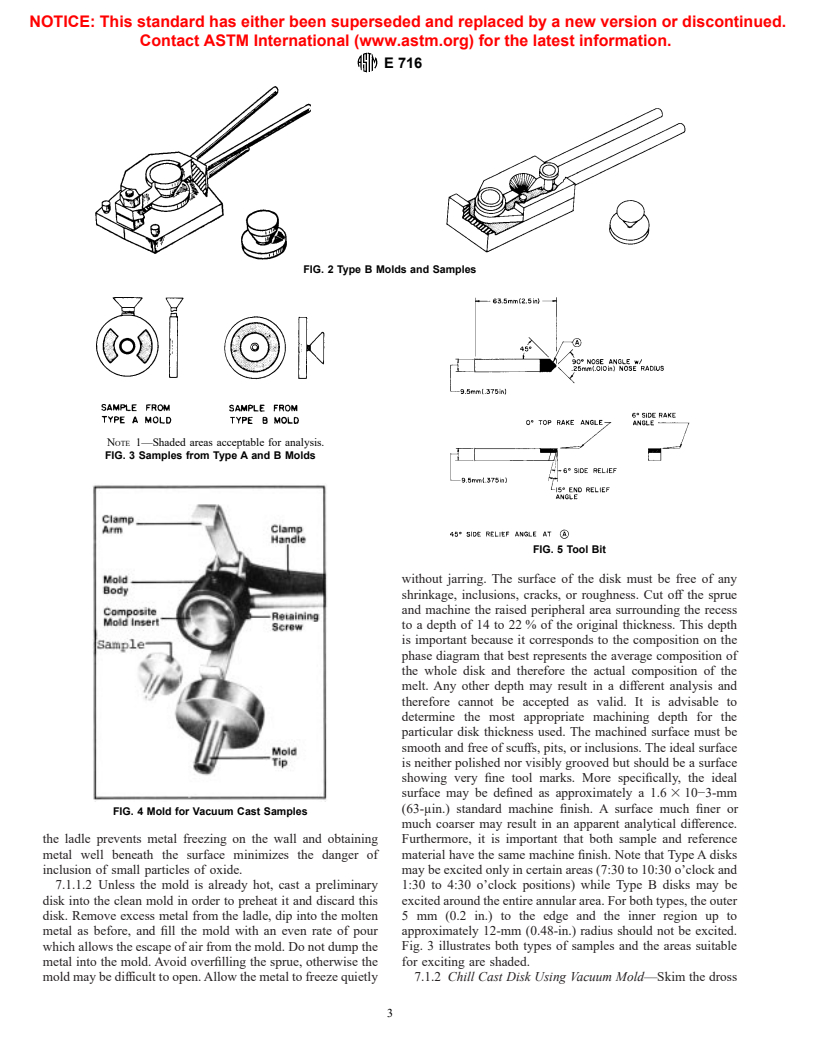
5.2.2 Type B, center-pour mold, is shown in Fig. 2. The uniformity of samples obtained from Type A or B molds, and
advantage of this mold is that the sample obtained may be furthermore that such samples have a spectrochemical response
excited around the entire annular area. This mold produces a similar to the reference materials used for preparing the
horizontally cast disk with the sprue over the center on the back analytical curve.
side. The mold dimensions are such as to produce a disk 5.3 Lathe, capable of machining a smooth flat surface and
approximately 64 mm (2.5 in.) in diameter by 6 to 13 mm (0.24 having automatic cross feed. A milling machine may also be
to 0.50 in.) in thickness. A circular central recess 10 to 20 mm used.
(0.4 to 0.8 in.) in diameter on one side of the disk facilitates 5.4 Tool Bits—Either alloy steel or cemented carbide is
machining of that side in preparation for excitation. It also recommended. The best shape of the tool varies with the type
promotes more uniform freezing of the raised peripheral area, and speed of the lathe, but in general, soft metals require less
but the corresponding raised portion of the mold must not be so top and side rake than steel. For example, for pure aluminum,
large as to restrict the throat for the sprue. A slight taper, 1 to a top rake of 0° and a side rake of 0 to 6° should prove
2 deg, on the hinged portion of the mold facilitates opening satisfactory. Also a side clearance of about 6° and a front
when a disk has been cast. The mold material should be steel clearance of 15° should be satisfactory for all aluminum disk
or cast iron and should weigh approximately 3.5 to 4.5 kg (8 to samples. The nose of the tool should be rounded. A tool bit
10 lb). design that has been found satisfactory for most aluminum
alloys is shown in Fig. 5.
NOTE 3—Prepare the surface of the mold cavity to minimize the
5.5 Portable Electric Melting Furnace, equipped with a
formation of gas pockets on the surface of the castings and to resist rusting
graphite crucible with a minimum capacity of 200 g (7.1 oz) of
of the mold cavity surface. To do this, blast the inner surface with a sharp
molten aluminum, and capable of maintaining temperatures for
grit that cuts rather than peens. The resulting finely roughened face is
essential for obtaining a smooth and uniform surface on the cast disk.
melting aluminum alloys.
Next, degrease the mold, place in a cold furnace, and raise the temperature
to 400°C (752°F). At this temperature and throughout the remainder of the 6. Materials
heating cycle, introduce steam into the furnace. Raise the temperature to
6.1 Graphite Rods—6.15 by 300-mm (0.242 by 12-in.)
540°C (1004°F) and maintain for 4 h. The resulting black oxide coating is
spectroscopic electrodes are satisfactory.
tenacious and of a dull black appearance.
6.2 Phosphorus, red, amorphous.
5.2.2.1 Special Type B Mold, which produces a disk 6 mm
NOTE 4—Caution: Provide adequate ventilation when phosphorus is
(0.24 in.) thick, is required for undiluted aluminum-silicon
added to molten metal.
alloys containing greater than 14 % silicon.
7. Preparation of Samples
7.1 Molten Metal:
7.1.1 Chill-Cast Disk by Molds A or B:
7.1.1.1 When a furnace or crucible of molten metal is to be
sampled, the temperature must be well above the point at
which any solid phase could be present. Using the ladle or a
separate skimming tool, coated with a dry, tightly adhering
mold wash (Note 2) and free of any remaining previous metal,
push any dross away from the sampling area. Next, dip the
ladle sideways into the clear area well below the surface and
stir momentarily. Then turn the ladle upright, and quickly
withdraw. Two things are thus accomplished, namely, heating
A portable Vacuum Sampler, available from Aluminum Company of America,
Alcoa Center, PA 15069, has been found suitable for this purpose.
A Jelrus Handy-Melt furnace and graphite crucible, available from Cole-Parmer
Instrument Co., 7425 North Oak Park Ave., Chicago, IL 60648, has been found
FIG. 1 Type A Mold and Sample suitable for this purpose.
NOTICE: This standard has either been superseded and rep
...


Questions, Comments and Discussion
Ask us and Technical Secretary will try to provide an answer. You can facilitate discussion about the standard in here.