ASTM E908-98(2022)
(Practice)Standard Practice for Calibrating Gaseous Reference Leaks
Standard Practice for Calibrating Gaseous Reference Leaks
ABSTRACT
This practice establishes the standard procedures for calibrating leak artifacts of a specified gas, that may be used for determining the response of leak detectors, or in other situations where a known small flow of gas is required. The purpose of this practice is to establish calibration without reference to other calibrated leaks in as straightforward a manner as possible using the likeliest available equipment. The two types of leaks considered here are Type I, which is pressure to vacuum, and Type II, which is pressure to atmosphere. Three calibration methods are described under each type of reference leak, as follows: Method A—accumulation comparison using a known volume of tracer gas at specified conditions of temperature and pressure as a reference; Method B—accumulation comparison using a reference leak artifact calibrated using Method A; and Method C—direct measurement of leak rate by timing the movement (displacement) of a liquid slug, by the leak, in a capillary tube of known dimensions.
SCOPE
1.1 This practice covers procedures for calibrating leak artifacts of a specified gas, that may be used for determining the response of leak detectors, or in other situations where a known small flow of gas is required. The purpose of this practice is to establish calibration without reference to other calibrated leaks in as straightforward a manner as possible using the likeliest available equipment. While the uncertainties associated with these procedures will most likely be greater than those obtained via traceable calibration chains (on the order of 10 %), these procedures allow independent means of establishing or verifying the leakage rate from leak artifacts of questionable history, or when traceable leak artifacts are not available.
1.2 Two types of leaks are considered:
1.2.1 Type I—Pressure to vacuum.
1.2.2 Type II—Pressure to atmosphere.
1.3 Three calibration methods are described under each type of reference leak:
1.3.1 Method A—Accumulation comparison, using a known volume of gas at specified conditions of temperature and pressure as a reference.
1.3.2 Method B—Accumulation comparison, using a leak artifact calibrated using Method A.
1.3.3 Method C—Displacement of a liquid slug, by the leak, in capillary tube of known dimensions.
1.4 The values stated in inch-pound units are to be regarded as standard. The values given in parentheses are mathematical conversions to SI units that are provided for information only and are not considered standard.
1.5 This standard does not purport to address all of the safety concerns, if any, associated with its use. It is the responsibility of the user of this standard to establish appropriate safety, health, and environmental practices and determine the applicability of regulatory limitations prior to use.
1.6 This international standard was developed in accordance with internationally recognized principles on standardization established in the Decision on Principles for the Development of International Standards, Guides and Recommendations issued by the World Trade Organization Technical Barriers to Trade (TBT) Committee.
General Information
- Status
- Published
- Publication Date
- 31-May-2022
- Technical Committee
- E07 - Nondestructive Testing
- Drafting Committee
- E07.08 - Leak Testing Method
Relations
- Effective Date
- 01-Dec-2006
- Refers
ASTM E479-91(2006) - Standard Guide for Preparation of a Leak Testing Specification (Withdrawn 2014) - Effective Date
- 01-May-2006
- Effective Date
- 10-Jul-2000
- Effective Date
- 01-Jan-2000
Overview
ASTM E908-98(2022) - Standard Practice for Calibrating Gaseous Reference Leaks establishes recognized procedures for calibrating leaks of a specified gas. This practice is essential in situations requiring precise, known small flows of gas, such as when determining the response of leak detectors or verifying leakage rates from artifacts of questionable history. Developed by ASTM International, this standard delivers methods that can be performed independently and without reliance on previously calibrated leak artifacts, making it particularly valuable when traceable leak standards are unavailable.
The procedures outlined help ensure that leak detectors and other sensitive equipment perform accurately, supporting processes in industries such as manufacturing, electronics, and chemical processing where precision leak detection is critical.
Key Topics
Types of Reference Leaks:
- Type I: Pressure to vacuum leaks
- Type II: Pressure to atmosphere leaks
Calibration Methods:
- Method A: Accumulation Comparison
- Uses a known volume of tracer gas at specified temperature and pressure to calibrate a leak.
- Method B: Accumulation with Reference Artifact
- Employs a reference leak previously calibrated with Method A for comparative calibration.
- Method C: Liquid Displacement in Capillary Tube
- Measures leak rate by timing the movement of a liquid slug through a capillary tube with known dimensions.
- Method A: Accumulation Comparison
Practical Considerations:
- Designed for straightforward application with commonly available equipment.
- Supports independent verification of leaks, especially where standard calibration chains are not accessible.
- Accounts for potential measurement uncertainties, often greater than those achieved with traceable calibration but still highly functional.
Units and Safety:
- Standard values are provided in inch-pound units, with SI conversions for reference.
- Users are responsible for ensuring safety, health, and regulatory compliance during use.
Applications
ASTM E908-98(2022) is widely applicable across sectors requiring rigorous gas leak calibration and verification. Key usage scenarios include:
- Leak Detector Calibration: Essential for setting up and verifying the performance of helium, halogen, or other gas leak detectors commonly used in quality assurance and equipment testing.
- Quality Control in Manufacturing: Supports industries such as electronics, pharmaceuticals, and aerospace where hermetic sealing and precise leak control are crucial.
- Research and Laboratory Settings: Provides protocols for laboratories needing to generate and measure controlled micro-flows of test gases.
- On-Site Troubleshooting: Enables field technicians to verify leaks independently when historic data or traceable standards are unavailable.
- Routine Verification: Assists in confirming ongoing equipment integrity and compliance with maintenance schedules.
Related Standards
For organizations and professionals implementing ASTM E908-98(2022), familiarity with related standards enhances overall leak testing best practices:
- ASTM E425: Definitions of Terms Relating to Leak Testing (Withdrawn)
- ASTM E427: Practice for Testing for Leaks Using the Halogen Leak Detector Alkali-Ion Diode (Withdrawn)
- ASTM E479: Guide for Preparation of a Leak Testing Specification (Withdrawn)
- ASTM F134: Test Methods for Determining Hermeticity of Electron Devices with a Helium Mass Spectrometer Leak Detector (Withdrawn)
- AVS 2.2-1968: Method for Vacuum Leak Calibration by the American Vacuum Society
Implementing ASTM E908 promotes accuracy, traceability, and reliability in critical gas leak measurements, supporting robust quality and operational controls across multiple industries. For institutions subject to international guidelines, this standard is aligned with World Trade Organization Technical Barriers to Trade (TBT) principles, reflecting recognized best practices in global standardization.
Buy Documents
ASTM E908-98(2022) - Standard Practice for Calibrating Gaseous Reference Leaks
Get Certified
Connect with accredited certification bodies for this standard

BSMI (Bureau of Standards, Metrology and Inspection)
Taiwan's standards and inspection authority.
Sponsored listings
Frequently Asked Questions
ASTM E908-98(2022) is a standard published by ASTM International. Its full title is "Standard Practice for Calibrating Gaseous Reference Leaks". This standard covers: ABSTRACT This practice establishes the standard procedures for calibrating leak artifacts of a specified gas, that may be used for determining the response of leak detectors, or in other situations where a known small flow of gas is required. The purpose of this practice is to establish calibration without reference to other calibrated leaks in as straightforward a manner as possible using the likeliest available equipment. The two types of leaks considered here are Type I, which is pressure to vacuum, and Type II, which is pressure to atmosphere. Three calibration methods are described under each type of reference leak, as follows: Method A—accumulation comparison using a known volume of tracer gas at specified conditions of temperature and pressure as a reference; Method B—accumulation comparison using a reference leak artifact calibrated using Method A; and Method C—direct measurement of leak rate by timing the movement (displacement) of a liquid slug, by the leak, in a capillary tube of known dimensions. SCOPE 1.1 This practice covers procedures for calibrating leak artifacts of a specified gas, that may be used for determining the response of leak detectors, or in other situations where a known small flow of gas is required. The purpose of this practice is to establish calibration without reference to other calibrated leaks in as straightforward a manner as possible using the likeliest available equipment. While the uncertainties associated with these procedures will most likely be greater than those obtained via traceable calibration chains (on the order of 10 %), these procedures allow independent means of establishing or verifying the leakage rate from leak artifacts of questionable history, or when traceable leak artifacts are not available. 1.2 Two types of leaks are considered: 1.2.1 Type I—Pressure to vacuum. 1.2.2 Type II—Pressure to atmosphere. 1.3 Three calibration methods are described under each type of reference leak: 1.3.1 Method A—Accumulation comparison, using a known volume of gas at specified conditions of temperature and pressure as a reference. 1.3.2 Method B—Accumulation comparison, using a leak artifact calibrated using Method A. 1.3.3 Method C—Displacement of a liquid slug, by the leak, in capillary tube of known dimensions. 1.4 The values stated in inch-pound units are to be regarded as standard. The values given in parentheses are mathematical conversions to SI units that are provided for information only and are not considered standard. 1.5 This standard does not purport to address all of the safety concerns, if any, associated with its use. It is the responsibility of the user of this standard to establish appropriate safety, health, and environmental practices and determine the applicability of regulatory limitations prior to use. 1.6 This international standard was developed in accordance with internationally recognized principles on standardization established in the Decision on Principles for the Development of International Standards, Guides and Recommendations issued by the World Trade Organization Technical Barriers to Trade (TBT) Committee.
ABSTRACT This practice establishes the standard procedures for calibrating leak artifacts of a specified gas, that may be used for determining the response of leak detectors, or in other situations where a known small flow of gas is required. The purpose of this practice is to establish calibration without reference to other calibrated leaks in as straightforward a manner as possible using the likeliest available equipment. The two types of leaks considered here are Type I, which is pressure to vacuum, and Type II, which is pressure to atmosphere. Three calibration methods are described under each type of reference leak, as follows: Method A—accumulation comparison using a known volume of tracer gas at specified conditions of temperature and pressure as a reference; Method B—accumulation comparison using a reference leak artifact calibrated using Method A; and Method C—direct measurement of leak rate by timing the movement (displacement) of a liquid slug, by the leak, in a capillary tube of known dimensions. SCOPE 1.1 This practice covers procedures for calibrating leak artifacts of a specified gas, that may be used for determining the response of leak detectors, or in other situations where a known small flow of gas is required. The purpose of this practice is to establish calibration without reference to other calibrated leaks in as straightforward a manner as possible using the likeliest available equipment. While the uncertainties associated with these procedures will most likely be greater than those obtained via traceable calibration chains (on the order of 10 %), these procedures allow independent means of establishing or verifying the leakage rate from leak artifacts of questionable history, or when traceable leak artifacts are not available. 1.2 Two types of leaks are considered: 1.2.1 Type I—Pressure to vacuum. 1.2.2 Type II—Pressure to atmosphere. 1.3 Three calibration methods are described under each type of reference leak: 1.3.1 Method A—Accumulation comparison, using a known volume of gas at specified conditions of temperature and pressure as a reference. 1.3.2 Method B—Accumulation comparison, using a leak artifact calibrated using Method A. 1.3.3 Method C—Displacement of a liquid slug, by the leak, in capillary tube of known dimensions. 1.4 The values stated in inch-pound units are to be regarded as standard. The values given in parentheses are mathematical conversions to SI units that are provided for information only and are not considered standard. 1.5 This standard does not purport to address all of the safety concerns, if any, associated with its use. It is the responsibility of the user of this standard to establish appropriate safety, health, and environmental practices and determine the applicability of regulatory limitations prior to use. 1.6 This international standard was developed in accordance with internationally recognized principles on standardization established in the Decision on Principles for the Development of International Standards, Guides and Recommendations issued by the World Trade Organization Technical Barriers to Trade (TBT) Committee.
ASTM E908-98(2022) is classified under the following ICS (International Classification for Standards) categories: 17.060 - Measurement of volume, mass, density, viscosity. The ICS classification helps identify the subject area and facilitates finding related standards.
ASTM E908-98(2022) has the following relationships with other standards: It is inter standard links to ASTM E427-95(2006), ASTM E479-91(2006), ASTM E427-95(2000), ASTM E479-91(2000). Understanding these relationships helps ensure you are using the most current and applicable version of the standard.
ASTM E908-98(2022) is available in PDF format for immediate download after purchase. The document can be added to your cart and obtained through the secure checkout process. Digital delivery ensures instant access to the complete standard document.
Standards Content (Sample)
This international standard was developed in accordance with internationally recognized principles on standardization established in the Decision on Principles for the
Development of International Standards, Guides and Recommendations issued by the World Trade Organization Technical Barriers to Trade (TBT) Committee.
Designation: E908 − 98 (Reapproved 2022)
Standard Practice for
Calibrating Gaseous Reference Leaks
This standard is issued under the fixed designation E908; the number immediately following the designation indicates the year of
original adoption or, in the case of revision, the year of last revision.Anumber in parentheses indicates the year of last reapproval.A
superscript epsilon (´) indicates an editorial change since the last revision or reapproval.
1. Scope 1.6 This international standard was developed in accor-
dance with internationally recognized principles on standard-
1.1 This practice covers procedures for calibrating leak
ization established in the Decision on Principles for the
artifacts of a specified gas, that may be used for determining
Development of International Standards, Guides and Recom-
the response of leak detectors, or in other situations where a
mendations issued by the World Trade Organization Technical
known small flow of gas is required. The purpose of this
Barriers to Trade (TBT) Committee.
practice is to establish calibration without reference to other
calibrated leaks in as straightforward a manner as possible
2. Referenced Documents
using the likeliest available equipment.While the uncertainties
associated with these procedures will most likely be greater 2.1 ASTM Standards:
E425Definitions of Terms Relating to Leak Testing (With-
than those obtained via traceable calibration chains (on the
order of 10%), these procedures allow independent means of drawn 1991)
E427PracticeforTestingforLeaksUsingtheHalogenLeak
establishing or verifying the leakage rate from leak artifacts of
questionable history, or when traceable leak artifacts are not Detector Alkali-Ion Diode (Withdrawn 2013)
E479Guide for Preparation of a Leak Testing Specification
available.
(Withdrawn 2014)
1.2 Two types of leaks are considered:
F134Test Methods for Determining Hermeticity of Electron
1.2.1 Type I—Pressure to vacuum.
Devices with a Helium Mass Spectrometer Leak Detector
1.2.2 Type II—Pressure to atmosphere.
(Withdrawn 1996)
1.3 Threecalibrationmethodsaredescribedundereachtype
2.2 Other Documents:
of reference leak: 4
AVS 2.2-1968Method for Vacuum Leak Calibration
1.3.1 MethodA—Accumulation comparison, using a known
Recommended Practices for the Calibration and Use of
volume of gas at specified conditions of temperature and 5
Leaks
pressure as a reference.
1.3.2 Method B—Accumulation comparison, using a leak
3. Summary of Practice
artifact calibrated using Method A.
3.1 Method A—Accumulation comparison, using a known
1.3.3 MethodC—Displacementofaliquidslug,bytheleak,
volume of tracer gas:
in capillary tube of known dimensions.
3.1.1 This method uses a closed chamber of nonreactive
1.4 The values stated in inch-pound units are to be regarded
material having a means of removing all tracer gas and a
as standard. The values given in parentheses are mathematical
connection to the tracer sensor.
conversions to SI units that are provided for information only
3.1.2 A small, known quantity of tracer gas is discharged
and are not considered standard.
intothechamberandtheresponserecordedforaperiodoftime
inwhichitisanticipatedtheunknownleakwillrequiretoreach
1.5 This standard does not purport to address all of the
safety concerns, if any, associated with its use. It is the the same concentration.
responsibility of the user of this standard to establish appro-
priate safety, health, and environmental practices and deter-
mine the applicability of regulatory limitations prior to use.
For referenced ASTM standards, visit the ASTM website, www.astm.org, or
contact ASTM Customer Service at service@astm.org. For Annual Book of ASTM
Standards volume information, refer to the standard’s Document Summary page on
the ASTM website.
1 3
This practice is under the jurisdiction of ASTM Committee E07 on Nonde- The last approved version of this historical standard is referenced on
structive Testing and is the direct responsibility of Subcommittee E07.08 on Leak www.astm.org.
Testing Method. AvailablefromAVS,AmericanVacuumSociety,335E.45thStreet,NewYork,
CurrenteditionapprovedJune1,2022.PublishedJuly2022.Originallyapproved N.Y., 10017.
in 1982. Last previous edition approved in 2018 as E908–98(2018). DOI: C.D. Ehrlich and J.A. Basford, Journal of Vac. Sci, Technology, A(10), 1992,
10.1520/E0908-98R22. pp. 1–17.
Copyright © ASTM International, 100 Barr Harbor Drive, PO Box C700, West Conshohocken, PA 19428-2959. United States
E908 − 98 (2022)
3.1.3 The tracer gas is removed from the chamber, and the 3.3.1 The tube is closely coupled to the leak, and has a
unknown leak is allowed to discharge into it until the sensor vent/fill valve to allow gas filling or positioning of the slug, or
response equals that of 3.1.2. both, which is then driven by the leakage of the gas.
3.1.4 The leakage rate in mol/s can be calculated as: 3.3.2 Due to capillary “friction,” this method is limited to a
−10 3
minimum leak size of about 4×10 mol/s (1 µPa·m /s).
Q 5PV t·R·T (1)
~ !
m
where:
4. Interferences
P = pressure in known volume in atmospheres (1
4.1 Type I Leaks, atmosphere to vacuum, MethodsAand B:
atm=101 325 Pa),
4.1.1 Forthepurposesofthissection,itwillbeassumedthat
V = the volume of gas in cm introduced in 3.1.2,
the gas is helium and the detector is the mass spectrometer
t = the time in seconds required for the concentration in
tuned for helium.
3.1.3 to equal that in 3.1.2,
R = gas constant=82.06=1 atm cm /mol/K, and NOTE 1—Other gases or detectors, or both, can be used with little
difference in procedures or interferences.
T = absolute temperature, K.
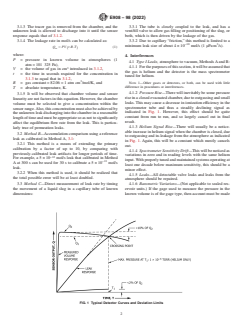
4.1.2 PressureRise—Therewillinevitablybesomepressure
3.1.5 It will be observed that chamber volume and sensor
riseinaclosedevacuatedchamber,duetooutgassingandsmall
linearityarenotfactorsinthisequation.However,thechamber
leaks.This may cause a decrease in ionization efficiency in the
volume must be selected to give a concentration within the
spectrometer tube and thus a steadily declining signal as
sensorrange.Also,thisconcentrationmustalsobeachievedby
indicated in Fig. 1. However, this effect should be quite
theunknownleakdischargingintothechamberinareasonable
constant from run to run, and so largely cancel out in final
lengthoftimeandmustbeappropriatesoasnottosignificantly
result.
affect the equilibrium flow rate from the leak. This is particu-
4.1.3 Helium Signal Rise—There will usually be a notice-
larly true of permeation leaks.
ableincreaseinheliumsignalwhenthechamberisclosed,due
3.2 MethodB—Accumulationcomparisonusingareference
to outgassing and in-leakage from the atmosphere as indicated
leak as calibrated in Method A, 3.1:
in Fig. 1. Again, this will be a constant which mostly cancels
3.2.1 This method is a means of extending the primary
out.
calibration by a factor of up to 10, by comparing with
4.1.4 SpectrometerSensitivityDrift—Thiswillbenoticedas
previously-calibrated leak artifacts for longer periods of time.
variations in zero and in reading levels with the same helium
−12
For example, a 5×10 mol/s leak that calibrated in Method
input.Withproperlytunedandmaintainedsystemsoperatingat
−13
A at 300 s can be used for 30 s to calibrate a 5×10 mol/s
least one decade below maximum sensitivity, this should be a
leak.
minor effect.
3.2.2 When this method is used, it should be realized that
4.1.5 Leaks—All detectable valve leaks and leaks from the
the total possible error will be at least doubled.
atmosphere should be repaired.
3.3 Method C—Direct measurement of leak rate by timing 4.1.6 Barometric Variations—(Not applicable to sealed res-
the movement of a liquid slug in a capillary tube of known ervoir units.) If the gage used to measure the pressure in the
dimensions: known volume is of the gage type, then account must be made
FIG. 1 Typical Detector Curves and Deviation Limits
E908 − 98 (2022)
of the local barometric pressure when calculating the absolute 4.3.3 SensorSensitivityDrift—Thiswillbenoticedasvaria-
pressure. This is probably true for falling pressures of the tions in zero and reading levels with the same halogen input.
known volume near 1 atmosphere or less. With properly maintained systems operating at least one
4.1.7 Temperature Drift—Changes in temperature between decade below maximum sensitivity, this should be a minor
measurements may result in slight variations in indicated effect.
pressures. These should be recorded and compensated for 4.3.4 Barometric Variations—Substantial variations from
accordingly. standard atmosphere pressure should be corrected.
4.2 Type I Leaks, atmosphere to vacuum, Method C: 4.4 Type II Leaks, pressure to atmosphere, Method
4.2.1 Liquid Slug Friction—This can be appreciable in C—Same as Type I, Method C, in 4.2.
small capillaries. It should be measured and a correction made
5. Apparatus
for it.
4.2.2 Vapor Pressure of Liquid—Water is the recommended
5.1 Type I Leaks, pressure to vacuum, Methods A and B:
liquid, and has a vapor pressure of about 20 mm Hg (3 kPa) at
5.1.1 Mass Spectrometer with Remote Tube Tuned for
−15
room temperature. This gives a theoretical increase in leak Helium—Minimum resolution (5×10 mol/s) helium, when
3 −5
indication of 20/760 (3×10/1×10 ) or approximately 3%.
operated as a leak detector.
This correction should be added to the final result.
5.1.2 Helium Supply with Pressure Regulator and Flowme-
4.2.3 Excess Volume Between Leak and Capillary—This
ter (approximately 10 cm /s).
willcausedelayedandjerkymovementoftheslug,andshould
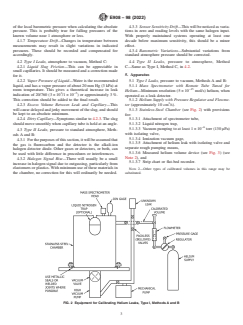
5.1.3 Stainless-Steel Chamber (see Fig. 2) with provisions
be kept to an absolute minimum.
for:
4.2.4 Dirty Capillary—Symptoms similar to 4.2.3.The slug
5.1.3.1 Attachment of spectrometer tube,
should move smoothly when capillary tube is held at an angle.
5.1.3.2 Liquid nitrogen trap,
−6
5.1.3.3 Vacuum pumping to at least 1×10 torr (130 µPa)
4.3 Type II Leaks, pressure to standard atmosphere, Meth-
with isolating valve,
ods A and B:
5.1.3.4 Ionization vacuum gage,
4.3.1 Forthepurposesofthissection,itwillbeassumedthat
5.1.3.5 Attachment of helium leak with isolating valve and
the gas is fluorocarbon and the detector is the alkali-ion
separate rough pumping means,
halogen detector diode. Other gases or detectors, or both, can
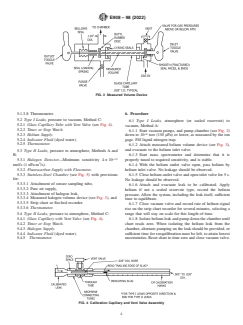
5.1.3.6 Measured helium volume device (see Fig. 3) (see
be used with little difference in procedures or interferences.
Note 2), and
4.3.2 Halogen Signal Rise—There will usually be a small
5.1.3.7 Strip chart or flat-bed recorder.
increase in halogen signal due to outgassing, particularly from
elastomers or plastics.With minimum use of these materials in
NOTE 2—Other types of calibrated volumes in this range may be
the chamber, no correction for this will ordinarily be needed. substitute
...


Questions, Comments and Discussion
Ask us and Technical Secretary will try to provide an answer. You can facilitate discussion about the standard in here.
Loading comments...