ASTM D4618-92(2003)
(Specification)Standard Specification for Design and Fabrication of Flue Gas Desulfurization System Components for Protective Lining Application
Standard Specification for Design and Fabrication of Flue Gas Desulfurization System Components for Protective Lining Application
ABSTRACT
This specification covers the design and fabrication of metal components for flue gas desulfurization equipment, including absorber, tanks, chimney liners, ductwork, and associated equipment intended for use in protective lining applications, that are to be lined for corrosion or abrasion resistance, or both. It does not however cover the structural performance of the components and the use of metallic linings. Each of the components shall be designed in such a way that it conforms to the engineering requirements for rigidity wherein the effects of pressure, wind, seismic, and other design loads shall be considered; accessability to welding, grinding, surface preparation, and lining application; shell penetrations; appurtenances inside components such as agitators, anti-swirl baffles, gaging devices, internal piping, ladders, and support brackets; and structural reinforcement members and supports. All internal welds shall be continuous without imperfections and the degree of weld preparation prior to lining shall depend on the type of lining to be applied. Riveted joints and internal bolted joints shall not be used while lap bolted joints shall be avoided whenever possible. Intermittent or spot welding shall not be permitted as well.
SCOPE
1.1 This specification covers the design and fabrication of metal components for Flue Gas Desulfurization (FGD) equipment, including absorbers, tanks, chimney liners, ductwork and associated equipment that are to be lined for corrosion or abrasion resistance, or both.
1.2 Limitations
1.2.1 This specification is intended only to define the design considerations for successful application and performance of protective linings for FGD system components.
1.2.2 It does not cover structural performance of FGD components.
1.2.3 It does not cover use of metallic linings.
1.3 This specification represents the minimum requirements for lining work. In cases where the manufacturer's instructions and recommendations differ from this specification, these differences must be resolved before fabrication is started.
1.4 The values stated in inch-pound units are to be regarded as the standard. The values given in parentheses are for information only.
1.5 This standard does not purport to address all of the safety concerns, if any, associated with its use. It is the responsibility of the user of this standard to establish appropriate safety and health practices and determine the applicability of regulatory limitations prior to use.
General Information
Relations
Standards Content (Sample)
NOTICE: This standard has either been superseded and replaced by a new version or withdrawn.
Contact ASTM International (www.astm.org) for the latest information
Designation: D4618 – 92 (Reapproved 2003)
Standard Specification for
Design and Fabrication of Flue Gas Desulfurization System
Components for Protective Lining Application
This standard is issued under the fixed designation D4618; the number immediately following the designation indicates the year of
original adoption or, in the case of revision, the year of last revision. A number in parentheses indicates the year of last reapproval. A
superscript epsilon (´) indicates an editorial change since the last revision or reapproval.
1. Scope 2.1.3 Thedesignshallconsidertheeffectsofpressure,wind,
seismic and other design loads.
1.1 This specification covers the design and fabrication of
2.1.4 Vibration may cause flexing or high surface strains on
metal components for Flue Gas Desulfurization (FGD) equip-
the lining. This is of particular concern to rigid lining materials
ment,includingabsorbers,tanks,chimneyliners,ductworkand
and shall be minimized.
associated equipment that are to be lined for corrosion or
2.1.5 Special consideration shall be given to all conditions
abrasion resistance, or both.
of potentially excessive strain such as unsupported bottom
1.2 Limitations
areas, oil-canning, out of roundness, sidewall-to-bottom joints,
1.2.1 This specification is intended only to define the design
etc.
considerations for successful application and performance of
2.1.5.1 Where a component is on a concrete foundation,
protective linings for FGD system components.
grouting shall be done if necessary to correct unsupported
1.2.2 It does not cover structural performance of FGD
bottom areas.
components.
2.1.5.2 Sand fill shall not be used for bottom support unless
1.2.3 It does not cover use of metallic linings.
provisions are made to ensure that the sand cannot be lost due
1.3 This specification represents the minimum requirements
to erosion.
for lining work. In cases where the manufacturer’s instructions
2.2 Accessibility:
and recommendations differ from this specification, these
2.2.1 All interior surfaces of the components shall be
differences must be resolved before fabrication is started.
designed to be readily accessible for welding, grinding, surface
1.4 The values stated in inch-pound units are to be regarded
preparation, and lining application.
as the standard. The values given in parentheses are for
2.2.2 The minimum manway size for a working entrance
information only.
during lining application shall be 36 in. (900 mm) in diameter
1.5 This standard does not purport to address all of the
or 24 in. (600 mm) width by 36 in. (900 mm) height.
safety concerns, if any, associated with its use. It is the
2.2.2.1 Closed components shall have a minimum of two
responsibility of the user of this standard to establish appro-
manways, one near the top and one near the bottom, preferably
priate safety and health practices and determine the applica-
located 180° apart to facilitate adequate ventilation for work-
bility of regulatory limitations prior to use.
ers.
2. Design/Engineering Requirements 2.2.2.2 Additional or larger openings may be required to
facilitate ventilation and material handling. The lining material
2.1 Rigidity:
applicator should be consulted for specific requirements.
2.1.1 The components shall be designed so that the interior
2.3 Shell Penetrations:
metal surfaces are sufficiently rigid for the intended lining
2.3.1 Openings such as, inlets, manholes, and outlet nozzles
materials. Manufacturer’s recommendations for maximum
shall be flush with the interior wall.
strains or deflection limits for the lining material shall be
2.3.1.1 Inlet nozzles may extend into vessels if incoming
followed.
fluids will be detrimental to lining materials.
2.1.2 The weight of the lining system shall be considered in
2.3.2 Any exterior or interior connection shall be flanged in
the structural design of the component.
order to facilitate lining.
2.3.3 The maximum length of flanged nozzles, 4 in. (100
This specification is under the jurisdiction of ASTM Committee D33 on
mm) and greater in diameter, shall not exceed the dimensions
ProtectiveCoatingandLiningWorkforPowerGenerationFacilitiesandisthedirect
responsibility of Subcommittee D33.09 on Protective Linings for FGD Systems. in Table 1.
Current edition approved Jan. 10, 2003. Published March 2003. Originally
2.3.3.1 Only 4 in. (100 mm) diameter and larger nozzles
approved in 1987. Last previous edition approved in 1996 as D4618 – 92 (1996).
shall be used for maximum reliability of the lining system.
DOI: 10.1520/D4618-92R03.
Copyright © ASTM International, 100 Barr Harbor Drive, PO Box C700, West Conshohocken, PA 19428-2959, United States.
D4618 – 92 (2003)
TABLE 1 Maximum Length of Nozzles
3. Fabrication
Maximum Nozzle Length—
3.1 Welds:
Nominal Nozzle Size,
Shell to Face of Flange,
in. (mm)
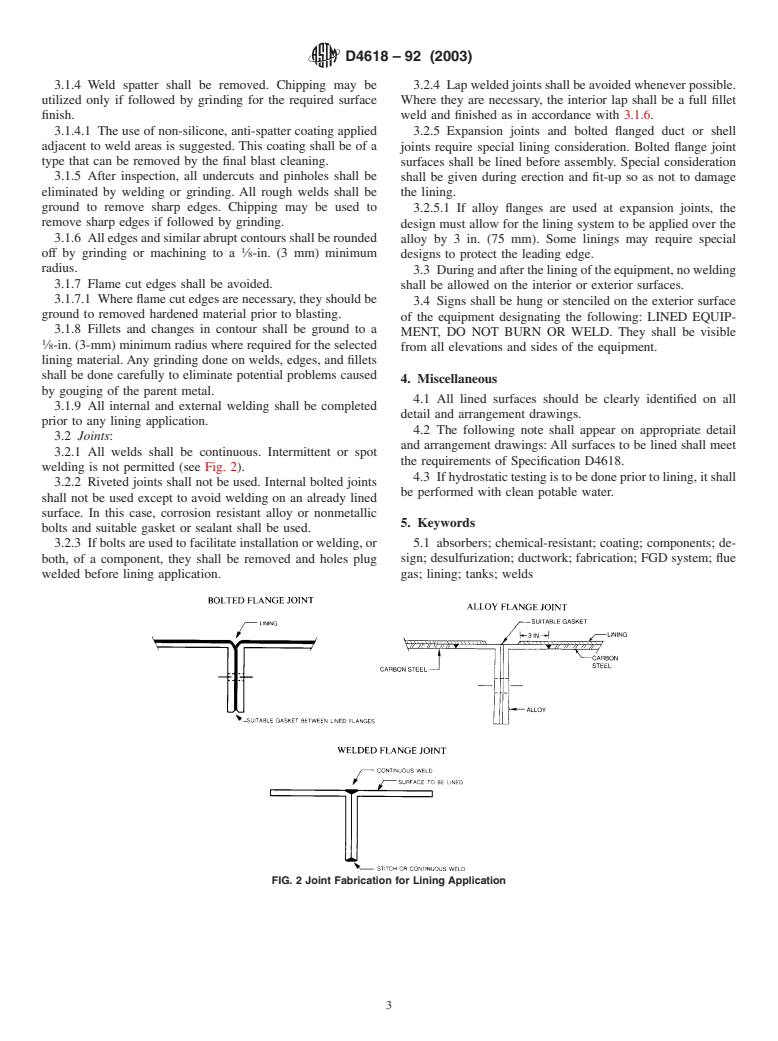
3.1.1 All internal welds to be lined shall be continuous
in. (mm)
without imperfections such as weld slag, weld spatter, rough
4 (100) 8 (200)
surfaces, undercutting, high peaks, porosity, sharp corners,
6 (150) 12 (300)
8–24 (200–600) 16 (400)
sharp edges and inadequate thickness shall be corrected (see
26–36 (600–900) 24 (600)
Fig. 1).
Over 36 (900) any length
3.1.2 The degree of weld preparation prior to lining depends
on the type of lining to be applied. The lining manufacturer
must be consulted for specific requirements for weld prepara-
tion during the design of the component and prior to start of
2.3.3.2 As an alternative to lined nozzles, compatible pre-
fabrication.
fabricated, reinforced plastic, ceramic or alloy metal inserts
3.1.3 Use of weld display samples before and after grinding
(sleeves) may be used if they offer superior corrosion and
may be of help to the component fabricator in supplying
abrasion protection. Lining shall overlap onto prefabricated
acceptable welds with a minimum required rework. All welds
liners.
shall be inspected, corrected, and reinspected prior to blast
2.3.3.3 If an insert is used as an alternate, the lining shall
cleaning. Whenever possible, shop welds shall be inspected
overlap unto the insert or some other means of ensuring an
and imperfections corrected in the fabricator’s shop.
adequate seal should be provided.
3.1.3.1 All weld areas shall be inspected before and after
2.3.4 Lining thickness may dictate changes in nozzle di-
blast cleaning. Pinholes, pits, blind holes, porosity, undercut-
mensions to achieve design flow rates.
ting or similar depressions are not permissible in the finished
2.4 Appurtenances Inside Components:
surface. These shall be repaired. The profile shall be reestab-
2.4.1 The requirements in Sections 2 and 3 apply to any
lished as required by the lining manufacturer.
appurtenances that are being lined and installed insid
...


Questions, Comments and Discussion
Ask us and Technical Secretary will try to provide an answer. You can facilitate discussion about the standard in here.