ASTM E968-02
(Practice)Standard Practice for Heat Flow Calibration of Differential Scanning Calorimeters
Standard Practice for Heat Flow Calibration of Differential Scanning Calorimeters
SIGNIFICANCE AND USE
Differential scanning calorimetry is used to determine the heat or enthalpy of transition. For this information to be meaningful in an absolute sense, heat flow calibration of the apparatus or comparison of the resulting data to that of a known standard is required.
This practice is useful in calibrating the heat flow axis of differential scanning calorimeters or quantitative differential thermal analyzers for subsequent use in the measurement of transition energies and specific heat capacities of unknowns.
SCOPE
1.1 This practice covers the heat flow calibration of differential scanning calorimeters over the temperature range from - 130°C to + 800°C.
1.2 Values given in SI units are to be regarded as the standard.
1.3 Computer or electronic based instruments, techniques or data manipulation equivalent to this practice may also be used.
1.4 This standard does not purport to address all of the safety concerns, if any, associated with its use. It is the responsibility of whoever uses this standard to consult and establish appropriate safety and health practices and determine the applicability of regulatory limitations prior to use. See also Section 7.
General Information
Relations
Standards Content (Sample)
NOTICE: This standard has either been superseded and replaced by a new version or withdrawn.
Contact ASTM International (www.astm.org) for the latest information
Designation: E 968 – 02
Standard Practice for
1
Heat Flow Calibration of Differential Scanning Calorimeters
This standard is issued under the fixed designation E968; the number immediately following the designation indicates the year of
original adoption or, in the case of revision, the year of last revision.Anumber in parentheses indicates the year of last reapproval.A
superscript epsilon (e) indicates an editorial change since the last revision or reapproval.
A
TABLE 1 Sapphire (a −Al O ) Specific Heat Capacity
1. Scope 2 3
Temperature, Specific Heat Specific Heat
1.1 This practice covers the heat flow calibration of differ-
Temperature, K
K Capacity, J/g·K Capacity, J/g·K
ential scanning calorimeters over the temperature range
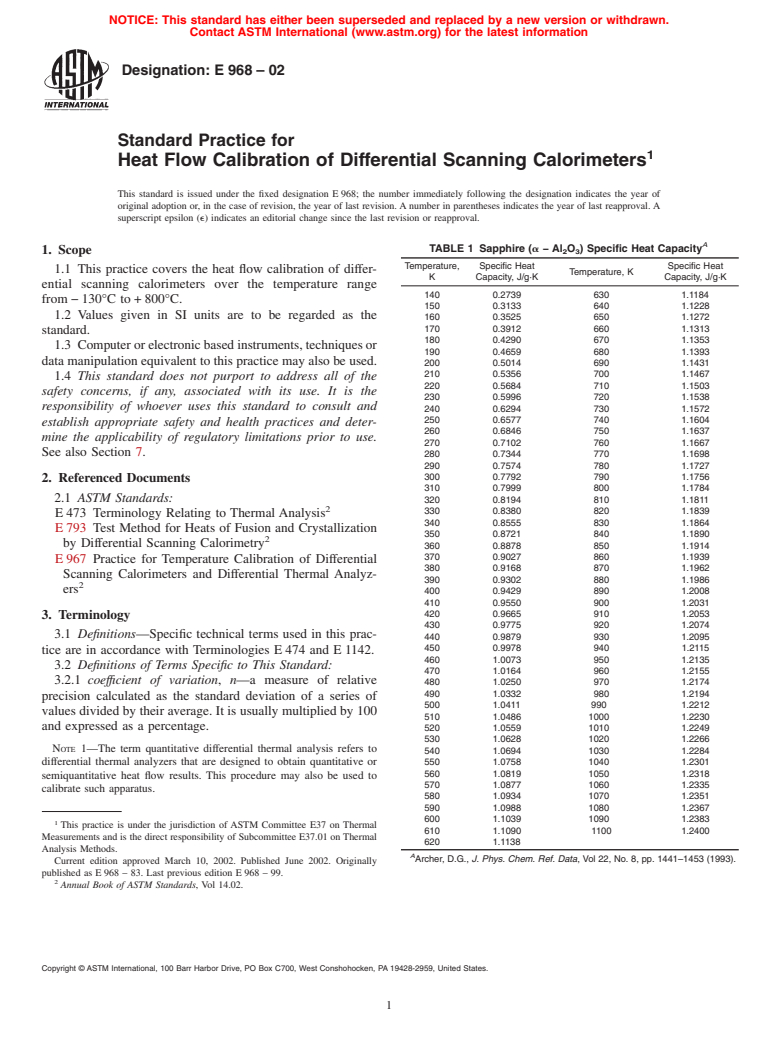
140 0.2739 630 1.1184
from−130°C to+800°C.
150 0.3133 640 1.1228
1.2 Values given in SI units are to be regarded as the
160 0.3525 650 1.1272
170 0.3912 660 1.1313
standard.
180 0.4290 670 1.1353
1.3 Computerorelectronicbasedinstruments,techniquesor
190 0.4659 680 1.1393
data manipulation equivalent to this practice may also be used.
200 0.5014 690 1.1431
210 0.5356 700 1.1467
1.4 This standard does not purport to address all of the
220 0.5684 710 1.1503
safety concerns, if any, associated with its use. It is the
230 0.5996 720 1.1538
responsibility of whoever uses this standard to consult and
240 0.6294 730 1.1572
250 0.6577 740 1.1604
establish appropriate safety and health practices and deter-
260 0.6846 750 1.1637
mine the applicability of regulatory limitations prior to use.
270 0.7102 760 1.1667
See also Section 7.
280 0.7344 770 1.1698
290 0.7574 780 1.1727
300 0.7792 790 1.1756
2. Referenced Documents
310 0.7999 800 1.1784
2.1 ASTM Standards:
320 0.8194 810 1.1811
2
330 0.8380 820 1.1839
E473 Terminology Relating to Thermal Analysis
340 0.8555 830 1.1864
E793 Test Method for Heats of Fusion and Crystallization
350 0.8721 840 1.1890
2
by Differential Scanning Calorimetry 360 0.8878 850 1.1914
370 0.9027 860 1.1939
E967 Practice for Temperature Calibration of Differential
380 0.9168 870 1.1962
Scanning Calorimeters and Differential Thermal Analyz-
390 0.9302 880 1.1986
2
ers
400 0.9429 890 1.2008
410 0.9550 900 1.2031
420 0.9665 910 1.2053
3. Terminology
430 0.9775 920 1.2074
3.1 Definitions—Specific technical terms used in this prac-
440 0.9879 930 1.2095
450 0.9978 940 1.2115
tice are in accordance with Terminologies E474 and E1142.
460 1.0073 950 1.2135
3.2 Definitions of Terms Specific to This Standard:
470 1.0164 960 1.2155
3.2.1 coeffıcient of variation, n—a measure of relative
480 1.0250 970 1.2174
490 1.0332 980 1.2194
precision calculated as the standard deviation of a series of
500 1.0411 990 1.2212
values divided by their average. It is usually multiplied by 100
510 1.0486 1000 1.2230
and expressed as a percentage. 520 1.0559 1010 1.2249
530 1.0628 1020 1.2266
NOTE 1—The term quantitative differential thermal analysis refers to
540 1.0694 1030 1.2284
differential thermal analyzers that are designed to obtain quantitative or 550 1.0758 1040 1.2301
560 1.0819 1050 1.2318
semiquantitative heat flow results. This procedure may also be used to
570 1.0877 1060 1.2335
calibrate such apparatus.
580 1.0934 1070 1.2351
590 1.0988 1080 1.2367
600 1.1039 1090 1.2383
1
This practice is under the jurisdiction of ASTM Committee E37 on Thermal
610 1.1090 1100 1.2400
Measurements and is the direct responsibility of Subcommittee E37.01 on Thermal
620 1.1138
Analysis Methods.
A
Archer, D.G., J. Phys. Chem. Ref. Data, Vol 22, No. 8, pp. 1441–1453 (1993).
Current edition approved March 10, 2002. Published June 2002. Originally
published as E968 – 83. Last previous edition E968 – 99.
2
Annual Book of ASTM Standards, Vol 14.02.
Copyright © ASTM International, 100 Barr Harbor Drive, PO Box C700, West Conshohocken, PA 19428-2959, United States.
1
---------------------- Page: 1 ----------------------
E968–02
temperatures depending upon the capabilities of the apparatus.
4. Summary of Practice
6.1.1.2 Atemperature sensor,toprovideanindicationofthe
4.1 Differential scanning calorimeters measure heat flow
(power) into or out of a test specimen and provide a signal specimen/furnace temperature to 6 0.01 K.
6.1.1.3 A differential sensor, to detect a heat flow (power)
output proportional to this measurement. This signal often is
recorded as a function of a second signal proportional to difference between the specimen and reference equivalent to 1
µW.
temperature or time. If this heat flow signal is integrated over
time, the resultant value is proportional to energy (or enthalpy 6.1.1.4 A means of sustaining a test chamber environment,
of an inert purge gas at a purge gas rate of 10 to 100 mL/min
orheat).Toobtainthedesiredenergyinformation,theobserved
instrument response (such as the area under the curve scribed) 6 5 mL/min.
must be multiplied by
...


Questions, Comments and Discussion
Ask us and Technical Secretary will try to provide an answer. You can facilitate discussion about the standard in here.