ASTM F1005-91(2019)
(Practice)Standard Practice for HVAC Duct Shapes; Identification and Description of Design Configuration
Standard Practice for HVAC Duct Shapes; Identification and Description of Design Configuration
SIGNIFICANCE AND USE
3.1 Standard nomenclature shall be used to facilitate communication between designers, suppliers, and users of HVAC ventilation ductwork components.
3.2 Standard design parameters shall be used to define ventilation ductwork shapes.
3.3 Standard variables for design parameters (see 2.2) are useful in writing CAD/CAM software for automatic fabrication of ventilation ductwork shapes.
SCOPE
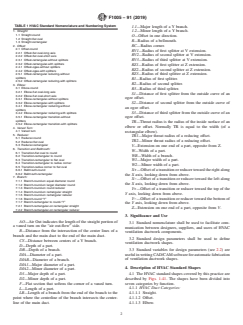
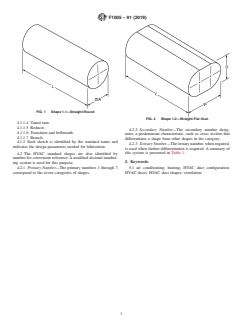
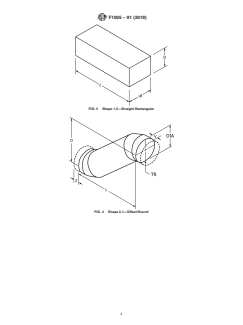
1.1 This practice covers the identification of design configurations and descriptive nomenclature for sheetmetal HVAC ductwork shapes frequently used in shipbuilding. This practice also covers parametric dimensions of these shapes. (See Table 1.)
1.2 This practice does not cover the location of seams or joints within a shape or the method of joining shapes together.
1.3 Since this practice is not measurement sensitive, it is applicable whether inch-pound or SI metric dimensions are used.
1.4 This standard does not purport to address all of the safety concerns, if any, associated with its use. It is the responsibility of the user of this standard to establish appropriate safety, health, and environmental practices and determine the applicability of regulatory limitations prior to use.
1.5 This international standard was developed in accordance with internationally recognized principles on standardization established in the Decision on Principles for the Development of International Standards, Guides and Recommendations issued by the World Trade Organization Technical Barriers to Trade (TBT) Committee.
General Information
- Status
- Published
- Publication Date
- 30-Nov-2019
- Technical Committee
- F25 - Ships and Marine Technology
- Drafting Committee
- F25.11 - Machinery and Piping Systems
Relations
- Effective Date
- 01-Dec-2019
Overview
ASTM F1005-91(2019), Standard Practice for HVAC Duct Shapes; Identification and Description of Design Configuration, establishes standardized nomenclature and parametric definitions for common HVAC ductwork shapes. Issued by ASTM International, this standard supports consistent communication and specification between HVAC system designers, suppliers, and users, particularly in the shipbuilding industry. The practice applies a systematic approach to identifying, naming, and referencing sheetmetal ductwork shapes, which streamlines HVAC design, fabrication, and documentation processes. It is compatible with both inch-pound and SI metric measurement systems, reflecting its international applicability.
Key Topics
- Standardized Nomenclature: Defines a clear naming system for various HVAC duct shapes such as elbows, offsets, reducers, and transitions, ensuring accurate and efficient communication among all stakeholders.
- Design Configuration Identification: Covers the categorization of ductwork configurations and describes their geometric parameters for use in manuals, drawings, and fabrication software.
- Shape Categories: HVAC duct shapes are divided into seven main functional categories:
- Straight
- Offset
- Elbow
- Vaned turn
- Reducer
- Transition and bellmouth
- Branch
- Variables and Parameters: Lists essential geometric variables (angle, length, width, diameter, radius, etc.), supporting the use of Computer-Aided Design and Manufacturing (CAD/CAM) systems for automatic ductwork fabrication.
- International Use: Designed to be applicable across international projects, supporting both inch-pound and metric units.
Applications
- Shipbuilding HVAC Systems: Directly addresses the frequent need for standardized ductwork in ship marine environments, ensuring design consistency and easier integration of ventilation systems.
- HVAC Design Software: The standardized parameters and nomenclature facilitate the development and implementation of CAD/CAM software tools, enabling automated layout, modeling, and fabrication of duct shapes.
- Engineering Documentation: Enhances technical clarity and documentation control for project specifications, installation manuals, and maintenance guides by providing a unified reference for ductwork components.
- Interdisciplinary Coordination: Assists architects, engineers, and contractors in specifying, ordering, and verifying HVAC components, thereby reducing design errors, fabrication issues, and project costs.
- Training and Education: Offers foundational terminology for training programs on HVAC systems, promoting a common understanding across design and production teams.
Related Standards
Organizations and professionals utilizing ASTM F1005-91(2019) may also reference the following standards for comprehensive HVAC ductwork system design and performance:
- SMACNA Standards: Sheet Metal and Air Conditioning Contractors' National Association standards for HVAC duct construction and installation.
- ASHRAE Guidelines: American Society of Heating, Refrigerating, and Air-Conditioning Engineers standards for HVAC system design.
- ASTM E29: Standard Practice for Using Significant Digits in Test Data to Determine Conformance with Specifications.
- ISO 16494: International standard for design and installation of ductwork for air distribution systems.
- ASTM F24 Series: Standards related to machinery and piping systems for ships and marine technology.
Summary of Practical Value
Adhering to ASTM F1005-91(2019) ensures that HVAC duct shapes are identified, described, and referenced consistently across all project stages. This promotes interoperability, reduces ambiguity in orders and specifications, and enhances fabrication efficiency in HVAC systems for both maritime and land-based applications. By leveraging this standard, organizations can support quality assurance, streamline project delivery, and assure compliance with internationally recognized best practices for ventilation ductwork design and documentation.
Buy Documents
ASTM F1005-91(2019) - Standard Practice for HVAC Duct Shapes; Identification and Description of Design Configuration
Get Certified
Connect with accredited certification bodies for this standard

ICC Evaluation Service
Building products evaluation and certification.

QAI Laboratories
Building and construction product testing and certification.

Aboma Certification B.V.
Specialized in construction, metal, and transport sectors.
Sponsored listings
Frequently Asked Questions
ASTM F1005-91(2019) is a standard published by ASTM International. Its full title is "Standard Practice for HVAC Duct Shapes; Identification and Description of Design Configuration". This standard covers: SIGNIFICANCE AND USE 3.1 Standard nomenclature shall be used to facilitate communication between designers, suppliers, and users of HVAC ventilation ductwork components. 3.2 Standard design parameters shall be used to define ventilation ductwork shapes. 3.3 Standard variables for design parameters (see 2.2) are useful in writing CAD/CAM software for automatic fabrication of ventilation ductwork shapes. SCOPE 1.1 This practice covers the identification of design configurations and descriptive nomenclature for sheetmetal HVAC ductwork shapes frequently used in shipbuilding. This practice also covers parametric dimensions of these shapes. (See Table 1.) 1.2 This practice does not cover the location of seams or joints within a shape or the method of joining shapes together. 1.3 Since this practice is not measurement sensitive, it is applicable whether inch-pound or SI metric dimensions are used. 1.4 This standard does not purport to address all of the safety concerns, if any, associated with its use. It is the responsibility of the user of this standard to establish appropriate safety, health, and environmental practices and determine the applicability of regulatory limitations prior to use. 1.5 This international standard was developed in accordance with internationally recognized principles on standardization established in the Decision on Principles for the Development of International Standards, Guides and Recommendations issued by the World Trade Organization Technical Barriers to Trade (TBT) Committee.
SIGNIFICANCE AND USE 3.1 Standard nomenclature shall be used to facilitate communication between designers, suppliers, and users of HVAC ventilation ductwork components. 3.2 Standard design parameters shall be used to define ventilation ductwork shapes. 3.3 Standard variables for design parameters (see 2.2) are useful in writing CAD/CAM software for automatic fabrication of ventilation ductwork shapes. SCOPE 1.1 This practice covers the identification of design configurations and descriptive nomenclature for sheetmetal HVAC ductwork shapes frequently used in shipbuilding. This practice also covers parametric dimensions of these shapes. (See Table 1.) 1.2 This practice does not cover the location of seams or joints within a shape or the method of joining shapes together. 1.3 Since this practice is not measurement sensitive, it is applicable whether inch-pound or SI metric dimensions are used. 1.4 This standard does not purport to address all of the safety concerns, if any, associated with its use. It is the responsibility of the user of this standard to establish appropriate safety, health, and environmental practices and determine the applicability of regulatory limitations prior to use. 1.5 This international standard was developed in accordance with internationally recognized principles on standardization established in the Decision on Principles for the Development of International Standards, Guides and Recommendations issued by the World Trade Organization Technical Barriers to Trade (TBT) Committee.
ASTM F1005-91(2019) is classified under the following ICS (International Classification for Standards) categories: 91.140.30 - Ventilation and air-conditioning systems. The ICS classification helps identify the subject area and facilitates finding related standards.
ASTM F1005-91(2019) has the following relationships with other standards: It is inter standard links to ASTM F1005-91(2013). Understanding these relationships helps ensure you are using the most current and applicable version of the standard.
ASTM F1005-91(2019) is available in PDF format for immediate download after purchase. The document can be added to your cart and obtained through the secure checkout process. Digital delivery ensures instant access to the complete standard document.
Standards Content (Sample)
This international standard was developed in accordance with internationally recognized principles on standardization established in the Decision on Principles for the
Development of International Standards, Guides and Recommendations issued by the World Trade Organization Technical Barriers to Trade (TBT) Committee.
Designation:F1005 −91 (Reapproved 2019) An American National Standard
Standard Practice for
HVAC Duct Shapes; Identification and Description of Design
Configuration
This standard is issued under the fixed designation F1005; the number immediately following the designation indicates the year of
original adoption or, in the case of revision, the year of last revision. A number in parentheses indicates the year of last reapproval. A
superscript epsilon (´) indicates an editorial change since the last revision or reapproval.
1. Scope 2.1.5 offset, n—fitting that changes the location of the duct
with the line of the duct remaining parallel.
1.1 This practice covers the identification of design configu-
2.1.6 ogee, n—a smoothly curved type of offset. The inside
rations and descriptive nomenclature for sheetmetal HVAC
curve of each end is tangent to the outside curve of the other
ductwork shapes frequently used in shipbuilding. This practice
end.
also covers parametric dimensions of these shapes. (See Table
1.)
2.1.7 radius corner, n—cross section that is generally
rectangular, but with the corners softened to a radius.
1.2 This practice does not cover the location of seams or
joints within a shape or the method of joining shapes together. 2.1.8 rectangular, n—rectangular or square cross section.
2.1.9 reducer, n—a fitting that changes the size but not the
1.3 Since this practice is not measurement sensitive, it is
cross-section type of duct.
applicable whether inch-pound or SI metric dimensions are
used.
2.1.10 round, n—circular cross section.
1.4 This standard does not purport to address all of the
2.1.11 short axis of flat oval, n—curved so that the flat sides
safety concerns, if any, associated with its use. It is the
of the flat oval correspond to the curve.
responsibility of the user of this standard to establish appro-
2.1.12 splitter, n—internal part of some elbows and offsets;
priate safety, health, and environmental practices and deter-
sometimes required in diverging transitions. Used to provide
mine the applicability of regulatory limitations prior to use.
more uniform velocity and distribution of air flow.The number
1.5 This international standard was developed in accor-
and location of splitters is determined by calculation or from a
dance with internationally recognized principles on standard-
nomograph.
ization established in the Decision on Principles for the
2.1.13 straight, n—duct that remains constant in cross
Development of International Standards, Guides and Recom-
section and size throughout its length.
mendations issued by the World Trade Organization Technical
2.1.14 throat, n—wrapper around the inside of a fitting.
Barriers to Trade (TBT) Committee.
2.1.15 transition, n—fitting that changes the cross-section
2. Terminology
type of the duct.
2.1 Definitions of Terms Specific to This Standard:
2.1.16 vane, n—internal part of vaned turns. Used to pro-
2.1.1 branch, n—portion of a duct system connection to a vide more uniform velocity of air flow. Configuration, number,
main duct. and location of vanes is determined from drawing, NAVSHIPS
No. S3801-385260. The direction of airflow must be marked
2.1.2 elbow, n—a fitting used to change direction of air
on vaned turns.
flow.
2.1.17 vaned turn, n—a fitting containing vanes that is used
2.1.3 flat oval, n—cross section that has flat sides and
to change the direction of air flow.
semicircular ends.
2.2 Variables Specific to This Standard:
2.1.4 longaxisofflatoval,n—curvedsothattheflatsidesof
A—Angle. Included angle of an elbow, branch, vaned turn,
the flat oval remain in a plane.
or slant-top fitting.
AI—Air In indicates the length of the straight portion of a
vaned turn in the “air in-flow” side.
This practice is under the jurisdiction of ASTM Committee F25 on Ships and
Marine Technology and is the direct responsibility of Subcommittee F25.11 on
Machinery and Piping Systems. Drawing: Naval Sea Systems Command (NAVSEA) NAVSHIPS S3801-
Current edition approved Dec. 1, 2019. Published January 2020. Originally 385260 Vanes Channels Ventilation Vane, available from Commander, Portsmouth
approved in 1986. Last previous edition approved in 2013 as F1005 – 91 (2013). Naval Shipyard, Naval Engineering Drawing Support Activity, Code 202.2,
DOI: 10.1520/F1005-91R19. Portsmouth, NH 03804-5000.
Copyright © ASTM International, 100 Barr Harbor Drive, PO Box C700, West Conshohocken, PA 19428-2959. United States
F1005−91 (2019)
TABLE 1 HVAC Standard Nomenclature and Numbering System
1.1—Major length of a Y branch.
1. Straight: 1.2—Minor length of a Y branch.
1.1 Straight-round
O—Offset in one direction.
1.2 Straight-flat oval
R—Radius of a bellmouth.
1.3 Straight-rectangular
2. Offset: RC—Radius corner.
2.1 Offset-round
RV1—Radius of first splitter at V extension.
2.2.1 Offset-flat oval-long axis
RV2—Radius of second splitter at V extension.
2.2.2 Offset-flat oval-short axis
2.3.1 Offset-rectangular-without splitters
RV3—Radius of third splitter at V extension.
2.3.2 Offset-rectangular-with splitters
RZ1—Radius of first splitter at Z extension.
2.4.1 Offset-ogee-without splitters
RZ2—Radius of second splitter at Z extension.
2.4.2 Offset-ogee-with splitters
2.5.1 Offset-rectangular reducing-without RZ3—Radius of third splitter at Z extension.
splitters
R1—Radius of first splitter.
2.5.2 Offset-rectangular reducing-with splitters
R2—Radius of second splitter.
3. Elbow:
3.1 Elbow-round
R3—Radius of third splitter.
3.2.1 Elbow-flat oval-long axis
S1—Distance of first splitter from the outside curve of an
3.2.2 Elbow-flat oval-short axis
ogee offset.
3.3.1 Elbow-rectangular-without splitters
3.3.2 Elbow-rectangular-with splitters
S2—Distance of second splitter from the outside curve of
3.4.1 Elbow-rectangular reducing-without
an ogee offset.
splitters
S3—Distance of third splitter from the outside curve of an
3.4.2 Elbow-rectangular reducing-with splitters
3.5.1 Elbow-rectangular transition-without
ogee offset.
splitters
TR—Throat radius is the radius of the inside surface of an
3.5.2 Elbow-rectangular transition-with splitters
elbow or offset. Normally TR is equal to the width (of a
4. Vaned Turn:
4.1 Vaned turn
rectangular elbow).
5. Reducer:
TR1—Major throat radius of a reducing offset.
5.1 Reducer-round
TR2—Minor throat radius of a reducing offset.
5.2 Reducer-flat oval
5.3 Reducer-rectangular
V—Extension on one end of a part, opposite from Z.
6. Transition and Bellmouth:
W—Width of a part.
6.1 Transition-flat oval to round
WB—Width of a branch.
6.2 Transition-rectangular to round
6.3 Transition-rectangular to flat oval
W1—Major width of a part.
6.4 Transition-rectangular to radius corner
W2—Minor width of a part.
6.5 Transition-radius corner to flat oval
X+—Offsetofatransitionorreducertowardtherightalong
6.6.1 Bellmouth-round
6.6.2 Bellmouth-rectangular
the X axis, looking down from above.
7. Branch:
X−—Offset of a transition or reducer toward the left along
7.1.1 Branch-round-on equal diameter round
the X axis, looking down from above.
7.1.2 Branch-round-on larger diameter round
7.1.3 Branch-round-on round reducer
Y+—Offset of a transition or reducer toward the top of the
7.1.4 Branch-round-on rectangular straight
Y axis, looking down from above.
7.1.5 Branch-round-on rectangular reducer
Y−—Offset of a transition or reducer toward the bottom of
7.1.6 Branch-round “Y”
7.1.7 Branch-rectangular to round-“Y”
the Y axis, looking down from above.
7.2.1 Branch-rectangular-on rectangular straight
Z—Extension on one end of a part, oppos
...


Questions, Comments and Discussion
Ask us and Technical Secretary will try to provide an answer. You can facilitate discussion about the standard in here.
Loading comments...