ASTM F2328M-07(2013)
(Test Method)Standard Test Method for Determining Decarburization and Carburization in Hardened and Tempered Threaded Steel Bolts, Screws and Studs (Metric)
Standard Test Method for Determining Decarburization and Carburization in Hardened and Tempered Threaded Steel Bolts, Screws and Studs (Metric)
SIGNIFICANCE AND USE
4.1 Decarburization and carburization are two surface conditions created, either intentionally or unintentionally, as with a pre-existing condition created during the rod rolling process, the rod/wire annealing process, or while heat treating threaded steel products. Too much of either will adversely affect the safety and performance of the threaded product. Therefore, limits have been established for four different product groups: the harder and greater the tensile strength of the product, the more susceptible to failure the product becomes if these limits are exceeded.
4.2 When testing to a particular product specification that lists the dimensions and microindentation data to be used, that data shall take precedence over the tables in this test method.
4.3 There are only two viable methods available to detect these deficiencies: either by the visual method or the microindentation method. Both methods are used for routine inspections when evaluations are conducted at a single location on the product sample. Because an evaluation at a specific location may not be representative of the whole part, the referee method employs the microindentation method taken as an average of evaluations conducted on four adjacent threads. This procedure significantly reduces random test variables when compared to testing on a single thread.˙
4.4 Specifying this test method does not specify or imply that testing shall be for either decarburization or carburization alone or for both conditions. When either test method is performed, both conditions will be apparent and shall be reported. For example, if an order is placed to test for decarburization and none is found but the presence of decarburization is detected, it shall be reported on the test report that carburization was found.
SCOPE
1.1 This test method covers procedures for measuring, classifying, and determining the presence of decarburization and carburization in the threaded section of hardened and tempered metric steel bolts, screws, studs, and similar parts which have been heated to facilitate fabrication or to modify its mechanical properties. This test method is not intended to address products which are intentionally carburized to achieve specific results.
1.2 Two routine methods are described for measuring the limits of and determining the presence of decarburization or carburization; the Optical Method and the Microindentation Method 1. Either method is appropriate for routine examinations. The Microindentation Method 2 shall be considered the referee method.
1.3 For the purpose of these tests, there are four classes of hardened and tempered steel products for which specific measurements must be made with respect to their physical properties.
1.4 The values stated in SI units are to be regarded as standard. No other units of measurement are included in this standard.
1.5 This standard does not purport to address all of the safety concerns, if any, associated with its use. It is the responsibility of the user of this standard to establish appropriate safety and health practices and determine the applicability of regulatory limitations prior to use.
General Information
Relations
Standards Content (Sample)
NOTICE: This standard has either been superseded and replaced by a new version or withdrawn.
Please contact ASTM International (www.astm.org) for the latest information.
Designation: F2328M − 07 (Reapproved 2013)
Standard Test Method for
Determining Decarburization and Carburization in Hardened
and Tempered Threaded Steel Bolts, Screws and Studs
(Metric)
This standard is issued under the fixed designation F2328M; the number immediately following the designation indicates the year of
original adoption or, in the case of revision, the year of last revision. A number in parentheses indicates the year of last reapproval. A
superscript epsilon (´) indicates an editorial change since the last revision or reapproval.
1. Scope A574M Specification for Alloy Steel Socket-Head Cap
Screws (Metric)
1.1 This test method covers procedures for measuring,
E3 Guide for Preparation of Metallographic Specimens
classifying, and determining the presence of decarburization
E384 Test Method for Knoop and Vickers Hardness of
and carburization in the threaded section of hardened and
Materials
tempered metric steel bolts, screws, studs, and similar parts
F835M Specification forAlloy Steel Socket Button and Flat
whichhavebeenheatedtofacilitatefabricationortomodifyits
Countersunk Head Cap Screws (Metric)
mechanical properties. This test method is not intended to
F912M Specification for Alloy Steel Socket Set Screws
address products which are intentionally carburized to achieve
(Metric)
specific results.
F1789 Terminology for F16 Mechanical Fasteners
1.2 Two routine methods are described for measuring the
limits of and determining the presence of decarburization or
3. Terminology
carburization; the Optical Method and the Microindentation
3.1 Definitions:
Method 1. Either method is appropriate for routine examina-
tions. The Microindentation Method 2 shall be considered the 3.1.1 carburization—process or result of increasing the
carbon content of the surface layers of the steel fastener
referee method.
product.
1.3 For the purpose of these tests, there are four classes of
hardened and tempered steel products for which specific 3.1.2 decarburization—in accordance with Terminology
measurements must be made with respect to their physical
F1789,isalossofcarbonfromthesurfacelayerofthefastener,
properties.
normally associated with heat treatment.
1.4 The values stated in SI units are to be regarded as
3.1.3 gross decarburization—also known as complete
standard. No other units of measurement are included in this
decarburization, is characterized by a sufficient carbon loss to
standard.
show only clearly defined ferrite grains.
1.5 This standard does not purport to address all of the
3.1.4 partial decarburization—characterized as a loss of
safety concerns, if any, associated with its use. It is the
carbon sufficient to cause a lighter shade of tempered marten-
responsibility of the user of this standard to establish appro-
site than that of the immediately adjacent base metal, but as
priate safety and health practices and determine the applica-
being of insufficient carbon loss to show clearly defined ferrite
bility of regulatory limitations prior to use.
grains.
2. Referenced Documents
4. Significance and Use
2.1 ASTM Standards:
4.1 Decarburization and carburization are two surface con-
ditions created, either intentionally or unintentionally, as with
a pre-existing condition created during the rod rolling process,
This test method is under the jurisdiction of ASTM Committee F16 on
the rod/wire annealing process, or while heat treating threaded
Fasteners and is the direct responsibility of Subcommittee F16.01 on Test Methods.
steel products. Too much of either will adversely affect the
Current edition approved Aug. 1, 2013. Published October 2013. Originally
safety and performance of the threaded product. Therefore,
approved in 2004. Last previous edition approved in 2007 as F2328M – 07. DOI:
10.1520/F2328M-07R13.
limits have been established for four different product groups:
For referenced ASTM standards, visit the ASTM website, www.astm.org, or
the harder and greater the tensile strength of the product, the
contact ASTM Customer Service at service@astm.org. For Annual Book of ASTM
more susceptible to failure the product becomes if these limits
Standards volume information, refer to the standard’s Document Summary page on
the ASTM website. are exceeded.
Copyright © ASTM International, 100 Barr Harbor Drive, PO Box C700, West Conshohocken, PA 19428-2959. United States
NOTICE: This standard has either been superseded and replaced by a new version or withdrawn.
Please contact ASTM International (www.astm.org) for the latest information.
F2328M − 07 (2013)
4.2 When testing to a particular product specification that of any light-etching band of martensite defines the depth of
lists the dimensions and microindentation data to be used, that decarburization. Compare the image with Fig. 1 for the
data shall take precedence over the tables in this test method. maximum limits for G by taking a measurement on a line
perpendicular to the flank of the thread midway between the
4.3 There are only two viable methods available to detect
thread crest and root (pitch diameter).
these deficiencies: either by the visual method or the microin-
dentation method. Both methods are used for routine inspec-
7.2 Interpretation of Results:
tionswhenevaluationsareconductedatasinglelocationonthe
7.2.1 Allowable limits for partial decarburization shall be in
product sample. Because an evaluation at a specific location
accordancewith3.1.4andFig.1,andthemeasuredvaluesshall
maynotberepresentativeofthewholepart,therefereemethod
be in accordance with Table 2, when measured in accordance
employs the microindentation method taken as an average of
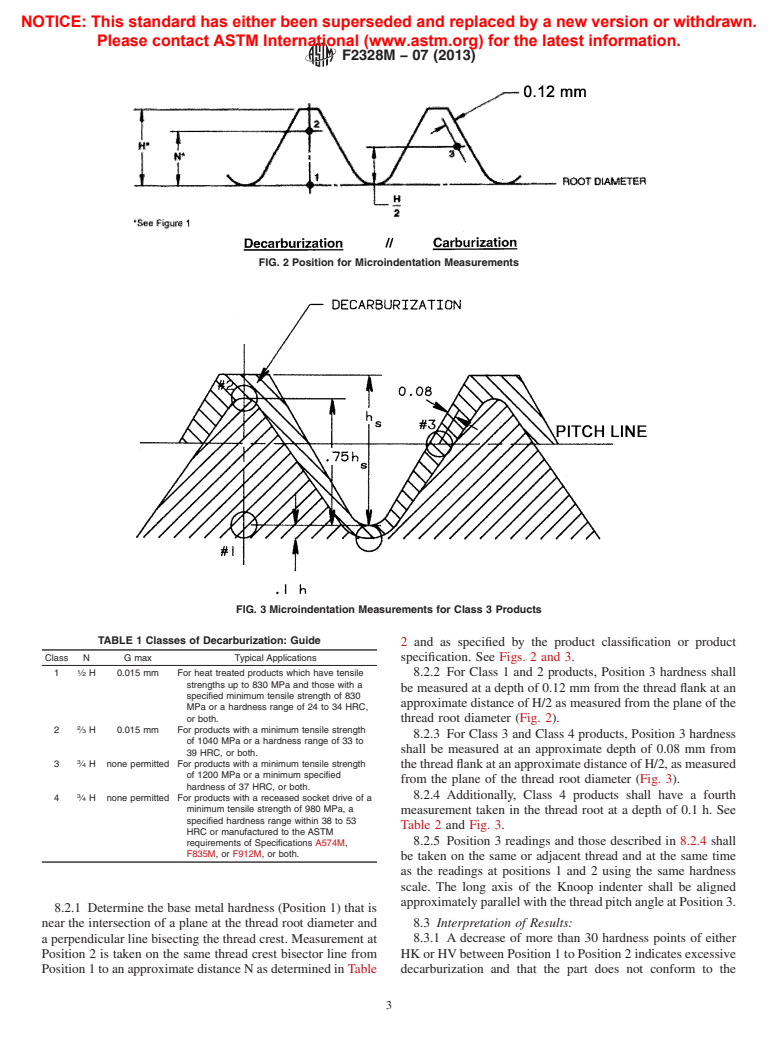
with the illustrations in Figs. 2 and 3.
evaluationsconductedonfouradjacentthreads.Thisprocedure
7.2.2 Allowablelimitsforgrossdecarburization(G)shallbe
significantly reduces random test variables when compared to
in accordance with 3.1.3 and the measured values as defined in
testing on a single thread.
Table 1. The optical method is the only valid method for
4.4 Specifying this test method does not specify or imply evaluating the depth of gross decarburization. Gross decarbur-
that testing shall be for either decarburization or carburization ization is prohibited in Class 3 and Class 4 products.
alone or for both conditions. When either test method is
7.2.3 Carburization is identified when the tempered marten-
performed, both conditions will be apparent and shall be
siteisadarkershadethantheimmediatelyadjacentbasemetal.
reported. For example, if an order is placed to test for
If visible evidence of surface carburization is present on the
decarburization and none is found but the presence of decar-
surface zone, the microindentation hardness method, in accor-
burization is detected, it shall be reported on the test report that
dance with Section 8, shall be used.
carburization was found.
7.2.4 The optical method may not be appropriate for speci-
mens with certain coatings, such as zinc, where the coating can
5. Class of Decarburization
affecttheetchingprocessanddistorttheappearanceofthebase
5.1 Class Determination—These measurements by Class
material microstructure. These coatings shall be removed prior
arepredicatedupontheirrelationshipbetweentheheight(H)of
to mounting if the coating prevents proper etching. Care must
the external thread at its maximum boundary, disregarding any
also be exercised to not alter the surface condition of the
surface coating, and N, which is the minimum thread height in
substrate during the coating removal process.
the non-decarburized zone (see Figs. 1-3). The dimensions for
7.2.5 If the results of the optical method indicate a possible
N and H are listed in Table 2 for each Class. Dimension G
nonconformance in the measurement of partial decarburization
(Table 1 and Fig. 1) represents the maximum depth of gross or
or carburization, or are otherwise inconclusive, the microin-
complete decarburization.
dentation hardness method (Section 8) shall be performed after
NOTE 1—Refer to the product standard for specific requirements.When
the specimens are repolished.
limits are not specified, use Table 1 as a suggested reference.
8. Evaluation by the Microindentation Hardness Method
6. Preparation
8.1 Prepare the sample in accordance with Section 6 and
6.1 The use of either the optical or microindentation hard-
ness method requires the finished product to be longitudinally perform measurements in accordance with Test Method E384
...


Questions, Comments and Discussion
Ask us and Technical Secretary will try to provide an answer. You can facilitate discussion about the standard in here.