ASTM E428-00
(Practice)Standard Practice for Fabrication and Control of Steel Reference Blocks Used in Ultrasonic Examination
Standard Practice for Fabrication and Control of Steel Reference Blocks Used in Ultrasonic Examination
SCOPE
1.1 This practice covers a procedure for fabrication and control of metal alloy reference blocks used in ultrasonic examination that have a flat-surface sound entry, are cylindrical in shape, and contain flat-bottom holes (FBH) which may be used for checking the performance of ultrasonic examination instrumentation and search units and for standardization and control of ultrasonic examination of metal alloy products. The reference blocks described are suitable for use with either the direct-contact method or immersion pulse-echo ultrasonic methods.
1.2 While this procedure is basically designed for the fabrication and control of carbon and alloy steel blocks to be used in conjunction with the examination of these materials, the fabrication and control procedures may also be suitable for the preparation of blocks for other types of materials such as nickel-base alloys, certain types of aluminum alloys, and so forth. Additional procedures and controls may be required when fabricating reference blocks from other than carbon or alloy steel material. This practice shall in no way preclude the specification or addition of any supplemented requirements as deemed necessary for the specific application. This practice, however, must not be confused with, nor does it supersede Practice E127, specifically governing the fabrication and evaluation of 7075-T6 aluminum alloy ultrasonic standard reference blocks.
Note 1--Practice E127 and Guide E1158 also describe procedures for selecting material, fabricating blocks, and checking response. Unlike this practice, Practice E127 has requirements for evaluation relative to a specified standard target.
1.3 The values stated in inch-pound units are to be regarded as the standard.
1.4This standard does not purport to address all of the safety problems, if any, associated with its use. It is the responsibility of the user of this standard to establish appropriate safety and health practices and determine the applicability of regulatory limitations prior to use.
General Information
Relations
Standards Content (Sample)
NOTICE: This standard has either been superseded and replaced by a new version or withdrawn.
Contact ASTM International (www.astm.org) for the latest information
Designation: E 428 – 00
Standard Practice for
Fabrication and Control of Steel Reference Blocks Used in
Ultrasonic Examination
This standard is issued under the fixed designation E 428; the number immediately following the designation indicates the year of
original adoption or, in the case of revision, the year of last revision. A number in parentheses indicates the year of last reapproval. A
superscript epsilon (e) indicates an editorial change since the last revision or reapproval.
This specification has been approved for use by agencies of the Department of Defense.
1. Scope priate safety and health practices and determine the applica-
bility of regulatory limitations prior to use.
1.1 This practice covers a procedure for fabrication and
control of metal alloy reference blocks used in ultrasonic
2. Referenced Documents
examinationthathaveaflat-surfacesoundentry,arecylindrical
2.1 ASTM Standards:
in shape, and contain flat-bottom holes (FBH) which may be
E 127 Practice for Fabricating and Checking Aluminum
used for checking the performance of ultrasonic examination
Alloy Ultrasonic Standard Reference Blocks
instrumentation and search units and for standardization and
E 1158 Guide for Material Selection and Fabrication of
control of ultrasonic examination of metal alloy products. The
Reference Blocks for the Pulsed Longitudinal Wave Ultra-
reference blocks described are suitable for use with either the
sonic Examination of Metal and Metal Alloy Production
direct-contact method or immersion pulse-echo ultrasonic
Material
methods.
E 1316 Terminology for Nondestructive Examinations
1.2 While this procedure is basically designed for the
fabrication and control of carbon and alloy steel blocks to be
3. Terminology
used in conjunction with the examination of these materials,
3.1 Definitions—For definitions of terms used in this prac-
the fabrication and control procedures may also be suitable for
tice, see Terminology E 1316.
the preparation of blocks for other types of materials such as
nickel-base alloys, certain types of aluminum alloys, and so
4. Summary of Practice
forth. Additional procedures and controls may be required
4.1 This practice details a basic fabrication and control
when fabricating reference blocks from other than carbon or
procedure and defines the minimum requirements to be met in
alloy steel material. This practice shall in no way preclude the
matching carbon and alloy steel reference blocks with the
specification or addition of any supplemented requirements as
material to be examined. Additional supplemental require-
deemed necessary for the specific application. This practice,
ments may be needed when using this practice to fabricate
however, must not be confused with, nor does it supersede
reference blocks from other types of materials or with larger
Practice E 127, specifically governing the fabrication and
diameter holes. The physical characteristics of the hole may be
evaluation of 7075-T6 aluminum alloy ultrasonic standard
established by evaluating plastic replicas. It must be recog-
reference blocks.
nized however that there are limitations on the size hole that
NOTE 1—Practice E 127 and Guide E 1158 also describe procedures for
may be replicated and evaluated.
selecting material, fabricating blocks, and checking response. Unlike this
practice, Practice E 127 has requirements for evaluation relative to a
5. Material Selection
specified standard target.
5.1 The material to be used for reference blocks should be
1.3 The values stated in inch-pound units are to be regarded
similar in its acoustic attenuation to the material which is to be
as the standard.
examined. The grain size, heat treat condition, physical and
1.4 This standard does not purport to address all of the
chemical composition, surface finish, and manufacturing pro-
safety problems, if any, associated with its use. It is the
cedure (rolling, forging, etc.) are variables to be considered in
responsibility of the user of this standard to establish appro-
matching acoustic responses.
5.1.1 The general evaluation procedure shall be to introduce
a longitudinal pulse-echo beam into either side of the block on
This practice is under the jurisdiction of ASTM Committee E07 on Nonde-
the axis to be used for determining metal-path distance. An
structive Testing and is the direct responsibility of Subcommittee E07.06 on
Ultrasonic Testing Procedures.
Current edition approved July 10, 2000. Published September 2000. Originally
published as E 428 – 71. Last previous edition E 428 – 92. Annual Book of ASTM Standards, Vol 03.03.
Copyright © ASTM International, 100 Barr Harbor Drive, PO Box C700, West Conshohocken, PA 19428-2959, United States.
E428–00
immersionexaminationmethodusingcleanwaterasacouplant OnsamplesthataretohaveFBHssmallerthan ⁄64in.(1.2mm)
or, a contact method using appropriate couplant (oil, glycerin, in diameter, the decay patterns shall compare within 610 % or
and so forth) is satisfactory. The examination instruments, as required by the application.
frequency, and search unit used in the evaluation of the raw
5.1.5 Lowering the examination frequency tends to mini-
material intended for the fabrication of the reference blocks
mize discernible differences in response. At 1.0 MHz, a large
shall be comparable to that used in the examination of the
group of materials may be acoustically penetrable with rela-
production material.
tively similar results and may satisfy the requirements of 5.1.4.
5.1.2 The material used for reference blocks shall be 100 % At frequencies such as 5.0 MHz and higher, microstructure
scanned while the examination system is adjusted to display,
changes usually yield readily discernible differences in acous-
whenever possible, an acoustic noise level from the material of tic response and restrict the applicability of reference blocks.
20 % of full-scale deflection (FSD). In cases of materials that
are acoustically transparent to the extent that this requirement
6. Fabrication Procedure
cannot be satisfied, a readable acoustic noise level shall be
6.1 Unless otherwise specified, select the blocks to be made
displayed. The acoustic noise level from the material is not to
from those listed in Table 1. Block sets conforming to
be confused with inherent electrical instrument noise often
customary commercial practice are grouped as follows:
observed when the system sensitivity is adjusted to its maxi-
6.1.1 Distance-Amplitude Response (D/A),
mum level range.
6.1.2 Area-Amplitude Response (A/A), and
5.1.3 The material used for reference blocks shall be free of
6.1.3 Basic (selected from D/A and A/A groups).
discrete ultrasonic discontinuity indications greater than twice
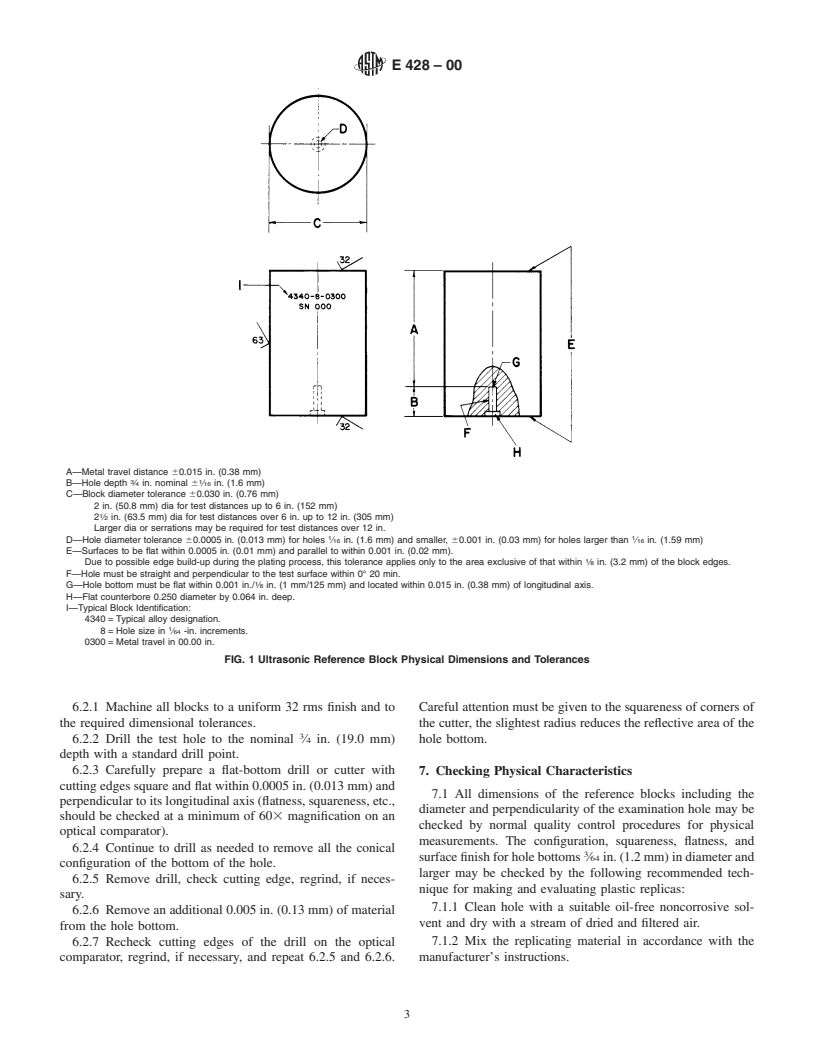
6.2 AllblocksaretobefabricatedinaccordancewithFig.1.
the amplitude of the noise level displayed in accordance with
Dimension “A” (metal travel) and Dimension “D” (FBH
the requirements of 5.1.2.
diameter) are given in Table 1; Dimension “E” (block length)
5.1.4 Attenuation shall be checked by comparing multiple
is derived. The following machining sequence is recom-
reflections from the back surface of the test block material with
mended:
that of the material to be examined. With the amplitude from
thefirstbackreflectionadjustedto90 %ofFSD,thesumofthe
NOTE 2—This practice may be used to produce blocks with flat-bottom
amplitude of the first three back reflections from both samples
holes of a larger diameter than described. Utilization of larger flat-bottom
shall compare within 625 % or as required by the application. holes shall be by agreement of the using parties.
TABLE 1 Standard Block Sizes and Recommended Block Sets
NOTE 1—Material to be as specified by the user.
NOTE 2—All dimensions and tolerances are to be in accordance with Fig. 11.
NOTE 3—1 in. = 25.4 mm.
NOTE 4—Block sets shown are typical of established commercial practice: more or fewer blocks may be required for specific applications.
E428–00
A—Metal travel distance 60.015 in. (0.38 mm)
3 1
B—Hole depth ⁄4 in. nominal 6 ⁄16 in. (1.6 mm)
C—Block diameter tolerance 60.030 in. (0.76 mm)
2 in. (50.8 mm) dia for test distances up to 6 in. (152 mm)
2 ⁄2 in. (63.5 mm) dia for test distances over 6 in. up to 12 in. (305 mm)
Larger dia or serrations may be required for test distances over 12 in.
1 1
D—Hole diameter tolerance 60.0005 in. (0.013 mm) for holes ⁄16 in. (1.6 mm) and smaller, 60.001 in. (0.03 mm) for holes larger than ⁄16 in. (1.59 mm)
E—Surfaces to be flat within 0.0005 in. (0.01 mm) and parallel to within 0.001 in. (0.02 mm).
Due to possible edge build-up during the plating process, this tolerance applies only to the area exclusive of that within ⁄8 in. (3.2 mm) of the block edges.
F—Hole must be straight and perpendicular to the test surface within 0° 20 min.
G—Hole bottom must be flat within 0.001 in./ ⁄8 in. (1 mm/125 mm) and located within 0.015 in. (0.38 mm) of longitudinal axis.
H—Flat counterbore 0.250 diameter by 0.064 in. deep.
I—Typical Block Identification:
4340 = Typical alloy designation.
8=Holesizein ⁄64 -in. increments.
0300 = Metal travel in 00.00 in.
FIG. 1 Ultrasonic Reference Block Physical Dimensions and Tolerances
6.2.1 Machine all blocks to a uniform 32 rms finish and to Careful attention must be given to the squareness of corners of
the required dimensional tolerances. the cutter, the slightest radius reduces the reflective area of the
6.2.2 Drill the test hole to the nominal ⁄4 in. (19.0 mm) hole bottom.
depth with a standard drill point.
6.2.3 Carefully prepare a flat-bottom drill or cutter with
7. Checking Physical Characteristics
cutting edges square and flat within 0.0005 in. (0.013 mm) and
7.1 All dimensions of the reference blocks including the
perpendicular to its longitudinal axis (flatness, squareness, etc.,
diameter and perpendicularity of the examination hole may be
should be checked at a minimum of 603 magnification on an
checked by normal quality control procedures for physical
optical comparator).
measurements. T
...


Questions, Comments and Discussion
Ask us and Technical Secretary will try to provide an answer. You can facilitate discussion about the standard in here.