ASTM B893-98
(Specification)Specification for Hard-Coat Anodizing of Magnesium for Engineering Applications
Specification for Hard-Coat Anodizing of Magnesium for Engineering Applications
SCOPE
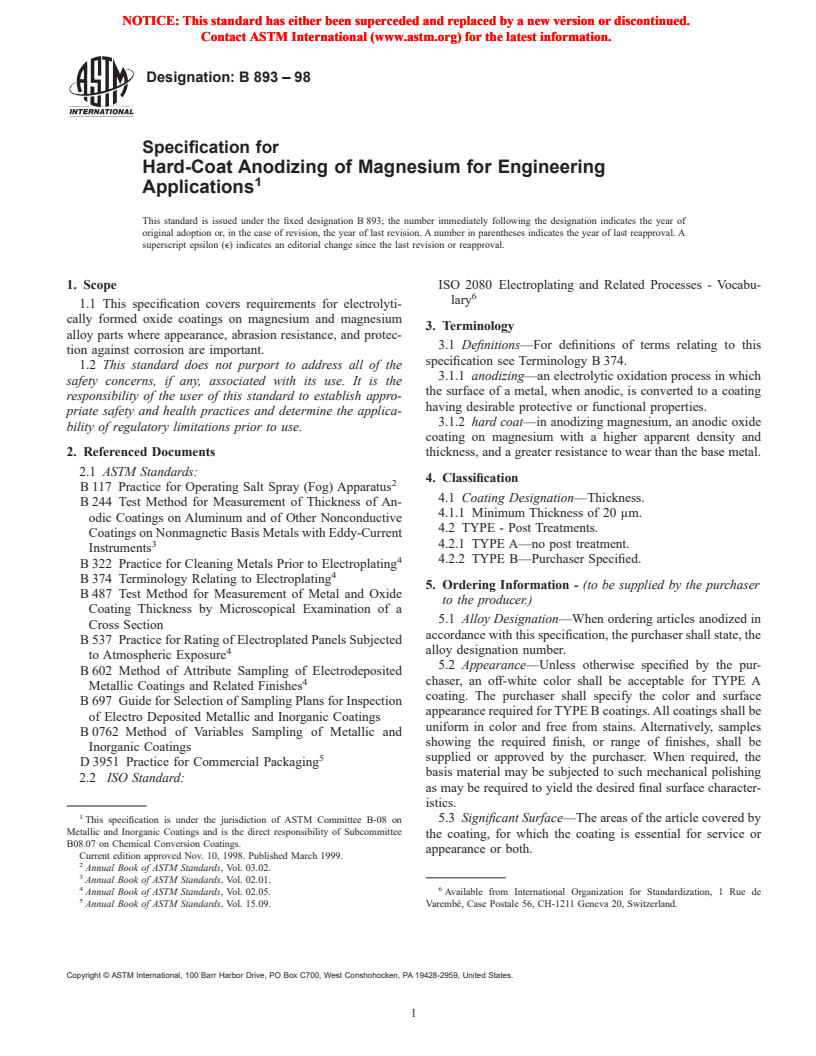
1.1 This specification covers requirements for electrolytically formed oxide coatings on magnesium and magnesium alloy parts where appearance, abrasion resistance, and protection against corrosion are important.
1.2 This standard does not purport to address all of the safety concerns, if any, associated with its use. It is the responsibility of the user of this standard to establish appropriate safety and health practices and determine the applicability of regulatory limitations prior to use.
General Information
Relations
Standards Content (Sample)
NOTICE: This standard has either been superceded and replaced by a new version or discontinued. NOTICE: This standard has either been superceded and replaced by a new version or discontinued.
Contact ASTM International (www.astm.org) for the latest information. Contact ASTM International (www.astm.org) for the latest information.
Designation: B 893 – 98
Specification for
Hard-Coat Anodizing of Magnesium for Engineering
Applications
This standard is issued under the fixed designation B 893; the number immediately following the designation indicates the year of
original adoption or, in the case of revision, the year of last revision. A number in parentheses indicates the year of last reapproval. A
superscript epsilon (e) indicates an editorial change since the last revision or reapproval.
1. Scope ISO 2080 Electroplating and Related Processes - Vocabu-
lary
1.1 This specification covers requirements for electrolyti-
cally formed oxide coatings on magnesium and magnesium
3. Terminology
alloy parts where appearance, abrasion resistance, and protec-
3.1 Definitions—For definitions of terms relating to this
tion against corrosion are important.
specification see Terminology B 374.
1.2 This standard does not purport to address all of the
3.1.1 anodizing—an electrolytic oxidation process in which
safety concerns, if any, associated with its use. It is the
the surface of a metal, when anodic, is converted to a coating
responsibility of the user of this standard to establish appro-
having desirable protective or functional properties.
priate safety and health practices and determine the applica-
3.1.2 hard coat—in anodizing magnesium, an anodic oxide
bility of regulatory limitations prior to use.
coating on magnesium with a higher apparent density and
2. Referenced Documents thickness, and a greater resistance to wear than the base metal.
2.1 ASTM Standards:
4. Classification
B 117 Practice for Operating Salt Spray (Fog) Apparatus
4.1 Coating Designation—Thickness.
B 244 Test Method for Measurement of Thickness of An-
4.1.1 Minimum Thickness of 20 μm.
odic Coatings on Aluminum and of Other Nonconductive
4.2 TYPE - Post Treatments.
Coatings on Nonmagnetic Basis Metals with Eddy-Current
3 4.2.1 TYPE A—no post treatment.
Instruments
4.2.2 TYPE B—Purchaser Specified.
B 322 Practice for Cleaning Metals Prior to Electroplating
B 374 Terminology Relating to Electroplating
5. Ordering Information - (to be supplied by the purchaser
B 487 Test Method for Measurement of Metal and Oxide
to the producer.)
Coating Thickness by Microscopical Examination of a
5.1 Alloy Designation—When ordering articles anodized in
Cross Section
accordance with this specification, the purchaser shall state, the
B 537 Practice for Rating of Electroplated Panels Subjected
4 alloy designation number.
to Atmospheric Exposure
5.2 Appearance—Unless otherwise specified by the pur-
B 602 Method of Attribute Sampling of Electrodeposited
4 chaser, an off-white color shall be acceptable for TYPE A
Metallic Coatings and Related Finishes
coating. The purchaser shall specify the color and surface
B 697 Guide for Selection of Sampling Plans for Inspection
appearance required for TYPE B coatings. All coatings shall be
of Electro Deposited Metallic and Inorganic Coatings
uniform in color and free from stains. Alternatively, samples
B 0762 Method of Variables Sampling of Metallic and
showing the required finish, or range of finishes, shall be
Inorganic Coatings
supplied or approved by the purchaser. When required, the
D 3951 Practice for Commercial Packaging
basis material may be subjected to such mechanical polishing
2.2 ISO Standard:
as may be required to yield the desired final surface character-
istics.
5.3 Significant Surface—The areas of the article covered by
This specification is under the jurisdiction of ASTM Committee B-08 on
Metallic and Inorganic Coatings and is the direct responsibility of Subcommittee
the coating, for which the coating is essential for service or
B08.07 on Chemical Conversion Coatings.
appearance or both.
Current edition approved Nov. 10, 1998. Published March 1999.
Annual Book of ASTM Standards, Vol. 03.02.
Annual Book of ASTM Standards, Vol. 02.01.
4 6
Annual Book of ASTM Standards, Vol. 02.05. Available from International Organization for Standardization, 1 Rue de
Annual Book of ASTM Standards, Vol. 15.09. Varembé, Case Postale 56, CH-1211 Geneva 20, Switzerland.
Copyright © ASTM International, 100 Barr Harbor Drive, PO Box C700, West Conshohocken, PA 19428-2959, United States.
NOTICE: This standard has either been superceded and replaced by a new version or discontinued. NOTICE: This standard has either been superceded and replaced by a new version or discontinued.
Contact ASTM International (www.astm.org) for the latest information. Contact ASTM International (www.astm.org) for the latest information.
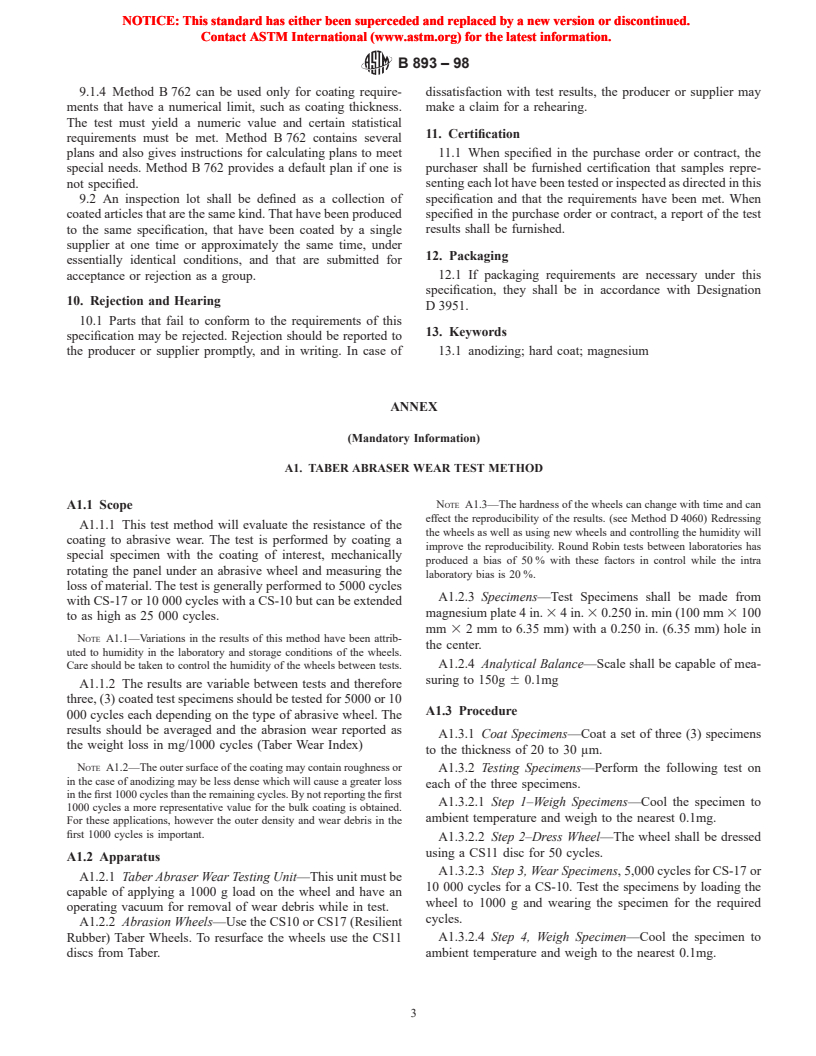
B893–98
5.3.1 Contact Marks—Contact marks will occur. The Pur- 7.1.2.1 Coating Thickness for SC20—The anodic film thick-
chaser shall specify where contact marks are unacceptable. ness shall be a minimum of 20 um and not exceed 30 um on the
significant surface.
5.4 Tolerances—Dimensional build-up is approximately
one-half of anodic film thickness. The order document shall 7.1.2.2 Test—Hard-coating thickness shall be evaluated by
include any coating thickness tolerances and shall not exceed one or more of the following test methods in Section 8.
any applicable drawing dimensions. 7.2 Qualification Tests—The process shall be evaluated
5.5 The purchaser shall provide the number for this standard monthly or more frequently if required by the purchaser using
TYPE. the following test methods on panels that are of the same alloy
of the parts coated with TYPE A hard coat.
5.6 The purchaser shall state any special post treatments.
(see 4.2 and 5.2) 7.2.1 Corrosion Test—Use method described in 8.1
5.7 Test Methods—The purchaser shall state the test meth- 7.2.2 Abrasion Resistance Test—Use the Taber Abraser test
od(s) by which the coated article will be evaluated (see Section method in Annex A1 of this specification.
8).
5.8 Sampling Plan—(see Section 9)
8. Test Methods
5.9 Any requirement for certification (see Section 11)
8.1 Corrosion Test—Panel(s) shall be subjected to a 5
5.10 Any requirement for packaging (see Section 12)
percent salt spray (fog) test in accordance with Practice B 117
for 336 h. The panel(s) shall be prepared and evaluated in
6. Materials and Process
accordance with Practice B 537. A Protective Rating of 6 or
6.1 Process less is considered a failure.
6.1.1 Basis Metal—This standard does not specify require- 8.2 Abrasion Resistance Test—Test panels in accordance
ments for the surface condition of the basis metal before with Annex A1. The acceptance criteria shall be as follows.
anodizing, but agreement should preferably be reached be- 8.2.1 Abrasive Wheel No. CS-10—A wear index of more
tween the purchaser and the producer that the surface condition
than 7 mg/1000 cycles or less than 10 000 wear cycles shall be
of the basis metal is satisfactory. considered a failure.
6.1.2 Surface Preparation—Preparatory procedures and
8.2.2 Abrasive Wheel No. CS-17—A wear index of more
cleaning of the basis material may be necessary, see Practice than 20 mg/1000 cycles or less than 5 000 wear cycles shall be
B 322.
considered a failure.
6.1.3 Hard-Coating—Following the preparatory operations, 8.3 Thickness Tests:
the articles are introduced into the solution for a period of time
8.3.1 Eddy-Current Method (Test Method B 244)
at the current density and temperature required to produce the
8.3.2 Microscopical Cross Section Method (Test Method
hard-coated surface.
B 487).
NOTE 1—Hard-Coating solutions and operating conditions are commer-
9. Sampling
cially available. The appropriate operating instructions should be fol-
lowed.
9.1 The purchaser and producer are urged to employ statis-
NOTE 2—Intricately shaped articles may not receive the same thickness
tical process control in the coating process. Properly per-
of coating in recessed areas due to lower current densities. Auxiliary
formed, statistical process control will assure coated products
cathodes, may be used to improve anodize thickness in these areas.
of satisfactory quality and will reduce the amount of accep-
tance inspection. The sampling plan used for the inspection of
6.2 Post Treatments:
6.2.1 Final Rinsing—Rinsing subsequent to anodizing is the quality coated article shall be agreed upon between the
purchaser and pr
...


Questions, Comments and Discussion
Ask us and Technical Secretary will try to provide an answer. You can facilitate discussion about the standard in here.