ASTM E2330-12
(Test Method)Standard Test Method for Determination of Concentrations of Elements in Glass Samples Using Inductively Coupled Plasma Mass Spectrometry (ICP-MS) for Forensic Comparisons
Standard Test Method for Determination of Concentrations of Elements in Glass Samples Using Inductively Coupled Plasma Mass Spectrometry (ICP-MS) for Forensic Comparisons
SIGNIFICANCE AND USE
This technique is destructive, in that the glass fragments may need to be crushed, and must be digested in acid.
Although the concentration ranges of the calibration curves shown in Appendix X1 are applicable to soda lime and borosilicate glass, this method is useful for the accurate measurement of element concentrations from a wide variety of glass samples.
The determination of the element concentrations in glass yields data that can be used to compare fragments.
It should be recognized that the method measures the bulk concentration of the target elements. Any extraneous material present on the glass that is not removed before digestion may result in inaccurate concentrations of the measured elements.
The precision and accuracy of the method should be established in each laboratory that employs the method.
SCOPE
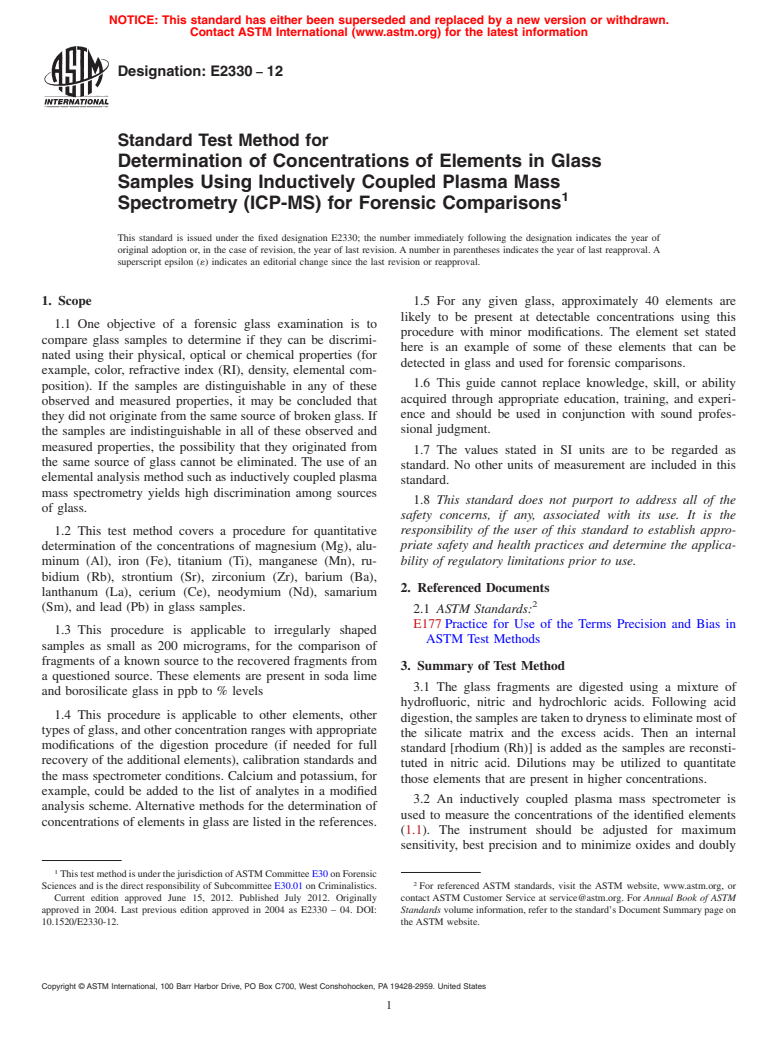
1.1 One objective of a forensic glass examination is to compare glass samples to determine if they can be discriminated using their physical, optical or chemical properties (for example, color, refractive index (RI), density, elemental composition). If the samples are distinguishable in any of these observed and measured properties, it may be concluded that they did not originate from the same source of broken glass. If the samples are indistinguishable in all of these observed and measured properties, the possibility that they originated from the same source of glass cannot be eliminated. The use of an elemental analysis method such as inductively coupled plasma mass spectrometry yields high discrimination among sources of glass.
1.2 This test method covers a procedure for quantitative determination of the concentrations of magnesium (Mg), aluminum (Al), iron (Fe), titanium (Ti), manganese (Mn), rubidium (Rb), strontium (Sr), zirconium (Zr), barium (Ba), lanthanum (La), cerium (Ce), neodymium (Nd), samarium (Sm), and lead (Pb) in glass samples.
1.3 This procedure is applicable to irregularly shaped samples as small as 200 micrograms, for the comparison of fragments of a known source to the recovered fragments from a questioned source. These elements are present in soda lime and borosilicate glass in ppb to % levels
1.4 This procedure is applicable to other elements, other types of glass, and other concentration ranges with appropriate modifications of the digestion procedure (if needed for full recovery of the additional elements), calibration standards and the mass spectrometer conditions. Calcium and potassium, for example, could be added to the list of analytes in a modified analysis scheme. Alternative methods for the determination of concentrations of elements in glass are listed in the references.
1.5 For any given glass, approximately 40 elements are likely to be present at detectable concentrations using this procedure with minor modifications. The element set stated here is an example of some of these elements that can be detected in glass and used for forensic comparisons.
1.6 This guide cannot replace knowledge, skill, or ability acquired through appropriate education, training, and experience and should be used in conjunction with sound professional judgment.
1.7 The values stated in SI units are to be regarded as standard. No other units of measurement are included in this standard.
1.8 This standard does not purport to address all of the safety concerns, if any, associated with its use. It is the responsibility of the user of this standard to establish appropriate safety and health practices and determine the applicability of regulatory limitations prior to use.
General Information
Relations
Buy Standard
Standards Content (Sample)
NOTICE: This standard has either been superseded and replaced by a new version or withdrawn.
Contact ASTM International (www.astm.org) for the latest information
Designation: E2330 − 12
Standard Test Method for
Determination of Concentrations of Elements in Glass
Samples Using Inductively Coupled Plasma Mass
1
Spectrometry (ICP-MS) for Forensic Comparisons
This standard is issued under the fixed designation E2330; the number immediately following the designation indicates the year of
original adoption or, in the case of revision, the year of last revision. A number in parentheses indicates the year of last reapproval. A
superscript epsilon (´) indicates an editorial change since the last revision or reapproval.
1. Scope 1.5 For any given glass, approximately 40 elements are
likely to be present at detectable concentrations using this
1.1 One objective of a forensic glass examination is to
procedure with minor modifications. The element set stated
compare glass samples to determine if they can be discrimi-
here is an example of some of these elements that can be
nated using their physical, optical or chemical properties (for
detected in glass and used for forensic comparisons.
example, color, refractive index (RI), density, elemental com-
1.6 This guide cannot replace knowledge, skill, or ability
position). If the samples are distinguishable in any of these
acquired through appropriate education, training, and experi-
observed and measured properties, it may be concluded that
ence and should be used in conjunction with sound profes-
they did not originate from the same source of broken glass. If
sional judgment.
the samples are indistinguishable in all of these observed and
measured properties, the possibility that they originated from
1.7 The values stated in SI units are to be regarded as
the same source of glass cannot be eliminated. The use of an
standard. No other units of measurement are included in this
elemental analysis method such as inductively coupled plasma
standard.
mass spectrometry yields high discrimination among sources
1.8 This standard does not purport to address all of the
of glass.
safety concerns, if any, associated with its use. It is the
1.2 This test method covers a procedure for quantitative responsibility of the user of this standard to establish appro-
priate safety and health practices and determine the applica-
determination of the concentrations of magnesium (Mg), alu-
minum (Al), iron (Fe), titanium (Ti), manganese (Mn), ru- bility of regulatory limitations prior to use.
bidium (Rb), strontium (Sr), zirconium (Zr), barium (Ba),
2. Referenced Documents
lanthanum (La), cerium (Ce), neodymium (Nd), samarium
2
(Sm), and lead (Pb) in glass samples. 2.1 ASTM Standards:
E177 Practice for Use of the Terms Precision and Bias in
1.3 This procedure is applicable to irregularly shaped
ASTM Test Methods
samples as small as 200 micrograms, for the comparison of
fragments of a known source to the recovered fragments from
3. Summary of Test Method
a questioned source. These elements are present in soda lime
3.1 The glass fragments are digested using a mixture of
and borosilicate glass in ppb to % levels
hydrofluoric, nitric and hydrochloric acids. Following acid
1.4 This procedure is applicable to other elements, other
digestion,thesamplesaretakentodrynesstoeliminatemostof
types of glass, and other concentration ranges with appropriate
the silicate matrix and the excess acids. Then an internal
modifications of the digestion procedure (if needed for full
standard [rhodium (Rh)] is added as the samples are reconsti-
recovery of the additional elements), calibration standards and
tuted in nitric acid. Dilutions may be utilized to quantitate
the mass spectrometer conditions. Calcium and potassium, for
those elements that are present in higher concentrations.
example, could be added to the list of analytes in a modified
3.2 An inductively coupled plasma mass spectrometer is
analysis scheme. Alternative methods for the determination of
used to measure the concentrations of the identified elements
concentrations of elements in glass are listed in the references.
(1.1). The instrument should be adjusted for maximum
sensitivity, best precision and to minimize oxides and doubly
1
ThistestmethodisunderthejurisdictionofASTMCommitteeE30onForensic
2
Sciences and is the direct responsibility of Subcommittee E30.01 on Criminalistics. For referenced ASTM standards, visit the ASTM website, www.astm.org, or
Current edition approved June 15, 2012. Published July 2012. Originally contact ASTM Customer Service at service@astm.org. For Annual Book of ASTM
approved in 2004. Last previous edition approved in 2004 as E2330 – 04. DOI: Standards volume information, refer to the standard’s Document Summary page on
10.1520/E2330-12. the ASTM website.
Copyright © ASTM International, 100 Barr Harbor Drive, PO Box C700, West Conshohocken, PA 19428-2959. United States
1
---------------------- Page: 1 ----------------------
E2
...
This document is not anASTM standard and is intended only to provide the user of anASTM standard an indication of what changes have been made to the previous version. Because
it may not be technically possible to adequately depict all changes accurately, ASTM recommends that users consult prior editions as appropriate. In all cases only the current version
of the standard as published by ASTM is to be considered the official document.
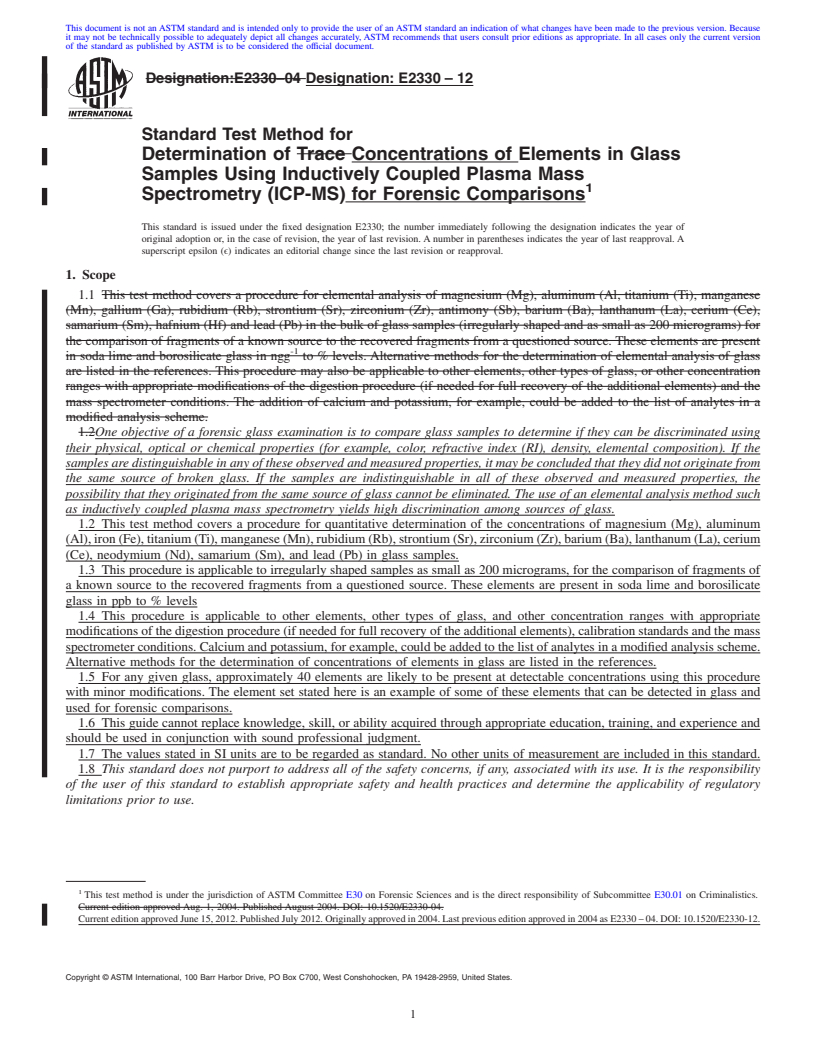
Designation:E2330–04 Designation:E2330–12
Standard Test Method for
Determination of Trace Concentrations of Elements in Glass
Samples Using Inductively Coupled Plasma Mass
1
Spectrometry (ICP-MS) for Forensic Comparisons
This standard is issued under the fixed designation E2330; the number immediately following the designation indicates the year of
original adoption or, in the case of revision, the year of last revision. A number in parentheses indicates the year of last reapproval. A
superscript epsilon (ϵ) indicates an editorial change since the last revision or reapproval.
1. Scope
1.1 This test method covers a procedure for elemental analysis of magnesium (Mg), aluminum (Al, titanium (Ti), manganese
(Mn), gallium (Ga), rubidium (Rb), strontium (Sr), zirconium (Zr), antimony (Sb), barium (Ba), lanthanum (La), cerium (Ce),
samarium (Sm), hafnium (Hf) and lead (Pb) in the bulk of glass samples (irregularly shaped and as small as 200 micrograms) for
the comparison of fragments of a known source to the recovered fragments from a questioned source. These elements are present
-1
in soda lime and borosilicate glass in ngg to % levels. Alternative methods for the determination of elemental analysis of glass
are listed in the references. This procedure may also be applicable to other elements, other types of glass, or other concentration
ranges with appropriate modifications of the digestion procedure (if needed for full recovery of the additional elements) and the
mass spectrometer conditions. The addition of calcium and potassium, for example, could be added to the list of analytes in a
modified analysis scheme.
1.2One objective of a forensic glass examination is to compare glass samples to determine if they can be discriminated using
their physical, optical or chemical properties (for example, color, refractive index (RI), density, elemental composition). If the
samples are distinguishable in any of these observed and measured properties, it may be concluded that they did not originate from
the same source of broken glass. If the samples are indistinguishable in all of these observed and measured properties, the
possibility that they originated from the same source of glass cannot be eliminated. The use of an elemental analysis method such
as inductively coupled plasma mass spectrometry yields high discrimination among sources of glass.
1.2 This test method covers a procedure for quantitative determination of the concentrations of magnesium (Mg), aluminum
(Al),iron(Fe),titanium(Ti),manganese(Mn),rubidium(Rb),strontium(Sr),zirconium(Zr),barium(Ba),lanthanum(La),cerium
(Ce), neodymium (Nd), samarium (Sm), and lead (Pb) in glass samples.
1.3 This procedure is applicable to irregularly shaped samples as small as 200 micrograms, for the comparison of fragments of
a known source to the recovered fragments from a questioned source. These elements are present in soda lime and borosilicate
glass in ppb to % levels
1.4 This procedure is applicable to other elements, other types of glass, and other concentration ranges with appropriate
modificationsofthedigestionprocedure(ifneededforfullrecoveryoftheadditionalelements),calibrationstandardsandthemass
spectrometerconditions.Calciumandpotassium,forexample,couldbeaddedtothelistofanalytesinamodifiedanalysisscheme.
Alternative methods for the determination of concentrations of elements in glass are listed in the references.
1.5 For any given glass, approximately 40 elements are likely to be present at detectable concentrations using this procedure
with minor modifications. The element set stated here is an example of some of these elements that can be detected in glass and
used for forensic comparisons.
1.6 This guide cannot replace knowledge, skill, or ability acquired through appropriate education, training, and experience and
should be used in conjunction with sound professional judgment.
1.7 The values stated in SI units are to be regarded as standard. No other units of measurement are included in this standard.
1.8 This standard does not purport to address all of the safety concerns, if any, associated with its use. It is the responsibility
of the user of this standard to establish appropriate safety and health practices and determine the applicability of regulatory
limitations prior to use.
1
This test method is under the jurisdiction of ASTM Committee E30 on Forensic Sciences and is the direct responsibility of Subcommittee E30.01 on Criminalistics.
Current edition approved Aug. 1, 2004. Published August 2004. DOI: 10.1520/E2330-04.
Currentedit
...


Questions, Comments and Discussion
Ask us and Technical Secretary will try to provide an answer. You can facilitate discussion about the standard in here.