ASTM D1212-91(2020)
(Test Method)Standard Test Methods for Measurement of Wet Film Thickness of Organic Coatings
Standard Test Methods for Measurement of Wet Film Thickness of Organic Coatings
SIGNIFICANCE AND USE
4.1 Wet film thickness measurements aid in the prediction of dry film thickness. In instances where dry film thickness cannot be measured nondestructively, wet film thickness is frequently specified. Also, the ability to determine wet film thickness during application can provide the opportunity to correct the application procedures.
SCOPE
1.1 These test methods cover the determination of wet film thickness of organic coatings such as paint, varnish, and lacquer. Two methods are described as follows:
1.1.1 In Test Method A, the Wet Film Thickness Gage (English or Metric graduation (see 5.1)) is used to measure wet film thicknesses up to 60 mils on the English scale series, and up to 700 μm on the metric scale series (Sections 5 – 8).
1.1.2 In Test Method B, the Pfund Gage is used to measure wet film thicknesses up to 14.2 mils (360 μm) (Sections 9 – 13).
1.2 The values stated in SI units are to be regarded as the standard. The values given in parentheses are for information only.
1.3 This standard does not purport to address all of the safety concerns, if any, associated with its use. It is the responsibility of the user of this standard to establish appropriate safety, health, and environmental practices and determine the applicability of regulatory limitations prior to use.
1.4 This international standard was developed in accordance with internationally recognized principles on standardization established in the Decision on Principles for the Development of International Standards, Guides and Recommendations issued by the World Trade Organization Technical Barriers to Trade (TBT) Committee.
General Information
- Status
- Published
- Publication Date
- 31-May-2020
- Technical Committee
- D01 - Paint and Related Coatings, Materials, and Applications
- Drafting Committee
- D01.23 - Physical Properties of Applied Paint Films
Relations
- Effective Date
- 01-Jun-2020
- Effective Date
- 01-Dec-2017
- Effective Date
- 01-Nov-2012
- Effective Date
- 01-Jun-2007
- Effective Date
- 01-Jan-2001
- Effective Date
- 01-Jan-2001
- Effective Date
- 01-Jun-2020
- Effective Date
- 01-Jun-2020
- Effective Date
- 01-Jun-2020
- Effective Date
- 01-Jun-2020
- Effective Date
- 01-Jun-2020
- Effective Date
- 01-Jun-2020
- Effective Date
- 01-Jun-2020
- Effective Date
- 01-Jun-2020
- Effective Date
- 01-Jun-2020
Overview
ASTM D1212-91(2020), Standard Test Methods for Measurement of Wet Film Thickness of Organic Coatings, is a critical international standard established by ASTM International. This standard outlines consistent procedures for measuring the wet film thickness of organic coatings such as paints, varnishes, and lacquers on various substrates. Accurate measurement of wet film thickness is essential for predicting dry film thickness, which directly impacts product performance, appearance, and durability.
Two primary test methods are described:
- Test Method A: Utilizes a Wet Film Thickness Gage for measurements up to 60 mils (700 μm).
- Test Method B: Employs a Pfund Gage for more precise wet film thicknesses up to 14.2 mils (360 μm).
This standard supports the quality control of coating processes, enabling adjustments and corrections during application when nondestructive dry film inspection is impractical.
Key Topics
- Scope of Measurement: The standard applies to organic coatings including paint, varnish, and lacquer on rigid or commercial surfaces.
- Test Method A – Wet Film Thickness Gage:
- Measures thickness up to 60 mils (700 μm).
- Utilizes a gage with an eccentric and two concentric wheels to detect the wet film thickness at the point of contact.
- Several ranges and graduations ensure precision across different applications.
- Test Method B – Pfund Gage:
- Designed for thicknesses up to 14.2 mils (360 μm).
- Uses a convex lens to determine thickness by analyzing a spot created when pressed into the wet coating.
- Particularly useful for finer coatings requiring higher precision.
- Significance of Measurement:
- Assists in predicting dry film thickness, especially when direct, nondestructive measurement is impossible.
- Provides immediate feedback during application, allowing for real-time correction and optimization.
- Reporting and Precision:
- Recommends statistical methods to ensure repeatability and reproducibility.
- Precise test procedures help reduce variation both within and between laboratories.
Applications
The methods outlined in ASTM D1212-91(2020) are essential across numerous industries where organic coatings are applied, including:
- Manufacturing: Ensures coatings on metal, plastics, and composites meet quality specifications.
- Construction and Infrastructure: Verifies protective coatings on architectural components for durability and compliance.
- Automotive and Aerospace: Confirms that applied coatings provide the intended corrosion resistance and aesthetic qualities.
- Quality Control Laboratories: Provides standardized procedures for coating manufacturers and end-users.
- Field Inspections: Used in maintenance and inspection scenarios where onsite non-destructive dry film measurements are not feasible.
By standardizing wet film thickness measurement, this ASTM test method ensures consistency in coating performance and compliance with regulatory or contractual requirements.
Related Standards
- ASTM D823 – Practices for Producing Films of Uniform Thickness of Paint, Coatings and Related Products on Test Panels
- ISO 2808 – Paints and Varnishes - Determination of film thickness
- ISO 19840 – Paints and varnishes – Corrosion protection of steel structures by protective paint systems – Measurement of, and acceptance criteria for, the thickness of dry films on rough surfaces
Summary
The adoption of ASTM D1212-91(2020) ensures reliable, repeatable, and accurate measurement of wet film thickness in organic coatings, improving quality control and enabling effective process adjustments. Organizations benefit from standardized procedures that guarantee coatings meet both functional and aesthetic standards, supporting compliance across global supply chains and application scenarios.
Buy Documents
ASTM D1212-91(2020) - Standard Test Methods for Measurement of Wet Film Thickness of Organic Coatings
Get Certified
Connect with accredited certification bodies for this standard

DVS-ZERT GmbH
German welding certification society.

CARES (UK Certification Authority for Reinforcing Steels)
UK certification for reinforcing steels and construction.

EWF/IIW (European/International Welding Federation)
International welding personnel certification.
Sponsored listings
Frequently Asked Questions
ASTM D1212-91(2020) is a standard published by ASTM International. Its full title is "Standard Test Methods for Measurement of Wet Film Thickness of Organic Coatings". This standard covers: SIGNIFICANCE AND USE 4.1 Wet film thickness measurements aid in the prediction of dry film thickness. In instances where dry film thickness cannot be measured nondestructively, wet film thickness is frequently specified. Also, the ability to determine wet film thickness during application can provide the opportunity to correct the application procedures. SCOPE 1.1 These test methods cover the determination of wet film thickness of organic coatings such as paint, varnish, and lacquer. Two methods are described as follows: 1.1.1 In Test Method A, the Wet Film Thickness Gage (English or Metric graduation (see 5.1)) is used to measure wet film thicknesses up to 60 mils on the English scale series, and up to 700 μm on the metric scale series (Sections 5 – 8). 1.1.2 In Test Method B, the Pfund Gage is used to measure wet film thicknesses up to 14.2 mils (360 μm) (Sections 9 – 13). 1.2 The values stated in SI units are to be regarded as the standard. The values given in parentheses are for information only. 1.3 This standard does not purport to address all of the safety concerns, if any, associated with its use. It is the responsibility of the user of this standard to establish appropriate safety, health, and environmental practices and determine the applicability of regulatory limitations prior to use. 1.4 This international standard was developed in accordance with internationally recognized principles on standardization established in the Decision on Principles for the Development of International Standards, Guides and Recommendations issued by the World Trade Organization Technical Barriers to Trade (TBT) Committee.
SIGNIFICANCE AND USE 4.1 Wet film thickness measurements aid in the prediction of dry film thickness. In instances where dry film thickness cannot be measured nondestructively, wet film thickness is frequently specified. Also, the ability to determine wet film thickness during application can provide the opportunity to correct the application procedures. SCOPE 1.1 These test methods cover the determination of wet film thickness of organic coatings such as paint, varnish, and lacquer. Two methods are described as follows: 1.1.1 In Test Method A, the Wet Film Thickness Gage (English or Metric graduation (see 5.1)) is used to measure wet film thicknesses up to 60 mils on the English scale series, and up to 700 μm on the metric scale series (Sections 5 – 8). 1.1.2 In Test Method B, the Pfund Gage is used to measure wet film thicknesses up to 14.2 mils (360 μm) (Sections 9 – 13). 1.2 The values stated in SI units are to be regarded as the standard. The values given in parentheses are for information only. 1.3 This standard does not purport to address all of the safety concerns, if any, associated with its use. It is the responsibility of the user of this standard to establish appropriate safety, health, and environmental practices and determine the applicability of regulatory limitations prior to use. 1.4 This international standard was developed in accordance with internationally recognized principles on standardization established in the Decision on Principles for the Development of International Standards, Guides and Recommendations issued by the World Trade Organization Technical Barriers to Trade (TBT) Committee.
ASTM D1212-91(2020) is classified under the following ICS (International Classification for Standards) categories: 25.220.60 - Organic coatings. The ICS classification helps identify the subject area and facilitates finding related standards.
ASTM D1212-91(2020) has the following relationships with other standards: It is inter standard links to ASTM D1212-91(2013), ASTM D823-17, ASTM D823-95(2012), ASTM D823-95(2007), ASTM D823-95(2001), ASTM D823-95, ASTM E1797-12(2017)e1, ASTM D823-18(2022), ASTM D7377-09(2018), ASTM D6577-15(2019), ASTM D7538-09(2018), ASTM D1014-18, ASTM D6669-19, ASTM D6803-19, ASTM E1796-20. Understanding these relationships helps ensure you are using the most current and applicable version of the standard.
ASTM D1212-91(2020) is available in PDF format for immediate download after purchase. The document can be added to your cart and obtained through the secure checkout process. Digital delivery ensures instant access to the complete standard document.
Standards Content (Sample)
This international standard was developed in accordance with internationally recognized principles on standardization established in the Decision on Principles for the
Development of International Standards, Guides and Recommendations issued by the World Trade Organization Technical Barriers to Trade (TBT) Committee.
Designation: D1212 − 91 (Reapproved 2020)
Standard Test Methods for
Measurement of Wet Film Thickness of Organic Coatings
This standard is issued under the fixed designation D1212; the number immediately following the designation indicates the year of
original adoption or, in the case of revision, the year of last revision. A number in parentheses indicates the year of last reapproval. A
superscript epsilon (´) indicates an editorial change since the last revision or reapproval.
1. Scope film thickness is determined as quickly as possible to reduce
shrinkage due to solvent loss.
1.1 These test methods cover the determination of wet film
thickness of organic coatings such as paint, varnish, and 3.2 In Test Method A, a gage with one eccentric and two
lacquer. Two methods are described as follows: concentricwheelsisrolledoverthesurfaceandthepointwhere
1.1.1 In Test Method A, the Wet Film Thickness Gage the eccentric wheel first touches the wet film is determined.
(English or Metric graduation (see 5.1)) is used to measure wet
3.3 InTest Method B, a gage with a convex lower surface is
film thicknesses up to 60 mils on the English scale series, and
pushed into the wet film until the center touches the substrate.
up to 700 µm on the metric scale series (Sections5–8).
The diameter of the spot of wet coating left on the convex
1.1.2 In Test Method B, the Pfund Gage is used to measure
surface is measured and the film thickness calculated from the
wet film thicknesses up to 14.2 mils (360 µm) (Sections9–
diameter of the spot and the radius of curvature.
13).
4. Significance and Use
1.2 The values stated in SI units are to be regarded as the
standard. The values given in parentheses are for information
4.1 Wet film thickness measurements aid in the prediction
only.
of dry film thickness. In instances where dry film thickness
1.3 This standard does not purport to address all of the cannot be measured nondestructively, wet film thickness is
frequently specified. Also, the ability to determine wet film
safety concerns, if any, associated with its use. It is the
responsibility of the user of this standard to establish appro- thickness during application can provide the opportunity to
correct the application procedures.
priate safety, health, and environmental practices and deter-
mine the applicability of regulatory limitations prior to use.
1.4 This international standard was developed in accor-
TEST METHOD A
dance with internationally recognized principles on standard-
ization established in the Decision on Principles for the
5. Apparatus
Development of International Standards, Guides and Recom-
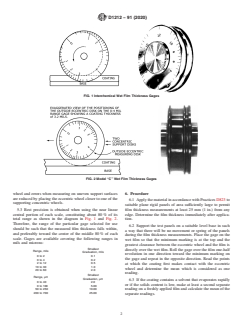
5.1 WetFilmThicknessGage—Two versions of the gage are
mendations issued by the World Trade Organization Technical
now in use: The original design as shown in Fig. 1 and a later
Barriers to Trade (TBT) Committee.
designasshowninFig.2.Bothdesignsconsistsofaneccentric
2. Referenced Documents
center wheel supported by two concentric wheels so as to
provide two scales that are bilaterallysymmetrical.As the gage
2.1 ASTM Standards:
is rolled on the film, there is a change in clearance between the
D823 Practices for Producing Films of Uniform Thickness
wet film and the eccentric wheel. The point at which the film
of Paint, Coatings and Related Products on Test Panels
first touches the center wheel measures the thickness of the
3. Summary of Test Methods
film.
3.1 The material is applied in the laboratory to plane, rigid
5.2 The later design shown in Fig. 2, moves the eccentric
test panels or in the field to the surface being coated. The wet
wheel from between the concentric wheels, as shown in Fig. 1,
to the outside of the gage and closer to one of the concentric
These test methods are under the jurisdiction of ASTM Committee D01 on
wheels. Gage reading errors of parallax across the gage are
Paint and Related Coatings, Materials, and Applications and are the direct
eliminatedasthetwoscalesareplaceddirectlyontheeccentric
responsibility of Subcommittee D01.23 on Physical Properties of Applied Paint
Films.
Current edition approved June 1, 2020. Published June 2020. Originally
approved in 1952. Last previous edition approved in 2013 as D1212 – 91 (2013). Both versions of this gage (Interchemical (INMONT) and Model “C”) are
DOI: 10.1520/D1212-91R20. covered by U.S. Patents 2 507 592 and 3 128 558 and are issued to Maynard R.
For referenced ASTM standards, visit the ASTM website, www.astm.org, or Euverard. Interested parties are invited to submit information regarding the
contact ASTM Customer Service at service@astm.org. For Annual Book of ASTM identification of acceptable alternatives to this patented item to the Committee on
Standards volume information, refer to the standard’s Document Summary page on Standards, ASTM Headquarters. Your comments will receive careful consideration
the ASTM website. at a meeting of the responsible technical committee, which you may attend.
Copyright © ASTM International, 100 Barr Harbor Drive, PO Box C700, West Conshohocken, PA 19428-2959. United States
D1212 − 91 (2020)
FIG. 1 Interchemical Wet Film Thickness Gages
FIG. 2 Model “C” Wet Film Thickness Gages
wheel and errors when measuring on uneven support surfaces 6. Procedure
are reduced by placing the eccentric wheel closer to one of the
6.1 ApplythematerialinaccordancewithPracticesD823to
supporting concentric wheels.
suitable plane rigid panels of area sufficiently large to permit
5.3 Best precision is obtained when using the near linear film thickness measurements at least 25 mm (1 in.) from any
central portion of each scale, constituting about 80 % of its edge. Determine the film thickness immediately after applica-
total range as shown in the diagram in Fig. 1 and Fig. 2. tion.
Therefore, the range of the particular gage selected for use
6.2 Support the test panels on a suitable level base in such
should be such that the measured film thickness falls within,
a way that there will be no movement or spring of the panels
and preferably toward the center of the middle 80 % of each
during the film thickness measurements. Place the gage on the
scale. Gages are available covering the following ranges in
wet film so that the minimum marking is at the top and the
mils and microns:
greatest clearance between the eccentric wheel and the film is
Smallest
directly over the wet film. Roll the gage over the film one-half
Range, mils
Graduation, mils
revolution in one direction toward the minimum marking on
0to2 0.1
the gage and repeat in the opposite direction. Read the points
0to4 0.2
2to12 0.5
at which the coating first makes contact with the eccentric
10 to 30 1.0
wheel and determine the mean which is considered as one
20 to 60 2.0
reading.
Smallest
Range, µm
Graduation, µm
6.3 If the coating contains a solvent that evaporates rapidly
0to40 2.0
or if the solids content is low, make at least a second separate
0 to 100 5.00
50 to 250 10.00 reading on a freshly applied film and calculate the mean of the
200 to 700 25.00
separate readings.
D1212 − 91 (2020)
7. Report
7.1 Report the mean of the separate readings and the range
and smallest graduation of the gage used.
8. Precision
8.1 In an interlaboratory study of this test method, in which
two ope
...


Questions, Comments and Discussion
Ask us and Technical Secretary will try to provide an answer. You can facilitate discussion about the standard in here.
Loading comments...