ASTM E1382-97(2023)
(Test Method)Standard Test Methods for Determining Average Grain Size Using Semiautomatic and Automatic Image Analysis
Standard Test Methods for Determining Average Grain Size Using Semiautomatic and Automatic Image Analysis
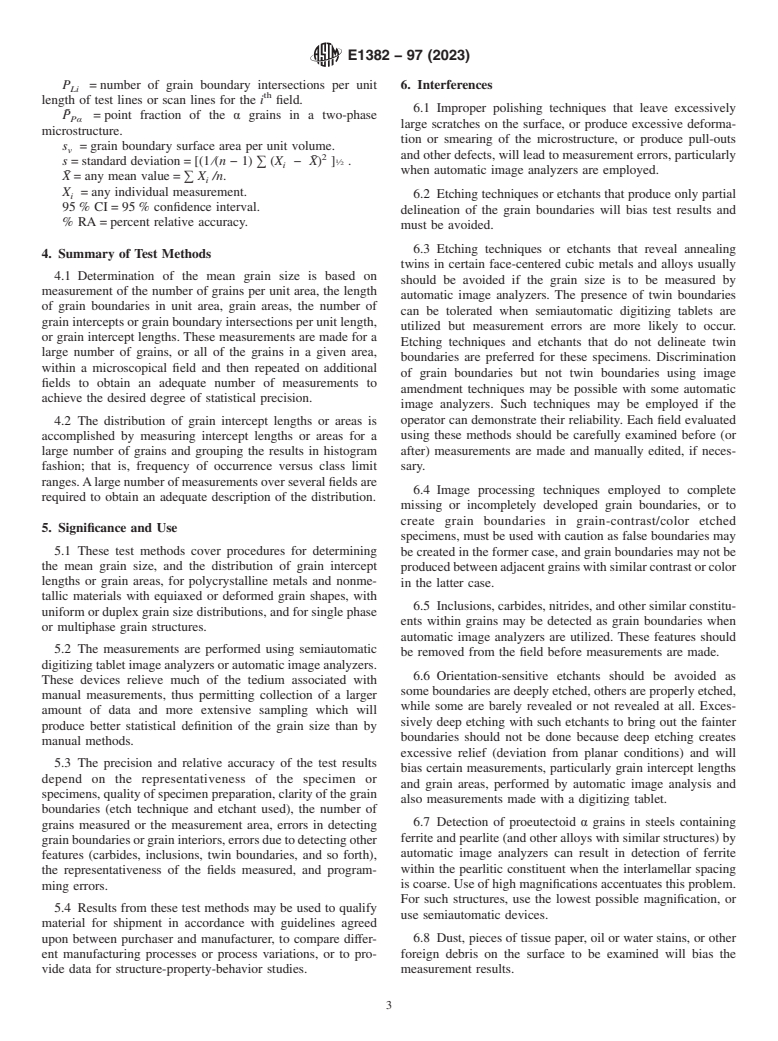
SIGNIFICANCE AND USE
5.1 These test methods cover procedures for determining the mean grain size, and the distribution of grain intercept lengths or grain areas, for polycrystalline metals and nonmetallic materials with equiaxed or deformed grain shapes, with uniform or duplex grain size distributions, and for single phase or multiphase grain structures.
5.2 The measurements are performed using semiautomatic digitizing tablet image analyzers or automatic image analyzers. These devices relieve much of the tedium associated with manual measurements, thus permitting collection of a larger amount of data and more extensive sampling which will produce better statistical definition of the grain size than by manual methods.
5.3 The precision and relative accuracy of the test results depend on the representativeness of the specimen or specimens, quality of specimen preparation, clarity of the grain boundaries (etch technique and etchant used), the number of grains measured or the measurement area, errors in detecting grain boundaries or grain interiors, errors due to detecting other features (carbides, inclusions, twin boundaries, and so forth), the representativeness of the fields measured, and programming errors.
5.4 Results from these test methods may be used to qualify material for shipment in accordance with guidelines agreed upon between purchaser and manufacturer, to compare different manufacturing processes or process variations, or to provide data for structure-property-behavior studies.
SCOPE
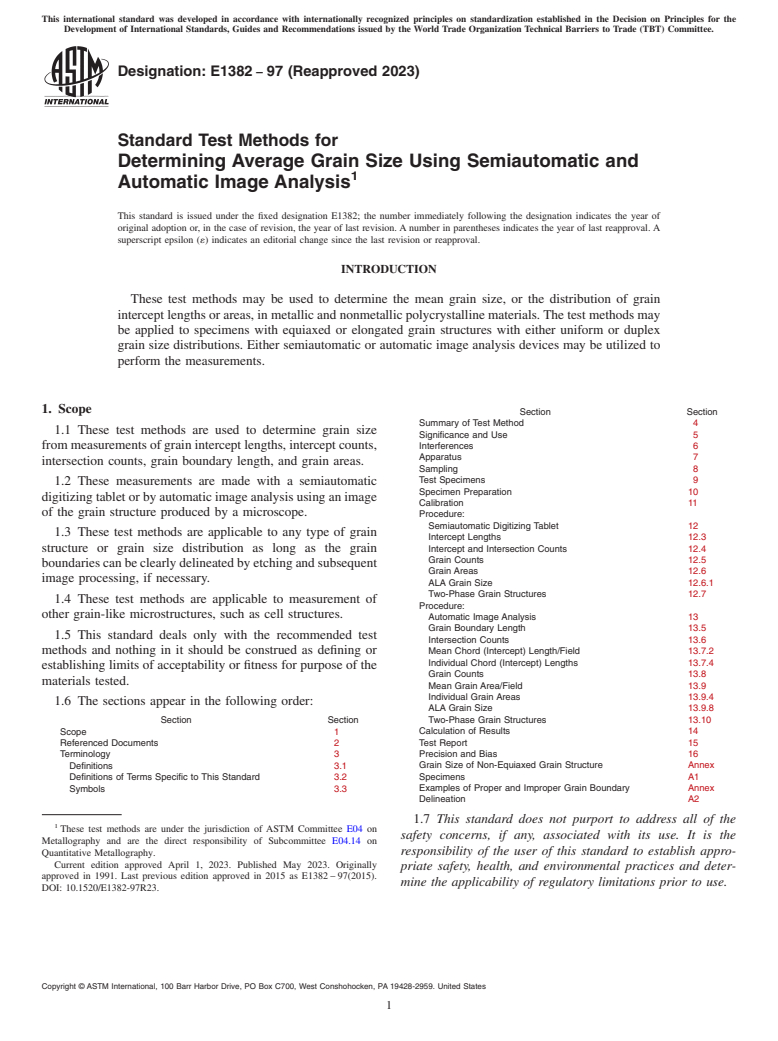
1.1 These test methods are used to determine grain size from measurements of grain intercept lengths, intercept counts, intersection counts, grain boundary length, and grain areas.
1.2 These measurements are made with a semiautomatic digitizing tablet or by automatic image analysis using an image of the grain structure produced by a microscope.
1.3 These test methods are applicable to any type of grain structure or grain size distribution as long as the grain boundaries can be clearly delineated by etching and subsequent image processing, if necessary.
1.4 These test methods are applicable to measurement of other grain-like microstructures, such as cell structures.
1.5 This standard deals only with the recommended test methods and nothing in it should be construed as defining or establishing limits of acceptability or fitness for purpose of the materials tested.
1.6 The sections appear in the following order:
Section
Section
Scope
1
Referenced Documents
2
Terminology
3
Definitions
3.1
Definitions of Terms Specific to This Standard
3.2
Symbols
3.3
Summary of Test Method
4
Significance and Use
5
Interferences
6
Apparatus
7
Sampling
8
Test Specimens
9
Specimen Preparation
10
Calibration
11
Procedure:
Semiautomatic Digitizing Tablet
12
Intercept Lengths
12.3
Intercept and Intersection Counts
12.4
Grain Counts
12.5
Grain Areas
12.6
ALA Grain Size
12.6.1
Two-Phase Grain Structures
12.7
Procedure:
Automatic Image Analysis
13
Grain Boundary Length
13.5
Intersection Counts
13.6
Mean Chord (Intercept) Length/Field
13.7.2
Individual Chord (Intercept) Lengths
13.7.4
Grain Counts
13.8
Mean Grain Area/Field
13.9
Individual Grain Areas
13.9.4
ALA Grain Size
13.9.8
Two-Phase Grain Structures
13.10
Calculation of Results
14
Test Report
15
Precision and Bias
16
Grain Size of Non-Equiaxed Grain Structure Specimens
Annex A1
Examples of Proper and Improper Grain Boundary Delineation
Annex A2
1.7 This standard does not purport to address all of the safety concerns, if any, associated with its use. It is the responsibility of the user of this standard to establish appropriate safety, health, and environmental pra...
General Information
Standards Content (Sample)
This international standard was developed in accordance with internationally recognized principles on standardization established in the Decision on Principles for the
Development of International Standards, Guides and Recommendations issued by the World Trade Organization Technical Barriers to Trade (TBT) Committee.
Designation: E1382 − 97 (Reapproved 2023)
Standard Test Methods for
Determining Average Grain Size Using Semiautomatic and
1
Automatic Image Analysis
This standard is issued under the fixed designation E1382; the number immediately following the designation indicates the year of
original adoption or, in the case of revision, the year of last revision. A number in parentheses indicates the year of last reapproval. A
superscript epsilon (´) indicates an editorial change since the last revision or reapproval.
INTRODUCTION
These test methods may be used to determine the mean grain size, or the distribution of grain
intercept lengths or areas, in metallic and nonmetallic polycrystalline materials. The test methods may
be applied to specimens with equiaxed or elongated grain structures with either uniform or duplex
grain size distributions. Either semiautomatic or automatic image analysis devices may be utilized to
perform the measurements.
1. Scope
Section Section
Summary of Test Method 4
1.1 These test methods are used to determine grain size
Significance and Use 5
from measurements of grain intercept lengths, intercept counts, Interferences 6
Apparatus 7
intersection counts, grain boundary length, and grain areas.
Sampling 8
Test Specimens 9
1.2 These measurements are made with a semiautomatic
Specimen Preparation 10
digitizing tablet or by automatic image analysis using an image
Calibration 11
of the grain structure produced by a microscope.
Procedure:
Semiautomatic Digitizing Tablet 12
1.3 These test methods are applicable to any type of grain
Intercept Lengths 12.3
structure or grain size distribution as long as the grain Intercept and Intersection Counts 12.4
Grain Counts 12.5
boundaries can be clearly delineated by etching and subsequent
Grain Areas 12.6
image processing, if necessary.
ALA Grain Size 12.6.1
Two-Phase Grain Structures 12.7
1.4 These test methods are applicable to measurement of
Procedure:
other grain-like microstructures, such as cell structures.
Automatic Image Analysis 13
Grain Boundary Length 13.5
1.5 This standard deals only with the recommended test
Intersection Counts 13.6
methods and nothing in it should be construed as defining or Mean Chord (Intercept) Length/Field 13.7.2
Individual Chord (Intercept) Lengths 13.7.4
establishing limits of acceptability or fitness for purpose of the
Grain Counts 13.8
materials tested.
Mean Grain Area/Field 13.9
Individual Grain Areas 13.9.4
1.6 The sections appear in the following order:
ALA Grain Size 13.9.8
Two-Phase Grain Structures 13.10
Section Section
Scope 1 Calculation of Results 14
Test Report 15
Referenced Documents 2
Terminology 3 Precision and Bias 16
Grain Size of Non-Equiaxed Grain Structure Annex
Definitions 3.1
Definitions of Terms Specific to This Standard 3.2 Specimens A1
Examples of Proper and Improper Grain Boundary Annex
Symbols 3.3
Delineation A2
1.7 This standard does not purport to address all of the
1
These test methods are under the jurisdiction of ASTM Committee E04 on
safety concerns, if any, associated with its use. It is the
Metallography and are the direct responsibility of Subcommittee E04.14 on
responsibility of the user of this standard to establish appro-
Quantitative Metallography.
Current edition approved April 1, 2023. Published May 2023. Originally
priate safety, health, and environmental practices and deter-
approved in 1991. Last previous edition approved in 2015 as E1382 – 97(2015).
mine the applicability of regulatory limitations prior to use.
DOI: 10.1520/E1382-97R23.
Copyright © ASTM International, 100 Barr Harbor Drive, PO Box C700, West Conshohocken, PA 19428-2959. United States
1
---------------------- Page: 1 ----------------------
E1382 − 97 (2023)
1.8 This international standard was developed in accor- 3.2.6 watershed segmentation—an iterative image amend-
dance with internationally recognized principles on standard- ment procedure in which each grain, or other features, is
ization established in the Decision on Principles for the
eroded to a single pixel, without loosing that pixel (''ultimate
Development of International Standards, Guides and Recom-
erosion”); this is followed by dilation without touching to
mendations issued by the World Trade Organization Technical
rebuild the grain structure with a very thin line (grain bound-
Barriers to Trade (TBT) Committee.
aries) separating each grain.
3.3 Symbols:
2. Referenced Documents
α = the phase of interest for grain size measurement in a
2
2.1 ASTM Standards:
two-phase (constituent) microstructure.
E3 Guide for Preparation of Metallographic Specimens
¯
A = average area of α grains in a two-phase (constituent)
α
E7 Terminology Relating to
...


Questions, Comments and Discussion
Ask us and Technical Secretary will try to provide an answer. You can facilitate discussion about the standard in here.