ASTM D1494-97(2008)e1
(Test Method)Standard Test Method for Diffuse Light Transmission Factor of Reinforced Plastics Panels
Standard Test Method for Diffuse Light Transmission Factor of Reinforced Plastics Panels
SIGNIFICANCE AND USE
The purpose of this test method is to obtain the diffuse light transmittance factor of both flat and corrugated translucent building panels by the use of simple apparatus and by employing as a light source a combination of fluorescent tubes whose energy distribution closely approximates CIE Source C.
SCOPE
1.1 This test method covers the determination of the diffuse light transmission factor of translucent reinforced plastics building panels.
1.2 The values stated in SI units are to be regarded as the standard. The values given in the parentheses are for information only.
1.3 The text of this standard references notes and footnotes which provide explanatory material. These notes and footnotes (excluding those in Tables and Figures) shall not be considered as requirements of this standard.
1.4 This standard does not purport to address all of the safety concerns, if any, associated with its use. It is the responsibility of the user of this standard to establish appropriate safety and health practices and determine the applicability of regulatory limitations prior to use.
Note 1—There is no know ISO equivalent to this standard..
General Information
Relations
Standards Content (Sample)
NOTICE: This standard has either been superseded and replaced by a new version or withdrawn.
Contact ASTM International (www.astm.org) for the latest information
´1
Designation: D1494 − 97(Reapproved 2008) An American National Standard
Standard Test Method for
Diffuse Light Transmission Factor of Reinforced Plastics
Panels
This standard is issued under the fixed designation D1494; the number immediately following the designation indicates the year of
original adoption or, in the case of revision, the year of last revision. A number in parentheses indicates the year of last reapproval. A
superscript epsilon (´) indicates an editorial change since the last revision or reapproval.
This standard has been approved for use by agencies of the Department of Defense.
´ NOTE—Editorial changes were made throughout in April 2008.
1. Scope* Determine the Precision of a Test Method
2.2 ASTM Adjuncts:
1.1 This test method covers the determination of the diffuse
Test Cabinet for Diffuse Light Transmission Factor of
light transmission factor of translucent reinforced plastics
Reinforced Panels
building panels.
1.2 The values stated in SI units are to be regarded as the
3. Terminology
standard. The values given in the parentheses are for informa-
3.1 General—Definitions are in accordance with Terminol-
tion only.
ogy D883 and abbreviations with Terminology D1600, unless
1.3 The text of this standard references notes and footnotes
otherwise indicated.
which provide explanatory material. These notes and footnotes
(excluding those inTables and Figures) shall not be considered
4. Significance and Use
as requirements of this standard.
4.1 The purpose of this test method is to obtain the diffuse
1.4 This standard does not purport to address all of the
light transmittance factor of both flat and corrugated translu-
safety concerns, if any, associated with its use. It is the
cent building panels by the use of simple apparatus and by
responsibility of the user of this standard to establish appro-
employing as a light source a combination of fluorescent tubes
priate safety and health practices and determine the applica-
whose energy distribution closely approximates CIE Source C.
bility of regulatory limitations prior to use.
5. Apparatus
NOTE 1—There is no know ISO equivalent to this standard.
5.1 The apparatus for this test method shall consist of a
2. Referenced Documents
transmissometer, Fig. 1, comprising essentially the following:
5.1.1 LightSource—Theilluminationshallconsistoftwelve
2.1 ASTM Standards:
20-W fluorescent tubes which are assembled in three banks of
C618 Specification for Coal Fly Ash and Raw or Calcined
four tubes each, according to the following schedule: daylight,
Natural Pozzolan for Use in Concrete
deluxe cool white, blue, and daylight.
D883 Terminology Relating to Plastics
5.1.2 Photometer—The photometer shall consist of a pho-
D1600 Terminology forAbbreviatedTerms Relating to Plas-
tocell and of a galvanometer. The photocell shall be of the
tics
barrier-layer type and shall contain a visual correction filter.
D4968 Guide for Annual Review of Test Methods and
The assembly preferably should be hermetically sealed into
Specifications for Plastics
plastic as a protection against moisture. The indicating galva-
E691 Practice for Conducting an Interlaboratory Study to
nometer should contain one scale graduated from 0 to 100, and
a circuit with sufficient variable resistance so that the sensitiv-
ity of the photometer can be adjusted over the range of 50 to
This test method is under the jurisdiction ofASTM Committee D20 on Plastics
and is the direct responsibility of Subcommittee D20.24 on Plastic Building 100 footcandles.
Products.
5.1.3 Test Cabinet, constructed in accordance with the
Current edition approved March 1, 2008. Published April 2008. Originally 3
following dimensions.
´1
approved in 1957. Last previous edition approved in 2001 as D1494 – 00 . DOI:
10.1520/D1494-97R08E01.
For referenced ASTM standards, visit the ASTM website, www.astm.org, or
contact ASTM Customer Service at service@astm.org. For Annual Book of ASTM Detailed working drawings and a bill of materials for this equipment can be
Standards volume information, refer to the standard’s Document Summary page on obtained at a nominal charge fromASTM Headquarters, 100 Barr Harbor Drive, PO
the ASTM website. Box C700, West Conshohocken, PA 19428–2959. Order Adjunct: ADJD1494.
*A Summary of Changes section appears at the end of this standard
Copyright © ASTM International, 100 Barr Harbor Drive, PO Box C700, West Conshohocken, PA 19428-2959. United States
´1
D1494 − 97 (2008)
Metric Equivalents
in. mm in. mm in. mm in. mm
1 3 3 3
⁄32 0.8 ⁄4 19.1 8 ⁄4 222 24 ⁄4 634
3 1 3 1
⁄16 4.8 1 ⁄4 31.8 9 ⁄4 248 25 ⁄2 648
7 1
⁄37 5.6 1 ⁄2 38.1 12 305 28 711
1 1
⁄4 6.4 2 50.8 14 356 29 ⁄2 749
9 3 1
⁄32 7.1 6 ⁄4 172 24 610 38 ⁄2 978
⁄8 9.5
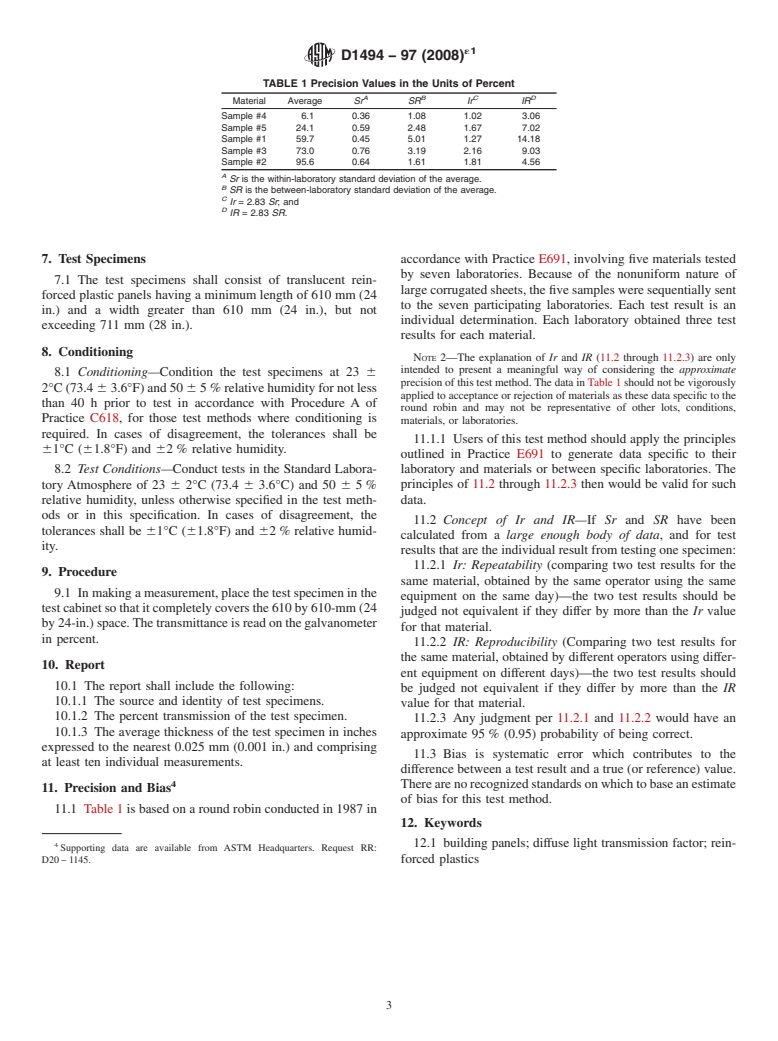
FIG. 1 Assembly Drawing of Transmissometer
5.1.3.1 The transmitted area of the test specimen shall be bottom of the test specimen to the bottom of the masking plate
3 1
610.0 6 1.6 mm by 610.0 6 1.6 mm (24 6 ⁄16 in. by 24 6 shall be 233.0 6 0.8 mm (9 ⁄4 6 ⁄32 in.).
⁄16 in.).
5.1.3.2 The distance from the bottom of the fluorescent
6. Standardization of Transmissometer
tubes to the bottom of the test specimen shall be 203.0 6 0.8
6.1 Center the photocell beneath the 31.8-mm (1 ⁄4-in.)
mm (8 6 ⁄32 in.).
diameter hole in the bottom masking plate. Place the galva-
5.1.3.3 A 4.8-mm ( ⁄16-in.) thick, white, standard outdoor,
nometer in a flat level position. Ensure that no current flows in
translucent diffusing plate shall be placed between the light
the electrical circuit by opening the circuit.Adjust the position
source and the test specimen so that the distance from the
of the indicating needle on the galvanometer to read “0’’ by
bottom of the diffusing plate to the bottom of the test specimen
1 1
means of the zero adjustment knob. Close the galvanometer
is 31.8 6 0.8 mm (1 ⁄4 6 ⁄32 in.).
circuit. Turn on the illumination in the transmissometer. Wait a
5.1.3.4 The photocell shall be positioned below the center
axis of the test specimen so that the distance from the bottom minimum of 20 min to permit the transmissometer to reach
of the specimen to the top of the cell is 283.0 6 0.8 mm (11 ⁄
...


Questions, Comments and Discussion
Ask us and Technical Secretary will try to provide an answer. You can facilitate discussion about the standard in here.