ASTM D3762-03(2010)
(Test Method)Standard Test Method for Adhesive-Bonded Surface Durability of Aluminum (Wedge Test) (Withdrawn 2019)
Standard Test Method for Adhesive-Bonded Surface Durability of Aluminum (Wedge Test) (Withdrawn 2019)
SIGNIFICANCE AND USE
The test is primarily qualitative, but is very discriminating in determining variations in adherend surface preparation parameters and adhesive environmental durability. The test has found application in controlling surface preparation operations and in screening surface preparations, primer and adhesive systems for durability. In addition to determining crack growth rate and assigning a value to it, the adhesive–joint failure is evaluated and reported. For example, adhesion failure; cohesion failure; or adherend failure are noted after opening up the specimen at the conclusion of the test period.
SCOPE
1.1 This test method , simulates in a qualitative manner the forces and effects on an adhesive bond joint at metal-adhesive/primer interface. It has proven to be highly reliable in determining and predicting the environmental durability of adherend surface preparations. The method has proven to be correlatable with service performance in a manner that is much more reliable than conventional lap shear or peel tests (Note 2).
Note 1—While this test method is intended for use in aluminum-to-aluminum applications it may be used for determining surface durability of other metals and plastics provided consideration is given to thickness and rigidity of the adherends.
Note 2—This test method is not a quantitative fracture strength test method. To measure fracture strength see Test Method D3433.
1.2 The values stated in SI units are to be regarded as the standard. The values given in parentheses are for information only.
1.3 This standard does not purport to address all of the safety concerns, if any, associated with its use. It is the responsibility of the user of this standard to establish appropriate safety and health practices and determine the applicability of regulatory limitations prior to use.
WITHDRAWN RATIONALE
This test method simulates in a qualitative manner the forces and effects on an adhesive bond joint at metal-adhesive/primer interface. It has proven to be highly reliable in determining and predicting the environmental durability of adherend surface preparations. The method has proven to be correlatable with service performance in a manner that is much more reliable than conventional lap shear or peel tests
Formerly under the jurisdiction of Committee D14 on Adhesives, this test method was withdrawn in July 2019 in accordance with section 10.6.3 of the Regulations Governing ASTM Technical Committees, which requires that standards shall be updated by the end of the eighth year since the last approval date.
General Information
Relations
Standards Content (Sample)
NOTICE: This standard has either been superseded and replaced by a new version or withdrawn.
Contact ASTM International (www.astm.org) for the latest information
Designation: D3762 − 03 (Reapproved 2010)
Standard Test Method for
Adhesive-Bonded Surface Durability of Aluminum (Wedge
Test)
This standard is issued under the fixed designation D3762; the number immediately following the designation indicates the year of
original adoption or, in the case of revision, the year of last revision. A number in parentheses indicates the year of last reapproval. A
superscript epsilon (´) indicates an editorial change since the last revision or reapproval.
1. Scope D3433 Test Method for Fracture Strength in Cleavage of
2,3 Adhesives in Bonded Metal Joints
1.1 This test method simulates in a qualitative manner the
forces and effects on an adhesive bond joint at metal-adhesive/
3. Terminology
primer interface. It has proven to be highly reliable in deter-
3.1 Definitions—Many of the terms used in this test method
mining and predicting the environmental durability of adher-
are defined in Terminology D907.
end surface preparations. The method has proven to be
correlatable with service performance in a manner that is much
4. Summary of Test Method
morereliablethanconventionallapshearorpeeltests(Note2).
4.1 A wedge is forced into the bondline of a flat-bonded
NOTE 1—While this test method is intended for use in aluminum-to-
aluminum specimen, thereby creating a tensile stress in the
aluminum applications it may be used for determining surface durability
of other metals and plastics provided consideration is given to thickness
region of the resulting crack tip. The stressed specimen is
and rigidity of the adherends.
exposed to an aqueous environment, usually at an elevated
temperature, or to an appropriate environment relative to the
NOTE 2—This test method is not a quantitative fracture strength test
method. To measure fracture strength see Test Method D3433.
use of the bonded structure. The resulting crack growth with
time and failure modes are then evaluated. Variations in
1.2 The values stated in SI units are to be regarded as the
adherend surface quality are easily observable when the
standard. The values given in parentheses are for information
specimens are forcibly, if necessary, opened at the test conclu-
only.
sion.
1.3 This standard does not purport to address all of the
safety concerns, if any, associated with its use. It is the
5. Significance and Use
responsibility of the user of this standard to establish appro-
5.1 The test is primarily qualitative, but is very discriminat-
priate safety and health practices and determine the applica-
ing in determining variations in adherend surface preparation
bility of regulatory limitations prior to use.
parameters and adhesive environmental durability.The test has
found application in controlling surface preparation operations
2. Referenced Documents
and in screening surface preparations, primer and adhesive
2.1 ASTM Standards:
systems for durability. In addition to determining crack growth
D907 Terminology of Adhesives
rate and assigning a value to it, the adhesive–joint failure is
evaluated and reported. For example, adhesion failure; cohe-
sion failure; or adherend failure are noted after opening up the
This test method is under the jurisdiction of ASTM Committee D14 on
specimen at the conclusion of the test period.
Adhesives and is the direct responsibility of Subcommittee D14.80 on Metal
Bonding Adhesives.
Current edition approved Oct. 1, 2010. Published October 2010. Originally 6. Apparatus
approved in 1979. Last previous edition approved in 2003 as D3762 – 03. DOI:
6.1 Magnifier (preferably stereo binocular), 5 to 30-power.
10.1520/D3762-03R10.
Marceau, J. A., Moji, Y., and McMillan, J. C., “A Wedge Test for Evaluating
6.2 Marking Stylus, sharp-pointed, or triangular file.
Adhesive Bonded Surface Durability,” 21st SAMPE Symposium, Vol 21,April 6–8,
1976.
6.3 Wedges, aluminum or stainless steel.
Scardino, W. M., Marceau J.A., “Comparative Stressed Durability ofAdhesive
Bonded Aluminum Alloy Joints,” Symposium on Durability of Adhesive Bonded NOTE 3—Wedges are preferably of the same composition as the
Structures, U. S.ArmyArmament Research and Development Command, Dover, N. adherends of the specimen being tested to reduce the possibility of
J. Oct, 27–29, 1976.
electrolytic corrosion. Stainless steel wedges have been found to work
For referenced ASTM standards, visit the ASTM website, www.astm.org, or
well with many adherends and are very durable and reuseable.
contact ASTM Customer Service at service@astm.org. For Annual Book of ASTM
6.4 Scale, small, graduated in millimetres or hundredths of
Standards volume information, refer to the standard’s Document Summary page on
the ASTM website. an inch.
Copyright © ASTM International, 100 Barr Harbor Drive, PO Box C700, West Conshohocken, PA 19428-2959. United States
D3762 − 03 (2010)
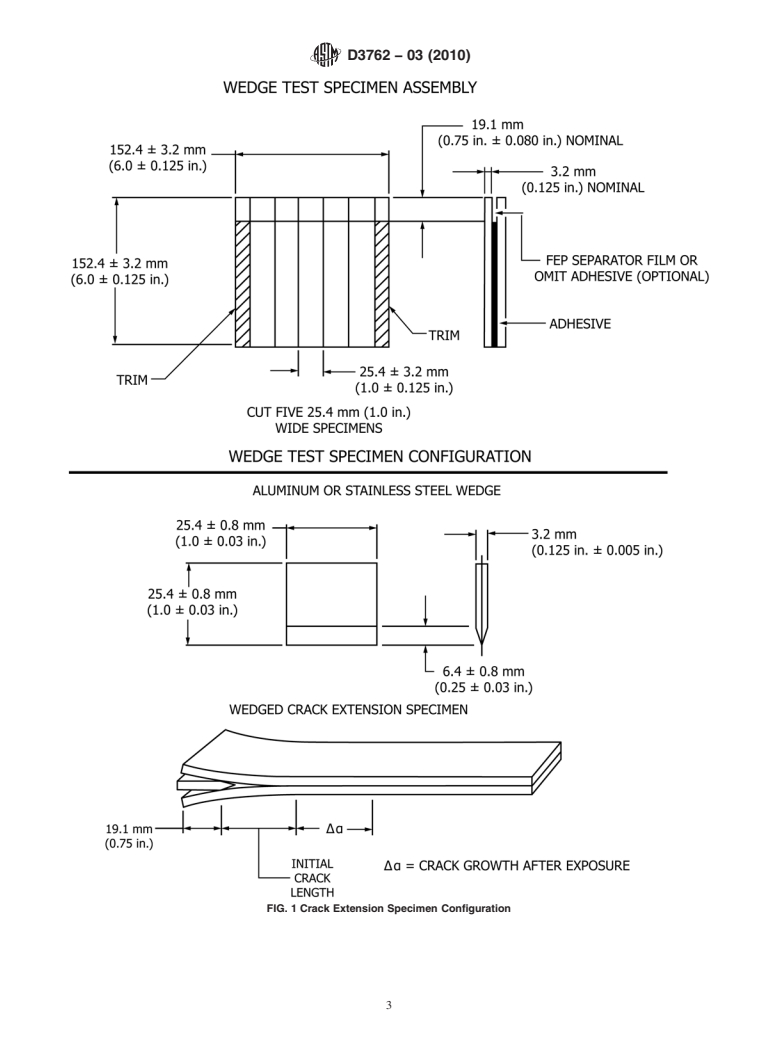
7. Test Specimen of the 152-mm wide edges of the assembly as shown in Fig. 1
to omit the adhesive from between the separation film and the
7.1 Use a minimum of five 25.4 by 203-mm (1 by 8-in.)
aluminum surface.
specimens from a single assembly for each test (Fig. 1).
9.3 Cut the test assembly into five 1-in. wide test specimens
7.2 It is desirable to prevent plastic deformation (yielding)
asshowninFig.1.Thesurfacefinishofbothcutedgesis3.175
of the test specimen adherends when inserting the wedge into
µm (125 µin.) or finer. No burrs or smearing of adherend
the bondline. However, some plastic deformation is permis-
material onto the bondline is allowed. Do not overheat or
sible providing it is not excessive. (Fig. 2 illustrates data in
damage the bond when cutting or finishing.
which some plastic deformation of high-strength aluminum
alloys occurred when the wedges was forced into the bond-
9.4 Mark all test specimens to identify them appropriately
line.)
with respect to their processing in a manner such that testing in
a high-humidity environment does not destroy the identifica-
7.3 The adherend yield point and the toughness of the
tion markings. [Appropriately positioned identification mark-
adhesive are the two most important factors in determining a
ings can be made on the 152 by 152-mm (6 by 6-in.) panels
satisfactoryadherendthickness.TheconfigurationofFig.1has
prior to surface preparation processing.]
been satisfactory for high-strength aluminum alloys, for
example, 2024T-3 and 7075-T6, when used with most tough,
9.5 Open the end of the test specimen that contains the
high-strength aerospace adhesives.
separationfilm,andinsertthewedge.Positionthewedgesothe
7.4 A satisfactory adherend thickness for a specific end and sides are approximately flush with the sides of the
adhesive-adherend system can be determined by trial and error
specimen. (In any use of an auxiliary tool to open the
methods and can also be approximated. specimen, remove the separation film or insert the wedge, do
not bend the specimen.)
NOTE4—Theminimumpermissiblethicknessinauniformsymmetrical
adherend may be computed from the following relationship:
9.6 Using 5 to 30-power magnification and adequate
illumination, locate the tip of the crack, a , on the 3.175-µm
o
6Ta
h 5Œ (1) (125-µ in.) finish edge of each specimen. This is the poin
...


Questions, Comments and Discussion
Ask us and Technical Secretary will try to provide an answer. You can facilitate discussion about the standard in here.