ASTM E2218-15
(Test Method)Standard Test Method for Determining Forming Limit Curves
Standard Test Method for Determining Forming Limit Curves
SIGNIFICANCE AND USE
5.1 A forming limit curve (FLC) defines the maximum (limiting) strain that a given sample of a metallic sheet can undergo for a range of forming conditions, such as deep drawing, stretching and bending over a radius in a press and die drawing operation, without developing a localized zone of thinning (localized necking) that would indicate incipient failure.
5.1.1 FLCs may be obtained empirically by using a laboratory hemispherical punch biaxial stretch test and also a tension test to strain metal sheet specimens from a material sample beyond their elastic limit, just prior to localized necking and fracture.
5.1.1.1 Since this cannot be predetermined, one or both surfaces of specimens are covered with a grid pattern of gauge lengths usually as squares or small diameter circles, by a suitable method such as scribing, photo-grid, or electro-etching, and then each specimen is formed to the point of localized necking, or fracture.
5.1.2 Strains in the major (e1) and minor (e2) directions are measured using points on the grid pattern in the area of the localized necking or fracture.
5.1.2.1 Blanks of varied widths are used to produce a wide range of strain states in the minor (e2) direction.
5.1.2.2 The major (e1) strain is determined by the capacity of the material to be stretched in one direction as simultaneous surface forces either stretch, do not change, or compress, the metal in the (e2) direction.
5.1.2.3 In the tension test deformation process, the (e2) strains are negative and the metal is narrowed both through the thickness and across its width.
5.1.3 These strains are plotted on a forming limit diagram (FLD) and the forming limit curve (FLC) is drawn to connect the highest measured (e1 and e2) strain combinations that include good data points.
5.1.3.1 When there is intermixing and no clear distinction between good and necked data points, a best fit curve is established to follow the maximum good data points as the FLC.
5.1.4 The forming l...
SCOPE
1.1 This method gives the procedure for constructing a forming limit curve (FLC) for a metallic sheet material by using a hemispherical deformation punch test and a uniaxial tension test to quantitatively simulate biaxial stretch and deep drawing processes.
1.2 FLCs are useful in evaluating press performance by metal fabrication strain analysis.
1.3 The method applies to metallic sheet from 0.5 mm (0.020 in.) to 3.3 mm (0.130 in.).
1.4 The values stated in SI units are to be regarded as the standard. The inch-pound equivalents are approximate.
1.5 This standard does not purport to address all of the safety concerns, if any, associated with its use. It is the responsibility of the user of this standard to establish appropriate safety and health practices and determine the applicability of regulatory limitations prior to use.
General Information
Buy Standard
Standards Content (Sample)
NOTICE: This standard has either been superseded and replaced by a new version or withdrawn.
Contact ASTM International (www.astm.org) for the latest information
Designation: E2218 − 15
Standard Test Method for
1
Determining Forming Limit Curves
This standard is issued under the fixed designation E2218; the number immediately following the designation indicates the year of
original adoption or, in the case of revision, the year of last revision. A number in parentheses indicates the year of last reapproval. A
superscript epsilon (´) indicates an editorial change since the last revision or reapproval.
1. Scope 3. Terminology
1.1 This method gives the procedure for constructing a 3.1 Terminology E6 shall apply including the special terms
forming limit curve (FLC) for a metallic sheet material by used in this method shown in 3.2.
using a hemispherical deformation punch test and a uniaxial
3.2 Definitions:
tension test to quantitatively simulate biaxial stretch and deep
3.2.1 biaxial stretching—a mode of metal sheet forming in
drawing processes.
which positive strains are observed in all directions at a given
1.2 FLCs are useful in evaluating press performance by location.
metal fabrication strain analysis.
3.2.1.1 Discussion—See Fig. 1.
1.3 The method applies to metallic sheet from 0.5 mm
3.2.2 deep drawing—a metal sheet forming operation in
(0.020 in.) to 3.3 mm (0.130 in.).
which strains on the sheet surface are positive in the direction
of the punch travel (e ) and negative at 90° to that direction.
1
1.4 The values stated in SI units are to be regarded as the
standard. The inch-pound equivalents are approximate.
3.2.2.1 Discussion—Deep drawing, see Fig. 1, occurs in the
1.5 This standard does not purport to address all of the walls of a drawn cylinder or the corner walls of a deep drawn
part when the flange clamping force is sufficient to restrain
safety concerns, if any, associated with its use. It is the
responsibility of the user of this standard to establish appro- metal movement and wrinkling, while permitting the punch to
push the center area of the blank into the cavity of the die.
priate safety and health practices and determine the applica-
bility of regulatory limitations prior to use. Strain conditions that can cause wrinkling or thickening are
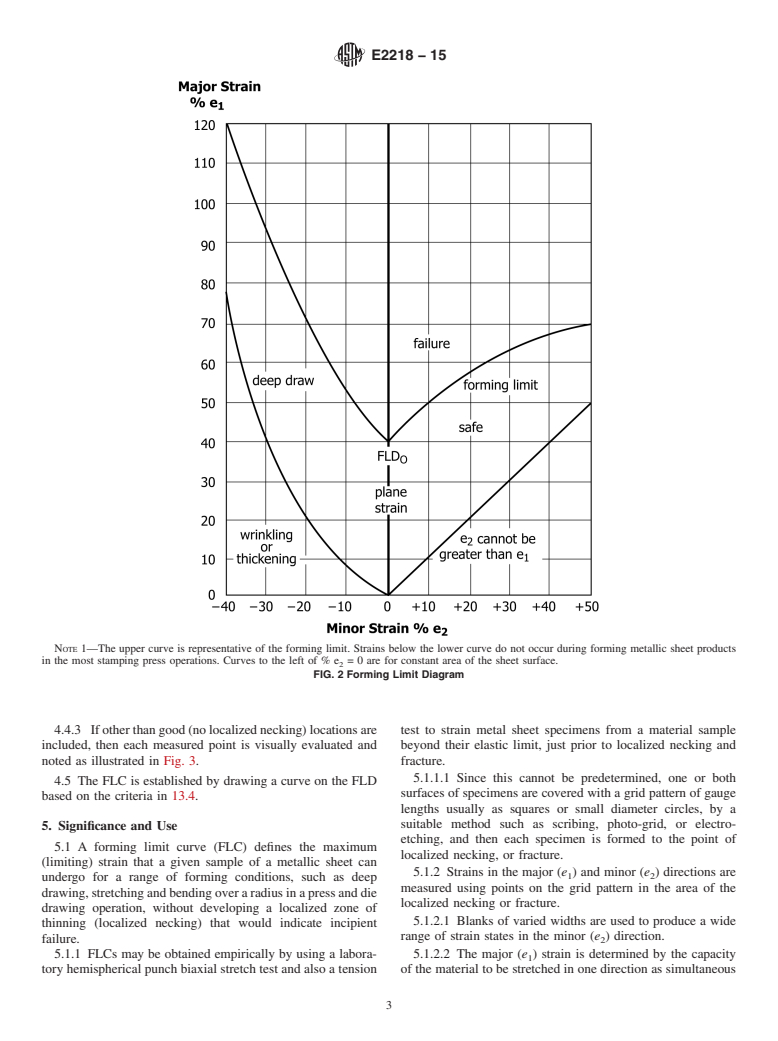
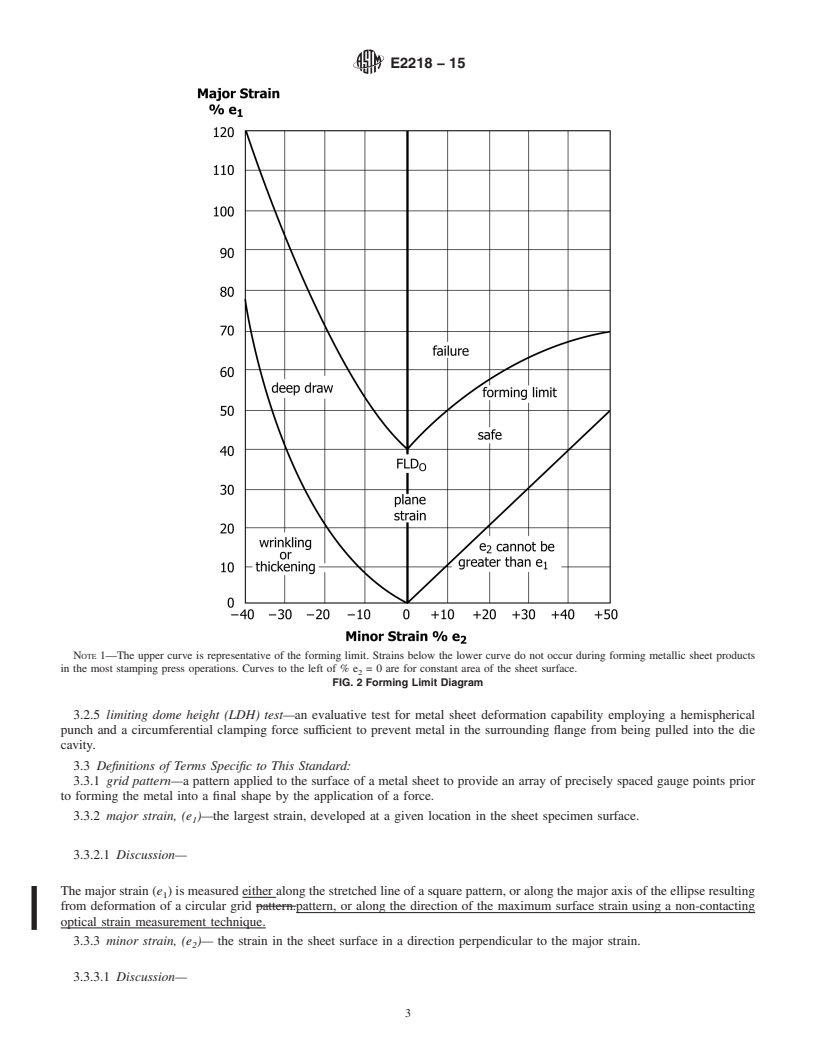
shown in Fig. 2.
2. Referenced Documents
3.2.2.2 Discussion—In forming a square pan shape, metal
2 from an area of the flange under a reduced clamping force is
2.1 ASTM Standards:
pulled into the die to form the side wall of the part.
A568/A568M Specification for Steel, Sheet, Carbon,
3.2.3 forming limit diagram (FLD)—a graph on which the
Structural, and High-Strength, Low-Alloy, Hot-Rolled and
measured major (e ) and associated minor (e ) strain combi-
Cold-Rolled, General Requirements for 1 2
nations are plotted to develop a forming limit curve.
E6 Terminology Relating to Methods of Mechanical Testing
E8/E8M Test Methods for Tension Testing of Metallic Ma- 3.2.3.1 Discussion—See Fig. 2.
terials
3.2.4 forming limit curve (FLC)—an empirically derived
E517 Test Method for Plastic Strain Ratio r for Sheet Metal
curve showing the biaxial strain levels beyond which localized
E646 Test Method for Tensile Strain-Hardening Exponents
through-thickness thinning (necking) and subsequent failure
(n -Values) of Metallic Sheet Materials
occur during the forming of a metallic sheet.
E2208 Guide for Evaluating Non-Contacting Optical Strain
Measurement Systems
3.2.4.1 Discussion— See Fig. 3.
3.2.4.2 Discussion—The curve of Fig. 3 is considered the
forming limit for the material when the metal is subjected to a
1
stamping press operation. It was obtained for a drawing quality
This method is under the jurisdiction of ASTM Committee E28 on Mechanical
Testing and is the direct responsibility of Subcommittee E28.02 on Ductility and
aluminum killed steel sheet. The curve of Fig. 3 correlates with
Formability.
the upper curve of Fig. 2, a generic curve representing a
Current edition approved Oct. 1, 2015. Published December 2015. Originally
ɛ1 metallic sheet material with a FLD of 40 %.
o
published in 2002. Last previous edition approved in 2014 as E2218–14 . DOI:
10.1520/E2218-15
3.2.4.3 Discussion—The strains are given in terms of per-
2
For referenced ASTM standards, visit the ASTM website, www.astm.org, or
cent major and minor strain measured after forming a series of
contact ASTM Customer Service at service@astm.org. For Annual Book of ASTM
test specimen blanks by using a grid pattern. The gauge lengths
Standards volume information, refer to the standard’s Document Summary page on
the ASTM website. before and after forming the part are measured to obtain the
Copyright © ASTM International, 100 Barr Harbor Drive, PO Box C700, West Conshohocken, PA 19428-2959. United States
1
---------------------- Page: 1 ----------------------
E2218 − 15
FIG. 1 Possible Changes in Shape of the Grid Pattern Caused by Forming Operations on Metallic Sheet Products
percent strain. The cur
...
This document is not an ASTM standard and is intended only to provide the user of an ASTM standard an indication of what changes have been made to the previous version. Because
it may not be technically possible to adequately depict all changes accurately, ASTM recommends that users consult prior editions as appropriate. In all cases only the current version
of the standard as published by ASTM is to be considered the official document.
´1
Designation: E2218 − 14 E2218 − 15
Standard Test Method for
1
Determining Forming Limit Curves
This standard is issued under the fixed designation E2218; the number immediately following the designation indicates the year of
original adoption or, in the case of revision, the year of last revision. A number in parentheses indicates the year of last reapproval. A
superscript epsilon (´) indicates an editorial change since the last revision or reapproval.
1
ε NOTE—Editorial corrections were made to 3.2 and throughout the standard in May 2015.
1. Scope
1.1 This method gives the procedure for constructing a forming limit curve (FLC) for a metallic sheet material by using a
hemispherical deformation punch test and a uniaxial tension test to quantitatively simulate biaxial stretch and deep drawing
processes.
1.2 FLCs are useful in evaluating press performance by metal fabrication strain analysis.
1.3 The method applies to metallic sheet from 0.5 mm (0.020 in.) to 3.3 mm (0.130 in.).
1.4 The values stated in SI units are to be regarded as the standard. The inch-pound equivalents are approximate.
1.5 This standard does not purport to address all of the safety concerns, if any, associated with its use. It is the responsibility
of the user of this standard to establish appropriate safety and health practices and determine the applicability of regulatory
limitations prior to use.
2. Referenced Documents
2
2.1 ASTM Standards:
A568/A568M Specification for Steel, Sheet, Carbon, Structural, and High-Strength, Low-Alloy, Hot-Rolled and Cold-Rolled,
General Requirements for
E6 Terminology Relating to Methods of Mechanical Testing
E8/E8M Test Methods for Tension Testing of Metallic Materials
E517 Test Method for Plastic Strain Ratio r for Sheet Metal
E646 Test Method for Tensile Strain-Hardening Exponents (n -Values) of Metallic Sheet Materials
E2208 Guide for Evaluating Non-Contacting Optical Strain Measurement Systems
3. Terminology
3.1 Terminology E6 shall apply including the special terms used in this method shown in 3.2.
3.2 Definitions:
3.2.1 biaxial stretching—a mode of metal sheet forming in which positive strains are observed in all directions at a given
location.
1
This method is under the jurisdiction of ASTM Committee E28 on Mechanical Testing and is the direct responsibility of Subcommittee E28.02 on Ductility and
Formability.
Current edition approved April 1, 2014Oct. 1, 2015. Published June 2014December 2015. Originally published in 2002. Last previous edition approved in 20082014 as
ɛ1
E2218–02(2008).E2218–14 . DOI: 10.1520/E2218-14E0110.1520/E2218-15
2
For referenced ASTM standards, visit the ASTM website, www.astm.org, or contact ASTM Customer Service at service@astm.org. For Annual Book of ASTM Standards
volume information, refer to the standard’s Document Summary page on the ASTM website.
3.2.1.1 Discussion—
See Fig. 1.
3.2.2 deep drawing—a metal sheet forming operation in which strains on the sheet surface are positive in the direction of the
punch travel (e ) and negative at 90° to that direction.
1
3.2.2.1 Discussion—
Copyright © ASTM International, 100 Barr Harbor Drive, PO Box C700, West Conshohocken, PA 19428-2959. United States
1
---------------------- Page: 1 ----------------------
E2218 − 15
FIG. 1 Possible Changes in Shape of the Grid Pattern Caused by Forming Operations on Metallic Sheet Products
Deep drawing, see Fig. 1, occurs in the walls of a drawn cylinder or the corner walls of a deep drawn part when the flange clamping
force is sufficient to restrain metal movement and wrinkling, while permitting the punch to push the center area of the blank into
the cavity of the die. Strain conditions that can cause wrinkling or thickening are shown in Fig. 2.
3.2.2.2 Discussion—
In forming a square pan shape, metal from an area of the flange under a reduced clamping force is pulled into the die to form the
side wall of the part.
3.2.3 forming limit diagram (FLD)—a graph on which the measured major (e ) and associated minor (e ) strain combinations
1 2
are plotted to develop a forming limit curve.
3.2.3.1 Discussion—
See Fig. 2.
3.2.4 forming limit curve (FLC)—an empirically derived curve showing the biaxial strain levels beyond which localized
through-thickness thinning (necking) and subsequent failure occur during the forming of a metallic sheet.
3.2.4.1 Discussion—
See Fig. 3.
3.2.4.2 Discussion—
The curve of Fig. 3 is considered the forming limit for the material when the metal is subjected to a stamping press operation. It
was obtained for a drawing quality alum
...


Questions, Comments and Discussion
Ask us and Technical Secretary will try to provide an answer. You can facilitate discussion about the standard in here.