ASTM E2860-20
(Test Method)Standard Test Method for Residual Stress Measurement by X-Ray Diffraction for Bearing Steels
Standard Test Method for Residual Stress Measurement by X-Ray Diffraction for Bearing Steels
SIGNIFICANCE AND USE
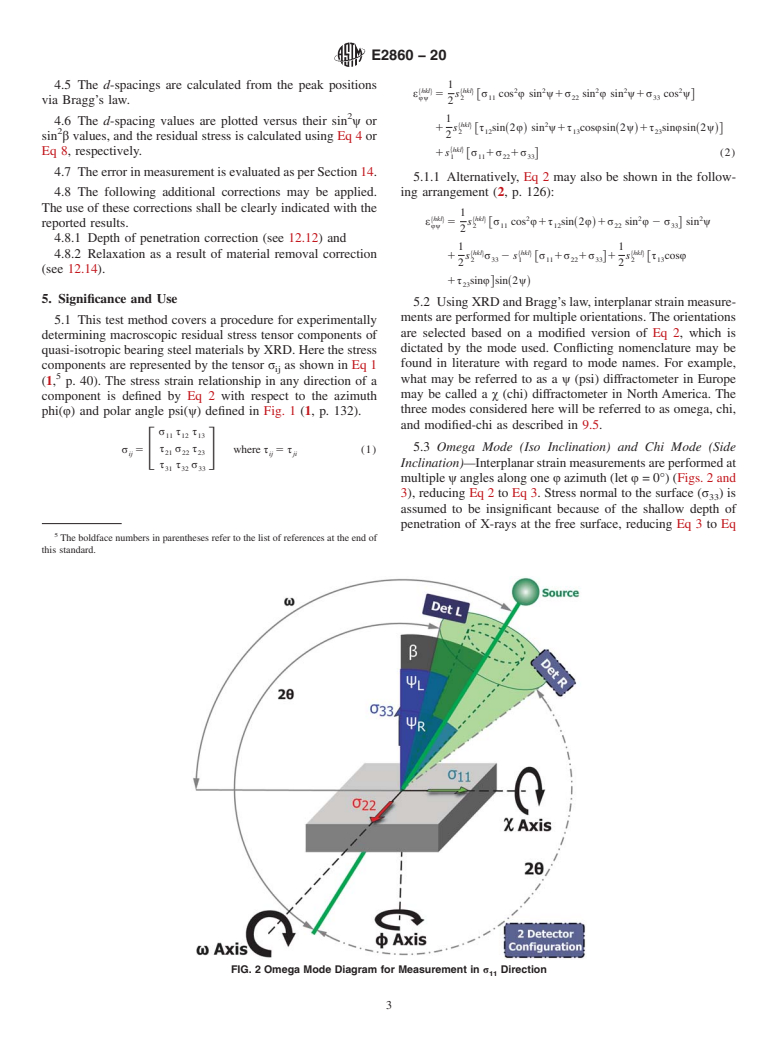
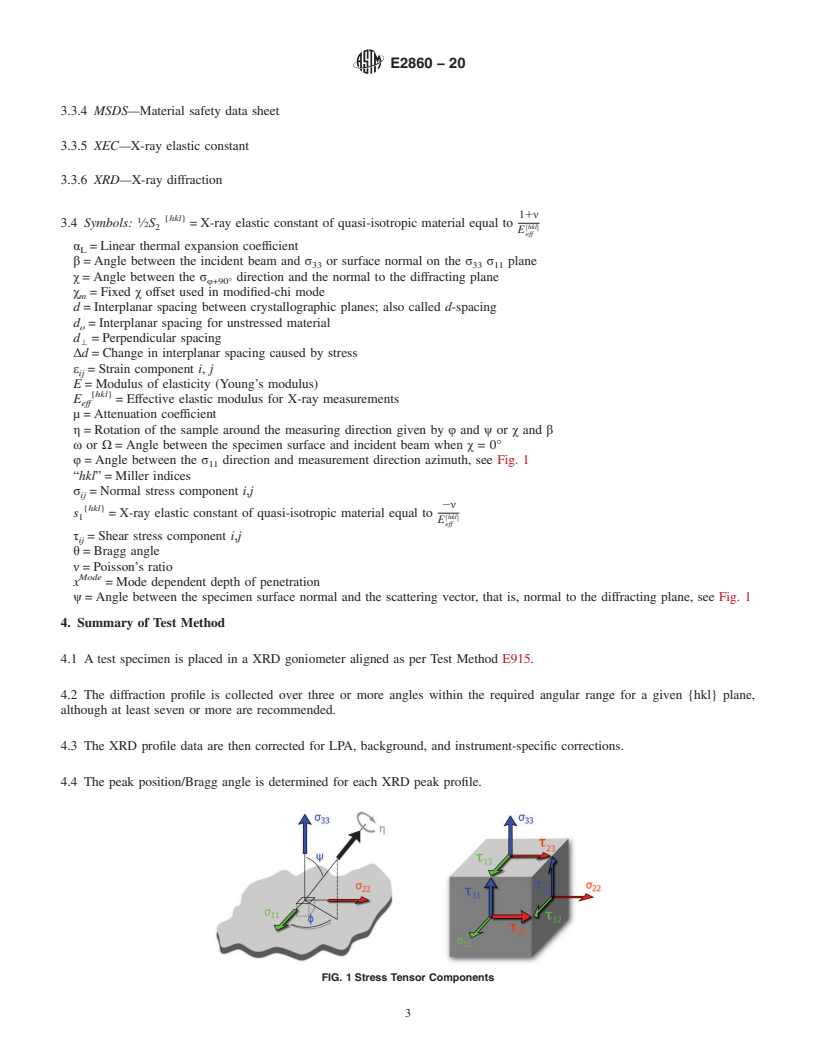
5.1 This test method covers a procedure for experimentally determining macroscopic residual stress tensor components of quasi-isotropic bearing steel materials by XRD. Here the stress components are represented by the tensor σij as shown in Eq 1 (1,5 p. 40). The stress strain relationship in any direction of a component is defined by Eq 2 with respect to the azimuth phi(φ) and polar angle psi(ψ) defined in Fig. 1 (1, p. 132).
5.1.1 Alternatively, Eq 2 may also be shown in the following arrangement (2, p. 126):
5.2 Using XRD and Bragg’s law, interplanar strain measurements are performed for multiple orientations. The orientations are selected based on a modified version of Eq 2, which is dictated by the mode used. Conflicting nomenclature may be found in literature with regard to mode names. For example, what may be referred to as a ψ (psi) diffractometer in Europe may be called a χ (chi) diffractometer in North America. The three modes considered here will be referred to as omega, chi, and modified-chi as described in 9.5.
5.3 Omega Mode (Iso Inclination) and Chi Mode (Side Inclination)—Interplanar strain measurements are performed at multiple ψ angles along one φ azimuth (let φ = 0°) (Figs. 2 and 3), reducing Eq 2 to Eq 3. Stress normal to the surface (σ33) is assumed to be insignificant because of the shallow depth of penetration of X-rays at the free surface, reducing Eq 3 to Eq 4. Post-measurement corrections may be applied to account for possible σ33 influences (12.12). Since the σij values will remain constant for a given azimuth, the s1{hkl} term is renamed C.
FIG. 2 Omega Mode Diagram for Measurement in σ11 Direction
FIG. 3 Chi Mode Diagram for Measurement in σ11 Direction
Note 1: Stress matrix is rotated 90° about the surface normal compared to Fig. 2 and Fig. 14.
5.3.1 The measured interplanar spacing values are converted to strain using Eq 24, Eq 25, or Eq 26. Eq 4 is used to fit the strain versus sin2ψ data yiel...
SCOPE
1.1 This test method covers a procedure for experimentally determining macroscopic residual stress tensor components of quasi-isotropic bearing steel materials by X-ray diffraction (XRD).
1.2 This test method provides a guide for experimentally determining stress values, which play a significant role in bearing life.
1.3 Examples of how tensor values are used are:
1.3.1 Detection of grinding type and abusive grinding;
1.3.2 Determination of tool wear in turning operations;
1.3.3 Monitoring of carburizing and nitriding residual stress effects;
1.3.4 Monitoring effects of surface treatments such as sand blasting, shot peening, and honing;
1.3.5 Tracking of component life and rolling contact fatigue effects;
1.3.6 Failure analysis;
1.3.7 Relaxation of residual stress; and
1.3.8 Other residual-stress-related issues that potentially affect bearings.
1.4 Units—The values stated in SI units are to be regarded as standard. No other units of measurement are included in this standard.
1.5 This standard does not purport to address all of the safety concerns, if any, associated with its use. It is the responsibility of the user of this standard to establish appropriate safety, health, and environmental practices and determine the applicability of regulatory limitations prior to use.
1.6 This international standard was developed in accordance with internationally recognized principles on standardization established in the Decision on Principles for the Development of International Standards, Guides and Recommendations issued by the World Trade Organization Technical Barriers to Trade (TBT) Committee.
General Information
Buy Standard
Standards Content (Sample)
This international standard was developed in accordance with internationally recognized principles on standardization established in the Decision on Principles for the
Development of International Standards, Guides and Recommendations issued by the World Trade Organization Technical Barriers to Trade (TBT) Committee.
Designation: E2860 − 20
Standard Test Method for
Residual Stress Measurement by X-Ray Diffraction for
1
Bearing Steels
This standard is issued under the fixed designation E2860; the number immediately following the designation indicates the year of
original adoption or, in the case of revision, the year of last revision.Anumber in parentheses indicates the year of last reapproval.A
superscript epsilon (´) indicates an editorial change since the last revision or reapproval.
INTRODUCTION
The measurement of residual stress using X-ray diffraction (XRD) techniques has gained much
popularityinthematerialstestingfieldoverthepasthalfcenturyandhasbecomeamandatorytestfor
many production and prototype bearing components. However, measurement practices have evolved
over this time period. With each evolutionary step, it was discovered that previous assumptions were
sometimes erroneous, and as such, results obtained were less reliable than those obtained using
state-of-the-art XRD techniques. Equipment and procedures used today often reflect different periods
inthisevolution;forexample,systemsthatstillusethesingle-anddouble-exposuretechniquesaswell
as others that use more advanced multiple exposure techniques can all currently be found in
widespread use. Moreover, many assumptions made, such as negligible shear components and
2
non-oscillatory sin ψ distributions, cannot safely be made for bearing materials in which the demand
for measurement accuracy is high. The use of the most current techniques is, therefore, mandatory to
achievenotonlythemostreliablemeasurementresultsbutalsotoenableidentificationandevaluation
of potential measurement errors, thus paving the way for future developments.
1. Scope* 1.3.8 Other residual-stress-related issues that potentially
affect bearings.
1.1 This test method covers a procedure for experimentally
determining macroscopic residual stress tensor components of 1.4 Units—The values stated in SI units are to be regarded
quasi-isotropic bearing steel materials by X-ray diffraction asstandard.Nootherunitsofmeasurementareincludedinthis
(XRD). standard.
1.5 This standard does not purport to address all of the
1.2 This test method provides a guide for experimentally
safety concerns, if any, associated with its use. It is the
determining stress values, which play a significant role in
responsibility of the user of this standard to establish appro-
bearing life.
priate safety, health, and environmental practices and deter-
1.3 Examples of how tensor values are used are:
mine the applicability of regulatory limitations prior to use.
1.3.1 Detection of grinding type and abusive grinding;
1.6 This international standard was developed in accor-
1.3.2 Determination of tool wear in turning operations;
dance with internationally recognized principles on standard-
1.3.3 Monitoringofcarburizingandnitridingresidualstress
ization established in the Decision on Principles for the
effects;
Development of International Standards, Guides and Recom-
1.3.4 Monitoring effects of surface treatments such as sand
mendations issued by the World Trade Organization Technical
blasting, shot peening, and honing;
Barriers to Trade (TBT) Committee.
1.3.5 Tracking of component life and rolling contact fatigue
effects;
2. Referenced Documents
1.3.6 Failure analysis;
2
2.1 ASTM Standards:
1.3.7 Relaxation of residual stress; and
E6Terminology Relating to Methods of Mechanical Testing
E7Terminology Relating to Metallography
1
This test method is under the jurisdiction of ASTM Committee E28 on
Mechanical Testing and is the direct responsibility of Subcommittee E28.13 on
2
Residual Stress Measurement. For referenced ASTM standards, visit the ASTM website, www.astm.org, or
Current edition approved Nov. 1, 2020. Published February 2021. Originally contact ASTM Customer Service at service@astm.org. For Annual Book of ASTM
approved in 2012. Last previous edition approved in 2012 as E2860–12. DOI: Standards volume information, refer to the standard’s Document Summary page on
10.1520/E2860–20. the ASTM website.
*A Summary of Changes section appears at the end of this standard
Copyright © ASTM International, 100 Barr Harbor Drive, PO Box C700, West Conshohocken, PA 19428-2959. United States
1
---------------------- Page: 1 ----------------------
E2860 − 20
E177Practice for Use of the Terms Precision and Bias in α =Linear thermal expansion coefficient
L
ASTM Test Methods β=Angle between the incident beam and σ or surface
33
E691Practice for Conducting an Interlaboratory Study to normal on the σ σ plane
33 11
Determine the Precision of a Test Method χ=Anglebetweenthe σ directionandthenormaltothe
φ+90°
E915Test Method for Ver
...
This document is not an ASTM standard and is intended only to provide the user of an ASTM standard an indication of what changes have been made to the previous version. Because
it may not be technically possible to adequately depict all changes accurately, ASTM recommends that users consult prior editions as appropriate. In all cases only the current version
of the standard as published by ASTM is to be considered the official document.
Designation: E2860 − 12 E2860 − 20
Standard Test Method for
Residual Stress Measurement by X-Ray Diffraction for
1
Bearing Steels
This standard is issued under the fixed designation E2860; the number immediately following the designation indicates the year of
original adoption or, in the case of revision, the year of last revision. A number in parentheses indicates the year of last reapproval. A
superscript epsilon (´) indicates an editorial change since the last revision or reapproval.
INTRODUCTION
The measurement of residual stress using X-ray diffraction (XRD) techniques has gained much
popularity in the materials testing field over the past half century and has become a mandatory test for
many production and prototype bearing components. However, measurement practices have evolved
over this time period. With each evolutionary step, it was discovered that previous assumptions were
sometimes erroneous, and as such, results obtained were less reliable than those obtained using
state-of-the-art XRD techniques. Equipment and procedures used today often reflect different periods
in this evolution; for example, systems that still use the single- and double-exposure techniques as well
as others that use more advanced multiple exposure techniques can all currently be found in
widespread use. Moreover, many assumptions made, such as negligible shear components and
2
non-oscillatory sin ψ distributions, cannot safely be made for bearing materials in which the demand
for measurement accuracy is high. The use of the most current techniques is, therefore, mandatory to
achieve not only the most reliable measurement results but also to enable identification and evaluation
of potential measurement errors, thus paving the way for future developments.
1. Scope Scope*
1.1 This test method covers a procedure for experimentally determining macroscopic residual stress tensor components of
quasi-isotropic bearing steel materials by X-ray diffraction (XRD).
1.2 This test method provides a guide for experimentally determining stress values, which play a significant role in bearing life.
1.3 Examples of how tensor values are used are:
1.3.1 Detection of grinding type and abusive grinding;
1.3.2 Determination of tool wear in turning operations;
1.3.3 Monitoring of carburizing and nitriding residual stress effects;
1.3.4 Monitoring effects of surface treatments such as sand blasting, shot peening, and honing;
1
This test method is under the jurisdiction of ASTM Committee E28 on Mechanical Testing and is the direct responsibility of Subcommittee E28.13 on Residual Stress
Measurement.
Current edition approved April 1, 2012Nov. 1, 2020. Published May 2012February 2021. Originally approved in 2012. Last previous edition approved in 2012 as
E2860–12. DOI: 10.1520/E2860–12.10.1520/E2860–20.
*A Summary of Changes section appears at the end of this standard
Copyright © ASTM International, 100 Barr Harbor Drive, PO Box C700, West Conshohocken, PA 19428-2959. United States
1
---------------------- Page: 1 ----------------------
E2860 − 20
1.3.5 Tracking of component life and rolling contact fatigue effects;
1.3.6 Failure analysis;
1.3.7 Relaxation of residual stress; and
1.3.8 Other residual-stress-related issues that potentially affect bearings.
1.4 Units—The values stated in SI units are to be regarded as standard. No other units of measurement are included in this
standard.
1.5 This standard does not purport to address all of the safety concerns, if any, associated with its use. It is the responsibility
of the user of this standard to establish appropriate safety safety, health, and healthenvironmental practices and determine the
applicability of regulatory limitations prior to use.
1.6 This international standard was developed in accordance with internationally recognized principles on standardization
established in the Decision on Principles for the Development of International Standards, Guides and Recommendations issued
by the World Trade Organization Technical Barriers to Trade (TBT) Committee.
2. Referenced Documents
2
2.1 ASTM Standards:
E6 Terminology Relating to Methods of Mechanical Testing
E7 Terminology Relating to Metallography
E177 Practice for Use of the Terms Precision and Bias in ASTM Test Methods
E691 Practice for Conducting an Interlaboratory Study to Determine the Precision of a Test Method
E915 Test Method for Verifying the Alignment of X-Ray Diffraction Instrumentation for Residual Stress Measurement
E1426 Test Method for Determining the X-Ray Elastic Constants for Use in the Measurem
...


Questions, Comments and Discussion
Ask us and Technical Secretary will try to provide an answer. You can facilitate discussion about the standard in here.