ASTM D7255-06
(Test Method)Standard Test Method for Abrasion Resistance of Leather (Rotary Platform, Double-Head Method)
Standard Test Method for Abrasion Resistance of Leather (Rotary Platform, Double-Head Method)
SCOPE
1.1 This test method covers the determination of the abrasion resistance of leather using the rotary platform, double-head tester (RPDH).
This standard does not purport to address all of the safety concerns, if any, associated with its use. It is the responsibility of the user of this standard to establish appropriate safety and health practices and to determine the applicability of regulatory limitations prior to use.
General Information
Relations
Standards Content (Sample)
NOTICE: This standard has either been superseded and replaced by a new version or withdrawn.
Contact ASTM International (www.astm.org) for the latest information
Designation:D7255–06
Standard Test Method for
Abrasion Resistance of Leather (Rotary Platform, Double-
Head Method)
This standard is issued under the fixed designation D 7255; the number immediately following the designation indicates the year of
original adoption or, in the case of revision, the year of last revision. A number in parentheses indicates the year of last reapproval. A
superscript epsilon (e) indicates an editorial change since the last revision or reapproval.
1. Scope 3.2 For definitions of other leather terms used in this test
method, refer to Terminology D 1517.
1.1 This test method covers the determination of the abra-
sion resistance of leather using the rotary platform, double-
4. Summary of Test Method
head tester (RPDH).
4.1 Aspecimenisabradedusingrotaryrubbingactionunder
1.2 This standard does not purport to address all of the
controlled conditions of pressure and abrasive action. The test
safety concerns, if any, associated with its use. It is the
specimen, mounted on a turntable platform, turns on a vertical
responsibility of the user of this standard to establish appro-
axis, against the sliding rotation of two abrading wheels. One
priate safety and health practices and to determine the
abrading wheel rubs the specimen outward toward the periph-
applicability of regulatory limitations prior to use.
ery and the other, inward toward the center. The resulting
2. Referenced Documents abrasion marks form a pattern of crossed arcs over an area of
approximately 30 cm . Resistance to abrasion is evaluated by
2.1 ASTM Standards:
visual inspection of the specimen or change in weight, as
D 1517 Terminology Relating to Leather
described in Section 14.
D 1610 Practice for Conditioning Leather and Leather
Products for Testing
5. Significance and Use
D 2240 Test Method for Rubber Property—Durometer
5.1 The resistance of leather to abrasion, as measured on a
Hardness
testing machine in the laboratory, is generally only one of
D 2813 Practice for Sampling Leather for Physical and
several factors contributing to wear performance or durability
Chemical Tests
as experienced in the actual use of the material. While
3. Terminology “abrasion resistance” (often stated in terms of the number of
abrasion cycles) and “durability” (defined as the ability to
3.1 Definitions:
withstand deterioration or wear out in use, including the effects
3.1.1 abraser—a wear testing instrument, also referred to as
of abrasion) are frequently related, the relationship varies with
a rotary platform, double head (RPDH) tester or abrader.
differentendusesanddifferentfactorsmaybenecessaryinany
3.1.2 abrasion—the wearing away of any part of a material
calculation of predicted durability from specific abrasion data.
by rubbing against another surface.
This test method provides a comparative ranking of material
3.1.3 abrasion cycle—in abrasion testing, one or more
performance, which can be used as an indication of relative
movements of the abradant across a material surface, or the
end-use performance.
material surface across the abradant, that permits a return to its
5.2 The resistance of leather to abrasion may be affected by
starting position. In the case of the rotary platform test method,
factors including test conditions, type of abradant, pressure
it consists of one complete rotation of the specimen.
betweenthespecimenandabradant,mountingortensionofthe
3.1.4 resurface—the preparation of an abrasive wheel on a
specimen, and type, kind, or amount of finishing materials.
resurfacing disk or diamond tool wheel refacer, prior to use in
5.3 Abrasion tests utilizing the rotary platform, double-head
testing.
tester may be subject to variation due to changes in the
abradant during specific tests. Depending on abradant type and
This test method is under the jurisdiction ofASTM Committee D31 on Leather test specimen, the wheel surface may change (that is, become
and is the direct responsibility of Subcommittee D31.07 on Physical Properties.
clogged) due to the pick up of finishing or other materials from
Current edition approved April 1, 2006. Published April 2006.
test specimens and must be cleaned at regularly defined
For referenced ASTM standards, visit the ASTM website, www.astm.org, or
contact ASTM Customer Service at service@astm.org. For Annual Book of ASTM intervals.
Standards volume information, refer to the standard’s Document Summary page on
the ASTM website.
Copyright © ASTM International, 100 Barr Harbor Drive, PO Box C700, West Conshohocken, PA 19428-2959, United States.
D7255–06
5.4 The measurement of the relative amount of abrasion 6.1.5 Acounter to record the number of cycles (revolutions)
may also be affected by the method of evaluation and may be made by the turntable platform.
influenced by the judgment of the operator.
6.2 Abrasive Wheels, which are attached to the free end of
the pivoted arms, and are able to rotate freely about horizontal
6. Apparatus
spindles.
6.1 Rotary Platform, Double-Head (RPDH) Tester, con-
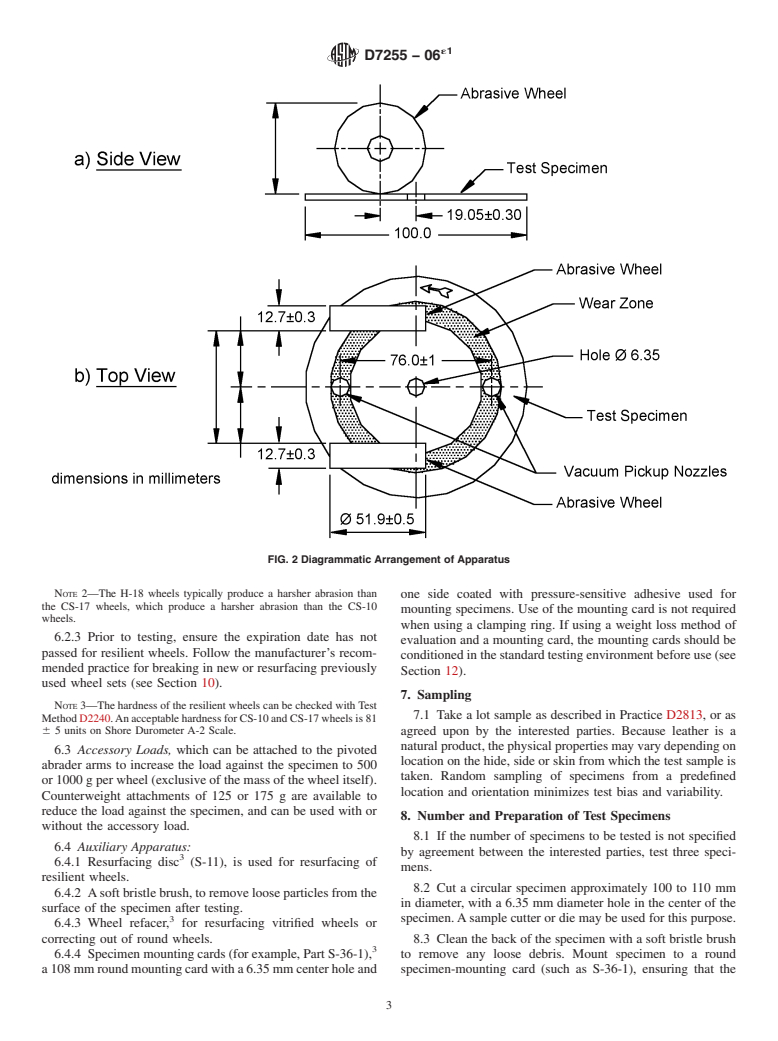
6.2.1 Their internal faces shall be 52.4 6 1.0 mm apart and
sisting of the elements described in 6.1.1-6.1.5 (see Fig. 1).
the hypothetical line through the two spindles shall be 19.05 6
6.1.1 A turntable platform, which is removable, parts pro-
0.3 mm away from the central axis of the turntable (see Fig. 2).
vided with the turntable include the S19 rubber pad, clamp
When resting on the specimen, the wheels will have a
plate and nut, and clamping ring to secure the specimen to the
peripheral engagement with the surface of the specimen, the
turntable. The turntable is motor driven and mounted so as to
direction of travel of the periphery of the wheels and of the
produce a circular surface travel of an essentially flat specimen
specimen at the contacting portions being at acute angles, and
in the plane of its surface,
the angles of travel of one wheel periphery being opposite to
6.1.2 Amotor capable of rotating the turntable platform at a
that of the other. Motion of the abrasive wheels, in opposite
speed of either 72 6 2 r/min for 110 V/60 Hz or 60 6 2 r/min
directions, is provided by rotation of the specimen and the
for 230 V/50 Hz,
associated friction there from.
6.1.3 A pair of pivoted arms to which the abrasive wheels
6.2.2 The wheels shall be 12.7 6 0.3 mm thick and have an
and accessory weights or counterweights are attached,
external diameter of 51.9 6 0.5 mm when new, and in no case
NOTE 1—Without auxiliary weights or counter weights applied, each
less than 44.4 mm. The abrasive wheels are either resilient or
arm will apply a load against the specimen of 250 6 1 g (exclusive of the
vitrified based, with both types of wheels consisting of hard
mass of the wheel itself).
particles embedded in a binder material and manufactured in
6.1.4 A vacuum suction system and vacuum pickup nozzle
different grades of abrasive quality.
to remove debris and abrasive particles from the specimen
NOTE 2—The H-19 wheels typically produce a harsher abrasion than
surface during testing.The height of the vacuum pickup nozzle
the CS-17 wheels, which produce a harsher abrasion than the CS-10
shall be adjustable, and will have two openings – with one
wheels.
opening positioned between the two wheels and over the wear
path and the other placed diametrically opposite. The distance
between the axes of the two openings shall be 76.0 6 1.0 mm,
and
The sole source of supply of the apparatus known to the committee at this time
is Taber Industries, 455 Bryant Street, North Tonawanda, NY 14120. If you are
aware of alternative suppliers, please provide this information to ASTM Interna-
Available from Tabert Industries, 455 Bryant Street, North Tonawanda, NY
tional Headquarters.Your comments will receive careful consideration at a meeting
14120.
of the responsible technical committee, which you may attend.
FIG. 1 Rotary Platform, Double-Head Tester
D7255–06
FIG. 2 Diagrammatic Arrangement of Apparatus
6.2.3 Prior to testing, ensure the expiration date has not evaluation and a mounting card, the mounting cards should be
passed for resilient wheels. Follow the manufacturer’s recom- conditionedinthestandardtestingenvironmentbeforeuse(see
mended practice for breaking in new or resurfacing previously Section 12).
used wheel sets (see Section 10).
7. Sampling
NOTE 3—The hardness of the resilient wheels can be checked withTest
Method D 2240. An acceptable hardness for CS-10 and CS-17 wheels is
7.1 Take a lot sample as described in Practice D 2813,oras
81 6 5 units on Shore Durometer A-2 Scale.
agreed upon by the interested parties. Because leather is a
6.3 Accessory Loads, which can be attached to the pivoted
natural product, the physical properties may vary depending on
abrader arms to increase the load against the specimen to 500
location on the hide, side or skin from which the test sample is
or 1000 g per wheel (exclusive of the mass of the wheel itself).
taken. Random sampling of specimens from a predefined
Counterweight attachments of 125 or 175 g are available to
location and orientation minimizes test bias and variability.
reduce the load against the specimen, and can be used with or
without the accessory load.
8. Number and Preparation of Test Specimens
6.4 Auxiliary Apparatus:
8.1 If the number of specimens to be tested is not specified
6.4.1 Resurfacing disc (S-11), is used for resurfacing of
by agreement between the interested parties, test three speci-
resilient wheels.
mens.
6.4.2 Asoft bristle brush, to remove loose particles from the
8.2 Cut a circular specimen approximately 100 to 110 mm
surface of the specimen after testing.
in diameter, with a 6.35 mm diameter hole in the center of the
6.4.3 Wheel refacer, for resurfacing vitrified wheels or
specimen.Asample cutter or die may be used for this purpose.
correcting out of round wheels.
6.4.4 Specimen mounting cards (for example, Part S-36-1), 8.3 Clean the back of the specimen with a soft bristle brush
to remove any loose debris. Mount specimen to a round
a108mmroundmountingcardwitha6.35mmcenterholeand
one side coated with pressure-sensitive adhesive used for specimen-mounting card (such as S-36-1), ensuring that the
specimen is free of folds, creases, or wrinkles. Avoid getting
mounting specimens. Use of the mounting card is not required
when using a clamping ring. If using a weight loss method of oil,water,grease,andsoforth,onthespecimenwhenhandling.
D7255–06
placing in service a new set of resilient wheels they must be subjected to
8.3.1 Alternatively, a sample of 130 6 5 mm diameter may
two (2) resurfacings of 50 cycles to ensure perfect contact of the abrading
be used, with or without a mounting card, and secured to the
faces with the specimen surface. The resurfacing disc is used only once
turntable with a clamp ring.
(maximum of 50 cycles), therefore this initial resurfacing of new wheels
8.4 If the leather has a pattern such as embossment, ensure
will require two (2) resurfacing discs.
that the specimen is a representative sampling of the pattern.
NOTE 6—Starting a Test with Previously Used Wheels—Before testing
a specimen with previously used wheels, resurface 25 to 50 cycles on a
9. Preparation of Apparatus
new resurfacing disc. When the previous test was short in duration
9.1 Load—A load of 1000 g per wheel should be used,
(<1,000 cycles), resurfacing of 25 cycles is sufficient. When the previous
unless otherwise agreed upon by the interested parties.
test was 1,000 cycles or more, a resurfacing of 50 cycles is recommended.
9.2 Vacuum Pickup Nozzle—The height of the vacuum Wheels that have not been used for an extended period of time may
require a break-in resurfacing like a new set of wheels.
pickup nozzle should be set 7 6 1 mm above the specimen
surface, unless otherwise agreed upon by the interested parties. NOTE 7—Resurfacing During Testing—To maintain consistency and
avoidcloggingofwheelfaces,thewheelsshouldberesurfacedafterevery
9.3 Vacuum Suction—The vacuum suction force should be
1000 cycles of use. During the course of a test which requires more than
adjusted to lift the abraded particles, but not lift the specimen.
1000cycles,removethespecimenafterevery1000cycles(orasagreedby
When the suction nozzles are in position, the air pressure in the
interested parties) and resurface the wheels for 25 to 50 cycles with a new
suction device shall be within the range stated in 11.1.5.A
resurfacingdisc.Thesampleshouldbecarefullyreplacedafterresurfacing
setting of 75 - 100 has been found to be sufficient and should
of the wheels.
beused,unlessotherwiseagreeduponbytheinterestedparties.
10.2 Preparation of Vitrified Abrading Wheels—Vitrified
NOTE 4—Vacuum suction force may be influenced by the condition of
wheels do not require refacing unless the abrading surface
the collection bag, which must be emptied or replaced on a regular basis.
becomes clogged, chipped or out of round. A wheel refacer
Any connection or seal leaks will also influence suction force.
should be used to correct any of these conditions.
9.4 Selection of Wheel Type—The CS-10 wheel should be
used, unless otherwise agreed upon by the interested parties.
11. Calibration
10. Standardization of Abrading Wheels
11.1 Verify calibration of the rotary platform, double head
10.1 Preparation of resilient abrading wheels—To ensure tester as directed by the equipment manufacturer (see Appen-
that the abrading function of the wheels is maintained at a dix X1).
constant level, prepare the resilient wheels following 10.1.1-
11.1.1 Wheel Position—The wheels should be spaced
10.1.4
equally on both sides from the wheel-mounting flange to the
10.1.1 Mount the selected resilient wheels on their respec-
centerofthespecimenholder(see6.2.1).Thedistancefromthe
tive flange holders, taking care not to handle them by their
inside of the wheel-mounting flange to the center of the
abrasive surfaces. Adjust the load on each wheel to 1000 g or
specimen holder is 38.8 6 0.5 mm.
the load agreed upon between the interested parties.
11.1.2 Wheel Bearings—The RPDH tester wheel bearings
10.1.2 Mount the resurfacing disc (S-11) on the turntable
installed in the free end of the pivoting arms to support the
and affix using the clamp plate and nut, and clamp ring. Lower
wheels should not stick when caused to spin rapidly by a quick
the abrading heads carefully until the wheels rest on the
driving motion of the forefinger.
resurfacing disc. Place the vacuum pick-up nozzle in position
11.1.3 Turntable Platform Position—The vertical distance
andadjustittoadistanceof7 61mmabovethesurfaceofthe
from the center of the pivot point of the RPDH tester arms to
disc.
the top of the specimen holder should be approximately
...
Questions, Comments and Discussion
Ask us and Technical Secretary will try to provide an answer. You can facilitate discussion about the standard in here.