Standard Test Method for Oxidative-Induction Time of Polyolefins by Differential Scanning Calorimetry

SCOPE
1.1 This test method outlines a procedure for the determination of oxidative-induction time (OIT) of polymeric materials by differential scanning calorimetry (DSC). It is applicable to polyolefin resins that are in a fully stabilized/compounded form.
1.2 The values stated in SI units are to be regarded as the standard.
1.3 This standard does not purport to address all of the safety concerns, if any, associated with its use. It is the responsibility of the user of this standard to establish appropriate safety and health practices and determine the applicability of regulatory limitations prior to use. Specific hazards information is given in Section 8.  
Note 1-This test method has no ISO equivalent.

General Information

Status
Historical
Publication Date
09-Jul-1998
Technical Committee
Drafting Committee
Current Stage
Ref Project

Relations

Buy Standard

Standard
ASTM D3895-98 - Standard Test Method for Oxidative-Induction Time of Polyolefins by Differential Scanning Calorimetry
English language
6 pages
sale 15% off
Preview
sale 15% off
Preview

Standards Content (Sample)


NOTICE: This standard has either been superseded and replaced by a new version or discontinued.
Contact ASTM International (www.astm.org) for the latest information.
Designation: D 3895 – 98
Standard Test Method for
Oxidative-Induction Time of Polyolefins by Differential
Scanning Calorimetry
This standard is issued under the fixed designation D 3895; the number immediately following the designation indicates the year of
original adoption or, in the case of revision, the year of last revision. A number in parentheses indicates the year of last reapproval. A
superscript epsilon (e) indicates an editorial change since the last revision or reapproval.
1. Scope 3.2.2 Abbreviations:
3.2.3 HDPE—high-density polyethylene.
1.1 This test method outlines a procedure for the determi-
3.2.4 LDPE—low-density polyethylene.
nation of oxidative-induction time (OIT) of polymeric materi-
3.2.5 LLDPE—linear low-density polyethylene.
als by differential scanning calorimetry (DSC). It is applicable
3.2.6 OIT—oxidative induction time.
to polyolefin resins that are in a fully stabilized/compounded
form.
4. Summary of Test Method
1.2 The values stated in SI units are to be regarded as the
4.1 The sample to be tested and the reference material are
standard.
heated at a constant rate in an inert gaseous environment
1.3 This standard does not purport to address all of the
(nitrogen). When the specified temperature has been reached,
safety concerns, if any, associated with its use. It is the
the atmosphere is changed to oxygen maintained at the same
responsibility of the user of this standard to establish appro-
flow rate. The specimen is then held at constant temperature
priate safety and health practices and determine the applica-
until the oxidative reaction is displayed on the thermal curve.
bility of regulatory limitations prior to use. Specific hazards
The time interval from when the oxygen flow is first initiated
information is given in Section 8.
to the oxidative reaction is referred to as the induction period.
NOTE 1—This test method has no ISO equivalent.
4.1.1 The end of the induction period is signaled by an
abrupt increase in the specimen’s evolved heat or temperature
2. Referenced Documents
and may be observed by a differential scanning calorimeter
2.1 ASTM Standards:
(DSC). The OIT is determined from the data recorded during
D 1928 Practice for Preparation of Compression-Molded
the isothermal test.
Polyethylene Test Sheets and Test Specimens
4.2 The type of containment system used depends on the
E 473 Terminology Relating to Thermal Analysis
intended application use of the material being tested. Polyole-
E 691 Practice for Conducting an Interlaboratory Study to
fins used in the wire and cable industry typically require copper
Determine the Precision of a Test Method
or aluminum pans, whereas polyolefins used in geomembrane
E 967 Practice for Temperature Calibration of Differential
and vapor-barrier film applications exclusively use aluminum
Scanning Calorimeters and Differential Thermal Analyz-
pans.
ers
4.3 Unless otherwise specified, the analysis temperature
used in this test has been set arbitrarily at 200.0°C. For samples
3. Terminology
that have relatively low or high stabilization levels, a different
3.1 Definitions—Definitions of terms applying to thermal
temperature may be selected (typically between 180 and
analysis appear in Terminology E 473.
220°C) to yield a thermal curve that can be interpreted and
3.2 Description of Term Specific to This Standard:
analyzed easily.
3.2.1 oxidative induction time—a relative measure of a
material’s resistance to oxidative decomposition; it is deter-
5. Significance and Use
mined by the thermoanalytical measurement of the time
5.1 The OIT is a qualitative assessment of the level (or
interval to onset of exothermic oxidation of a material at a
degree) of stabilization of the material tested. This test can be
specified temperature in an oxygen atmosphere.
used as a quality control measure to monitor the stabilization
level in formulated resin as received from a supplier, prior to
This test method is under the jurisdiction of ASTM Committee D-20 on Plastics extrusion.
and is the direct responsibility of Subcommittee D 20.30 on Thermal Properties
NOTE 2—The OIT measurement is an accelerated thermal-aging test
(Section D 20.30.07).
and as such can be misleading. Caution should be exercised in data
Current edition approved July 10, 1998. Published December 1998. Originally
published as D 3895 – 80. Last previous edition D 3895 – 97. interpretation since oxidation reaction kinetics are a function of tempera-
Annual Book of ASTM Standards, Vol 08.01.
ture and the inherent properties of the additives contained in the sample.
Annual Book of ASTM Standards, Vol 14.02.
Copyright © ASTM International, 100 Barr Harbor Drive, PO Box C700, West Conshohocken, PA 19428-2959, United States.
NOTICE: This standard has either been superseded and replaced by a new version or discontinued.
Contact ASTM International (www.astm.org) for the latest information.
D 3895
For example, OIT results are often used to select optimum resin
7.5 Indium (99.999 % purity).
formulations. Volatile antioxidants may generate poor OIT results even
7.6 Tin (99.999 % purity).
though they may perform adequately at the intended use temperature of
the finished product.
8. Hazards
NOTE 3—There is no accepted sampling procedure, nor have any
8.1 Oxygen is a strong oxidizer that accelerates combustion
definitive relationships been established for comparing OIT values on field
vigorously. Keep oil and grease away from equipment using or
samples to those on unused products, hence the use of such values for
determining life expectancy is uncertain and subjective.
containing oxygen.
8.2 The use of pressurized gas requires safe and proper
6. Apparatus
handling.
6.1 Differential Scanning Calorimeter—As a minimum re-
9. Sampling
quirement, the thermal analysis equipment shall be capable of
measuring heat flow of at least 10-mW full scale. The
9.1 The following sample preparation procedures are rec-
instrument recorder should be capable of displaying heat flow
ommended: the test sample is compression molded into sheet
or temperature differential on the Y-axis and time on the X-axis.
format (thickness of 250 6 15 μm) prior to analysis to yield
The time base must be accurate to 61 % and be readable to 0.1
consistent sample morphology and weight. Specimen disks
min.
(6.4-mm diameter) cut from the sheet will have a weight of
approximately 5 to 10 mg, depending on sample density.
NOTE 4—The OIT test is a function of a particular compound’s
stabilizer system and should not be used as a basis of comparison between
NOTE 8—If the sample requires homogenization prior to analysis, the
formulations that might contain, different resins, stabilizers, or additive
melt compounding procedure given in Appendix X1 is recommended.
packages, or all of these.
Poor sample uniformity will affect test precision adversely.
6.2 Gas-Selector Switch and Regulators, for high-purity
9.1.1 Meter out the required mass of the sample and place
nitrogen and oxygen. The distance between the gas-switching
the material in the center of the appropriately sized spacer
point and the instrument cell should be kept small to minimize
4 4
between two sheets of Mylar or Teflon coated cloth and two
the switching volume.
caul plates.
6.3 Analytical Balance, 0.1-mg sensitivity.
9.1.2 Place the assembly into the compression-molding
6.4 Bore-Hole Cutter, 6.4-mm diameter.
device. The preheat and pressing temperature should be 160°C
6.5 Specimen-Encapsulating Press.
for polyethylene and 190°C for polypropylene.
6.6 Forceps, Scalpel, and Cutting Board.
9.1.3 Heat the sample with appropriate pressure and time
6.7 Rotometer (Calibrated) or Soap-Film Flowmeter, for
settings to obtain a plaque with uniform thickness.
gas-flow calibration.
9.1.4 Remove the plaque assembly and place it between two
6.8 Specimen Holders—Degreased aluminum or oxidized-
thick steel plates (heat sink) and cool the plaque to ambient
copper pans (6.0 to 7.0-mm diameter, 1.5-mm height). Use the
temperature. Alternatively, the plaque can be quenched in ice
appropriate pan type for the material being tested.
water.
9.1.5 Determine the average thickness of the sheet to ensure
NOTE 5—Aluminum lids are required for temperature calibration.
NOTE 6—Both types of pans are commercially available. Alternatively, that it is within the allowable tolerances.
the copper pans can be fabricated manually. Details on copper pan
9.1.6 Use the bore-hole cutter to punch out a disk from the
preparation and oxidation as well as instructions for aluminum pan
plaque and record the specimen weight.
conditioning (degreasing) are given in Annex A2-Annex A4.
9.1.7 Place the specimen disk into the appropriate pan type.
NOTE 7—The material composition of the specimen holder can influ-
Use an identical empty pan as the reference. (Do not crimp or
ence the OIT test result significantly (that is, including any associated
seal the pans.)
catalytic effects).
6.9 Compression-Molding Device with Heated Platens. NOTE 9—The test sample may also be prepared using Practice D 1928
(Condition C), with the exception that controlled cooling is not necessary.
6.10 Spacer Plates, Shim Stock, Caul Plates, etc.
4 4
6.11 Mylar (Polyester Film) or Teflon (Polytetrafluoroet-
10. Procedure
hylene) Coated Cloth, for sample-plaque preparation.
10.1 Instrumental Calibration—This procedure uses a two-
6.12 Thickness Gage.
point calibration step. Indium and tin are used as the calibrants
6.13 Laboratory Gas Burner, for copper-pan oxidation.
since their respective melting points encompass the specified
6.14 Boiling Flask, with condenser and heating mantle.
analysis temperature range (180 to 220°C). Calibrate the
6.15 Forced-Air Oven.
instrument in accordance with the manufacturer’s instructions
7. Reagents and Materials using the following procedure. The calibration step should be
performed at least once per month.
7.1 All chemical reagents used in this procedure shall be
10.1.1 Place 5 6 0.5 mg of indium/tin into an aluminum
analytical grade unless otherwise specified.
sample pan. Place an aluminum cover over the pan, and seal
7.2 Oxygen—Ultra-high-purity grade (extra dry).
using the encapsulating press. Prepare an empty sealed pan to
7.3 Nitrogen—Ultra-high-purity grade (extra dry).
be used as the reference. Place the specimen and reference pans
7.4 Aluminum Pan Degreasing Solvent.
into their respective locations in the instrument cell.
10.1.2 Turn on the nitrogen-gas flow at a rate of 50 mL/min
Mylar and Teflon are registered trademarks of DuPont. (with an absolute pressure of 140 kPa).
NOTICE: This standard has either been superseded and replaced by a new version or discontinued.
Contact ASTM International (www.astm.org) for the latest information.
D 3895
FIG. 1 Indium and Tin Melting Thermal Curves
10.1.3 Use the following melting profiles: event.) This changeover point to oxygen flow is considered the
zero time of the experiment.
10.2.5 Continue isothermal operation until at least 2 min
have elapsed after the steepest point of the exotherm has been
Indium: = ambient to 145°C at 10°C/min, 145 to 165°C at
displayed (see Fig. 2). At the tester’s discretion, the test may be
1°C/min
terminated if time requirements stated in the product’s speci-
Tin: = ambient to 220°C at 10°C/min, 220 to 240°C at
fication have been met.
1°C/min
10.2.6 Upon completion of the test, switch the gas selector
NOTE 10—The specified heating rates are for calibration use only.
back to nitrogen and cool the instrument to ambient tempera-
ture. If additional testing is being conducted, cooling the
10.1.4 Adjust the temperature-calibration software (or po-
instrument cell below 60 to 70°C should be sufficient to avoid
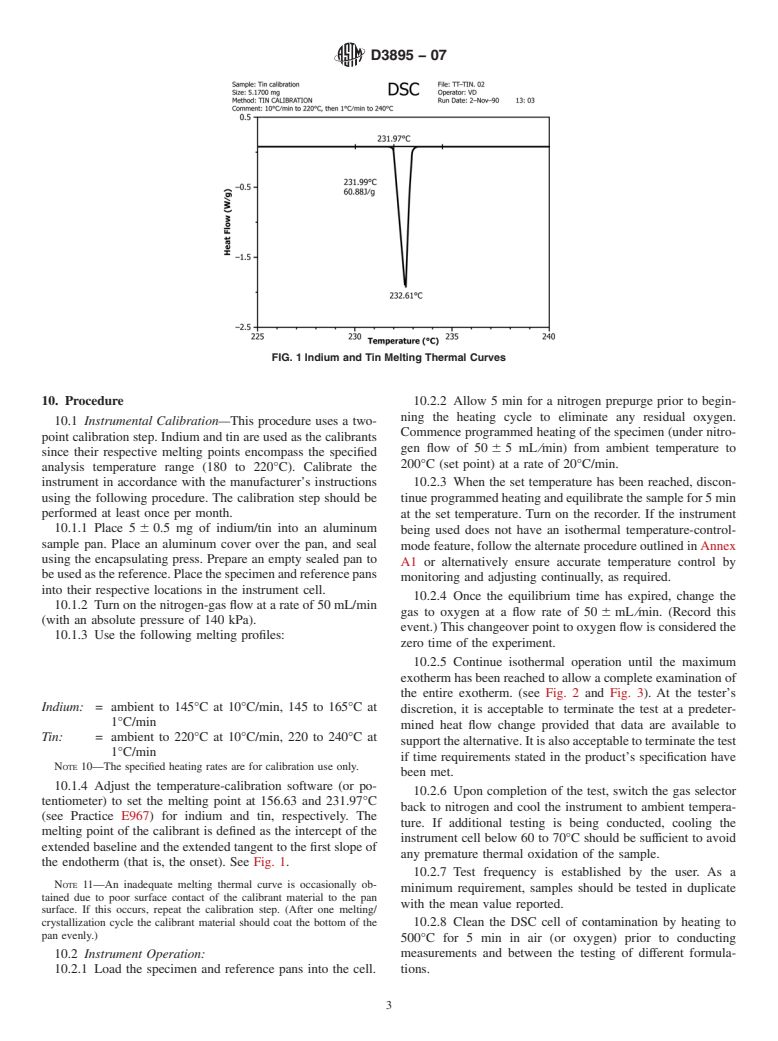
tentiometer) to set the melting point at 156.63 and 231.97°C
any premature thermal oxidation of the sample.
for indium and tin, respectively. The melting point of the
10.2.7 Test frequency is established by the user. As a
calibrant is defined as the intercept of the extended baseline
minimum requirement, samples should be tested in duplicate
and the extended tangent to the first slope of the endotherm
with the mean value reported.
(that is, the onset). See Fig. 1.
10.2.8 Clean the DSC cell of contamination by heating to
NOTE 11—An inadequate melting thermal curve is occasionally ob-
500°C for 5 min in air (or oxygen) prior to conducting
tained due to poor surface contact of the calibrant material to the pan
measurements and between the testing of different formula-
surface. If this occurs, repeat the calibration step. (After one melting/
tions.
crystallization cycle the calibrant material should coat the bottom of the
pan evenly.) 10.3 Thermal Curve Analysis—The data is plotted with the
heat-flow signal normalized to sample mass (that is, W/g) on
10.2 Instrument Operation:
the y-axis, versus time on the x-axis. The x-axis should be
10.2.1 Load the specimen and reference pans into the cell.
expanded as much as possible to facilitate analysis.
10.2.2 Allow 5 min for a nitrogen prepurge prior to begin-
10.3.1 Extend the recorded baseline beyond the oxidative
ning the heating cycle to eliminate any residual oxygen.
reactive exotherm. Extrapolate the steepest linear slope of this
Commence programmed heating of the specimen (under nitro-
exotherm to intercept the extended baseline (see Fig. 3).
gen flow of 50 6 5 mL/min) from ambient temperature to
10.3.2 The OIT is measured to within 60.1 min from zero
200°C (set point) at a rate of 20°C/min.
time to the intercept point.
10.2.3 When the set temperature has been reached, discon-
10.3.3 The tangent method used to measure the oxidation
tinue programmed heating and equilibrate the sample for 5 min
time is the preferred method, but the selection of the appropri-
at the set temperature. Turn on the recorder. If the instrument
ate tangent to the exotherm sloped line may be difficult if the
being used does not have an isothermal temperature-control-
exothermic peak has a leading edge. Exothermic peaks with
mode feature, follow the alternate procedure outlined in Annex
leading edges may occur if the oxidation reaction is slow.
A1 or alternatively ensure accurate temperature control by
monitoring and adjusting continually, as required.
NOTE 12—If the selection of the appropriate baseline is not obvious
10.2.4 Once the equilibrium time has expired, change the
using the tangent method, try the offset method. Draw a second baseline
gas to oxygen at a flow rate of 50 6 mL/min. (Record this
parallel to the first baseline at a distance of 0.05 W/g above the first
baseline. The intersection of this second line with the exotherm signal is
defined as the onset of oxidation. The time from this intersection to zero
See Practice E 967. time is the OIT.
----------------
...

Questions, Comments and Discussion

Ask us and Technical Secretary will try to provide an answer. You can facilitate discussion about the standard in here.