ASTM D660-93(2019)
(Test Method)Standard Test Method for Evaluating Degree of Checking of Exterior Paints
Standard Test Method for Evaluating Degree of Checking of Exterior Paints
SIGNIFICANCE AND USE
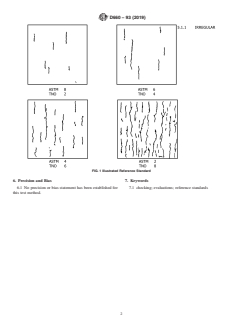
3.1 Since checking is not easily recognizable, this test method is intended to provide, through definition and illustrations, a means of evaluating the degree of this film failure.
SCOPE
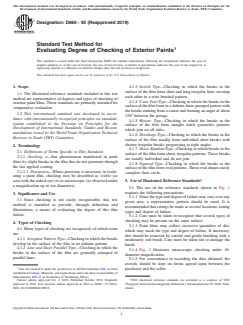
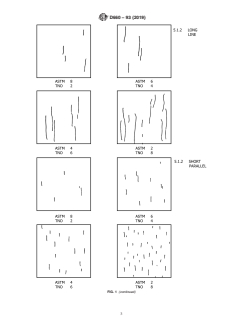
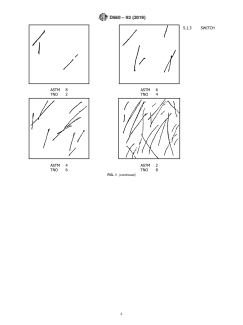
1.1 The illustrated reference standards included in this test method are representative of degrees and types of checking of exterior paint films. These standards are primarily intended for comparative evaluation.
1.2 This international standard was developed in accordance with internationally recognized principles on standardization established in the Decision on Principles for the Development of International Standards, Guides and Recommendations issued by the World Trade Organization Technical Barriers to Trade (TBT) Committee.
General Information
- Status
- Published
- Publication Date
- 30-Sep-2019
- Technical Committee
- D01 - Paint and Related Coatings, Materials, and Applications
- Drafting Committee
- D01.25 - Evaluation of Weathering Effects
Relations
- Replaces
ASTM D660-93(2011) - Standard Test Method for Evaluating Degree of Checking of Exterior Paints - Effective Date
- 01-Oct-2019
- Effective Date
- 01-Oct-2019
- Effective Date
- 01-Oct-2019
- Referred By
ASTM D661-93(2019) - Standard Test Method for Evaluating Degree of Cracking of Exterior Paints - Effective Date
- 01-Oct-2019
- Effective Date
- 01-Oct-2019
- Effective Date
- 01-Oct-2019
- Referred By
ASTM D6763-16(2022) - Standard Guide for Testing Exterior Wood Stains and Clear Water Repellents - Effective Date
- 01-Oct-2019
- Effective Date
- 01-Oct-2019
- Effective Date
- 01-Oct-2019
- Effective Date
- 01-Oct-2019
- Effective Date
- 01-Oct-2019
- Effective Date
- 01-Oct-2019
- Effective Date
- 01-Oct-2019
- Effective Date
- 01-Oct-2019
- Referred By
ASTM D3322-23 - Standard Practice for Testing Primers and Primer Surfacers Over Preformed Metal - Effective Date
- 01-Oct-2019
Overview
ASTM D660-93(2019) - Standard Test Method for Evaluating Degree of Checking of Exterior Paints - is a key international standard published by ASTM International. This test method provides definitions, illustrated reference standards, and procedures for evaluating the degree and type of checking (fine cracks that do not penetrate the paint film) that can occur on exterior paint surfaces. Developed in line with globally recognized standardization principles, including those established by the World Trade Organization’s Technical Barriers to Trade (TBT) Committee, it enables paint manufacturers, quality inspectors, contractors, and facilities managers to consistently assess paint performance and durability.
Key Topics
- Checking Defined: The standard describes “checking” as fine breaks in exterior paint films that do not go through the last applied coating. These can be visible to the naked eye or may require magnification for assessment.
- Types of Checking: Several types are identified for evaluation:
- Irregular Pattern: No specific pattern to the film breaks
- Line and Short Parallel: Breaks arranged in parallel lines
- Switch Type: Short and long irregular lines crossing, forming a wire-brushed look
- Crow Foot: Three-pronged breaks radiating from a center, like a crow's foot
- Mosaic: Geometric, straight-sided patterns joining on all sides
- Shrinkage: Short individual breaks progressing at right angles
- Short, Random: Individual, irregular, and disconnected short breaks
- Sigmoid: Oval patterns that rarely form a closed circle
- Illustrated Reference Standards: ASTM D660 provides visual reference standards to aid in consistent, comparative evaluation of checking across different samples and conditions.
- Assessment Precautions:
- Multiple locations on the painted surface should be examined because different degrees and types of failure may occur.
- The surface should be gently cleaned before evaluation, if necessary, to avoid masking by dirt without damaging the paint film.
- Records of evaluations should be maintained consistently for accurate comparisons.
Applications
ASTM D660-93(2019) is essential in the following practical scenarios:
- Quality Assurance in Manufacturing: Paint manufacturers use this standard to validate product performance before market release, ensuring resistance to checking meets customer and regulatory expectations.
- Inspection and Maintenance: Building owners, property managers, and professionals involved in coatings inspection rely on ASTM D660 to diagnose and document the condition of exterior painted surfaces for maintenance planning.
- Comparative Product Evaluation: The illustrated standards enable objective comparison between different paint types and brands under similar exposure conditions.
- Specification Compliance: Contractors and clients reference ASTM D660 for compliance checks and as part of project specifications in construction and renovation workflows.
- Dispute Resolution: The standard provides an authoritative benchmark for resolving warranty or service life questions related to exterior paint failures.
Related Standards
- ASTM D714 - Standard Test Method for Evaluating Degree of Blistering of Paints
- ASTM D661 - Standard Test Method for Evaluating Degree of Cracking of Exterior Paints
- ASTM D610 - Standard Test Method for Evaluating Degree of Rusting on Painted Steel Surfaces
- ISO 4628-4 - Paints and varnishes - Evaluation of degradation of coatings - Designation of quantity and size of defects, and of intensity of uniform changes in appearance: Part 4: Assessment of degree of cracking
Keywords: ASTM D660, exterior paint checking, paint film failure, illustrated reference standards, comparative paint evaluation, coatings inspection, paint durability assessment, checking types, paint quality standards.
Buy Documents
ASTM D660-93(2019) - Standard Test Method for Evaluating Degree of Checking of Exterior Paints
Frequently Asked Questions
ASTM D660-93(2019) is a standard published by ASTM International. Its full title is "Standard Test Method for Evaluating Degree of Checking of Exterior Paints". This standard covers: SIGNIFICANCE AND USE 3.1 Since checking is not easily recognizable, this test method is intended to provide, through definition and illustrations, a means of evaluating the degree of this film failure. SCOPE 1.1 The illustrated reference standards included in this test method are representative of degrees and types of checking of exterior paint films. These standards are primarily intended for comparative evaluation. 1.2 This international standard was developed in accordance with internationally recognized principles on standardization established in the Decision on Principles for the Development of International Standards, Guides and Recommendations issued by the World Trade Organization Technical Barriers to Trade (TBT) Committee.
SIGNIFICANCE AND USE 3.1 Since checking is not easily recognizable, this test method is intended to provide, through definition and illustrations, a means of evaluating the degree of this film failure. SCOPE 1.1 The illustrated reference standards included in this test method are representative of degrees and types of checking of exterior paint films. These standards are primarily intended for comparative evaluation. 1.2 This international standard was developed in accordance with internationally recognized principles on standardization established in the Decision on Principles for the Development of International Standards, Guides and Recommendations issued by the World Trade Organization Technical Barriers to Trade (TBT) Committee.
ASTM D660-93(2019) is classified under the following ICS (International Classification for Standards) categories: 87.040 - Paints and varnishes. The ICS classification helps identify the subject area and facilitates finding related standards.
ASTM D660-93(2019) has the following relationships with other standards: It is inter standard links to ASTM D660-93(2011), ASTM D5722-20, ASTM D5031/D5031M-13(2018), ASTM D661-93(2019), ASTM D4141/D4141M-22, ASTM D5146-10(2019), ASTM D6763-16(2022), ASTM D6577-15(2019), ASTM D3451-06(2017), ASTM D1006/D1006M-21, ASTM D4587-23, ASTM D6944-15(2020), ASTM D4082-10(2023), ASTM G210-13(2023), ASTM D3322-23. Understanding these relationships helps ensure you are using the most current and applicable version of the standard.
ASTM D660-93(2019) is available in PDF format for immediate download after purchase. The document can be added to your cart and obtained through the secure checkout process. Digital delivery ensures instant access to the complete standard document.
Standards Content (Sample)
This international standard was developed in accordance with internationally recognized principles on standardization established in the Decision on Principles for the
Development of International Standards, Guides and Recommendations issued by the World Trade Organization Technical Barriers to Trade (TBT) Committee.
Designation: D660 − 93 (Reapproved 2019)
Standard Test Method for
Evaluating Degree of Checking of Exterior Paints
This standard is issued under the fixed designation D660; the number immediately following the designation indicates the year of
original adoption or, in the case of revision, the year of last revision. A number in parentheses indicates the year of last reapproval. A
superscript epsilon (´) indicates an editorial change since the last revision or reapproval.
This standard has been approved for use by agencies of the U.S. Department of Defense.
1. Scope 4.1.3 Switch Type—Checking in which the breaks in the
surface of the film form short and long irregular lines crossing
1.1 The illustrated reference standards included in this test
each other in a wire brushed pattern.
method are representative of degrees and types of checking of
4.1.4 Crow Foot Type—Checking in which the breaks in the
exterior paint films. These standards are primarily intended for
surface of the film form in a definite three-pronged pattern with
comparative evaluation.
the breaks running from a center and forming an angle of about
1.2 This international standard was developed in accor-
120° between the prongs.
dance with internationally recognized principles on standard-
4.1.5 Mosaic Type—Checking in which the breaks in the
ization established in the Decision on Principles for the
surface of the film form straight sided, geometric patterns
Development of International Standards, Guides and Recom-
which join on all sides.
mendations issued by the World Trade Organization Technical
4.1.6 Shrinkage Type—Checking in which the breaks in the
Barriers to Trade (TBT) Committee.
surface of the film usually form individual short breaks with
shorter irregular breaks progressing at right angles.
2. Terminology
4.1.7 Short, Random Type—Checking in which breaks in the
2.1 Definitions of Terms Specific to This Standard:
surface of the film form short, irregular patterns. These breaks
2.1.1 checking, n—that phenomenon manifested in paint
are usually individual and do not join.
films by slight breaks in the film that do not penetrate through
4.1.8 Sigmoid Type—Checking in which the breaks in the
the last applied coating.
surface of the film form oval patterns. These oval shapes rarely
2.1.1.1 Discussion—Where precision is necessary in evalu-
complete their circle.
ating a paint film, checking may be described as visible (as
seen with the naked eye) or as microscopic (as observed under 5. Use of Illustrated Reference Standards
a magnification up to ten diameters).
5.1 The use of the reference standards shown in Fig. 1
requires the following precautions:
3. Significance and Use
5.1.1 Since the type and degree of failure may vary over any
3.1 Since checking is not easily recognizable, this test
given area, a representative portion should be rated. It is
method is intended to provide, through definition and
recommended that ratings be made at several locations, noting
illustrations, a means of evaluating the degree of this film
types and degree of failure.
failure.
5.1.2 Care must be taken to recognize that several types of
checking may be present on the same surface.
4. Types of Checking
5.1.3 Paint films may collect excessive quantities of dirt,
4.1 Many types of checking are recognized, of which some
which may mask the type and degree of failure. If necessary,
are:
dirt should be removed by careful and gentle brushing with
...


Questions, Comments and Discussion
Ask us and Technical Secretary will try to provide an answer. You can facilitate discussion about the standard in here.
Loading comments...