ASTM F288-96(2014)
(Specification)Standard Specification for Tungsten Wire for Electron Devices and Lamps
Standard Specification for Tungsten Wire for Electron Devices and Lamps
ABSTRACT
This specification covers three types of drawn pure and thoriated tungsten wire suitable for fabrication into parts for electron tubes, lamps, and other electron devices, and one type of rod for metal-to-glass sealing (grid wire is excepted): Type 1A, Type 1B, Type 2A, and Type 2B. Types 1A and 1B are designated as UNS R07005; Type 2A is designated as UNS R07911; and Type 2B is designated as UNS R07912. The wire and rod shall conform to the prescribed chemical requirements for thoria and tungsten and to the specified physical properties such as tensile strength, ductility, and surface defects. The weight/diameter conversion formulas are given. Wires shall be furnished in the following specified finishes: Finish 1, Finish 2, Finish 3, Finish 4, Finish 5, Finish 6, and Finish 7. The material shall be smooth, free of twists, bends, kinks, curls, and as free of dents, swaging marks, scratches, die marks, laps, seams, splits, slivers, inclusions, bumps, pits, grooves, cracks, and other physical defects Unless black finish is specified, all types of wire shall have a clean finish, free of graphite, grease, oil, and lubricants. Wire for hooks, supports, springs, anchors, and mesh shall have a bright smooth surface free of cracks holes, or craters. The requirements for straightness, and coiling and spooling are detailed as well. The following analysis and tests shall be performed: chemical analysis, tensile test, ductility test, visual inspection, dimensional measurements, and examination for surface flaws.
SCOPE
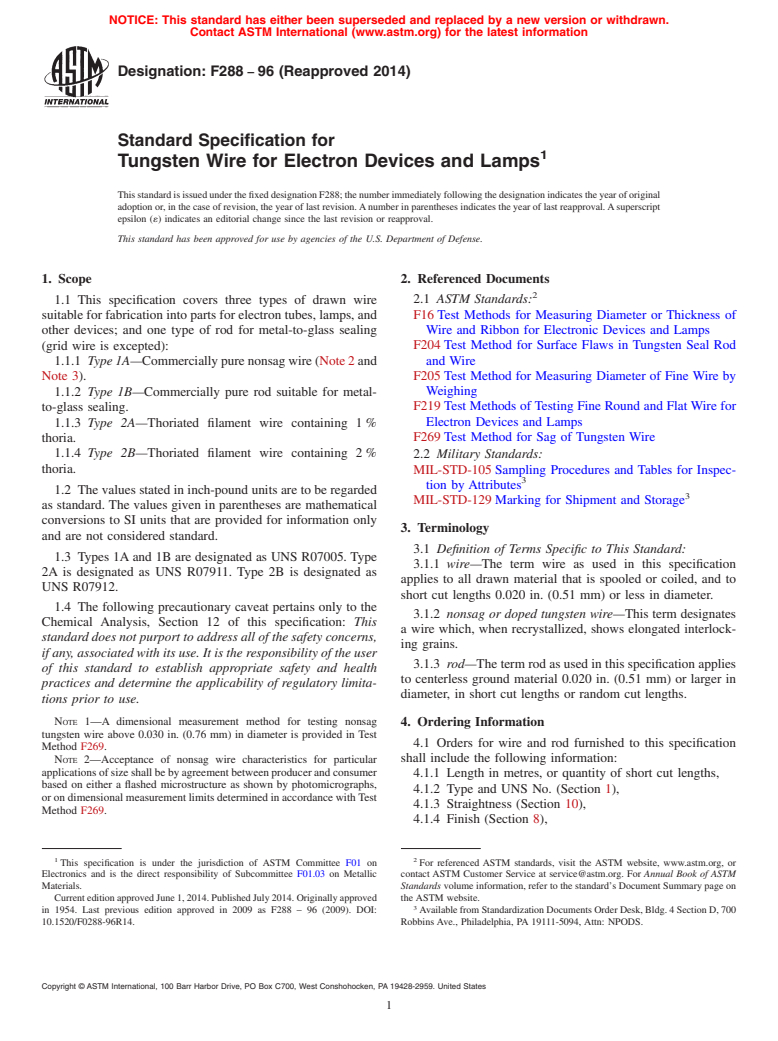
1.1 This specification covers three types of drawn wire suitable for fabrication into parts for electron tubes, lamps, and other devices; and one type of rod for metal-to-glass sealing (grid wire is excepted):
1.1.1 Type 1A—Commercially pure nonsag wire (Note 2 and Note 3).
1.1.2 Type 1B—Commercially pure rod suitable for metal-to-glass sealing.
1.1.3 Type 2A—Thoriated filament wire containing 1 % thoria.
1.1.4 Type 2B—Thoriated filament wire containing 2 % thoria.
1.2 The values stated in inch-pound units are to be regarded as standard. The values given in parentheses are mathematical conversions to SI units that are provided for information only and are not considered standard.
1.3 Types 1A and 1B are designated as UNS R07005. Type 2A is designated as UNS R07911. Type 2B is designated as UNS R07912.
1.4 The following precautionary caveat pertains only to the Chemical Analysis, Section 12 of this specification: This standard does not purport to address all of the safety concerns, if any, associated with its use. It is the responsibility of the user of this standard to establish appropriate safety and health practices and determine the applicability of regulatory limitations prior to use.
Note 1: A dimensional measurement method for testing nonsag tungsten wire above 0.030 in. (0.76 mm) in diameter is provided in Test Method F269.
Note 2: Acceptance of nonsag wire characteristics for particular applications of size shall be by agreement between producer and consumer based on either a flashed microstructure as shown by photomicrographs, or on dimensional measurement limits determined in accordance with Test Method F269.
General Information
Relations
Buy Standard
Standards Content (Sample)
NOTICE: This standard has either been superseded and replaced by a new version or withdrawn.
Contact ASTM International (www.astm.org) for the latest information
Designation:F288 −96 (Reapproved 2014)
Standard Specification for
Tungsten Wire for Electron Devices and Lamps
ThisstandardisissuedunderthefixeddesignationF288;thenumberimmediatelyfollowingthedesignationindicatestheyearoforiginal
adoptionor,inthecaseofrevision,theyearoflastrevision.Anumberinparenthesesindicatestheyearoflastreapproval.Asuperscript
epsilon (´) indicates an editorial change since the last revision or reapproval.
This standard has been approved for use by agencies of the U.S. Department of Defense.
1. Scope 2. Referenced Documents
2.1 ASTM Standards:
1.1 This specification covers three types of drawn wire
suitableforfabricationintopartsforelectrontubes,lamps,and F16Test Methods for Measuring Diameter or Thickness of
Wire and Ribbon for Electronic Devices and Lamps
other devices; and one type of rod for metal-to-glass sealing
(grid wire is excepted): F204Test Method for Surface Flaws in Tungsten Seal Rod
and Wire
1.1.1 Type 1A—Commerciallypurenonsagwire(Note2and
Note 3). F205Test Method for Measuring Diameter of Fine Wire by
Weighing
1.1.2 Type 1B—Commercially pure rod suitable for metal-
to-glass sealing. F219Test Methods ofTesting Fine Round and FlatWire for
Electron Devices and Lamps
1.1.3 Type 2A—Thoriated filament wire containing 1%
thoria. F269Test Method for Sag of Tungsten Wire
1.1.4 Type 2B—Thoriated filament wire containing 2%
2.2 Military Standards:
thoria.
MIL-STD-105Sampling Procedures and Tables for Inspec-
tion by Attributes
1.2 Thevaluesstatedininch-poundunitsaretoberegarded
MIL-STD-129Marking for Shipment and Storage
as standard. The values given in parentheses are mathematical
conversions to SI units that are provided for information only
3. Terminology
and are not considered standard.
3.1 Definition of Terms Specific to This Standard:
1.3 Types 1Aand 1B are designated as UNS R07005. Type
3.1.1 wire—The term wire as used in this specification
2A is designated as UNS R07911. Type 2B is designated as
applies to all drawn material that is spooled or coiled, and to
UNS R07912.
short cut lengths 0.020 in. (0.51 mm) or less in diameter.
1.4 The following precautionary caveat pertains only to the
3.1.2 nonsag or doped tungsten wire—This term designates
Chemical Analysis, Section 12 of this specification: This
a wire which, when recrystallized, shows elongated interlock-
standard does not purport to address all of the safety concerns,
ing grains.
if any, associated with its use. It is the responsibility of the user
3.1.3 rod—Thetermrodasusedinthisspecificationapplies
of this standard to establish appropriate safety and health
to centerless ground material 0.020 in. (0.51 mm) or larger in
practices and determine the applicability of regulatory limita-
diameter, in short cut lengths or random cut lengths.
tions prior to use.
NOTE 1—A dimensional measurement method for testing nonsag
4. Ordering Information
tungsten wire above 0.030 in. (0.76 mm) in diameter is provided in Test
4.1 Orders for wire and rod furnished to this specification
Method F269.
shall include the following information:
NOTE 2—Acceptance of nonsag wire characteristics for particular
applicationsofsizeshallbebyagreementbetweenproducerandconsumer
4.1.1 Length in metres, or quantity of short cut lengths,
based on either a flashed microstructure as shown by photomicrographs,
4.1.2 Type and UNS No. (Section 1),
orondimensionalmeasurementlimitsdeterminedinaccordancewithTest
4.1.3 Straightness (Section 10),
Method F269.
4.1.4 Finish (Section 8),
1 2
This specification is under the jurisdiction of ASTM Committee F01 on For referenced ASTM standards, visit the ASTM website, www.astm.org, or
Electronics and is the direct responsibility of Subcommittee F01.03 on Metallic contact ASTM Customer Service at service@astm.org. For Annual Book of ASTM
Materials. Standards volume information, refer to the standard’s Document Summary page on
CurrenteditionapprovedJune1,2014.PublishedJuly2014.Originallyapproved the ASTM website.
in 1954. Last previous edition approved in 2009 as F288 – 96 (2009). DOI: AvailablefromStandardizationDocumentsOrderDesk,Bldg.4SectionD,700
10.1520/F0288-96R14. Robbins Ave., Philadelphia, PA 19111-5094, Attn: NPODS.
Copyright © ASTM International, 100 Barr Harbor Drive, PO Box C700, West Conshohocken, PA 19428-2959. United States
F288−96 (2014)
4.1.5 Weight or size (Section 7) and tolerance, and 7.3.1 TheweightofType1AwireandType1Brod(density
4.1.6 Specification number. 19.17), is as follows:
wt inmg/200mm 5 diameterinmils 31.943, or
NOTE 3—Atypical ordering description for straight chemically cleaned ~ !
wire is as follows: xxxx metres, tungsten wire, Type 1A UNS R07005, ~diameterinmm! 33011
straightened, Finish 2; 280.8 mg/200 mm (63%), toASTM F288–XX.
7.3.2 The weight of Type 2A wire (density 18.80), is as
follows:
5. Chemical Composition
wtinmg/200mm 5 diameterinmils 31.905, or
5.1 Thewireandrodshallconformtothechemicalrequire- ~ !
diameterinmm 32953
~ !
ments specified in Table 1. The sample for analysis shall be
representative of the lot submitted. Lot size, sample size, and
7.3.3 The weight of Type 2B wire (density 18.50), is as
sampling method shall be as agreed upon by the supplier and
follows:
purchaser.
wtinmg/200mm 5 ~diameterinmils! 31.875, or
~diameterinmm! 32906
6. Physical Properties
6.1 Tensile Strength—The tensile strength of a 10-in. (250-
8. Workmanship, Finish, and Appearance
mm) gage length of wire in grams per milligram per 200 mm
8.1 Furnish the wire in the following finishes:
shall be within the limits specified in Table 2 when tested in
8.1.1 Finish 1—Black, as-drawn,
accordance with 13.1.
8.1.2 Finish 2—Chemically cleaned,
6.2 General Ductility Requirements —The ductility of
8.1.3 Finish 3—Chemically cleaned and stress-relieved.
Types 1A, 2A, and 2B wire shall be sufficient to meet the
8.1.4 Finish 4—Reducing atmosphere cleaned and
following requirements:
annealed,
6.2.1 Wire up to 75 mg/200 mm, Inclusive —Six1-mlengths
8.1.5 Finish 5—Etched, and
shall be tested in accordance with 13.2. The wire shall not
8.1.6 Finish 6—Electropolished.
break more than two times in the six tests. Where required, a
8.2 The rod shall be furnished in the following finish:
lower limit may be negotiated between purchaser and seller.
8.2.1 Finish 7—Centerless ground.
6.2.2 Wire over 75 mg/200 mm—Thirty successive close-
wound turns completely around mandrels shall be free of
9. General Requirements
splittingorcrackingwhentestedinaccordancewith13.2.2and
9.1 The material shall be smooth, free of twists, bends,
examined at a magnification of 30×.
6.2.3 Special Ductility Requirements —Wire for certain kinks,curls,andasfreeofdents,swagingmarks,scratches,die
marks, laps, seams, splits, slivers, inclusions, bumps, pits,
applications may require a special ductility as agreed upon
between the purchaser and the seller. grooves, cracks, and other physical defects when examined at
amagnificationof30×asbestcommercialpracticewillpermit.
6.3 Surface Defects— Type 1B rod shall not show faults
when tested in accordance with 13.5. 9.2 Unless black finish is specified, all types of wire shall
have a clean finish, free of graphite, grease, oil, and lubricants.
7. Dimensions, Weights, and Permissible Variations
All finishes shall be as free of dirt, oxide, stains, scale, and
other surface defects, as best commercial practice permits.
7.1 Dimensional tolerances for Type 1A (nonsag) wire for
Wire for hooks, supports, springs, anchors, and mesh shall
use as incandescent filaments shall conform to the require-
have a bright smooth surface free of cracks, holes, or craters
ments specified in Table 3.
when examined at a magnification of 10×.
NOTE 4—Tolerances are industry standards; closer tolerances may be
9.3 Rod of Type 1B shall have a bright smooth surface and
obtained in certain instances, usually at a premium.
be capable of making acceptable metal-to-glass seals when
7.2 Out-of-roundness of wire or rod over 0.020 in. (0.51
tested in accordance with Test Method F204.
mm)indiametershallbewithin5%ofthemaximumdiameter,
when measured by a method agreed upon by supplier and
10. Straightness
purchaser. A referee method for this test is contained in
Procedure B of Test Methods F16. 10.1 When ordered as straightened, straightness of wire
3.00 mg/200 mm and larger shall be specified as the radius of
7.3 Weight/Diameter Conversion Formulas:
curvature or camber of a given length of wire as agreed upon
between the purchaser and supplier. For wire under 3.00
A
TABLE 1 Chemical Requirements
mg/200 mm, alternative methods for straightness requirements
Type, Thoria, weight Tungsten, weight may be used as agreed upon between the purchaser and the
UNS number % %
supplier.
1A and 1B (R07005) . 99.95 min
2A (R07911) 0.8 min, 1.2 max balance
2B (R07912) 1.7 min, 2.2 max balance 11. Coiling and Spooling
A
For all Types:
11.1 Spoolsandbandsshallbecleanandfreeofopenseams
Other elements (each)—100 ppm max.
or projections which might catch or tangle the wire during
Total other elements—500 ppm max.
winding or unwinding.
F288−96 (2014)
A
TABLE 2 Tensile Properties of Nonsag Tungsten Wire (Type 1A)
Tensile Strength, g/mg/200 mm
High Tensile
Medium Low Tensile
Diameter of Wire, in. Wire
Weight of Wire, mg/200 mm Tensile Wire Wire
(mm, Approximate) (Finishes
(Finish 3) (Finish 4)
1 and 2)
Min Max Min Max Min Max
Up to 1.95 Up to 0.001 (0.03), incl 80 110 70
...
This document is not an ASTM standard and is intended only to provide the user of an ASTM standard an indication of what changes have been made to the previous version. Because
it may not be technically possible to adequately depict all changes accurately, ASTM recommends that users consult prior editions as appropriate. In all cases only the current version
of the standard as published by ASTM is to be considered the official document.
Designation: F288 − 96 (Reapproved 2009) F288 − 96 (Reapproved 2014)
Standard Specification for
Tungsten Wire for Electron Devices and Lamps
This standard is issued under the fixed designation F288; the number immediately following the designation indicates the year of original
adoption or, in the case of revision, the year of last revision. A number in parentheses indicates the year of last reapproval. A superscript
epsilon (´) indicates an editorial change since the last revision or reapproval.
This standard has been approved for use by agencies of the U.S. Department of Defense.
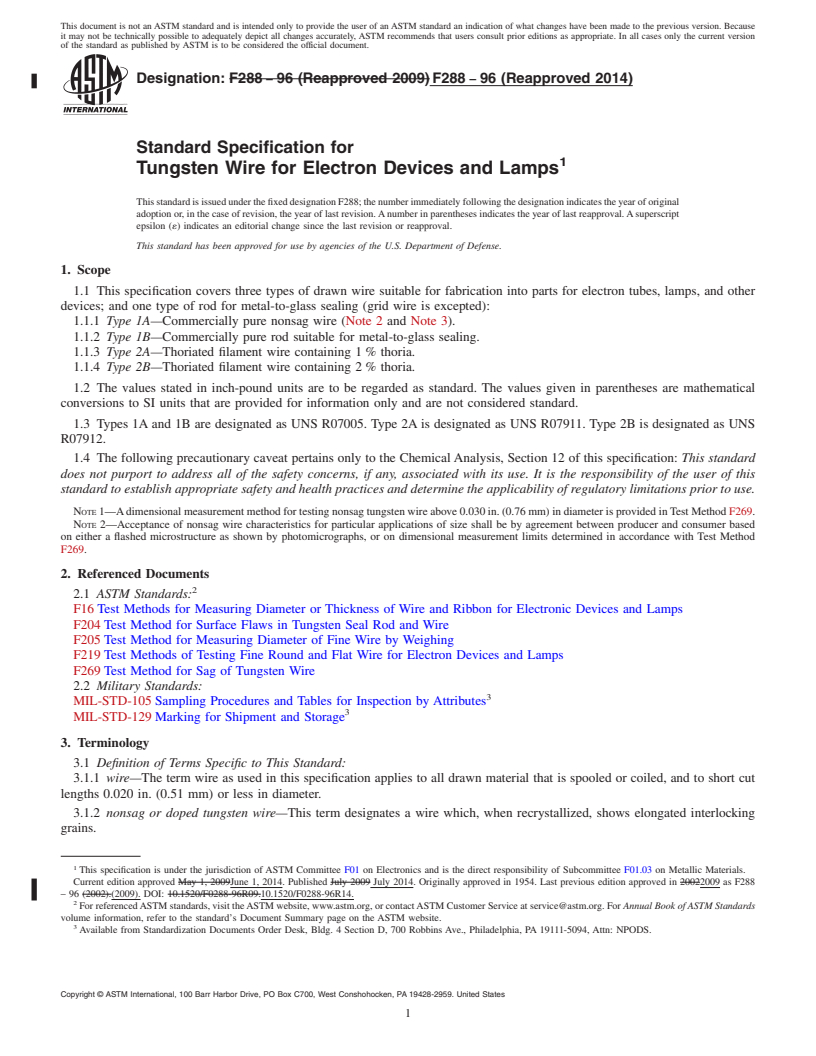
1. Scope
1.1 This specification covers three types of drawn wire suitable for fabrication into parts for electron tubes, lamps, and other
devices; and one type of rod for metal-to-glass sealing (grid wire is excepted):
1.1.1 Type 1A—Commercially pure nonsag wire (Note 2 and Note 3).
1.1.2 Type 1B—Commercially pure rod suitable for metal-to-glass sealing.
1.1.3 Type 2A—Thoriated filament wire containing 1 % thoria.
1.1.4 Type 2B—Thoriated filament wire containing 2 % thoria.
1.2 The values stated in inch-pound units are to be regarded as standard. The values given in parentheses are mathematical
conversions to SI units that are provided for information only and are not considered standard.
1.3 Types 1A and 1B are designated as UNS R07005. Type 2A is designated as UNS R07911. Type 2B is designated as UNS
R07912.
1.4 The following precautionary caveat pertains only to the Chemical Analysis, Section 12 of this specification: This standard
does not purport to address all of the safety concerns, if any, associated with its use. It is the responsibility of the user of this
standard to establish appropriate safety and health practices and determine the applicability of regulatory limitations prior to use.
NOTE 1—A dimensional measurement method for testing nonsag tungsten wire above 0.030 in. (0.76 mm) in diameter is provided in Test Method F269.
NOTE 2—Acceptance of nonsag wire characteristics for particular applications of size shall be by agreement between producer and consumer based
on either a flashed microstructure as shown by photomicrographs, or on dimensional measurement limits determined in accordance with Test Method
F269.
2. Referenced Documents
2.1 ASTM Standards:
F16 Test Methods for Measuring Diameter or Thickness of Wire and Ribbon for Electronic Devices and Lamps
F204 Test Method for Surface Flaws in Tungsten Seal Rod and Wire
F205 Test Method for Measuring Diameter of Fine Wire by Weighing
F219 Test Methods of Testing Fine Round and Flat Wire for Electron Devices and Lamps
F269 Test Method for Sag of Tungsten Wire
2.2 Military Standards:
MIL-STD-105 Sampling Procedures and Tables for Inspection by Attributes
MIL-STD-129 Marking for Shipment and Storage
3. Terminology
3.1 Definition of Terms Specific to This Standard:
3.1.1 wire—The term wire as used in this specification applies to all drawn material that is spooled or coiled, and to short cut
lengths 0.020 in. (0.51 mm) or less in diameter.
3.1.2 nonsag or doped tungsten wire—This term designates a wire which, when recrystallized, shows elongated interlocking
grains.
This specification is under the jurisdiction of ASTM Committee F01 on Electronics and is the direct responsibility of Subcommittee F01.03 on Metallic Materials.
Current edition approved May 1, 2009June 1, 2014. Published July 2009 July 2014. Originally approved in 1954. Last previous edition approved in 20022009 as F288
– 96 (2002).(2009). DOI: 10.1520/F0288-96R09.10.1520/F0288-96R14.
For referenced ASTM standards, visit the ASTM website, www.astm.org, or contact ASTM Customer Service at service@astm.org. For Annual Book of ASTM Standards
volume information, refer to the standard’s Document Summary page on the ASTM website.
Available from Standardization Documents Order Desk, Bldg. 4 Section D, 700 Robbins Ave., Philadelphia, PA 19111-5094, Attn: NPODS.
Copyright © ASTM International, 100 Barr Harbor Drive, PO Box C700, West Conshohocken, PA 19428-2959. United States
F288 − 96 (2014)
3.1.3 rod—The term rod as used in this specification applies to centerless ground material 0.020 in. (0.51 mm) or larger in
diameter, in short cut lengths or random cut lengths.
4. Ordering Information
4.1 Orders for wire and rod furnished to this specification shall include the following information:
4.1.1 Length in metres, or quantity of short cut lengths,
4.1.2 Type and UNS No. (Section 1),
4.1.3 Straightness (Section 10),
4.1.4 Finish (Section 8),
4.1.5 Weight or size (Section 7) and tolerance, and
4.1.6 Specification number.
NOTE 3—A typical ordering description for straight chemically cleaned wire is as follows: xxxx metres, tungsten wire, Type 1A UNS R07005,
straightened, Finish 2; 280.8 mg/200 mm (63 %), to ASTM F288 – XX.
5. Chemical Composition
5.1 The wire and rod shall conform to the chemical requirements specified in Table 1. The sample for analysis shall be
representative of the lot submitted. Lot size, sample size, and sampling method shall be as agreed upon by the supplier and
purchaser.
6. Physical Properties
6.1 Tensile Strength—The tensile strength of a 10-in. (250-mm) gage length of wire in grams per milligram per 200 mm shall
be within the limits specified in Table 2 when tested in accordance with 13.1.
6.2 General Ductility Requirements —The ductility of Types 1A, 2A, and 2B wire shall be sufficient to meet the following
requirements:
6.2.1 Wire up to 75 mg/200 mm, Inclusive —Six 1-m lengths shall be tested in accordance with 13.2. The wire shall not break
more than two times in the six tests. Where required, a lower limit may be negotiated between purchaser and seller.
6.2.2 Wire over 75 mg/200 mm—Thirty successive close-wound turns completely around mandrels shall be free of splitting or
cracking when tested in accordance with 13.2.2 and examined at a magnification of 30×.
6.2.3 Special Ductility Requirements —Wire for certain applications may require a special ductility as agreed upon between the
purchaser and the seller.
6.3 Surface Defects— Type 1B rod shall not show faults when tested in accordance with 13.5.
7. Dimensions, Weights, and Permissible Variations
7.1 Dimensional tolerances for Type 1A (nonsag) wire for use as incandescent filaments shall conform to the requirements
specified in Table 3.
NOTE 4—Tolerances are industry standards; closer tolerances may be obtained in certain instances, usually at a premium.
7.2 Out-of-roundness of wire or rod over 0.020 in. (0.51 mm) in diameter shall be within 5 % of the maximum diameter, when
measured by a method agreed upon by supplier and purchaser. A referee method for this test is contained in Procedure B of Test
Methods F16.
7.3 Weight/Diameter Conversion Formulas:
7.3.1 The weight of Type 1A wire and Type 1B rod (density 19.17), is as follows:
wt in mg/200 mm 5 diameter in mils 31.943, or
~ !
diameter in mm 33011
~ !
7.3.2 The weight of Type 2A wire (density 18.80), is as follows:
wt in mg/200 mm 5 diameter in mils 31.905, or
~ !
diameter in mm 32953
~ !
A
TABLE 1 Chemical Requirements
Type, Thoria, weight Tungsten, weight
UNS number % %
1A and 1B (R07005) . 99.95 min
2A (R07911) 0.8 min, 1.2 max balance
2B (R07912) 1.7 min, 2.2 max balance
A
For all Types:
Other elements (each)—100 ppm max.
Total other elements—500 ppm max.
F288 − 96 (2014)
A
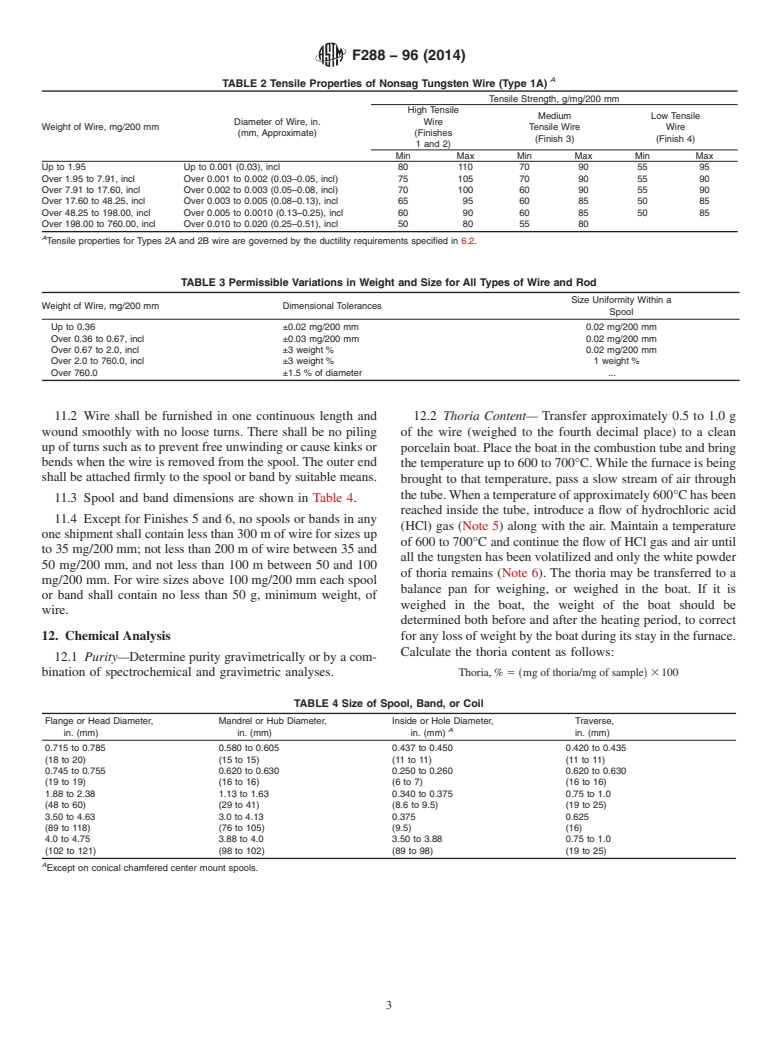
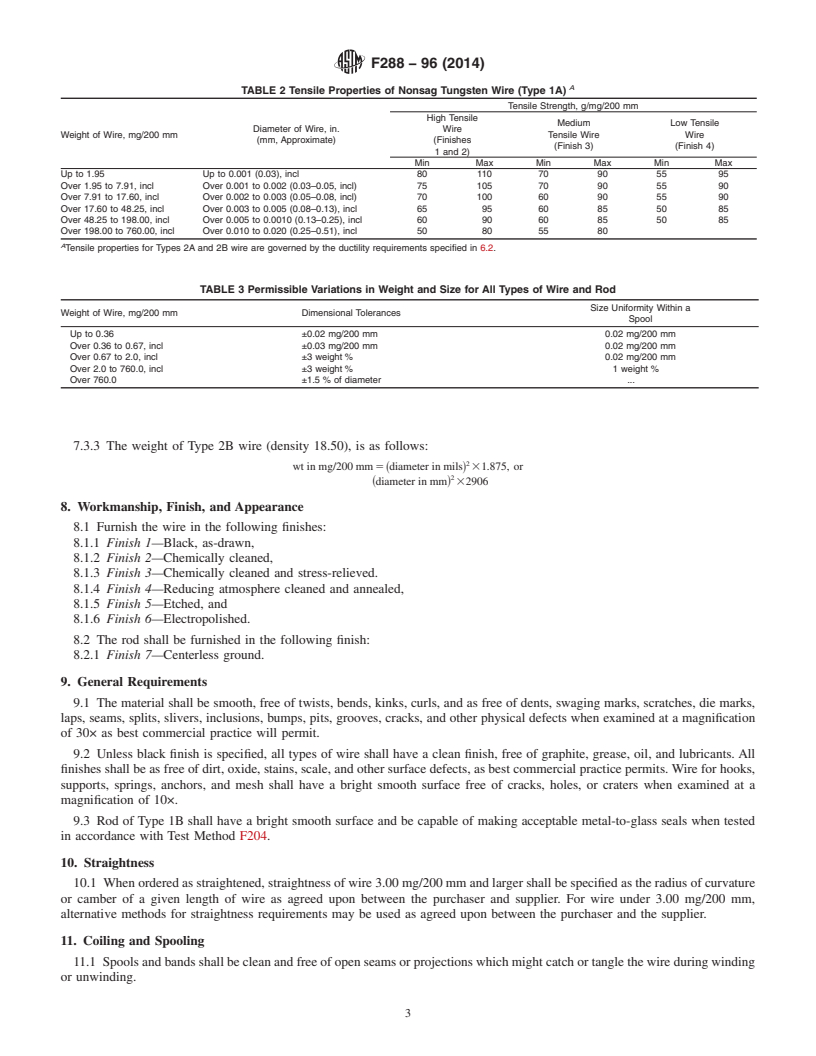
TABLE 2 Tensile Properties of Nonsag Tungsten Wire (Type 1A)
Tensile Strength, g/mg/200 mm
High Tensile
Medium Low Tensile
Diameter of Wire, in. Wire
Weight of Wire, mg/200 mm Tensile Wire Wire
(mm, Approximate) (Finishes
(Finish 3) (Finish 4)
1 and 2)
Min Max Min Max Min Max
Up to 1.95 Up to 0.001 (0.03), incl 80 110 70 90 55 95
Over 1.95 to 7.91, incl Over 0.001 to 0.002 (0.03–0.05, incl) 75 105 70 90 55 90
Over 7.91 to 17.60, incl Over 0.002 to 0.003 (0.05–0.08, incl) 70 100 60 90 55 90
Over 17.60 to 48.25, incl Over 0.003 to 0.005 (0.08–0.13), incl 65 95 60 85 50 85
Over 48.25 to 198.00, incl Over 0.005 to 0.0010 (0.13–0.25), incl 60 90 60 85 50 85
Over 198.00 to 760.00, incl Over 0.010 to 0.020 (0.25–0.51), incl 50 80 55 80
A
Tensile properties for Types 2A and 2B wire are governed by the ductility requirements specified in 6.2.
TABLE 3 Permissible Variations in Weight and Size for All Types of Wire and Rod
Size Uniformity Within a
Weight of Wire, mg/200 mm Dimensional Tolerances
Spool
Up to 0.36 ±0.02 mg/200 mm 0.02 mg/200 mm
Over 0.36 to 0.67, incl ±0.03 mg/200 mm 0.02 mg/200 mm
Over 0.67 to 2.0, incl ±3 weight % 0.02 mg/200 mm
Over 2.0 to 760.0, incl ±3 weight % 1 weight %
Over 760.0 ±1.5 % of diameter .
7.3.3 The weight of Type 2B wire (density 18.50), is as follows:
wt in mg/200 mm 5 diameter in mils 31.875, or
~ !
~diameter in mm! 32906
8. Workmanship, Finish, and Appearance
8.1 Furnish the wire in the following finishes:
8.1.1 Finish 1—Black, as-drawn,
8.1.2 Finish 2—Chemically cleaned,
8.1.3 Finish 3—Chemically cleaned and stress-relieved.
8.1.4 Finish 4—Reducing atmosphere cleaned and annealed,
8.1.5 Finish 5—Etched, and
8.1.6 Finish 6—Electropolished.
8.2 The rod shall be furnished in the following finish:
8.2.1 Finish 7—Centerless ground.
9. General Requirements
9.1 The material shall be smooth, free of twists, bends, kinks, curls, and as free of dents, swaging marks, scratches, die marks,
laps, seams, splits, slivers, inclusions, bumps, pits, grooves, cracks, and other physical defects when examined at a magnification
of 30× as best commercial practice will permit.
9.2 Unless
...


Questions, Comments and Discussion
Ask us and Technical Secretary will try to provide an answer. You can facilitate discussion about the standard in here.