ASTM E570-20
(Practice)Standard Practice for Flux Leakage Examination of Ferromagnetic Steel Tubular Products
Standard Practice for Flux Leakage Examination of Ferromagnetic Steel Tubular Products
SIGNIFICANCE AND USE
5.1 This practice outlines a procedure for examining ferromagnetic tubular products using the flux leakage method. If properly applied, this method is capable of detecting the presence and location of significant longitudinally or transversely oriented discontinuities, such as pits, scabs, slivers, gouges, roll-ins, laps, seams, cracks, holes, and improper welds in ferromagnetic tubes under inspection. In addition, the severity of a discontinuity may be estimated and a rejection level set with respect to the magnitude of the electromagnetic indication produced by the discontinuity.
5.2 The response from natural discontinuities can be significantly different from the response for artificial discontinuities, such as drilled holes or notches of equivalent depth. For this reason, sufficient work should be done to determine the conditions necessary to detect and mark natural discontinuities whose characteristics will adversely affect the serviceability of the tube, in order to establish acceptance criteria between the supplier and purchaser.
SCOPE
1.1 This practice covers the application and standardization of equipment using the flux leakage test method for detection of outer surface and inner surface discontinuities in ferromagnetic steel tubular products (Note 1) of uniform cross section, such as seamless and welded tubing. While this method may be sensitive to subsurface discontinuities, it is not the primary method used to identify these types of discontinuities. A secondary method, such as Ultrasonic Testing, should be considered for assessment of these types of discontinuities.
Note 1: The term “tube” or “tubular product” will be used to refer to both pipe and tubing.
1.2 This practice is intended for use on tubular products having outside diameters from approximately 1/2 to 24 in. (12.7 to 610 mm) with wall thicknesses to 1/2 in. (12.7 mm). These techniques have been used for other sizes, however, and may be so specified upon contractual agreement between the purchaser and the supplier.
1.3 This practice does not establish acceptance criteria; they must be specified by the using parties.
1.4 Units—The values stated in inch-pound units are to be regarded as standard. The values given in parentheses are mathematical conversions to SI units that are provided for information only and are not considered standard.
1.5 This standard does not purport to address all of the safety concerns, if any, associated with its use. It is the responsibility of the user of this standard to establish appropriate safety, health, and environmental practices and determine the applicability of regulatory limitations prior to use.
1.6 This international standard was developed in accordance with internationally recognized principles on standardization established in the Decision on Principles for the Development of International Standards, Guides and Recommendations issued by the World Trade Organization Technical Barriers to Trade (TBT) Committee.
General Information
- Status
- Published
- Publication Date
- 31-May-2020
- Technical Committee
- E07 - Nondestructive Testing
- Drafting Committee
- E07.07 - Electromagnetic Method
Relations
- Effective Date
- 01-Jun-2020
- Effective Date
- 01-Feb-2024
- Effective Date
- 01-Dec-2019
- Effective Date
- 01-Mar-2019
- Effective Date
- 01-Jan-2018
- Effective Date
- 15-Jun-2017
- Effective Date
- 01-Feb-2017
- Effective Date
- 01-Aug-2016
- Effective Date
- 01-Feb-2016
- Effective Date
- 01-Dec-2015
- Effective Date
- 01-Sep-2015
- Effective Date
- 01-Jun-2014
- Effective Date
- 01-Jun-2014
- Effective Date
- 01-Dec-2013
- Effective Date
- 15-Jun-2013
Overview
ASTM E570-20: Standard Practice for Flux Leakage Examination of Ferromagnetic Steel Tubular Products establishes a procedure for using the flux leakage test method to detect surface and near-surface discontinuities in ferromagnetic steel tubular products such as pipes and tubes. This nondestructive testing (NDT) method is suitable for identifying and locating longitudinal and transverse flaws, including pits, scabs, slivers, gouges, roll-ins, laps, seams, cracks, holes, and improper welds on steel tubes. The standard outlines the requirements for both the method and standardization of test equipment, providing guidance to both suppliers and purchasers.
Key Topics
Scope of Application:
- Applies to steel tubular products (including seamless and welded tubes) with outside diameters from approximately 1/2 to 24 inches (12.7 to 610 mm) and wall thicknesses up to 1/2 inch (12.7 mm).
- Can be used for other sizes upon agreement between supplier and purchaser.
Flux Leakage Testing Fundamentals:
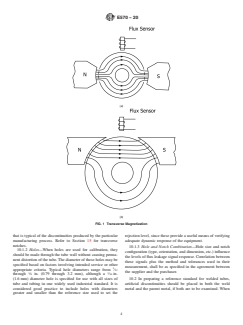
- Magnetizes the section of tubing under test to near-saturation.
- Utilizes magnetic flux sensors placed on or above tube surfaces.
- As the sensor or tube moves, it detects variations in magnetic flux, indicating discontinuities.
Types of Detectable Discontinuities:
- Longitudinally or transversely oriented flaws, such as:
- Surface or subsurface pits
- Laps, seams, and cracks
- Slivers and roll-ins
- Gouges and holes
- Welding defects
- Longitudinally or transversely oriented flaws, such as:
Setting Rejection Levels:
- Discontinuity severity can be estimated based on signal amplitude.
- Acceptance criteria must be established by agreement between supplier and purchaser.
Reference Standards and Equipment Setup:
- Use of reference standards containing artificial discontinuities (notches and holes) for equipment calibration.
- Procedures for standardizing sensitivity and verifying detection capabilities.
Personnel Qualification:
- NDT personnel should be qualified under recognized schemes such as ISO 9712, ANSI/ASNT CP-189, SNT-TC-1A, or NAS-410.
Applications
ASTM E570-20 is widely implemented in industries where the integrity and safety of steel tubular products are critical, including:
- Oil & Gas Pipelines: Ensuring pipeline reliability by detecting manufacturing-related or in-service defects before commissioning.
- Boiler and Heat Exchanger Tubes: Verifying the quality and fitness for service of tubes subjected to high pressure and temperature.
- Structural Steel Tubing: Inspecting tubes used in construction or heavy machinery to prevent failures due to hidden flaws.
- Automotive and Aerospace Tubing: Supporting high-performance applications requiring defect-free steel tubes.
The flux leakage examination method is valued for its speed, ability to scan full tube lengths, suitability for automated inspection, and effectiveness in identifying both inner and outer surface defects.
Related Standards
- ASTM E543: Specification for agencies performing nondestructive testing.
- ASTM E1316: Terminology for nondestructive examinations.
- ISO 9712: Qualification and certification of NDT personnel.
- ANSI/ASNT CP-189, SNT-TC-1A, NAS-410: Standards for the qualification and certification of nondestructive testing personnel.
ASTM E570-20 complements other test methods, such as ultrasonic testing, particularly when enhanced subsurface flaw detection is required. Suppliers, purchasers, and quality assurance specialists in the steel tube sector rely on this standard to ensure consistency, reliability, and robust flaw detection.
Keywords: ASTM E570-20, flux leakage, nondestructive testing, ferromagnetic steel tubes, pipe inspection, longitudinal discontinuities, transverse discontinuities, steel tubular products, NDT, magnetic flux leakage, quality assurance
Buy Documents
ASTM E570-20 - Standard Practice for Flux Leakage Examination of Ferromagnetic Steel Tubular Products
REDLINE ASTM E570-20 - Standard Practice for Flux Leakage Examination of Ferromagnetic Steel Tubular Products
Get Certified
Connect with accredited certification bodies for this standard

Element Materials Technology
Materials testing and product certification.

Inštitut za kovinske materiale in tehnologije
Institute of Metals and Technology. Materials testing, metallurgical analysis, NDT.
Sponsored listings
Frequently Asked Questions
ASTM E570-20 is a standard published by ASTM International. Its full title is "Standard Practice for Flux Leakage Examination of Ferromagnetic Steel Tubular Products". This standard covers: SIGNIFICANCE AND USE 5.1 This practice outlines a procedure for examining ferromagnetic tubular products using the flux leakage method. If properly applied, this method is capable of detecting the presence and location of significant longitudinally or transversely oriented discontinuities, such as pits, scabs, slivers, gouges, roll-ins, laps, seams, cracks, holes, and improper welds in ferromagnetic tubes under inspection. In addition, the severity of a discontinuity may be estimated and a rejection level set with respect to the magnitude of the electromagnetic indication produced by the discontinuity. 5.2 The response from natural discontinuities can be significantly different from the response for artificial discontinuities, such as drilled holes or notches of equivalent depth. For this reason, sufficient work should be done to determine the conditions necessary to detect and mark natural discontinuities whose characteristics will adversely affect the serviceability of the tube, in order to establish acceptance criteria between the supplier and purchaser. SCOPE 1.1 This practice covers the application and standardization of equipment using the flux leakage test method for detection of outer surface and inner surface discontinuities in ferromagnetic steel tubular products (Note 1) of uniform cross section, such as seamless and welded tubing. While this method may be sensitive to subsurface discontinuities, it is not the primary method used to identify these types of discontinuities. A secondary method, such as Ultrasonic Testing, should be considered for assessment of these types of discontinuities. Note 1: The term “tube” or “tubular product” will be used to refer to both pipe and tubing. 1.2 This practice is intended for use on tubular products having outside diameters from approximately 1/2 to 24 in. (12.7 to 610 mm) with wall thicknesses to 1/2 in. (12.7 mm). These techniques have been used for other sizes, however, and may be so specified upon contractual agreement between the purchaser and the supplier. 1.3 This practice does not establish acceptance criteria; they must be specified by the using parties. 1.4 Units—The values stated in inch-pound units are to be regarded as standard. The values given in parentheses are mathematical conversions to SI units that are provided for information only and are not considered standard. 1.5 This standard does not purport to address all of the safety concerns, if any, associated with its use. It is the responsibility of the user of this standard to establish appropriate safety, health, and environmental practices and determine the applicability of regulatory limitations prior to use. 1.6 This international standard was developed in accordance with internationally recognized principles on standardization established in the Decision on Principles for the Development of International Standards, Guides and Recommendations issued by the World Trade Organization Technical Barriers to Trade (TBT) Committee.
SIGNIFICANCE AND USE 5.1 This practice outlines a procedure for examining ferromagnetic tubular products using the flux leakage method. If properly applied, this method is capable of detecting the presence and location of significant longitudinally or transversely oriented discontinuities, such as pits, scabs, slivers, gouges, roll-ins, laps, seams, cracks, holes, and improper welds in ferromagnetic tubes under inspection. In addition, the severity of a discontinuity may be estimated and a rejection level set with respect to the magnitude of the electromagnetic indication produced by the discontinuity. 5.2 The response from natural discontinuities can be significantly different from the response for artificial discontinuities, such as drilled holes or notches of equivalent depth. For this reason, sufficient work should be done to determine the conditions necessary to detect and mark natural discontinuities whose characteristics will adversely affect the serviceability of the tube, in order to establish acceptance criteria between the supplier and purchaser. SCOPE 1.1 This practice covers the application and standardization of equipment using the flux leakage test method for detection of outer surface and inner surface discontinuities in ferromagnetic steel tubular products (Note 1) of uniform cross section, such as seamless and welded tubing. While this method may be sensitive to subsurface discontinuities, it is not the primary method used to identify these types of discontinuities. A secondary method, such as Ultrasonic Testing, should be considered for assessment of these types of discontinuities. Note 1: The term “tube” or “tubular product” will be used to refer to both pipe and tubing. 1.2 This practice is intended for use on tubular products having outside diameters from approximately 1/2 to 24 in. (12.7 to 610 mm) with wall thicknesses to 1/2 in. (12.7 mm). These techniques have been used for other sizes, however, and may be so specified upon contractual agreement between the purchaser and the supplier. 1.3 This practice does not establish acceptance criteria; they must be specified by the using parties. 1.4 Units—The values stated in inch-pound units are to be regarded as standard. The values given in parentheses are mathematical conversions to SI units that are provided for information only and are not considered standard. 1.5 This standard does not purport to address all of the safety concerns, if any, associated with its use. It is the responsibility of the user of this standard to establish appropriate safety, health, and environmental practices and determine the applicability of regulatory limitations prior to use. 1.6 This international standard was developed in accordance with internationally recognized principles on standardization established in the Decision on Principles for the Development of International Standards, Guides and Recommendations issued by the World Trade Organization Technical Barriers to Trade (TBT) Committee.
ASTM E570-20 is classified under the following ICS (International Classification for Standards) categories: 77.040.20 - Non-destructive testing of metals; 77.140.40 - Steels with special magnetic properties. The ICS classification helps identify the subject area and facilitates finding related standards.
ASTM E570-20 has the following relationships with other standards: It is inter standard links to ASTM E570-15e1, ASTM E1316-24, ASTM E1316-19b, ASTM E1316-19, ASTM E1316-18, ASTM E1316-17a, ASTM E1316-17, ASTM E1316-16a, ASTM E1316-16, ASTM E1316-15a, ASTM E1316-15, ASTM E1316-14, ASTM E1316-14e1, ASTM E1316-13d, ASTM E1316-13c. Understanding these relationships helps ensure you are using the most current and applicable version of the standard.
ASTM E570-20 is available in PDF format for immediate download after purchase. The document can be added to your cart and obtained through the secure checkout process. Digital delivery ensures instant access to the complete standard document.
Standards Content (Sample)
This international standard was developed in accordance with internationally recognized principles on standardization established in the Decision on Principles for the
Development of International Standards, Guides and Recommendations issued by the World Trade Organization Technical Barriers to Trade (TBT) Committee.
Designation: E570 − 20
Standard Practice for
Flux Leakage Examination of Ferromagnetic Steel Tubular
Products
This standard is issued under the fixed designation E570; the number immediately following the designation indicates the year of
original adoption or, in the case of revision, the year of last revision. A number in parentheses indicates the year of last reapproval. A
superscript epsilon (´) indicates an editorial change since the last revision or reapproval.
This standard has been approved for use by agencies of the U.S. Department of Defense.
1. Scope* mendations issued by the World Trade Organization Technical
Barriers to Trade (TBT) Committee.
1.1 This practice covers the application and standardization
of equipment using the flux leakage test method for detection
2. Referenced Documents
of outer surface and inner surface discontinuities in ferromag-
2.1 ASTM Standards:
netic steel tubular products (Note 1) of uniform cross section,
E543 Specification for Agencies Performing Nondestructive
suchasseamlessandweldedtubing.Whilethismethodmaybe
Testing
sensitive to subsurface discontinuities, it is not the primary
E1316 Terminology for Nondestructive Examinations
method used to identify these types of discontinuities. A
2.2 Other Documents:
secondary method, such as Ultrasonic Testing, should be
SNT-TC-1A Recommended Practice for Personnel Qualifi-
considered for assessment of these types of discontinuities.
cation and Certification of NondestructiveTesting Person-
NOTE 1—The term “tube” or “tubular product” will be used to refer to 3
nel
both pipe and tubing.
ANSI/ASNT CP-189 ASNT Standard for Qualification and
1.2 This practice is intended for use on tubular products
Certification of Nondestructive Testing Personnel
having outside diameters from approximately ⁄2 to 24 in. (12.7
NAS-410 NAS Certification and Qualification of Nonde-
to 610 mm) with wall thicknesses to ⁄2 in. (12.7 mm). These
structive Personnel (Quality Assurance Committee)
techniques have been used for other sizes, however, and may
ISO 9712 Non-destructive Testing—Qualification and Cer-
be so specified upon contractual agreement between the
tification of NDT Personnel
purchaser and the supplier.
3. Terminology
1.3 This practice does not establish acceptance criteria; they
must be specified by the using parties. 3.1 Definitionsoftermsrelatingtofluxleakageexamination
are provided in Terminology E1316.
1.4 Units—The values stated in inch-pound units are to be
regarded as standard. The values given in parentheses are
4. Summary of Practice
mathematical conversions to SI units that are provided for
4.1 This method consists of the following steps:
information only and are not considered standard.
4.1.1 The tube wall is magnetized at the area under exami-
1.5 This standard does not purport to address all of the
nation to a proper level approaching magnetic saturation.
safety concerns, if any, associated with its use. It is the
responsibility of the user of this standard to establish appro- NOTE 2—Tubes subjected to magnetic inspections can retain various
strengthsandconfigurationofresidualmagneticfieldsdependinguponthe
priate safety, health, and environmental practices and deter-
magnetization technique. If the residual field resulting from a given
mine the applicability of regulatory limitations prior to use.
technique can interfere with subsequent applications of the tube, then a
1.6 This international standard was developed in accor-
supplemental demagnetization process may be required.
dance with internationally recognized principles on standard-
ization established in the Decision on Principles for the
For referenced ASTM standards, visit the ASTM website, www.astm.org, or
Development of International Standards, Guides and Recom-
contact ASTM Customer Service at service@astm.org. For Annual Book of ASTM
Standards volume information, refer to the standard’s Document Summary page on
the ASTM website.
1 3
This practice is under the jurisdiction of ASTM Committee E07 on Nonde- AvailablefromAmericanSocietyforNondestructiveTesting(ASNT),P.O.Box
structive Testing and is the direct responsibility of Subcommittee E07.07 on 28518, 1711 Arlingate Ln., Columbus, OH 43228-0518, http://www.asnt.org.
Electromagnetic Method. Available from Aerospace Industries Association (AIA), 1000 Wilson Blvd.,
Current edition approved June 1, 2020. Published June 2020. Originally Suite 1700, Arlington, VA 22209, http://www.aia-aerospace.org.
ε1 5
approved in 1976. Last previous edition approved in 2015 as E570 – 15 . DOI: Available from International Organization for Standardization (ISO), 1, ch. de
10.1520/E0570-20. la Voie-Creuse, CP 56, CH-1211 Geneva 20, Switzerland, http://www.iso.org.
*A Summary of Changes section appears at the end of this standard
Copyright © ASTM International, 100 Barr Harbor Drive, PO Box C700, West Conshohocken, PA 19428-2959. United States
E570 − 20
4.1.2 A flux sensor containing magnetic transducers is revision shall be specified in the purchase specification or
placed on or above the outside surface of the tube in the contractual agreement between the using parties.
magnetized area. 6.1.9 Ifspecifiedinthepurchasespecificationorcontractual
4.1.3 Either the tube or the flux sensor is moved at a agreement, NDT agencies shall be evaluated and qualified as
constant speed in the direction of the magnetic field so that the described in Specification E543. The applicable edition of
sensor scans the entire surface of the tube. Specification E543 shall be identified in the purchase specifi-
4.1.4 Each magnetic transducer in the flux sensor is con- cation or contractual agreement between the using parties.
nected to an electronic console which amplifies, filters, and
electronically processes the signals such that significant dis- 7. Interferences
continuities are indicated (visually, audibly), and marked with
7.1 There are some manufacturing processes that produce
paint, or automatically removed from the production line, or
tubing with surface conditions that could interfere with or
both.
obscure signals related to inner surface discontinuities. In the
4.1.5 Asuitablemeansforassuringnearmagneticsaturation
examination of heavy-walled tubing having these conditions,
oftheproduct(subjecttoperiodiccheckorcalibration)mustbe
the ability to examine reliably for inner surface discontinuities
provided as part of the examination to verify the capability of
may be affected.
detection of outside diameter and inside diameter discontinui-
7.2 When examining tubes with large rapid surface
ties.
variations,falsesignalsmaybecausedbythesensorsbouncing
along the surface of the tubes.
5. Significance and Use
7.3 For active pole magnetizing systems, a small air gap
5.1 This practice outlines a procedure for examining ferro-
between the magnetizing system and material under examina-
magnetic tubular products using the flux leakage method. If
tion could cause a heavy accumulation of scale buildup on the
properly applied, this method is capable of detecting the
pole pieces.
presence and location of significant longitudinally or trans-
versely oriented discontinuities, such as pits, scabs, slivers,
DETECTION OF LONGITUDINAL
gouges,roll-ins,laps,seams,cracks,holes,andimproperwelds
DISCONTINUITIES
in ferromagnetic tubes under inspection. In addition, the
severity of a discontinuity may be estimated and a rejection
8. Apparatus
level set with respect to the magnitude of the electromagnetic
8.1 Rotary Mechanism—The rotary mechanism shall be
indication produced by the discontinuity.
capable of rotating a magnetizing system or flux leakage
5.2 The response from natural discontinuities can be signifi-
sensors, or both, in unison around tubing that is being
cantly different from the response for artificial discontinuities,
translated axially through the mechanism, thereby producing a
such as drilled holes or notches of equivalent depth. For this
helical scan over the surface. Good examination practices
reason, sufficient work should be done to determine the
require that the pole pieces of the magnetizing system rotate
conditions necessary to detect and marknatural discontinuities
uniformly about the tube and that the flux sensor ride on the
whose characteristics will adversely affect the serviceability of
tube or be spaced uniformly above the surface of the tube
the tube, in order to establish acceptance criteria between the
during rotation.
supplier and purchaser.
8.2 Spin Feed Mechanism—The spin feed mechanism shall
6. Basis of Application be capable of positioning a magnetizing system or flux leakage
sensors, or both, on or near the surface of a translating rotating
6.1 The following criteria may be specified in the purchase
tube such that there is a uniform spacing between the pole
specification, contractual agreement, or elsewhere, and may
pieces of the magnetizing system and the tube. The flux
require agreement between the purchaser and supplier:
leakage sensors shall ride on the surface of the tube or be held
6.1.1 Acceptance criteria.
uniformly from the surface of the tube during examination.
6.1.2 Type, dimensions, location, and number of artificial
discontinuities to be placed on the reference standard. 8.3 Magnetizing System:
6.1.3 Size and type of tubing to be examined. 8.3.1 An active field magnetizing system consists of a
6.1.4 Extent of examination (that is, full length, weld zone suitable means of applying a strong adjustable transverse
only if welded, etc.). magnetic field to the region of the tube under the flux sensors
6.1.5 Disposition of material with discontinuity indications. and shall be capable of bringing that region of the tube to near
6.1.6 Methods of verifying dimensions of artificial discon- saturation. Typical systems employ either permanent magnets
tinuities and allowable tolerances. or controllable electromagnets. If permanent magnets are used,
6.1.7 Time of inspection, that is, the point(s) in the manu- a means shall be provided to adjust the spacing of the pole
facturing process at which the material will be inspected. pieces in order to reach the proper magnetization level. Refer
6.1.8 Nondestructive testing (NDT) personnel shall be to Section 13 for application of longitudinal magnetic fields.
qualified in accordance with a nationally recognized NDT 8.3.2 A residual field magnetizing system consists of a
personnel qualification practice or standard such as ANSI/ meansofapplyingacircularresidualmagneticfieldtoanentire
ASNT CP-189, SNT-TC-1A, NAS-410, ISO 9712, or a similar tube before the tube is inspected. Typical systems employ a
document. The practice or standard used and its applicable centrally positioned conducting rod through which a high
E570 − 20
direct current is passed; alternatively, the current may be 9.1.2 Positionafluxsensor(orsensors)containingmagnetic
conducted through the tube itself. The current produces a field transducers on or near the tube surface and move at a
circular active magnetic field which is concentric with the uniform speed over the area being magnetized.
current distribution. When the current ceases, there remains a 9.1.3 At a discontinuity in the tube wall, the flux lines are
distorted, producing a leakage field. The maximum flux leak-
residual magnetic field which is circular, concentric with the
tube, and wholly contained within the tube wall. age for a discontinuity normally occurs when magnetization is
perpendicular to the discontinuity.
8.4 Flux Leakage Sensors:
9.1.4 For active pole magnetization, rotation of the magne-
8.4.1 The flux sensor shall consist of magnetic field trans-
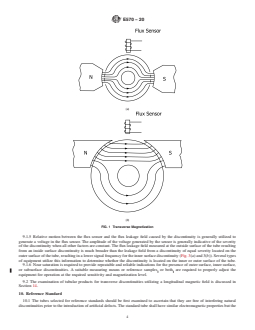
tizingsystemaboutthetuberesultsintransversemagnetization
ducers that respond to variations in magnetic flux density.
of the tube wall that is periodically perpendicular to all radii of
These sensors generally consist of one of the following types:
the tube (Fig. 2(a)). Rotation of the tube with the magnetizing
electromagnetic coils, Hall probes, magneto diodes,
poles held stationary will also produce t
...
This document is not an ASTM standard and is intended only to provide the user of an ASTM standard an indication of what changes have been made to the previous version. Because
it may not be technically possible to adequately depict all changes accurately, ASTM recommends that users consult prior editions as appropriate. In all cases only the current version
of the standard as published by ASTM is to be considered the official document.
´1
Designation: E570 − 15 E570 − 20
Standard Practice for
Flux Leakage Examination of Ferromagnetic Steel Tubular
Products
This standard is issued under the fixed designation E570; the number immediately following the designation indicates the year of
original adoption or, in the case of revision, the year of last revision. A number in parentheses indicates the year of last reapproval. A
superscript epsilon (´) indicates an editorial change since the last revision or reapproval.
This standard has been approved for use by agencies of the U.S. Department of Defense.
ε NOTE—Editorially corrected 10.1.1 in March 2016.
1. Scope*
1.1 This practice covers the application and standardization of equipment using the flux leakage test method for detection of
outer surface, inner surface, and subsurface surface and inner surface discontinuities in ferromagnetic steel tubular products (Note
1) of uniform cross section, such as seamless and welded tubing. While this method may be sensitive to subsurface discontinuities,
it is not the primary method used to identify these types of discontinuities. A secondary method, such as Ultrasonic Testing, should
be considered for assessment of these types of discontinuities.
NOTE 1—The term “tube” or “tubular product” will be used to refer to both pipe and tubing.
1.2 This practice is intended for use on tubular products having outside diameters from approximately ⁄2 to 24 in. (12.7 to 610
mm) with wall thicknesses to ⁄2 in. (12.7 mm). These techniques have been used for other sizes, however, and may be so specified
upon contractual agreement between the purchaser and the supplier.
1.3 This practice does not establish acceptance criteria; they must be specified by the using parties.
1.4 Units—The values stated in inch-pound units are to be regarded as the standard. The values given in parentheses are
mathematical conversions to SI units that are provided for information only and are not considered standard.
1.5 This standard does not purport to address all of the safety concerns, if any, associated with its use. It is the responsibility
of the user of this standard to establish appropriate safety safety, health, and healthenvironmental practices and determine the
applicability of regulatory limitations prior to use.
1.6 This international standard was developed in accordance with internationally recognized principles on standardization
established in the Decision on Principles for the Development of International Standards, Guides and Recommendations issued
by the World Trade Organization Technical Barriers to Trade (TBT) Committee.
2. Referenced Documents
2.1 ASTM Standards:
E543 Specification for Agencies Performing Nondestructive Testing
E1316 Terminology for Nondestructive Examinations
2.2 Other Documents:
SNT-TC-1A Recommended Practice for Personnel Qualification and Certification of Nondestructive Testing Personnel
ANSI/ASNT CP-189 ASNT Standard for Qualification and Certification of Nondestructive Testing Personnel
NAS-410 NAS Certification and Qualification of Nondestructive Personnel (Quality Assurance Committee)
ISO 9712 Non-destructive Testing—Qualification and Certification of NDT Personnel
This practice is under the jurisdiction of ASTM Committee E07 on Nondestructive Testing and is the direct responsibility of Subcommittee E07.07 on Electromagnetic
Method.
Current edition approved June 1, 2015June 1, 2020. Published July 2015June 2020. Originally approved in 1976. Last previous edition approved in 20092015 as
ε1
E570 - 09.E570 – 15 . DOI: 10.1520/E0570-15E01.10.1520/E0570-20.
For referenced ASTM standards, visit the ASTM website, www.astm.org, or contact ASTM Customer Service at service@astm.org. For Annual Book of ASTM Standards
volume information, refer to the standard’s Document Summary page on the ASTM website.
Available from American Society for Nondestructive Testing (ASNT), P.O. Box 28518, 1711 Arlingate Ln., Columbus, OH 43228-0518, http://www.asnt.org.
Available from Aerospace Industries Association of America, Inc., 1250 Eye St., NW, Washington, DC 20005.(AIA), 1000 Wilson Blvd., Suite 1700, Arlington, VA
22209, http://www.aia-aerospace.org.
Available from International Organization for Standardization (ISO), 1, ch. de la Voie-Creuse, CP 56, CH-1211 Geneva 20, Switzerland, http://www.iso.org.
*A Summary of Changes section appears at the end of this standard
Copyright © ASTM International, 100 Barr Harbor Drive, PO Box C700, West Conshohocken, PA 19428-2959. United States
E570 − 20
3. Terminology
3.1 Definitions of terms relating to flux leakage examination are provided in Terminology E1316.
4. Summary of Practice
4.1 This method consists of the following steps:
4.1.1 The tube wall is magnetized at the area under examination to a proper level approaching magnetic saturation.
NOTE 2—Tubes subjected to magnetic inspections can retain various strengths and configuration of residual magnetic fields depending upon the
magnetization technique. If the residual field resulting from a given technique can interfere with subsequent applications of the tube, then a supplemental
demagnetization process may be required.
4.1.2 A flux sensor containing magnetic transducers is placed on or above the outside surface of the tube in the magnetized area.
4.1.3 Either the tube or the flux sensor is moved at a constant speed in the direction of the magnetic field so that the sensor scans
the entire surface of the tube.
4.1.4 Each magnetic transducer in the flux sensor is connected to an electronic console which amplifies, filters, and
electronically processes the signals such that significant discontinuities are indicated (visually, audibly), and marked with paint,
or automatically removed from the production line, or both.
4.1.5 A suitable means for assuring near magnetic saturation of the product (subject to periodic check or calibration) must be
provided as part of the examination to verify the capability of detection of outside diameter and inside diameter discontinuities.
5. Significance and Use
5.1 This practice outlines a procedure for examining ferromagnetic tubular products using the flux leakage method. If properly
applied, this method is capable of detecting the presence and location of significant longitudinally or transversely oriented
discontinuities, such as pits, scabs, slivers, gouges, roll-ins, laps, seams, cracks, holes, and improper welds in ferromagnetic tubes
under inspection. In addition, the severity of a discontinuity may be estimated and a rejection level set with respect to the
magnitude of the electromagnetic indication produced by the discontinuity.
5.2 The response from natural discontinuities can be significantly different from the response for artificial discontinuities, such
as drilled holes or notches of equivalent depth. For this reason, sufficient work should be done to determine the conditions
necessary to detect and mark natural discontinuities whose characteristics will adversely affect the serviceability of the tube, in
order to establish acceptance criteria between the supplier and purchaser.
6. Basis of Application
6.1 The following criteria may be specified in the purchase specification, contractual agreement, or elsewhere, and may require
agreement between the purchaser and supplier:
6.1.1 Acceptance criteria.
6.1.2 Type, dimensions, location, and number of artificial discontinuities to be placed on the reference standard.
6.1.3 Size and type of tubing to be examined.
6.1.4 Extent of examination (that is, full length, weld zone only if welded, etc.).
6.1.5 Disposition of material with discontinuity indications.
6.1.6 Methods of verifying dimensions of artificial discontinuities and allowable tolerances.
6.1.7 Time of inspection, that is, the point(s) in the manufacturing process at which the material will be inspected.
6.1.8 Nondestructive testing (NDT) personnel shall be qualified in accordance with a nationally recognized NDT personnel
qualification practice or standard such as ANSI/ASNT CP-189, SNT-TC-1A, NAS-410, ISO 9712, or a similar document. The
practice or standard used and its applicable revision shall be specified in the purchase specification or contractual agreement
between the using parties.
6.1.9 If specified in the purchase specification or contractual agreement, NDT agencies shall be evaluated and qualified as
described in PracticeSpecification E543. The applicable edition of PracticeSpecification E543 shall be identified in the purchase
specification or contractual agreement between the using parties.
7. Interferences
7.1 There are some manufacturing processes that produce tubing with surface conditions that could interfere with or obscure
signals related to inner surface discontinuities. In the examination of heavy-walled tubing having these conditions, the ability to
examine reliably for inner surface discontinuities may be affected.
7.2 When examining tubes with large rapid surface variations, false signals may be caused by the sensors bouncing along the
surface of the tubes.
7.3 For active pole magnetizing systems, a small air gap between the magnetizing system and material under examination could
cause a heavy accumulation of scale buildup on the pole pieces.
E570 − 20
DETECTION OF LONGITUDINAL DISCONTINUITIES
8. Apparatus
8.1 Rotary Mechanism—The rotary mechanism shall be capable of rotating a magnetizing system or flux leakage sensors, or
both, in unison around tubing that is being translated axially through the mechanism, thereby producing a helical scan over the
surface. Good examination practices require that the pole pieces of the magnetizing system rotate uniformly about the tube and
that the flux sensor ride on the tube or be spaced uniformly above the surface of the tube during rotation.
8.2 Spin Feed Mechanism—The spin feed mechanism shall be capable of positioning a magnetizing system or flux leakage
sensors, or both, on or near the surface of a translating rotating tube such that there is a uniform spacing between the pole pieces
of the magnetizing system and the tube. The flux leakage sensors shall ride on the surface of the tube or be held uniformly from
the surface of the tube during examination.
8.3 Magnetizing System:
8.3.1 An active field magnetizing system consists of a suitable means of applying a strong adjustable transverse magnetic field
to the region of the tube under the flux sensors and shall be capable of bringing that region of the tube to near saturation. Typical
systems employ either permanent magnets or controllable electromagnets. If permanent magnets are used, a means shall be
provided to adjust the spacing of the pole pieces in order to reach the proper magnetization level. Refer to Section 13 for
application of longitudinal magnetic fields.
8.3.2 A residual field magnetizing system consists of a means of applying a circular residual magnetic field to an entire tube
before the tube is inspected. Typical systems employ a centrally positioned conducting rod through which a high direct current is
passed; alternatively, the current may be conducted through the tube itself. The current produces a circular active magnetic field
which is concentric with the current distribution. When the current ceases, there remains a residual magnetic field which is circular,
concentric with the tube, and wholly contained within the tube wall.
8.4 Flux Leakage Sensors:
8.4.1 The flux sensor shall consist of magnetic field transducers that respond to variations in magnetic flux density. These
sensors generally consist of one of the following types: electromagnetic coils, Hall probes, magneto diodes, magnistors, or
magnetoresistors. These sensors are normally used to detect the flux leakage directly from the discontinuity in the tube; however,
they may also be used to detect flux leakage patterns that have been transferred from the tube to a strip of magnetic tape. The flux
sensors should be of sufficient number and length so as to provide 100 % coverage while scanning the tube surface to be examined
at the desired examination speed. Their location (with respect to the magnetic pole pieces and the tubular product) should result
in maximum response to the leakage field caused by a discontinuity in the tubular product.
8.4.2 The depth and orientation of a discontinuity below the outside surface will affect the magnitude of the signal
...
Questions, Comments and Discussion
Ask us and Technical Secretary will try to provide an answer. You can facilitate discussion about the standard in here.
Loading comments...