ASTM E646-00
(Test Method)Standard Test Method for Tensile Strain-Hardening Exponents (n-Values) of Metallic Sheet Materials
Standard Test Method for Tensile Strain-Hardening Exponents (n-Values) of Metallic Sheet Materials
SIGNIFICANCE AND USE
This test method is useful for estimating the strain at the onset of necking in a uniaxial tension test (1). Practically, it provides an empirical parameter for appraising the relative stretch formability of similar metallic systems. The strain-hardening exponent is also a measure of the increase in strength of a material due to plastic deformation.
The strain-hardening exponent may be determined over the entire plastic stress-strain curve or any portion(s) of the stress-strain curve specified in a product specification.
Note 3—The strain interval 10–20% is commonly utilized for determining the n-value of formable low carbon steel products.
This test method is not intended to apply to any portion of the true-stress versus true-strain curve that exhibits discontinuous behavior; however, the method may be applied by curve-smoothing techniques as agreed upon.
Note 4—For example, those portions of the stress-strain curves for mild steel or aluminum alloys which exhibit yield-point elongation or Lüders bands may be characterized as behaving discontinuously.
Note 5—Caution should be observed in the use of curve-smoothing techniques as they may affect the n-value.
This test method is suitable for determining the tensile stress-strain response of metallic sheet materials in the plastic region prior to the onset of necking.
The n-value may vary with the displacement rate or strain rate used, depending on the metal and test temperature.
SCOPE
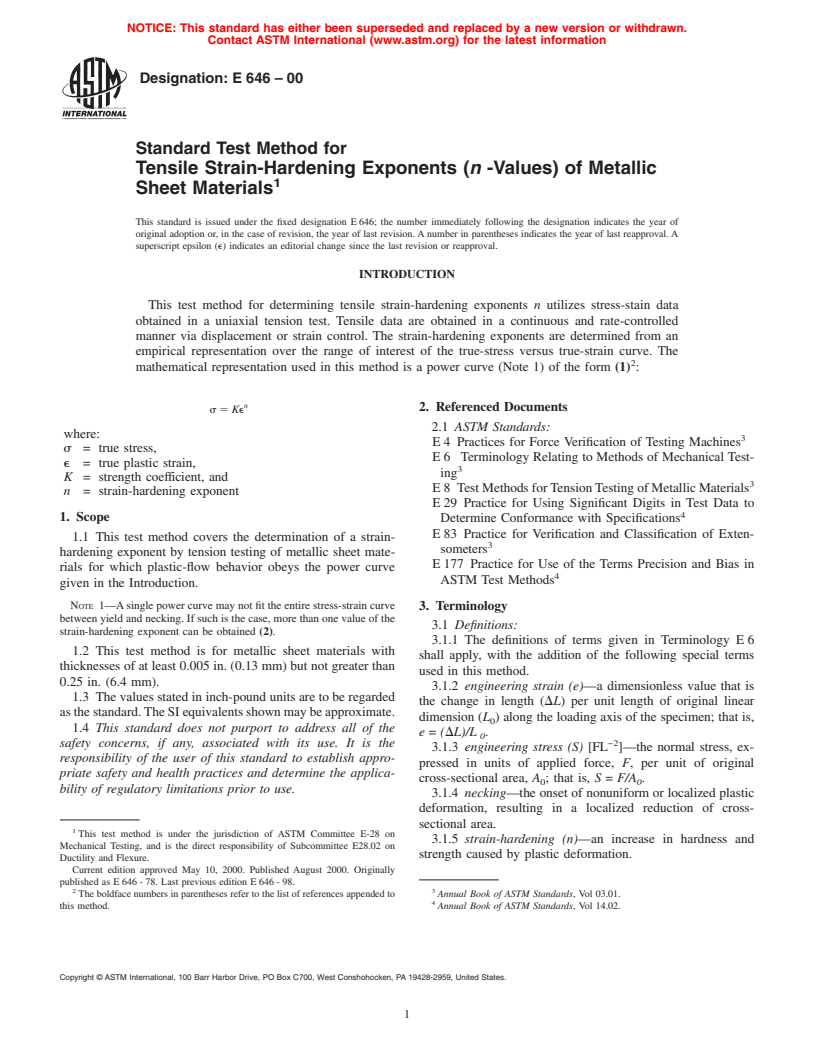
1.1 This test method covers the determination of a strain-hardening exponent by tension testing of metallic sheet materials for which plastic-flow behavior obeys the power curve given in the Introduction.
1.2 This test method is for metallic sheet materials with thicknesses of at least 0.005 in. (0.13 mm) but not greater than 0.25 in. (6.4 mm).
1.3 The values stated in inch-pound units are to be regarded as the standard. The SI equivalents shown may be approximate.
1.4 This standard does not purport to address all of the safety problems, if any, associated with its use. It is the responsibility of the user of this standard to establish appropriate safety and health practices and determine the applicability of regulatory limitations prior to use.
General Information
Relations
Standards Content (Sample)
NOTICE: This standard has either been superseded and replaced by a new version or withdrawn.
Contact ASTM International (www.astm.org) for the latest information
Designation:E646–00
Standard Test Method for
Tensile Strain-Hardening Exponents (n -Values) of Metallic
Sheet Materials
This standard is issued under the fixed designation E646; the number immediately following the designation indicates the year of
original adoption or, in the case of revision, the year of last revision.Anumber in parentheses indicates the year of last reapproval.A
superscript epsilon (e) indicates an editorial change since the last revision or reapproval.
INTRODUCTION
This test method for determining tensile strain-hardening exponents n utilizes stress-stain data
obtained in a uniaxial tension test. Tensile data are obtained in a continuous and rate-controlled
manner via displacement or strain control. The strain-hardening exponents are determined from an
empirical representation over the range of interest of the true-stress versus true-strain curve. The
mathematical representation used in this method is a power curve (Note 1) of the form (1) :
n
2. Referenced Documents
s5 Ke
2.1 ASTM Standards:
where:
E4 Practices for Force Verification of Testing Machines
s = true stress,
E6 Terminology Relating to Methods of Mechanical Test-
e = true plastic strain,
ing
K = strength coefficient, and
E8 TestMethodsforTensionTestingofMetallicMaterials
n = strain-hardening exponent
E29 Practice for Using Significant Digits in Test Data to
1. Scope Determine Conformance with Specifications
E83 Practice for Verification and Classification of Exten-
1.1 This test method covers the determination of a strain-
someters
hardening exponent by tension testing of metallic sheet mate-
E177 Practice for Use of the Terms Precision and Bias in
rials for which plastic-flow behavior obeys the power curve
ASTM Test Methods
given in the Introduction.
NOTE 1—Asinglepowercurvemaynotfittheentirestress-straincurve
3. Terminology
between yield and necking. If such is the case, more than one value of the
3.1 Definitions:
strain-hardening exponent can be obtained (2).
3.1.1 The definitions of terms given in Terminology E6
1.2 This test method is for metallic sheet materials with
shall apply, with the addition of the following special terms
thicknesses of at least 0.005 in. (0.13 mm) but not greater than
used in this method.
0.25 in. (6.4 mm).
3.1.2 engineering strain (e)—a dimensionless value that is
1.3 The values stated in inch-pound units are to be regarded
the change in length (DL) per unit length of original linear
asthestandard.TheSIequivalentsshownmaybeapproximate.
dimension (L ) along the loading axis of the specimen; that is,
1.4 This standard does not purport to address all of the
e=(DL)/L .
−2
safety concerns, if any, associated with its use. It is the
3.1.3 engineering stress (S) [FL ]—the normal stress, ex-
responsibility of the user of this standard to establish appro-
pressed in units of applied force, F, per unit of original
priate safety and health practices and determine the applica-
cross-sectional area, A ; that is, S = F/A .
0 0
bility of regulatory limitations prior to use.
3.1.4 necking—the onset of nonuniform or localized plastic
deformation, resulting in a localized reduction of cross-
sectional area.
This test method is under the jurisdiction of ASTM Committee E-28 on
3.1.5 strain-hardening (n)—an increase in hardness and
Mechanical Testing, and is the direct responsibility of Subcommittee E28.02 on
strength caused by plastic deformation.
Ductility and Flexure.
Current edition approved May 10, 2000. Published August 2000. Originally
published as E646-78. Last previous edition E646-98.
2 3
The boldface numbers in parentheses refer to the list of references appended to Annual Book of ASTM Standards, Vol 03.01.
this method. Annual Book of ASTM Standards, Vol 14.02.
Copyright © ASTM International, 100 Barr Harbor Drive, PO Box C700, West Conshohocken, PA 19428-2959, United States.
E646–00
−2
3.1.6 strength coeffıcient (K) [FL ]—an experimental con- usedtodeterminestressshallbewithintheloadingrangeofthe
stant, computed from the fit of the data to the assumed power testing machine as defined in Practices E4.
curve, that is numerically equal to the extrapolated value of 6.2 Strain-Measurement Equipment—Equipment for mea-
true stress at a true strain of 1.00. surement of extension shall conform to the requirements of
3.1.7 true strain (e)—the natural logarithm of the ratio of Class C or better as defined in Practice E83.
instantaneous gage length, L, to the original gage length, L ;
that is, e=1n(L/L)or e=1n (1+e).
7. Sampling
−2
3.1.8 true stress (s) [FL ]—the instantaneous normal
7.1 Samples shall be taken from the material as specified in
stress, calculated on the basis of the instantaneous cross-
the applicable product specification.
sectional area, A; that is, s= F/A; if no necking has occurred,
s= S(1+e).
8. Test Specimens
8.1 Selection and Preparation of Specimens:
4. Summary of Test Method
8.1.1 In the selection of specimen blanks, special care shall
4.1 This test method applies to materials exhibiting a
be taken to assure obtaining representative material that is flat
continuous stress-strain curve in the plastic region. The dis-
and uniform in thickness.
placement or strain is applied in a continuous and rate-
8.1.2 In the preparation of specimens, special care shall be
controlled manner while the normal tensile load and strain are
taken to prevent the introduction of residual stresses.
monitored. The instantaneous cross-sectional area may be
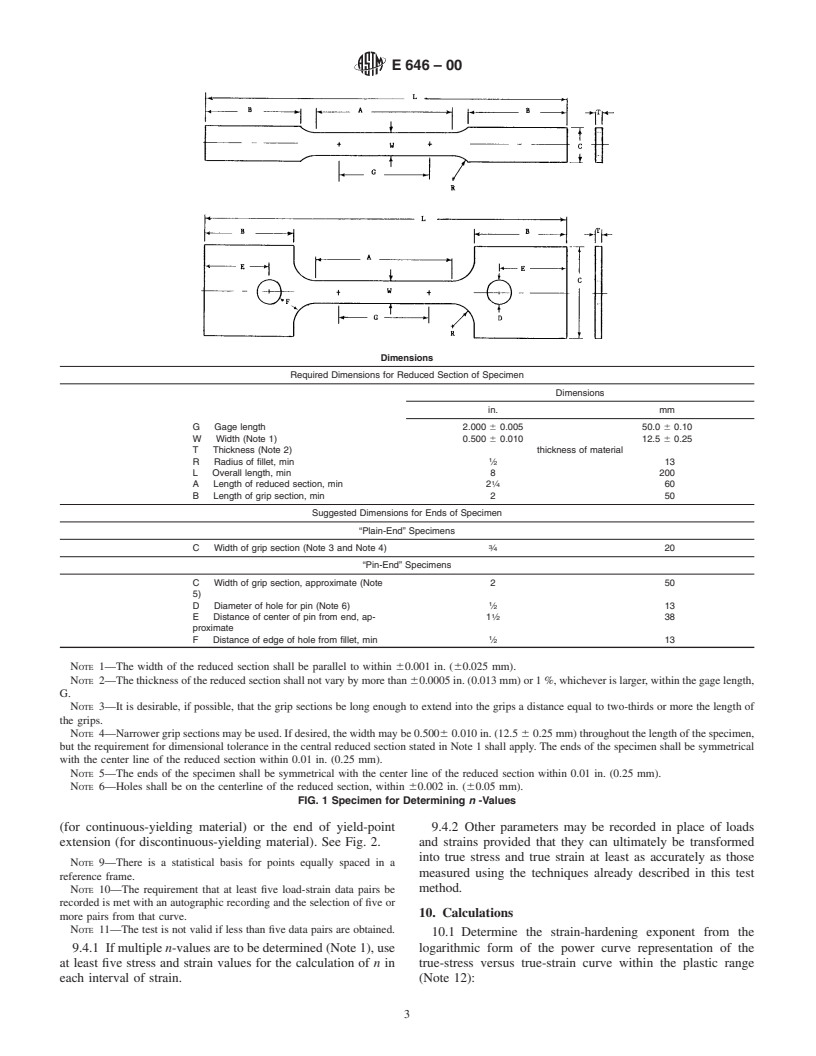
8.2 Dimensions—One of the specimen configurations
monitored or calculated by assuming constancy of volume in
shown in Fig. 1 shall be used.
the plastic region. Equations are presented that permit the
calculation of the true stress, s, true strain, e, strain-hardening
9. Procedure
exponent, n, and strength coefficient, K, for that continuous
portionofthetrue-stressversustrue-straincurvewhichfollows 9.1 Measureandrecordtheoriginalthicknessofthereduced
sectionofthespecimentoatleastthenearest0.0005in.(0.013
the empirical relationships described.
mm)andthewidthofthereducedsectiontoatleastthenearest
NOTE 2—The test method is recommended for use only in the plastic
0.001 in. (0.025 mm).
range for metallic sheet material for which the true-stress true-strain data
follow the stated relationship.
NOTE 6—Therounding-offmethodgiveninPracticeE29shallbeused
for all measurements.
5. Significance and Use
9.2 Grip the specimen in the testing machine in a manner to
5.1 Thistestmethodisusefulforestimatingthestrainatthe
ensure axial alignment of the specimen as noted in Test
onset of necking in a uniaxial tension test (1). Practically, it
Methods E8 and attach the extensometer.
provides an empirical parameter for appraising the relative
NOTE 7—The order of this step may be reversed if required by the
stretch formability of similar metallic systems. The strain-
design of the extensometer or the specimen grips, or both.
hardening exponent is also a measure of the increase in
strength of a material due to plastic deformation.
9.3 Speed of Testing:
5.2 The strain-hardening exponent may be determined over
9.3.1 The speed of testing shall be such that the loads and
the entire plastic stress-strain curve or any portion(s) of the
strains are accurately indicated.
stress-strain curve specified in a product specification.
9.3.2 Thetestspeed,definedintermsofrateofseparationof
heads during tests, free running crosshead speed, or rate of
NOTE 3—The strain interval 10–20% is commonly utilized for deter-
straining shall be between 0.05 and 0.50 in./in. (m/m) of the
mining the n-value of formable low carbon steel products.
length of the reduced section per minute (see Test Methods
5.3 This test method is not intended to apply to any portion
E8). The speed setting shall not be changed during the strain
of the true-stress versus true-strain curve that exhibits discon-
interval over which n is to be determined.
tinuous behavior; however, the method may be applied by
curve-smoothing techniques as agreed upon. NOTE 8—The mode of control and the rate used may affect the values
obtained.
NOTE 4—For example, those portions of the stress-strain curves for
9.3.3 If the yield point, yield-point elongation, yield
mild steel or aluminum alloys which exhibit yield-point elongation or
Lüders bands may be characterized as behaving discontinuously. strength, or any combination of these is to be determined also,
NOTE 5—Caution should be observed in the use of curve-smoothing
therateofstressapplicationorcrossheadseparationduringthis
techniques as they may affect the n-value.
portion of the test shall be within the range permitted by
Methods E8 or any other specific value. After exceeding the
5.4 This test method is suitable for determining the tensile
stress-strain response of metallic sheet materials in the plastic strain necessary for this information, adjust the crosshead
speed to within the range specified prior to the next step.
region prior to the onset of necking.
5.5 The n-value may vary with the displacement rate or 9.4 Recordtheloadandcorrespondingstrainforatleastfive
approximately equally spaced levels of strain (Note 10) en-
strain rate used, depending on the metal and test temperature.
compassing the range of interest specified in the product
6. Apparatus
specification. Usually, the greatest of these strains is at or
6.1 Testing Machines—Machines used for tension testing slightly prior to the strain at which the maximum load occurs,
shall conform to the requirements of Practices E4. The loads and usually the lower bound of these strains is the yield strain
E646–00
Dimensions
Required Dimensions for Reduced Section of Specimen
Dimensions
in. mm
G Gage length 2.000 6 0.005 50.0 6 0.10
W Width (Note 1) 0.500 6 0.010 12.5 6 0.25
T Thickness (Note 2) thickness of material
R Radius of fillet, min ⁄2 13
L Overall length, min 8 200
A Length of reduced section, min 2 ⁄4 60
B Length of grip section, min 2 50
Suggested Dimensions for Ends of Specimen
“Plain-End” Specimens
C Width of grip section (Note 3 and Note 4) ⁄4 20
“Pin-End” Specimens
C Width of grip section, approximate (Note 250
5)
D Diameter of hole for pin (Note 6) ⁄2 13
E Distance of center of pin from end, ap- 1 ⁄2 38
proximate
F Distance of edge of hole from fil
...


Questions, Comments and Discussion
Ask us and Technical Secretary will try to provide an answer. You can facilitate discussion about the standard in here.