ASTM B312-20
(Test Method)Standard Test Method for Green Strength of Specimens Compacted from Metal Powders
Standard Test Method for Green Strength of Specimens Compacted from Metal Powders
SIGNIFICANCE AND USE
5.1 The green strength value determined under the conditions specified by this test method is influenced by the characteristics of the powder, how it compacts under the specified conditions (that is, the particle to particle bonding that exists following compacting), and the lubrication system used.
5.2 Knowledge of the green strength value is useful to the production, characterization, and utilization of metal powders in the manufacture of PM structural parts and bearings.
5.3 The test for green strength of a compacted metal powder can be used to:
5.3.1 Relate the resistance of a pressed compact to breakage or damage due to handling.
5.3.2 Compare the quality of a metal powder or powder mixture from lot to lot.
5.3.3 Determine the effect of the addition of a lubricant or other powders to a base powder.
5.3.4 Evaluate powder mixing or blending variables.
5.4 Factors that are known to influence the green strength of a metal powder are particle shape, particle size distribution, and compressibility of the metal powder.
5.5 The amount and type of lubricant or other additives and the mixing procedures have a strong effect on the green strength of specimens produced from metal powder mixtures.
SCOPE
1.1 This standard covers a test method that may be used to measure the transverse rupture strength of a compacted but unsintered (green) test specimen produced from lubricated or unlubricated metal powders or powder mixtures.
1.2 Green strength is measured by a quantitative laboratory procedure in which the fracture strength is calculated from the force required to break an unsintered test specimen supported as a simple beam while subjected to a uniformly increasing three-point transverse load under controlled conditions.
1.3 This test method is a companion standard to Test Method B528 that covers the measurement of the transverse rupture strength of sintered PM test specimens.
1.4 Units—With the exception of the values for density and the mass used to determine density, for which the use of the gram per cubic centimeter (g/cm3) and gram (g) units is the longstanding industry practice, the values in inch-pound units are to be regarded as standard. The values given in parentheses are mathematical conversions to SI units that are provided for information only and are not considered standard.
1.5 This standard does not purport to address all of the safety concerns, if any, associated with its use. It is the responsibility of the user of this standard to establish appropriate safety, health, and environmental practices and determine the applicability of regulatory limitations prior to use.
1.6 This international standard was developed in accordance with internationally recognized principles on standardization established in the Decision on Principles for the Development of International Standards, Guides and Recommendations issued by the World Trade Organization Technical Barriers to Trade (TBT) Committee.
General Information
- Status
- Published
- Publication Date
- 31-Mar-2020
- Technical Committee
- B09 - Metal Powders and Metal Powder Products
- Drafting Committee
- B09.02 - Base Metal Powders
Relations
- Replaces
ASTM B312-14 - Standard Test Method for Green Strength of Specimens Compacted from Metal Powders - Effective Date
- 01-Apr-2020
- Effective Date
- 01-Oct-2018
- Effective Date
- 01-Jul-2016
- Effective Date
- 01-Apr-2015
- Effective Date
- 01-Sep-2014
- Effective Date
- 01-Nov-2013
- Effective Date
- 01-May-2013
- Effective Date
- 01-Apr-2013
- Effective Date
- 01-Nov-2012
- Effective Date
- 15-Jul-2012
- Effective Date
- 15-Nov-2011
- Effective Date
- 01-Nov-2011
- Effective Date
- 01-Dec-2010
- Effective Date
- 01-Jun-2010
- Effective Date
- 15-Jan-2010
Overview
ASTM B312-20 is the industry-recognized standard test method for determining the green strength of specimens compacted from metal powders. Developed by ASTM International, this standard provides a laboratory procedure for quantitatively measuring the transverse rupture strength of unsintered (green) test specimens produced from lubricated or unlubricated metal powders, or powder mixtures.
Green strength refers to the resistance to fracture of a compacted but unsintered powder metallurgy (PM) specimen. This property is critical in evaluating the handling characteristics and mechanical integrity of pressed metal powders prior to sintering.
Key Topics
Scope
- Measures the transverse rupture (flexural) strength of green PM specimens.
- Applies to metal powders and powder blends, with or without lubricants.
- Covers the use of both the transverse rupture test fixture and constant loading beam device.
Significance and Use
- Green strength values provide insight into the characteristics and compactibility of metal powders under defined conditions.
- Enables assessment of particle shape, size distribution, compressibility, and the effect of lubricants/additives.
- Useful in quality control, powder comparison, and optimizing powder blending and mixing procedures.
Testing Methodology
- Three rectangular test specimens are compacted to a predetermined density or pressure.
- Each specimen is subjected to a steadily increasing, three-point transverse load until fracture occurs.
- The breaking force is used to calculate the green strength using standard stress equations.
Precision and Reporting
- Results are averaged from three tests and reported in psi (or MPa) along with specimen thickness and density.
- Precision and repeatability data are available, aiding in the comparison of results across laboratories and powder lots.
Applications
ASTM B312-20 is widely used in the field of powder metallurgy and related industries for:
Quality Control
- Relates the green strength of pressed compacts to potential breakage or handling damage during manufacturing processes.
- Enables comparison of metal powder quality between batches or suppliers.
Powder Characterization
- Helps metallurgists and engineers evaluate how different powder blends, lubricants, or additional materials affect the green strength of a compact.
Manufacturing Optimization
- Assesses the impact of process variables such as particle morphology, mixing procedures, and compaction parameters.
- Guides the selection and quantity of lubricants or other additives for optimal green strength and downstream performance.
Typical applications include structural PM parts, sintered bearings, and precision components where reliable handling prior to sintering is essential for product integrity and yield.
Related Standards
When utilizing ASTM B312-20, the following related standards may also be relevant:
- ASTM B215 - Practices for Sampling Metal Powders
- ASTM B243 - Terminology of Powder Metallurgy
- ASTM B528 - Test Method for Transverse Rupture Strength of Sintered PM Specimens (companion to B312-20)
- ASTM B925 - Practices for Production and Preparation of PM Test Specimens
- ASTM B962 - Test Methods for Density of Compacted or Sintered PM Products
- ASTM E691 - Practice for Conducting Interlaboratory Studies to Determine the Precision of a Test Method
Conclusion
ASTM B312-20 is an essential standard in the powder metallurgy industry, providing an efficient, repeatable method to measure and report the green strength of metal powder compacts. Employing this test method supports higher quality standards, improved in-process handling, and reliable component manufacture. Accurate measurement of green strength is crucial for PM part producers, material suppliers, and quality assurance professionals seeking to ensure optimal product performance prior to sintering.
Buy Documents
ASTM B312-20 - Standard Test Method for Green Strength of Specimens Compacted from Metal Powders
REDLINE ASTM B312-20 - Standard Test Method for Green Strength of Specimens Compacted from Metal Powders
Get Certified
Connect with accredited certification bodies for this standard

Element Materials Technology
Materials testing and product certification.

Inštitut za kovinske materiale in tehnologije
Institute of Metals and Technology. Materials testing, metallurgical analysis, NDT.
Sponsored listings
Frequently Asked Questions
ASTM B312-20 is a standard published by ASTM International. Its full title is "Standard Test Method for Green Strength of Specimens Compacted from Metal Powders". This standard covers: SIGNIFICANCE AND USE 5.1 The green strength value determined under the conditions specified by this test method is influenced by the characteristics of the powder, how it compacts under the specified conditions (that is, the particle to particle bonding that exists following compacting), and the lubrication system used. 5.2 Knowledge of the green strength value is useful to the production, characterization, and utilization of metal powders in the manufacture of PM structural parts and bearings. 5.3 The test for green strength of a compacted metal powder can be used to: 5.3.1 Relate the resistance of a pressed compact to breakage or damage due to handling. 5.3.2 Compare the quality of a metal powder or powder mixture from lot to lot. 5.3.3 Determine the effect of the addition of a lubricant or other powders to a base powder. 5.3.4 Evaluate powder mixing or blending variables. 5.4 Factors that are known to influence the green strength of a metal powder are particle shape, particle size distribution, and compressibility of the metal powder. 5.5 The amount and type of lubricant or other additives and the mixing procedures have a strong effect on the green strength of specimens produced from metal powder mixtures. SCOPE 1.1 This standard covers a test method that may be used to measure the transverse rupture strength of a compacted but unsintered (green) test specimen produced from lubricated or unlubricated metal powders or powder mixtures. 1.2 Green strength is measured by a quantitative laboratory procedure in which the fracture strength is calculated from the force required to break an unsintered test specimen supported as a simple beam while subjected to a uniformly increasing three-point transverse load under controlled conditions. 1.3 This test method is a companion standard to Test Method B528 that covers the measurement of the transverse rupture strength of sintered PM test specimens. 1.4 Units—With the exception of the values for density and the mass used to determine density, for which the use of the gram per cubic centimeter (g/cm3) and gram (g) units is the longstanding industry practice, the values in inch-pound units are to be regarded as standard. The values given in parentheses are mathematical conversions to SI units that are provided for information only and are not considered standard. 1.5 This standard does not purport to address all of the safety concerns, if any, associated with its use. It is the responsibility of the user of this standard to establish appropriate safety, health, and environmental practices and determine the applicability of regulatory limitations prior to use. 1.6 This international standard was developed in accordance with internationally recognized principles on standardization established in the Decision on Principles for the Development of International Standards, Guides and Recommendations issued by the World Trade Organization Technical Barriers to Trade (TBT) Committee.
SIGNIFICANCE AND USE 5.1 The green strength value determined under the conditions specified by this test method is influenced by the characteristics of the powder, how it compacts under the specified conditions (that is, the particle to particle bonding that exists following compacting), and the lubrication system used. 5.2 Knowledge of the green strength value is useful to the production, characterization, and utilization of metal powders in the manufacture of PM structural parts and bearings. 5.3 The test for green strength of a compacted metal powder can be used to: 5.3.1 Relate the resistance of a pressed compact to breakage or damage due to handling. 5.3.2 Compare the quality of a metal powder or powder mixture from lot to lot. 5.3.3 Determine the effect of the addition of a lubricant or other powders to a base powder. 5.3.4 Evaluate powder mixing or blending variables. 5.4 Factors that are known to influence the green strength of a metal powder are particle shape, particle size distribution, and compressibility of the metal powder. 5.5 The amount and type of lubricant or other additives and the mixing procedures have a strong effect on the green strength of specimens produced from metal powder mixtures. SCOPE 1.1 This standard covers a test method that may be used to measure the transverse rupture strength of a compacted but unsintered (green) test specimen produced from lubricated or unlubricated metal powders or powder mixtures. 1.2 Green strength is measured by a quantitative laboratory procedure in which the fracture strength is calculated from the force required to break an unsintered test specimen supported as a simple beam while subjected to a uniformly increasing three-point transverse load under controlled conditions. 1.3 This test method is a companion standard to Test Method B528 that covers the measurement of the transverse rupture strength of sintered PM test specimens. 1.4 Units—With the exception of the values for density and the mass used to determine density, for which the use of the gram per cubic centimeter (g/cm3) and gram (g) units is the longstanding industry practice, the values in inch-pound units are to be regarded as standard. The values given in parentheses are mathematical conversions to SI units that are provided for information only and are not considered standard. 1.5 This standard does not purport to address all of the safety concerns, if any, associated with its use. It is the responsibility of the user of this standard to establish appropriate safety, health, and environmental practices and determine the applicability of regulatory limitations prior to use. 1.6 This international standard was developed in accordance with internationally recognized principles on standardization established in the Decision on Principles for the Development of International Standards, Guides and Recommendations issued by the World Trade Organization Technical Barriers to Trade (TBT) Committee.
ASTM B312-20 is classified under the following ICS (International Classification for Standards) categories: 77.160 - Powder metallurgy. The ICS classification helps identify the subject area and facilitates finding related standards.
ASTM B312-20 has the following relationships with other standards: It is inter standard links to ASTM B312-14, ASTM B243-18, ASTM B243-16, ASTM B962-15, ASTM B962-14, ASTM B243-13, ASTM E691-13, ASTM B962-13, ASTM B528-12, ASTM B243-12, ASTM B243-11, ASTM E691-11, ASTM B215-10, ASTM B528-10, ASTM B243-10. Understanding these relationships helps ensure you are using the most current and applicable version of the standard.
ASTM B312-20 is available in PDF format for immediate download after purchase. The document can be added to your cart and obtained through the secure checkout process. Digital delivery ensures instant access to the complete standard document.
Standards Content (Sample)
This international standard was developed in accordance with internationally recognized principles on standardization established in the Decision on Principles for the
Development of International Standards, Guides and Recommendations issued by the World Trade Organization Technical Barriers to Trade (TBT) Committee.
Designation: B312 − 20
Standard Test Method for
Green Strength of Specimens Compacted from Metal
Powders
This standard is issued under the fixed designation B312; the number immediately following the designation indicates the year of
original adoption or, in the case of revision, the year of last revision. A number in parentheses indicates the year of last reapproval. A
superscript epsilon (´) indicates an editorial change since the last revision or reapproval.
1. Scope* 2. Referenced Documents
1.1 This standard covers a test method that may be used to 2.1 ASTM Standards:
measure the transverse rupture strength of a compacted but B215 Practices for Sampling Metal Powders
unsintered (green) test specimen produced from lubricated or B243 Terminology of Powder Metallurgy
unlubricated metal powders or powder mixtures. B528 Test Method for Transverse Rupture Strength of Pow-
der Metallurgy (PM) Specimens
1.2 Green strength is measured by a quantitative laboratory
B925 Practices for Production and Preparation of Powder
procedure in which the fracture strength is calculated from the
Metallurgy (PM) Test Specimens
force required to break an unsintered test specimen supported
B962 Test Methods for Density of Compacted or Sintered
as a simple beam while subjected to a uniformly increasing
Powder Metallurgy (PM) Products Using Archimedes’
three-point transverse load under controlled conditions.
Principle
1.3 This test method is a companion standard to Test
E691 Practice for Conducting an Interlaboratory Study to
Method B528 that covers the measurement of the transverse
Determine the Precision of a Test Method
rupture strength of sintered PM test specimens.
3. Terminology
1.4 Units—With the exception of the values for density and
the mass used to determine density, for which the use of the 3.1 Definitions—The definitions of powder metallurgy (PM)
gram per cubic centimeter (g/cm ) and gram (g) units is the terms used in this test method can be found in Terminology
longstanding industry practice, the values in inch-pound units B243. Additional descriptive PM information is available in
are to be regarded as standard. The values given in parentheses the Related Material section of Vol 02.05 of the Annual Book
are mathematical conversions to SI units that are provided for
of ASTM Standards.
information only and are not considered standard.
4. Summary of Test Method
1.5 This standard does not purport to address all of the
4.1 Three rectangular test specimens are compacted to a
safety concerns, if any, associated with its use. It is the
predetermined green density or at a specified compacting
responsibility of the user of this standard to establish appro-
pressure from test portions of the metal powder or powder
priate safety, health, and environmental practices and deter-
mixture that is to be tested.
mine the applicability of regulatory limitations prior to use.
1.6 This international standard was developed in accor-
4.2 Each unsintered bar is placed, in turn, in a test fixture
dance with internationally recognized principles on standard-
and subjected to a uniformly increasing transverse load under
ization established in the Decision on Principles for the
controlled conditions until fracture occurs.
Development of International Standards, Guides and Recom-
4.3 The green strength or maximum flexural stress of each
mendations issued by the World Trade Organization Technical
specimenisdeterminedbycalculationusingthestressequation
Barriers to Trade (TBT) Committee.
for a simply supported beam with a concentrated mid-point
load.
This test method is under the jurisdiction of ASTM Committee B09 on Metal
Powders and Metal Powder Products and is the direct responsibility of Subcom-
mittee B09.02 on Base Metal Powders. For referenced ASTM standards, visit the ASTM website, www.astm.org, or
Current edition approved April 1, 2020. Published April 2020. Originally contact ASTM Customer Service at service@astm.org. For Annual Book of ASTM
approved in 1956. Last previous edition approved in 2014 as B312 – 14. DOI: Standards volume information, refer to the standard’s Document Summary page on
10.1520/B0312-20. the ASTM website.
*A Summary of Changes section appears at the end of this standard
Copyright © ASTM International, 100 Barr Harbor Drive, PO Box C700, West Conshohocken, PA 19428-2959. United States
B312 − 20
4.4 The green strength of the material being tested is 5.5 The amount and type of lubricant or other additives and
reported as the arithmetic mean of the results of three indi- the mixing procedures have a strong effect on the green
vidual tests at the measured green density or at the specified strength of specimens produced from metal powder mixtures.
compacting pressure rounded to the nearest 100 psi (0.5 MPa).
6. Apparatus
5. Significance and Use
6.1 Analytical Balance—Abalance readable to 0.001 g with
a minimum capacity of 100 g.
5.1 The green strength value determined under the condi-
tions specified by this test method is influenced by the
6.2 PM Tool Set—Acompacting die and punches capable of
characteristics of the powder, how it compacts under the
producing the test specimens, an example of which is shown in
specified conditions (that is, the particle to particle bonding
PracticesB925as Laboratory Tooling–Transverse Rupture Test
that exists following compacting), and the lubrication system
Specimen.
used.
6.3 Universal Testing Machine or PM Compacting
5.2 Knowledge of the green strength value is useful to the
Press—A press with the ability to hold the PM tooling and
production, characterization, and utilization of metal powders apply the force necessary to compact the test specimens to the
in the manufacture of PM structural parts and bearings.
target green density.
5.3 The test for green strength of a compacted metal powder 6.4 Outside Micrometers or Calipers—Instruments capable
can be used to:
of measuring from 0.000 to 1.250 in. (0.00 to 31.75 mm) with
5.3.1 Relate the resistance of a pressed compact to breakage an accuracy of 0.001 in. (0.02 mm).
or damage due to handling.
6.5 Either of the following sets of testing apparatus may be
5.3.2 Compare the quality of a metal powder or powder
used:
mixture from lot to lot.
6.5.1 Transverse Rupture Test Fixture and Compression
5.3.3 Determine the effect of the addition of a lubricant or
Testing Machine—A fixture (Fig. 1) for locating the test
other powders to a base powder.
specimen and a press capable of applying a breaking load at a
5.3.4 Evaluate powder mixing or blending variables.
controlled rate of approximately 20 lbf/min (~90 N/min), and
5.4 Factors that are known to influence the green strength on which the force can be read to the nearest 0.1 lbf (0.5 N), or
of a metal powder are particle shape, particle size distribution,
6.5.2 Constant Loading Beam Device, Metal Shot and
and compressibility of the metal powder. Scale—–A lever-arm laboratory device (Fig. 2), designed to
FIG. 1 Transverse Rupture Test Fixture
B312 − 20
FIG. 2 Example of Constant Loading Beam Device
collect a controlled flow of metal shot that will produce a force 8.1.2.1 If die-wall-lubrication is chosen, it shall be applied
with a loading rate of approximately 20 lbf/min (~90 N/min) prior to the compacting of each test specimen following the
on a pre-positioned test specimen until fracture occurs, and a procedures in Practices B925.
scale with a capacity of at least 25 lb (10 kg) to determine the 8.1.2.2 Ifanadmixedlubricantistobeused;thetype,grade,
mass to the nearest 0.01 lb (0.005 kg) of the shot that was percentageandmixingprocedureshallbeagreeduponbetween
required. the concerned parties or shall closely follow accepted PM
practice.
7. Test Specimen
8.2 Powder Sampling—Using Eq 1, calculate the mass of
7.1 The recommended test specimen is an unsintered, metal powder that will be needed to produce one test specimen
(green), rectangular compact having dimensions of 0.500 in.
from the nominal dimensions and desired thickness at the
(12.70 mm) wide by 1.250 in. (31.75 mm) long as specified in target green density.
Practices B925 as Transverse Rupture Strength Test Specimen.
D 3 W 3 T 3 L
G
M 5 (1)
7.2 Either the thin test specimen with a thickness 0.250 6 0.061
0.005 in. (6.35 6 0.13 mm) or the thick test specimen having
where:
a thickness of 0.500 6 0.005 in. (12.70 6 0.13 mm) may be
M = mass of powder needed, g,
used as agreed to by the concerned parties.
D = target green density, g/cm ,
G
7.3 The top and bottom faces of the green compact shall be
W = width of test specimen, in.,
parallel within 0.001 in. (0.03 mm).
T = thickness of test specimen, in.,
L = length of test specimen, in., and
7.4 The green density shall be within 6 0.02 g⁄cm of the
3 3
0.061 = conversion factor, in to cm .
target green density that has been agreed to between the
concerned parties. 8.2.1 Following the recommendations in Practices B215,
take a gross sample of powder from the lot that is to be tested
8. Procedure
of sufficient quantity to produce a minimum of three test
specimens.
8.1 Lubrication Method—The lubrication system to be used
8.2.2 From this gross sample, remove three test portions of
when compacting the test specimen shall be a matter of
powder that can be used to produce three test specimens of the
agreement between the concerned parties. Compactibility and
desired thickness at the target green density. Each test portion
green density will vary with the method chosen as well as the
shall be within 0.02 g of the powder mass that was calculated.
care with which it is applied and affect the green strength
value. 8.3 Compacting Procedure—Set-up the PM Tooling in the
8.1.1 Lubricated metal powder mixtures should be tested in compacting press or the universal testing machine.Then, using
the as-received condition. the force that is necessary to produce the desired thickness at
8.1.2 Unlubricated metal powder or powder mixtures may the target green density, compact three test specimens from the
be compacted with the aid of die-wall lubrication or an three test portions of powder following the compacting proce-
admixed powder lubricant.
...
This document is not an ASTM standard and is intended only to provide the user of an ASTM standard an indication of what changes have been made to the previous version. Because
it may not be technically possible to adequately depict all changes accurately, ASTM recommends that users consult prior editions as appropriate. In all cases only the current version
of the standard as published by ASTM is to be considered the official document.
Designation: B312 − 14 B312 − 20
Standard Test Method for
Green Strength of Specimens Compacted from Metal
Powders
This standard is issued under the fixed designation B312; the number immediately following the designation indicates the year of
original adoption or, in the case of revision, the year of last revision. A number in parentheses indicates the year of last reapproval. A
superscript epsilon (´) indicates an editorial change since the last revision or reapproval.
1. Scope*
1.1 This standard covers a test method that may be used to measure the transverse rupture strength of a compacted but
unsintered (green) test specimen produced from lubricated or unlubricated metal powders or powder mixtures.
1.2 Green strength is measured by a quantitative laboratory procedure in which the fracture strength is calculated from the force
required to break an unsintered test specimen supported as a simple beam while subjected to a uniformly increasing three-point
transverse load under controlled conditions.
1.3 This test method is a companion standard to Test Method B528 that covers the measurement of the transverse rupture
strength of sintered PM test specimens.
1.4 Units—With the exception of the values for density and the mass used to determine density, for which the use of the gram
per cubic centimeter (g/cm ) and gram (g) units is the longstanding industry practice, the values in inch-pound units are to be
regarded as standard. The values given in parentheses are mathematical conversions to SI units that are provided for information
only and are not considered standard.
1.5 This standard does not purport to address all of the safety concerns, if any, associated with its use. It is the responsibility
of the user of this standard to establish appropriate safety safety, health, and healthenvironmental practices and determine the
applicability of regulatory limitations prior to use.
1.6 This international standard was developed in accordance with internationally recognized principles on standardization
established in the Decision on Principles for the Development of International Standards, Guides and Recommendations issued
by the World Trade Organization Technical Barriers to Trade (TBT) Committee.
2. Referenced Documents
2.1 ASTM Standards:
B215 Practices for Sampling Metal Powders
B243 Terminology of Powder Metallurgy
B528 Test Method for Transverse Rupture Strength of Powder Metallurgy (PM) Specimens
B925 Practices for Production and Preparation of Powder Metallurgy (PM) Test Specimens
B962 Test Methods for Density of Compacted or Sintered Powder Metallurgy (PM) Products Using Archimedes’ Principle
E691 Practice for Conducting an Interlaboratory Study to Determine the Precision of a Test Method
3. Terminology
3.1 Definitions—theThe definitions of powder metallurgy (PM) terms used in this test method can be found in Terminology
B243. Additional descriptive PM information is available in the Related Material section of Vol 02.05 of the Annual Book of ASTM
Standards.
4. Summary of Test Method
4.1 Three rectangular test specimens are compacted to a predetermined green density or at a specified compacting pressure from
test portions of the metal powder or powder mixture that is to be tested.
This test method is under the jurisdiction of ASTM Committee B09 on Metal Powders and Metal Powder Products and is the direct responsibility of Subcommittee B09.02
on Base Metal Powders.
Current edition approved June 1, 2014April 1, 2020. Published July 2014April 2020. Originally approved in 1956. Last previous edition approved in 20092014 as
B312 – 09.B312 – 14. DOI: 10.1520/B0312-14.10.1520/B0312-20.
For referenced ASTM standards, visit the ASTM website, www.astm.org, or contact ASTM Customer Service at service@astm.org. For Annual Book of ASTM Standards
volume information, refer to the standard’s Document Summary page on the ASTM website.
*A Summary of Changes section appears at the end of this standard
Copyright © ASTM International, 100 Barr Harbor Drive, PO Box C700, West Conshohocken, PA 19428-2959. United States
B312 − 20
4.2 Each unsintered bar is placed, in turn, in a test fixture and subjected to a uniformly increasing transverse load under
controlled conditions until fracture occurs.
4.3 The green strength or maximum flexural stress of each specimen is determined by calculation using the stress equation for
a simply supported beam with a concentrated mid-point load.
4.4 The green strength of the material being tested is reported as the arithmetic mean of the results of three individual tests at
the measured green density or at the specified compacting pressure rounded to the nearest 100 psi (0.5 MPa).
5. Significance and Use
5.1 The green strength value determined under the conditions specified by this test method is influenced by the characteristics
of the powder, how it compacts under the specified conditions (i.e., (that is, the particle to particle bonding that exists following
compacting), and the lubrication system used.
5.2 Knowledge of the green strength value is useful to the production, characterization, and utilization of metal powders in the
manufacture of PM structural parts and bearings.
5.3 The test for green strength of a compacted metal powder can be used to:
5.3.1 Relate the resistance of a pressed compact to breakage or damage due to handling.
5.3.2 Compare the quality of a metal powder or powder mixture from lot to lot.
5.3.3 Determine the effect of the addition of a lubricant or other powders to a base powder.
5.3.4 Evaluate powder mixing or blending variables.
5.4 Factors that are known to influence the green strength of a metal powder are particle shape, particle size distribution, and
compressibility of the metal powder.
5.5 The amount and type of lubricant or other additives and the mixing procedures have a strong effect on the green strength
of specimens produced from metal powder mixtures.
6. Apparatus
6.1 Analytical Balance—A balance readable to 0.001 g with a minimum capacity of 100 g to be used for determining the mass
of the test portion of the powder and the green test specimen to the nearest 0.01 g.
6.2 PM Tool Set—aA compacting die and punches capable of producing the test specimens;specimens, an example of which is
shown in Practices B925 as Laboratory Tooling –Transverse Tooling–Transverse Rupture Test Specimen.
6.3 Universal Testing Machine or PM Compacting Press—aA press with the ability to hold the PM tooling and apply the force
necessary to compact the test specimens to the target green density.
6.4 Outside Micrometers or Calipers—instrumentsInstruments capable of measuring from 0.000 to 1.250 in. 1.250 in. (0.00 to
31.75 mm) 31.75 mm) with an accuracy of 0.001 in. (0.03 mm).0.001 in. (0.02 mm).
6.5 Either of the following sets of testing apparatus:apparatus may be used:
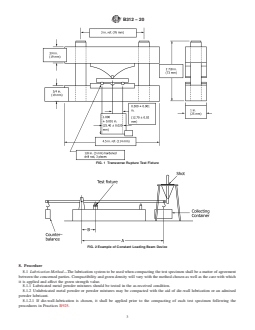
6.5.1 Transverse Rupture Test Fixture and Compression Testing Machine—aA fixture (Fig. 1) for locating the test specimen and
a press capable of applying a breaking load at a controlled rate of approximately 20 lbf/min (~90 N/min), and on which the force
can be read to the nearest 0.1 lbf (0.5 N), or
6.5.2 Constant Loading Beam Device, Metal Shot and Scale—– a –A lever-arm laboratory device (Fig. 2), designed to collect
a controlled flow of metal shot that will produce a force with a loading rate of approximately 20 lbf/min (~90 N/min) on a
pre-positioned test specimen until fracture occurs, and a scale with a capacity of at least 25 lb (10 kg) to determine the mass to
the nearest 0.01 lb (0.005 kg) of the shot that was required.
7. Test Specimen
7.1 The recommended test specimen is an unsintered, (green), rectangular compact having dimensions of 0.500 in. (12.70 mm)
0.500 in. (12.70 mm) wide by 1.250 in. (31.75 mm) (31.75 mm) long as specified in Practices B925 as Transverse Rupture Strength
Test Specimen.
7.2 Either the thin test specimen with a thickness 0.250 6 0.005 in. (6.35 6 0.13 mm) or the thick test specimen having a
thickness of 0.500 6 0.005 in. (12.70 6 0.13 mm) may be used as agreed to by the concerned parties.
7.3 The top and bottom faces of the green compact shall be parallel within 0.001 in. (0.03 mm).
7.4 The green density shall be within 6 0.05 0.02 g g/cm⁄cm of the target green density that has been agreed to between the
concerned parties.
B312 − 20
FIG. 1 Transverse Rupture Test Fixture
FIG. 2 Example of Constant Loading Beam Device
8. Procedure
8.1 Lubrication Method—The lubrication system to be used when compacting the test specimen shall be a matter of agreement
between the concerned parties. Compactibility and green density will vary with the method chosen as well as the care with which
it is applied and affect the green strength value.
8.1.1 Lubricated metal powder mixtures should be tested in the as-received condition.
8.1.2 Unlubricated metal powder or powder mixtures may be compacted with the aid of die-wall lubrication or an admixed
powder lubricant.
8.1.2.1 If die-wall-lubrication is chosen, it shall be applied prior to the compacting of each test specimen following the
procedures in Practices B925.
B312 − 20
8.1.2.2 If an admixed lubricant is to be used; the type, grade, percentage and mixing procedure shall be agreed upon between
the concerned parties or shall closely follow accepted PM practice.
8.2 Powder Sampling—Using Eq 1, calculate the mass of metal powder that will be needed to produce one test specimen from
the nominal dimensions and desired thickness at the target green density.
D 3W 3T 3L
G
M 5 (1)
0.061
where:
M = mass of powder needed, g,
D = target green density, g/cm ,
G
W = width of test specimen, in.,
T = thickness of test specimen, in.,
L = length of test specimen, in., and
3 3
0.061 = conversion factor, in to cm .
8.2.1 Following the recommendations in Practices B215, take a gross sample of powder from the lot that is to be tested of
sufficient quantity to produce a minimum of three test specimens.
8.2.2 From this gross sample, remove three test portions of powder that can be used to produce three test specimens of the
desired thickness at the target green density. Each test portion shall be within 0.02 g of the powder mass that was calculated.
8.3 Compacting Procedure—Set-up the PM Tooling in the compacting press or the universal testing machine. Then, using the
force that is necessary to produce the desired thickness at the target green density, compact three test specimens from the three test
portions of powder following the compacting procedure in Practices B925.
8.3.1 Do not use Test Methods B962 to measure the green density of the test specimens because of the possible effect of
impregnated oil on the green strength value.
8.3.2 Determine the mass of each test specimen and record it to the nearest 0.01 g, measure 0.001 g. Measure the specimen
dimensions to the nearest 0.001 in. (0.03 mm), 0.001 in. (0.02 mm); number and identify the top of each specimen.
8.3.3 Calculate the green density of each test specimen using Eq 2. Record these values to the nearest 0.01 0.01 g g/cm⁄cm .
M
D 5 0.061 (2)
G
W 3T 3L
where:
D = green density of the t
...
Questions, Comments and Discussion
Ask us and Technical Secretary will try to provide an answer. You can facilitate discussion about the standard in here.
Loading comments...