ASTM F289-96(2014)
(Specification)Standard Specification for Molybdenum Wire and Rod for Electronic Applications
Standard Specification for Molybdenum Wire and Rod for Electronic Applications
ABSTRACT
This specification deals with molybdenum wire and rod for electronic applications. The following grades of molybdenum wire and rod are covered in this specification: Grade 1—commercially pure molybdenum wire suitable for leads, hooks, supports, heaters, and metal-to-glass seals; Grade 2—commercially pure molybdenum wire suitable for mandrel either black or cleaned; and Grade 3—commercially pure molybdenum rod suitable for leads, hooks, supports, and metal-to-glass seals. Materials shall be tested and the individual grades shall conform to specified values of chemical composition, minimum tensile strength, elongation, ductility, surface finish, dimensional tolerances, and straightness.
SCOPE
1.1 This specification covers two grades of molybdenum wire less than 0.050 in. (1.27 mm) in diameter and one grade of molybdenum rod 1.00 in. (25.4 mm) or less in diameter as follows:
1.1.1 Grade 1—Commercially pure molybdenum wire suitable for leads, hooks, supports, heaters, and metal-to-glass seals.
1.1.2 Grade 2—Commercially pure molybdenum wire suitable for mandrel either black or cleaned.
1.1.3 Grade 3—Commercially pure molybdenum rod suitable for leads, hooks, supports, and metal-to-glass seals.
1.2 The term wire applies to all spooled or coiled material and 0.050 in. (1.3 mm) or less in diameter and to short cut lengths 0.020 in. (0.51 mm) or less in diameter.
1.3 The term rod applies to all material over 0.020 in. (0.51 mm) in diameter, supplied in straight lengths.
1.4 The values stated in inch-pound units are to be regarded as standard. The values given in parentheses are mathematical conversions to SI units that are provided for information only and are not considered standard.
1.5 This standard does not purport to address all of the safety concerns, if any, associated with its use. It is the responsibility of the user of this standard to establish appropriate safety and health practices and determine the applicability of regulatory limitations prior to use.
General Information
Relations
Buy Standard
Standards Content (Sample)
NOTICE: This standard has either been superseded and replaced by a new version or withdrawn.
Contact ASTM International (www.astm.org) for the latest information
Designation:F289 −96 (Reapproved 2014)
Standard Specification for
Molybdenum Wire and Rod for Electronic Applications
ThisstandardisissuedunderthefixeddesignationF289;thenumberimmediatelyfollowingthedesignationindicatestheyearoforiginal
adoptionor,inthecaseofrevision,theyearoflastrevision.Anumberinparenthesesindicatestheyearoflastreapproval.Asuperscript
epsilon (´) indicates an editorial change since the last revision or reapproval.
1. Scope E8Test Methods for Tension Testing of Metallic Materials
E315Test Methods for Chemical Analysis of Molybdenum
1.1 This specification covers two grades of molybdenum
(Withdrawn 2010)
wire less than 0.050 in. (1.27 mm) in diameter and one grade
F16Test Methods for Measuring Diameter or Thickness of
of molybdenum rod 1.00 in. (25.4 mm) or less in diameter as
Wire and Ribbon for Electronic Devices and Lamps
follows:
F205Test Method for Measuring Diameter of Fine Wire by
1.1.1 Grade 1—Commercially pure molybdenum wire suit-
Weighing
able for leads, hooks, supports, heaters, and metal-to-glass
F219Test Methods of Testing Fine Round and Flat Wire for
seals.
Electron Devices and Lamps
1.1.2 Grade 2—Commercially pure molybdenum wire suit-
2.2 Federal Standard:
able for mandrel either black or cleaned.
Fed. Std. No. 123Marking for Shipment (Civil Agencies)
1.1.3 Grade 3—Commercially pure molybdenum rod suit-
2.3 Military Standard:
able for leads, hooks, supports, and metal-to-glass seals.
MIL-STD-129Marking for Shipment and Storage (Military
1.2 The term wire applies to all spooled or coiled material
Agencies)
and 0.050 in. (1.3 mm) or less in diameter and to short cut
lengths 0.020 in. (0.51 mm) or less in diameter.
3. Chemical Composition
1.3 The term rod applies to all material over 0.020 in. (0.51
3.1 All grades of wire and rod shall be 99.90% minimum
mm) in diameter, supplied in straight lengths.
pure molybdenum. The maximum allowable oxygen content
1.4 The values stated in inch-pound units are to be regarded shall be 0.007 weight% , while the maximum carbon content
shall be 0.03 weight %.
as standard. The values given in parentheses are mathematical
conversions to SI units that are provided for information only
4. Mechanical Properties
and are not considered standard.
4.1 Tensile Properties:
1.5 This standard does not purport to address all of the
4.1.1 The tension test specimens and procedures shall con-
safety concerns, if any, associated with its use. It is the
form to Methods F219 for wire diameter up to and including
responsibility of the user of this standard to establish appro-
0.010 in. (0.25 mm), and Test Methods E8 for all other wire
priate safety and health practices and determine the applica-
and rod diameters.
bility of regulatory limitations prior to use.
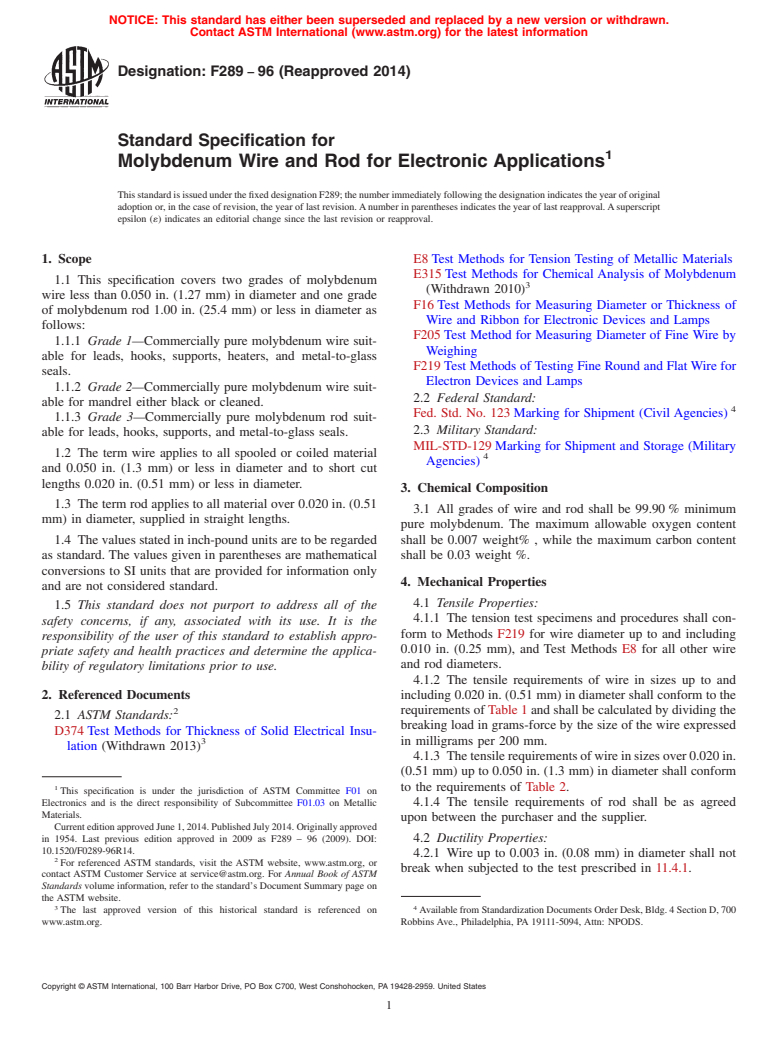
4.1.2 The tensile requirements of wire in sizes up to and
2. Referenced Documents including 0.020 in. (0.51 mm) in diameter shall conform to the
requirements of Table 1 and shall be calculated by dividing the
2.1 ASTM Standards:
breaking load in grams-force by the size of the wire expressed
D374Test Methods for Thickness of Solid Electrical Insu-
in milligrams per 200 mm.
lation (Withdrawn 2013)
4.1.3 Thetensilerequirementsofwireinsizesover0.020in.
(0.51 mm) up to 0.050 in. (1.3 mm) in diameter shall conform
1 to the requirements of Table 2.
This specification is under the jurisdiction of ASTM Committee F01 on
Electronics and is the direct responsibility of Subcommittee F01.03 on Metallic
4.1.4 The tensile requirements of rod shall be as agreed
Materials.
upon between the purchaser and the supplier.
CurrenteditionapprovedJune1,2014.PublishedJuly2014.Originallyapproved
in 1954. Last previous edition approved in 2009 as F289 – 96 (2009). DOI: 4.2 Ductility Properties:
10.1520/F0289-96R14.
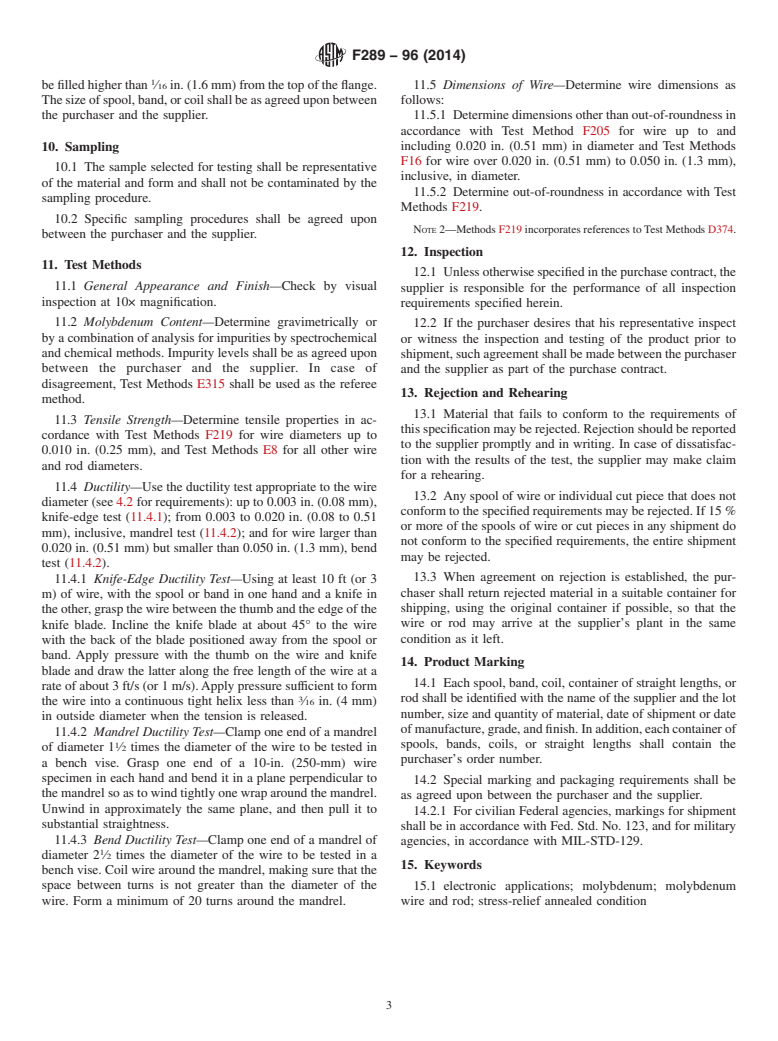
4.2.1 Wire up to 0.003 in. (0.08 mm) in diameter shall not
For referenced ASTM standards, visit the ASTM website, www.astm.org, or
break when subjected to the test prescribed in 11.4.1.
contact ASTM Customer Service at service@astm.org. For Annual Book of ASTM
Standards volume information, refer to the standard’s Document Summary page on
the ASTM website.
3 4
The last approved version of this historical standard is referenced on AvailablefromStandardizationDocumentsOrderDesk,Bldg.4SectionD,700
www.astm.org. Robbins Ave., Philadelphia, PA 19111-5094, Attn: NPODS.
Copyright © ASTM International, 100 Barr Harbor Drive, PO Box C700, West Conshohocken, PA 19428-2959. United States
F289−96 (2014)
TABLE 1 Tensile Requirements
Elongation in 10 in.
Wire Size, Minimum Tensile Breaking Load,
A
(250 mm), %
Maximum Diameter, in. (mm)
mg/200 mm gf/(mg/200 mm)
Grade 1 Grade 2
Up to 4.11, incl 0.0020 (0.051) 50 >6 #6
Over 4.11 to 6.42, incl 0.0025 (0.064) 46 >6 #6
Over 6.42 to 10.53, incl 0.0032 (0.081) 44 >6 #6
Over 10.53 to 411.2, incl 0.020 (0.51) 40 >6 #6
A −4
Wire diameter, in. = 9.86 × 10 weight in mg/200 mm.
œ
TABLE 2 Tensile Requirement
6.4 When centerless ground rod is specified, the diameter
Minimum Tensile Elongation in 10 in. shall meet the tolerances shown in Table 3.
Wire Diameter, in. Strength, psi (250 mm), %
(mm) (MPa) Class Class
7. General Requirements
1, min 2, max
Over 0.020 (0.51) 64 000 (441) 6 6
7.1 The material shall be uniform in composition, cross
to 0.050 (1.27)
section, and in structural condition.
7.2 Unless otherwise specified, all material shall be pro-
vided in the stress-relief annealed condition (not recrystal-
4.2.2 Wire over 0.003 in. (0.08 mm) up to 0.020 in. (0.51
mm) in diameter shall not break or show cracks under lized).
observation through a binocular microscope at 30× when
8. Straightness
subjected to the test prescribed in 11.4.2.
4.2.3 Wire over 0.020 in. (0.51 mm) in diameter shall not 8.1 When ordered as straightened, straightness of wire shall
break or show cracks under unaided visual observation when
be specified as the radius of curvature or camber of a given
subjected to the test prescribed in 11.4.3. length of wire as agreed upon between the purchaser and the
4.2.4 Rod shall have ductility properties as agreed upon
supplier.
between the purchaser and the supplier.
8.2 Rod and short cut lengths shall be straight to within ⁄8
in. camber in 1 ft (or 3 mm camber in 300 mm) of length.
5. Surface Finish
NOTE 1—The straightness criterion in terms of maximum permissible
5.1 Molybdenum wire shall be furnished in the following
camberinanarbitrarylength,L',iscalculatedastheproductoftheknown
finishes:
maximum permissible camber in a specified length, L, and the square of
5.1.1 As drawn, black, or
the ratio of L' to L. As an example, consider L' to be 3 ft. In inch-pound
5.1.2 As drawn, cleaned. 1 3 1
units, the maximum camber per 3-ft length=( ⁄8 in.) ( ⁄1) =1 ⁄8 in. In SI
units, the maximum camber per 760-mm length = (3 mm) ( ⁄300) =28
5.2 Molybdenum rod shall be furnished in the following
mm.Therelationgivenconstitutesanapproximationvalidforthepurpose
finishes:
as long as L' is not too large; the exact solution can be obtained by
5.2.1 Black,
considering a circle with the camber in length L' as one segment of a
diametral chord perpendicularly bisecting a chord of length L'.
5.2.2 Cleaned, or
5.2.3 Centerless ground.
9. Coiling and Spooling
5.3 Surfaces shall be smooth and free of contamination and
9.1 The spools or bands shall be clean and free of seams or
pernicious surface defects.
projections that might catch or tangle the wire during unwind-
ing. The wire shall be in one continuous length and wound
6. Dimensional Tolerances
smoothly in layers, with no piling upon turns, so that it
6.1 Forwireindiametersuptoandincluding0.020in.(0.51
unwinds freely without forming kinks. Inner and outer ends
mm)indiameterthetoleranceshallbe 65%ofweightper200
shallbefirmlyattachedtothespoolorbandbysuitablemeans.
mm. The size of wire shall be un
...
This document is not an ASTM standard and is intended only to provide the user of an ASTM standard an indication of what changes have been made to the previous version. Because
it may not be technically possible to adequately depict all changes accurately, ASTM recommends that users consult prior editions as appropriate. In all cases only the current version
of the standard as published by ASTM is to be considered the official document.
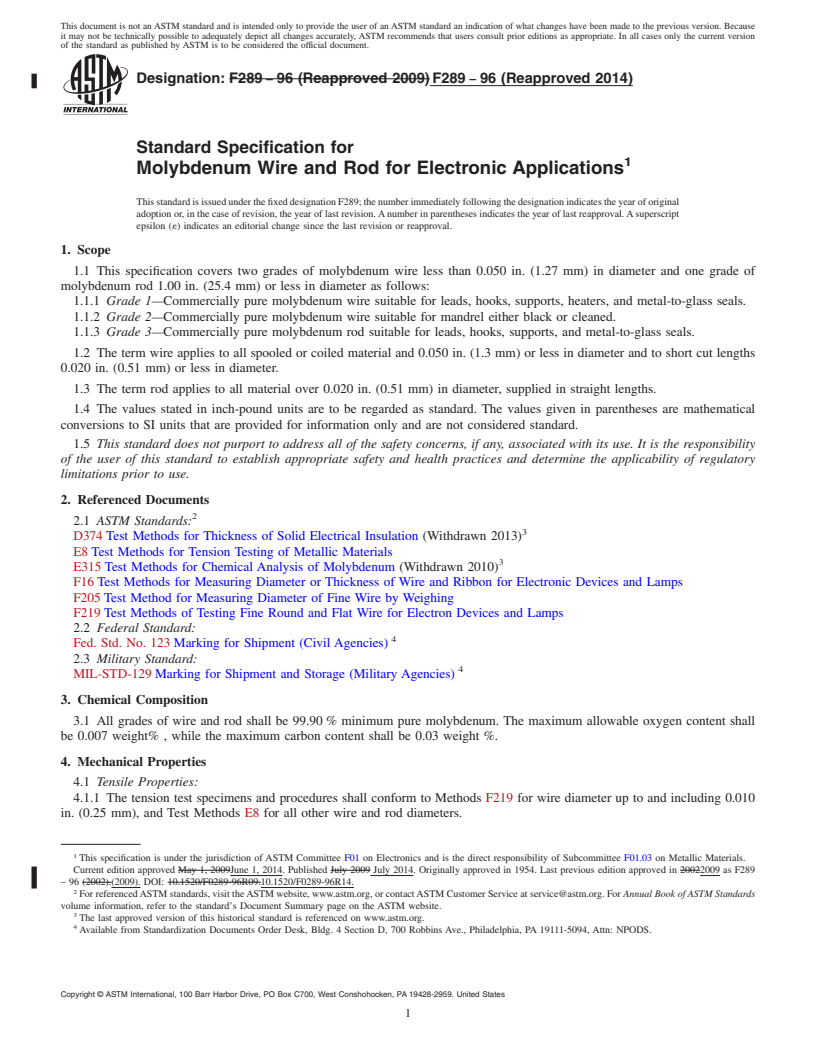
Designation: F289 − 96 (Reapproved 2009) F289 − 96 (Reapproved 2014)
Standard Specification for
Molybdenum Wire and Rod for Electronic Applications
This standard is issued under the fixed designation F289; the number immediately following the designation indicates the year of original
adoption or, in the case of revision, the year of last revision. A number in parentheses indicates the year of last reapproval. A superscript
epsilon (´) indicates an editorial change since the last revision or reapproval.
1. Scope
1.1 This specification covers two grades of molybdenum wire less than 0.050 in. (1.27 mm) in diameter and one grade of
molybdenum rod 1.00 in. (25.4 mm) or less in diameter as follows:
1.1.1 Grade 1—Commercially pure molybdenum wire suitable for leads, hooks, supports, heaters, and metal-to-glass seals.
1.1.2 Grade 2—Commercially pure molybdenum wire suitable for mandrel either black or cleaned.
1.1.3 Grade 3—Commercially pure molybdenum rod suitable for leads, hooks, supports, and metal-to-glass seals.
1.2 The term wire applies to all spooled or coiled material and 0.050 in. (1.3 mm) or less in diameter and to short cut lengths
0.020 in. (0.51 mm) or less in diameter.
1.3 The term rod applies to all material over 0.020 in. (0.51 mm) in diameter, supplied in straight lengths.
1.4 The values stated in inch-pound units are to be regarded as standard. The values given in parentheses are mathematical
conversions to SI units that are provided for information only and are not considered standard.
1.5 This standard does not purport to address all of the safety concerns, if any, associated with its use. It is the responsibility
of the user of this standard to establish appropriate safety and health practices and determine the applicability of regulatory
limitations prior to use.
2. Referenced Documents
2.1 ASTM Standards:
D374 Test Methods for Thickness of Solid Electrical Insulation (Withdrawn 2013)
E8 Test Methods for Tension Testing of Metallic Materials
E315 Test Methods for Chemical Analysis of Molybdenum (Withdrawn 2010)
F16 Test Methods for Measuring Diameter or Thickness of Wire and Ribbon for Electronic Devices and Lamps
F205 Test Method for Measuring Diameter of Fine Wire by Weighing
F219 Test Methods of Testing Fine Round and Flat Wire for Electron Devices and Lamps
2.2 Federal Standard:
Fed. Std. No. 123 Marking for Shipment (Civil Agencies)
2.3 Military Standard:
MIL-STD-129 Marking for Shipment and Storage (Military Agencies)
3. Chemical Composition
3.1 All grades of wire and rod shall be 99.90 % minimum pure molybdenum. The maximum allowable oxygen content shall
be 0.007 weight% , while the maximum carbon content shall be 0.03 weight %.
4. Mechanical Properties
4.1 Tensile Properties:
4.1.1 The tension test specimens and procedures shall conform to Methods F219 for wire diameter up to and including 0.010
in. (0.25 mm), and Test Methods E8 for all other wire and rod diameters.
This specification is under the jurisdiction of ASTM Committee F01 on Electronics and is the direct responsibility of Subcommittee F01.03 on Metallic Materials.
Current edition approved May 1, 2009June 1, 2014. Published July 2009 July 2014. Originally approved in 1954. Last previous edition approved in 20022009 as F289
– 96 (2002).(2009). DOI: 10.1520/F0289-96R09.10.1520/F0289-96R14.
For referenced ASTM standards, visit the ASTM website, www.astm.org, or contact ASTM Customer Service at service@astm.org. For Annual Book of ASTM Standards
volume information, refer to the standard’s Document Summary page on the ASTM website.
The last approved version of this historical standard is referenced on www.astm.org.
Available from Standardization Documents Order Desk, Bldg. 4 Section D, 700 Robbins Ave., Philadelphia, PA 19111-5094, Attn: NPODS.
Copyright © ASTM International, 100 Barr Harbor Drive, PO Box C700, West Conshohocken, PA 19428-2959. United States
F289 − 96 (2014)
4.1.2 The tensile requirements of wire in sizes up to and including 0.020 in. (0.51 mm) in diameter shall conform to the
requirements of Table 1 and shall be calculated by dividing the breaking load in grams-force by the size of the wire expressed in
milligrams per 200 mm.
4.1.3 The tensile requirements of wire in sizes over 0.020 in. (0.51 mm) up to 0.050 in. (1.3 mm) in diameter shall conform
to the requirements of Table 2.
4.1.4 The tensile requirements of rod shall be as agreed upon between the purchaser and the supplier.
4.2 Ductility Properties:
4.2.1 Wire up to 0.003 in. (0.08 mm) in diameter shall not break when subjected to the test prescribed in 11.4.1.
4.2.2 Wire over 0.003 in. (0.08 mm) up to 0.020 in. (0.51 mm) in diameter shall not break or show cracks under observation
through a binocular microscope at 30× when subjected to the test prescribed in 11.4.2.
4.2.3 Wire over 0.020 in. (0.51 mm) in diameter shall not break or show cracks under unaided visual observation when
subjected to the test prescribed in 11.4.3.
4.2.4 Rod shall have ductility properties as agreed upon between the purchaser and the supplier.
5. Surface Finish
5.1 Molybdenum wire shall be furnished in the following finishes:
5.1.1 As drawn, black, or
5.1.2 As drawn, cleaned.
5.2 Molybdenum rod shall be furnished in the following finishes:
5.2.1 Black,
5.2.2 Cleaned, or
5.2.3 Centerless ground.
5.3 Surfaces shall be smooth and free of contamination and pernicious surface defects.
6. Dimensional Tolerances
6.1 For wire in diameters up to and including 0.020 in. (0.51 mm) in diameter the tolerance shall be 65 % of weight per 200
mm. The size of wire shall be uniform for Grades 1 and 3 within 2 weight % as measured at both ends of the wire; and for Grade
2 within 1 weight % within the total length of the wire. The standard size tolerance for wire in a diameter range of 0.020 to 0.030
in. (0.51 to 0.76 mm) is6 3 % by diameter; but such wire can be ordered by any of several weight tolerances (mg/200 mm) as
agreed upon between the purchaser and the supplier.
6.2 For black or cleaned rod in diameters over 0.020 in. (0.51 mm) and wire over 0.030 in. (0.76 mm) the tolerance shall be
63 % of the specified diameter.
6.3 Out-of-roundness of wire over 0.005 in. (0.13 mm) in diameter and all rod except centerless ground shall be within 4 % of
the specified diameter, maximum.
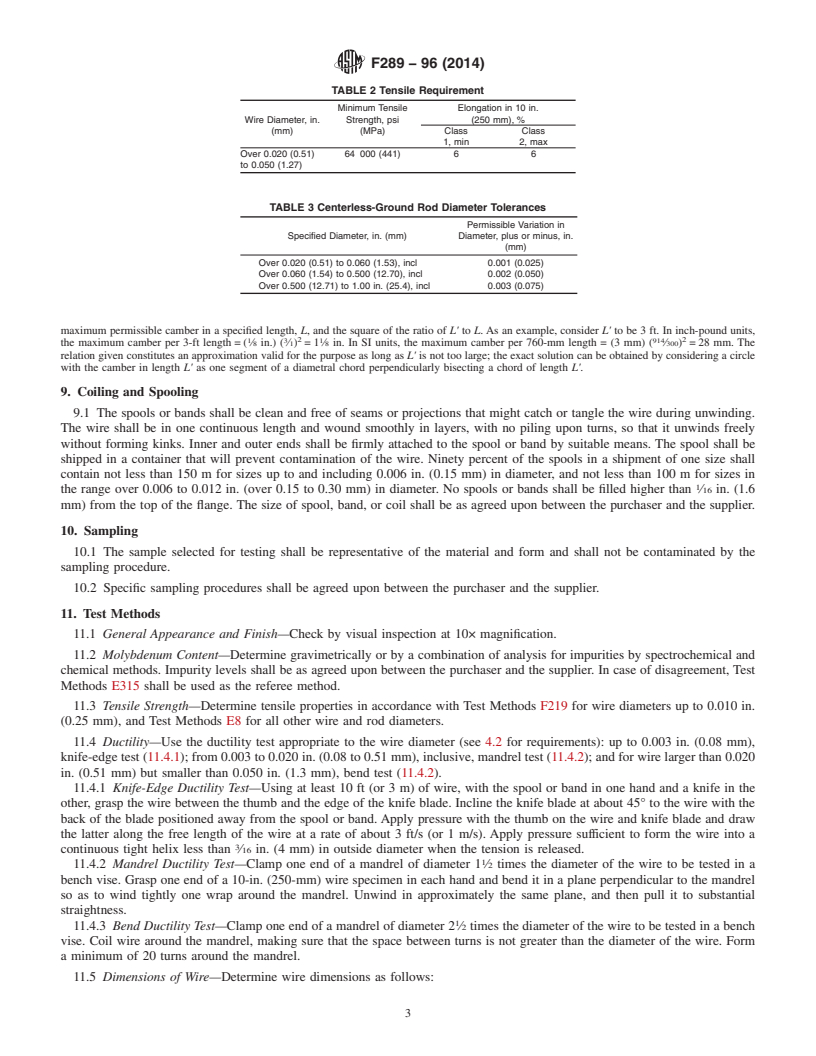
6.4 When centerless ground rod is specified, the diameter shall meet the tolerances shown in Table 3.
7. General Requirements
7.1 The material shall be uniform in composition, cross section, and in structural condition.
7.2 Unless otherwise specified, all material shall be provided in the stress-relief annealed condition (not recrystallized).
8. Straightness
8.1 When ordered as straightened, straightness of wire shall be specified as the radius of curvature or camber of a given length
of wire as agreed upon between the purchaser and the supplier.
8.2 Rod and short cut lengths shall be straight to within ⁄8 in. camber in 1 ft (or 3 mm camber in 300 mm) of length.
NOTE 1—The straightness criterion in terms of maximum permissible camber in an arbitrary length, L', is calculated as the product of the known
TABLE 1 Tensile Requirements
Elongation in 10 in.
Wire Size, Minimum Tensile Breaking Load,
A
(250 mm), %
Maximum Diameter, in. (mm)
mg/200 mm gf/(mg/200 mm)
Grade 1 Grade 2
Up to 4.11, incl 0.0020 (0.051) 50 >6 #6
Over 4.11 to 6.42, incl 0.0025 (0.064) 46 >6 #6
Over 6.42 to 10.53, incl 0.0032 (0.081) 44 >6 #6
Over 10.53 to 411.2, incl 0.020 (0.51) 40 >6 #6
A −4
Wire diameter, in. = 9.86 × 10 weight in mg/200 mm.
œ
F289 − 96 (2014)
TABLE 2 Tensile Requirement
Minimum Tensile Elongation in 10 in.
Wire Diameter, in. Strength, psi (250 mm), %
(mm) (MPa) Class Class
1, min 2, max
Over 0.020 (0.51) 64 000 (441) 6 6
to 0.050 (1.27)
TABLE 3 Centerless-
...


Questions, Comments and Discussion
Ask us and Technical Secretary will try to provide an answer. You can facilitate discussion about the standard in here.