ASTM F38-18
(Test Method)Standard Test Methods for Creep Relaxation of a Gasket Material
Standard Test Methods for Creep Relaxation of a Gasket Material
SIGNIFICANCE AND USE
4.1 These test methods are designed to compare related materials under controlled conditions and their ability to maintain a given compressive stress as a function of time. A portion of the torque loss on the bolted flange is a result of creep relaxation. Torque loss can also be caused by elongation of the bolts, distortion of the flanges, and vibration; therefore, the results obtained should be correlated with field results. These test methods may be used as a routine test when agreed upon between the consumer and the producer.
Note 1: Test Method B was developed using asbestos gasket materials and at issuance substantiating data were not available for other gasket materials.
SCOPE
1.1 These test methods provide a means of measuring the amount of creep relaxation of a gasket material at a predetermined time after a compressive stress has been applied.
1.1.1 Test Method A—Creep relaxation measured by means of a calibrated strain gauge on a bolt.
1.1.2 Test Method B—Creep relaxation measured by means of a calibrated bolt with dial indicator.
1.2 The values stated in SI units are to be regarded as standard. The values given in parentheses are for information only.
1.3 This standard does not purport to address all of the safety concerns, if any, associated with its use. It is the responsibility of the user of this standard to establish appropriate safety, health, and environmental practices and determine the applicability of regulatory limitations prior to use.
1.4 This international standard was developed in accordance with internationally recognized principles on standardization established in the Decision on Principles for the Development of International Standards, Guides and Recommendations issued by the World Trade Organization Technical Barriers to Trade (TBT) Committee.
General Information
- Status
- Published
- Publication Date
- 31-Jul-2018
- Technical Committee
- F03 - Gaskets
- Drafting Committee
- F03.20 - Mechanical Test Methods
Relations
- Effective Date
- 01-Aug-2018
- Effective Date
- 01-Mar-2024
- Effective Date
- 01-Dec-2023
- Refers
ASTM F436/F436M-18a - Standard Specification for Hardened Steel Washers Inch and Metric Dimensions - Effective Date
- 01-Sep-2018
- Refers
ASTM F436/F436M-18 - Standard Specification for Hardened Steel Washers Inch and Metric Dimensions - Effective Date
- 01-Jun-2018
- Effective Date
- 01-Oct-2016
- Refers
ASTM F436/F436M-16 - Standard Specification for Hardened Steel Washers Inch and Metric Dimensions - Effective Date
- 01-Sep-2016
- Effective Date
- 01-Nov-2015
- Effective Date
- 01-Jun-2015
- Effective Date
- 15-Nov-2014
- Effective Date
- 01-Jun-2014
- Effective Date
- 08-Aug-2012
- Effective Date
- 01-May-2012
- Effective Date
- 01-May-2012
- Effective Date
- 01-Mar-2012
Overview
ASTM F38-18: Standard Test Methods for Creep Relaxation of a Gasket Material provides standardized test methods to measure and compare the ability of gasket materials to retain compressive stress over time. These test methods are essential for evaluating the long-term sealing performance of gaskets used in bolted flange connections, and they help identify potential torque loss due to material creep relaxation.
The standard specifies procedures to test creep relaxation at a predetermined time after compressive stress is applied, either at room or elevated temperatures. The outcomes allow manufacturers and users to correlate laboratory results with field performance, supporting informed material selection and quality control in industries where gasket integrity is critical.
Key Topics
- Creep Relaxation Measurement: Determines stress retention capability of gasket materials when subjected to compressive loading over time.
- Test Methods Included:
- Test Method A: Uses a calibrated strain gauge on a bolt, generally conducted at room temperature.
- Test Method B: Involves a calibrated bolt with a dial indicator, suitable for both room and elevated temperatures.
- Routine Testing: Methods may be agreed upon for routine product evaluation between producers and consumers.
- Impact on Torque Loss: Addresses that some torque loss on bolted flanges arises from gasket creep relaxation, but other factors such as bolt elongation, flange distortion, and vibration also contribute.
- Safety Considerations: Users must establish appropriate safety, health, and environmental practices.
- International Standardization: Developed in accordance with the World Trade Organization (WTO) guidelines for international standards.
Applications
- Gasket Material Comparison: Enables direct comparison of related gasket materials under identical laboratory conditions, supporting material selection during engineering design or procurement.
- Quality Assurance: Provides a reliable and repeatable approach for manufacturers and end-users to evaluate the durability and performance of gasket materials before field deployment.
- Routine Material Testing: Can serve as a standard quality control tool when included as part of procurement or production specifications.
- Predicting Field Performance: Helps identify potential risks of gasket relaxation leading to loss of sealing load, which could contribute to leaks or failures in pressure-retaining equipment.
- Industry Relevance: Widely applicable across sectors such as oil & gas, petrochemical, automotive, power generation, and any industry where flanged connections must maintain reliable seals.
Related Standards
- ASTM A193/A193M: Specification for alloy-steel and stainless steel bolting for high temperature or high pressure service.
- ASTM B637: Specification for precipitation-hardening and cold worked nickel alloy bars, forgings, and forging stock.
- ASTM F104: Classification system for nonmetallic gasket materials.
- ASTM F436/F436M: Specification for hardened steel washers.
- ASTM D3040 (Withdrawn): Practice for preparing precision statements for standards related to rubber and rubber testing.
Practical Value
ASTM F38-18 is a vital reference for engineering teams, materials scientists, manufacturers, and quality assurance professionals working with gasketed flange connections. By following its test methods, stakeholders can:
- Ensure consistent evaluation of gasket creep relaxation.
- Make reliable, data-driven decisions on gasket material selection.
- Minimize the risk of seal failures and unplanned downtime due to gasket relaxation.
- Demonstrate compliance with recognized international standards in supply contracts and customer specifications.
- Optimize maintenance planning by understanding material performance limits.
Regular implementation of ASTM F38-18 helps organizations maintain safety, reliability, and cost-effectiveness in systems relying on gasketed joints.
Keywords: ASTM F38-18, creep relaxation, gasket material, compressive stress, torque loss, relaxometer, strain gauge, dial indicator, quality control, international gasket standards.
Buy Documents
ASTM F38-18 - Standard Test Methods for Creep Relaxation of a Gasket Material
REDLINE ASTM F38-18 - Standard Test Methods for Creep Relaxation of a Gasket Material
Get Certified
Connect with accredited certification bodies for this standard

Bureau Veritas Chile
Bureau Veritas certification services in Chile.

Bureau Veritas Peru
Bureau Veritas certification services in Peru.

BVQI Peru
Bureau Veritas certification in Peru.
Sponsored listings
Frequently Asked Questions
ASTM F38-18 is a standard published by ASTM International. Its full title is "Standard Test Methods for Creep Relaxation of a Gasket Material". This standard covers: SIGNIFICANCE AND USE 4.1 These test methods are designed to compare related materials under controlled conditions and their ability to maintain a given compressive stress as a function of time. A portion of the torque loss on the bolted flange is a result of creep relaxation. Torque loss can also be caused by elongation of the bolts, distortion of the flanges, and vibration; therefore, the results obtained should be correlated with field results. These test methods may be used as a routine test when agreed upon between the consumer and the producer. Note 1: Test Method B was developed using asbestos gasket materials and at issuance substantiating data were not available for other gasket materials. SCOPE 1.1 These test methods provide a means of measuring the amount of creep relaxation of a gasket material at a predetermined time after a compressive stress has been applied. 1.1.1 Test Method A—Creep relaxation measured by means of a calibrated strain gauge on a bolt. 1.1.2 Test Method B—Creep relaxation measured by means of a calibrated bolt with dial indicator. 1.2 The values stated in SI units are to be regarded as standard. The values given in parentheses are for information only. 1.3 This standard does not purport to address all of the safety concerns, if any, associated with its use. It is the responsibility of the user of this standard to establish appropriate safety, health, and environmental practices and determine the applicability of regulatory limitations prior to use. 1.4 This international standard was developed in accordance with internationally recognized principles on standardization established in the Decision on Principles for the Development of International Standards, Guides and Recommendations issued by the World Trade Organization Technical Barriers to Trade (TBT) Committee.
SIGNIFICANCE AND USE 4.1 These test methods are designed to compare related materials under controlled conditions and their ability to maintain a given compressive stress as a function of time. A portion of the torque loss on the bolted flange is a result of creep relaxation. Torque loss can also be caused by elongation of the bolts, distortion of the flanges, and vibration; therefore, the results obtained should be correlated with field results. These test methods may be used as a routine test when agreed upon between the consumer and the producer. Note 1: Test Method B was developed using asbestos gasket materials and at issuance substantiating data were not available for other gasket materials. SCOPE 1.1 These test methods provide a means of measuring the amount of creep relaxation of a gasket material at a predetermined time after a compressive stress has been applied. 1.1.1 Test Method A—Creep relaxation measured by means of a calibrated strain gauge on a bolt. 1.1.2 Test Method B—Creep relaxation measured by means of a calibrated bolt with dial indicator. 1.2 The values stated in SI units are to be regarded as standard. The values given in parentheses are for information only. 1.3 This standard does not purport to address all of the safety concerns, if any, associated with its use. It is the responsibility of the user of this standard to establish appropriate safety, health, and environmental practices and determine the applicability of regulatory limitations prior to use. 1.4 This international standard was developed in accordance with internationally recognized principles on standardization established in the Decision on Principles for the Development of International Standards, Guides and Recommendations issued by the World Trade Organization Technical Barriers to Trade (TBT) Committee.
ASTM F38-18 is classified under the following ICS (International Classification for Standards) categories: 23.100.60 - Filters, seals and contamination of fluids; 73.080 - Non-metalliferous minerals. The ICS classification helps identify the subject area and facilitates finding related standards.
ASTM F38-18 has the following relationships with other standards: It is inter standard links to ASTM F38-00(2014), ASTM A193/A193M-24, ASTM B637-23, ASTM F436/F436M-18a, ASTM F436/F436M-18, ASTM B637-16, ASTM F436/F436M-16, ASTM A193/A193M-15a, ASTM A193/A193M-15, ASTM A193/A193M-14a, ASTM A193/A193M-14, ASTM A193/A193M-12b, ASTM B637-12, ASTM B637-12e1, ASTM A193/A193M-12. Understanding these relationships helps ensure you are using the most current and applicable version of the standard.
ASTM F38-18 is available in PDF format for immediate download after purchase. The document can be added to your cart and obtained through the secure checkout process. Digital delivery ensures instant access to the complete standard document.
Standards Content (Sample)
This international standard was developed in accordance with internationally recognized principles on standardization established in the Decision on Principles for the
Development of International Standards, Guides and Recommendations issued by the World Trade Organization Technical Barriers to Trade (TBT) Committee.
Designation: F38 − 18
Standard Test Methods for
Creep Relaxation of a Gasket Material
ThisstandardisissuedunderthefixeddesignationF38;thenumberimmediatelyfollowingthedesignationindicatestheyearoforiginal
adoptionor,inthecaseofrevision,theyearoflastrevision.Anumberinparenthesesindicatestheyearoflastreapproval.Asuperscript
epsilon (´) indicates an editorial change since the last revision or reapproval.
This standard has been approved for use by agencies of the U.S. Department of Defense.
1. Scope dards Related to Rubber and Rubber Testing (Withdrawn
1987)
1.1 These test methods provide a means of measuring the
F104Classification System for Nonmetallic Gasket Materi-
amount of creep relaxation of a gasket material at a predeter-
als
mined time after a compressive stress has been applied.
F436/F436MSpecification for Hardened SteelWashers Inch
1.1.1 Test Method A—Creep relaxation measured by means
and Metric Dimensions
of a calibrated strain gauge on a bolt.
2.2 ASTM Adjuncts:
1.1.2 Test Method B—Creep relaxation measured by means
Relaxometer, Method A (F38)
of a calibrated bolt with dial indicator.
Relaxometer, Method B (F38)
1.2 The values stated in SI units are to be regarded as
standard. The values given in parentheses are for information
3. Summary of Test Methods
only.
3.1 In both test methods the specimen is subjected to a
1.3 This standard does not purport to address all of the
compressivestressbetweentwoplatens,withthestressapplied
safety concerns, if any, associated with its use. It is the
by a nut and bolt.
responsibility of the user of this standard to establish appro-
3.2 InTestMethodA,normallyrunatroomtemperature,the
priate safety, health, and environmental practices and deter-
stress is measured by a calibrated strain gauge on the bolt. In
mine the applicability of regulatory limitations prior to use.
running the test, strain indicator readings are taken at intervals
1.4 This international standard was developed in accor-
of time, beginning at the loading time, to the end of the test.
dance with internationally recognized principles on standard-
The strain indicator readings are converted to percentages of
ization established in the Decision on Principles for the
the initial stress which are then plotted against the log of time
Development of International Standards, Guides and Recom-
in hours. The percentage of initial stress loss or relaxation can
mendations issued by the World Trade Organization Technical
be read off the curve at any given time, within the limits of the
Barriers to Trade (TBT) Committee.
total test time.
2. Referenced Documents
3.3 InTestMethodB,runatroomorelevatedtemperatures,
the stress is determined by measuring the change in length of
2.1 ASTM Standards:
the calibrated bolt with a dial indicator. The bolt length is
A193/A193MSpecification for Alloy-Steel and Stainless
measured at the beginning of the test and at the end of the test;
Steel Bolting for High Temperature or High Pressure
from this the percentage of relaxation is calculated.
Service and Other Special Purpose Applications
B637Specification for Precipitation-Hardening and Cold
4. Significance and Use
Worked Nickel Alloy Bars, Forgings, and Forging Stock
4.1 These test methods are designed to compare related
for Moderate or High Temperature Service
materials under controlled conditions and their ability to
D3040Practice for Preparing Precision Statements for Stan-
maintain a given compressive stress as a function of time. A
portion of the torque loss on the bolted flange is a result of
These test methods are under the jurisdiction of ASTM Committee F03 on
Gaskets and are the direct responsibility of Subcommittee F03.20 on Mechanical
Test Methods. The last approved version of this historical standard is referenced on
Current edition approved Aug. 1, 2018. Published November 2018. Originally www.astm.org.
approvedin1962.Lastpreviouseditionapprovedin2014asF38–00(2014).DOI: AprintofthisapparatusisavailableatanominalcostfromASTMInternational
10.1520/F0038-18. Headquarters. OrderAdjunct No. ADJF003801. Original adjunct produced in 1965.
For referenced ASTM standards, visit the ASTM website, www.astm.org, or
contact ASTM Customer Service at service@astm.org. For Annual Book of ASTM Detailed working drawings of this apparatus are available from ASTM
Standards volume information, refer to the standard’s Document Summary page on International Headquarters. Order Adjunct No. ADJF003802. Original adjunct
the ASTM website. produced in 1965.
Copyright © ASTM International, 100 Barr Harbor Drive, PO Box C700, West Conshohocken, PA 19428-2959. United States
F38−18
FIG. 1 Relaxometer, Test Method A
creep relaxation. Torque loss can also be caused by elongation
of the bolts, distortion of the flanges, and vibration; therefore,
the results obtained should be correlated with field results.
These test methods may be used as a routine test when agreed
upon between the consumer and the producer.
NOTE1—TestMethodBwasdevelopedusingasbestosgasketmaterials
and at issuance substantiating data were not available for other gasket
materials.
5. Apparatus
5.1 Test Method A:
5.1.1 Strain Indicator.
5.1.2 Timer.
5.1.3 Relaxometer, composed of two platens, upper and
lower; a bolt, with mounted strain gauge; and a thrust bearing
as shown in Fig. 1.
5.1.4 Strain Gauges, 120Ω resistance with a gauge factor
of 2.0 6 0.10%. The gauges shall be mounted to indicate
tensile strain and positioned to compensate for torque,
temperature, and bending.The gauges shall be mounted on the
smalldiameteroftheboltabout50.8mm(2in.)fromthehead.
The bolt with mounted strain gauges must be calibrated.
5.2 Test Method B:
5.2.1 Relaxometer, Platen Assembly composed of two
platens, specially drilled and calibrated bolt, washer and nut
composed of Specification A193/A193M Grade B7 or Speci-
FIG. 2 Relaxometer, Platen Assembly and Dial Indicator
fication B637 Grade UNS N07718 or other alloys of construc-
Assembly, Test Method B
tion that would satisfy the calibration procedure (see Annex)
for the test temperature specified, as shown in Fig. 2.
5.2.2 Dial Indicator Assembly, composed of an adaptor
Thesolesourceofsupplyofstraingauges(TypeAB-7)knowntothecommittee
body, floating pin, set screw, and dial indicator, as shown in
at this time is Baldwin-Lima-Hamilton. If you are aware of alternative suppliers,
Fig. 2. Dial indicator should have graduations of 0.0025 mm
please provide this information to ASTM International Headquarters. Your com-
(0.0001 in.) or smaller.
ments will receive careful consideration at a meeting of the responsible technical
1 9
committee, which you may attend. 5.2.3 Box End Wrench— ⁄16 in., Qty. 2.
F38−18
6. Test Specimen 8.2 Test Method B:
8.2.1 Clean all surfaces and lightly lubricate the washer and
6.1 Test Method A—The sample size shall be 33.02 6
bolt threads; graphite and molybdenum disulfide have been
0.05mm (1.300 6 0.002 in.) in inside diameter and 52.32 6
found to be acceptable lubricants.
0.05mm (2.0606 0.002 in.) in outside diameter.
8.2.2 Place rectangular specimens between the platens in
6.2 Test Method B:
accordancewithFig.2andmakingsuretheyarenocloserthan
6.2.1 Specimen size shall be 10.16 6 0.381 mm (0.400 6
2mm(0.078in.)totheotherpiecesandtheedgeoftheplatens.
0.015in.)wideby31.75 60.381mm(1.250 60.015in.)long.
If an annular specimen is used, center the specimen around the
Four specimens are required per test.
bolt hole between the platens. If a Type 4 Class 2 specimen is
2 2
6.2.2 An annular specimen with 1290-mm (2.0-in. ) sur-
used, center the specimen around the bolt hole between the
face area may also be used. A size of 15.62-mm (0.615-in.)
platens, being certain that the two ends overlap by a minimum
inside diameter by 43.56-mm (1.715-in.) outside diameter is
of 6.35 mm (0.25 in.).
recommended.
8.2.3 Place the washer in position and screw on the nut,
6.2.3 For Type 4 Class 2 materials, specimen size shall be
finger tight.
one continuous length of 152.4 mm (6.0 in.).
8.2.4 Screw on the dial indicator assembly, finger tight, and
6.3 A minimum of three tests shall be conducted.
set the dial indicator at the zero reading.
6.4 Nominal thickness of specimen shall be 0.8 mm
8.2.5 Apply stress to the specimens by tightening the nut
(0.03in.) unless otherwise agreed upon between the consumer
with a wrench until the desired dial indicator reading is
andtheproducer.ForType4materialsthenominalthicknessof
reached. Record the reading (D ). Apply the stress in one
the specimen shall be no greater than 1.78 mm (0.07 in.).
continuousmotionwithamaximumloadingtimeof3s.Abolt
elongation of 0.1222 to 0.1270 mm (0.00481 to 0.00500 in.) is
7. Conditioning
typical for a compressive force of 26.7 kN (6000 lbf). Remove
7.1 Condition cut specimens in accordance with their clas-
the dial indicator assembly. (The calibration procedure is
sification as required in Classification F104.
outlined in Annex A1.)
NOTE 2—When testing materials thicker than 0.8 mm (0.03 in.), the
8. Procedure
time to tighten the nut may be extended to 5 s maximum to allow for the
8.1 Test Method A: longer arc required to apply the test load.
8.1.1 Clean all surfaces, platens, and specimen free of wax,
8.2.6 Place the specimen unit in a hot air-circulating oven
mold release, and oils. (Remove with isooctane or other
for 22 h at 100 6 2°C (212 6 3.6°F), unless otherwise
suitable solvent.) Lubricate bolt threads.
specified. The maximum test temperature for Specification
8.1.2 Use an initial stress of 13.8 6 0.3 MPa (2000 6
A193/A193M Grade B7 shall not exceed 204.4°C (400°F) and
50psi) unless otherwise specified.
the maximum test temperature for Specification B637 Grade
8.1.3 Conduct the test at 20 to 30°C (70 to 85°F) unless
UNS N07718 shall not exceed 482.2°C (900°F).
otherwise specified.
8.2.7 Remove from the oven and cool to room temperature.
8.1.4 Disassemble the relaxometer and place the specimen
8.2.8 Replace the dial indicator assembly, finger tight, and
between platens. The inside diameter of the specimen should
set the dial indicator at the zero reading. Loosen the nut,
be nearly concentric with the inside diameter of the platens.
without disturbing the dial indicator assembly, and record the
Screw on the nut and thrust bearing and tighten very slightly,
dial reading (D).
f
by hand, or just enough to hold the specimen in place during
8.2.9 Calculate the percentage relaxation as follows:
subsequent handling. Mount the head of the bolt in a clamp.
8.1.5 Hook up and balance the strain indicator. Record the
Relaxation, % 5 ~D 2 D ! / D 3100 (1)
@ #
0 f 0
reading. Then set the reading on the strain indicator for the
specified initial stress. (The microinches that are added to the 9. Report
above reading will vary the stress and the strain gauge bolt
9.1 Report the following information:
calibration.)
9.1.1 Identification and designation number of the material
8.1.6 Apply stress to the gasket by tightening the nut with a
tested,
solid wrench until the strain indicator reaches a balance. A
9.1.2 Test temperature,
torque of approximately 30 N·m (22 lbf·ft) is required for a
9.1.3 Length of the test, in hours,
compressive force of 17.8 kN (4000 lbf). The stress should be
applied at uniform rate such that at the end of 10 6 2 s the 9.1.4 “Initial stress” used, and the specimen thickness,
specified stress is reached. This is called the “initial stress.”
9.1.5 Percentage stress loss for each specimen, and
8.1.7 Beginning at the time of “initial stress,” take strain
9.1.6 Average of all the results recorded in 9.1.5.
indicator readings at intervals of 10 s, 1 min, 6 min, 30 min,
1h, 5 h, 24 h, etc., or until the end of the test. (Check the zero
o
...
This document is not an ASTM standard and is intended only to provide the user of an ASTM standard an indication of what changes have been made to the previous version. Because
it may not be technically possible to adequately depict all changes accurately, ASTM recommends that users consult prior editions as appropriate. In all cases only the current version
of the standard as published by ASTM is to be considered the official document.
Designation: F38 − 00 (Reapproved 2014) F38 − 18
Standard Test Methods for
Creep Relaxation of a Gasket Material
This standard is issued under the fixed designation F38; the number immediately following the designation indicates the year of original
adoption or, in the case of revision, the year of last revision. A number in parentheses indicates the year of last reapproval. A superscript
epsilon (´) indicates an editorial change since the last revision or reapproval.
This standard has been approved for use by agencies of the U.S. Department of Defense.
1. Scope
1.1 These test methods provide a means of measuring the amount of creep relaxation of a gasket material at a predetermined
time after a compressive stress has been applied.
1.1.1 Test Method A—Creep relaxation measured by means of a calibrated strain gauge on a bolt.
1.1.2 Test Method B—Creep relaxation measured by means of a calibrated bolt with dial indicator.
1.2 The values stated in SI units are to be regarded as standard. The values given in parentheses are for information only.
1.3 This standard does not purport to address all of the safety concerns, if any, associated with its use. It is the responsibility
of the user of this standard to establish appropriate safety safety, health, and healthenvironmental practices and determine the
applicability of regulatory limitations prior to use.
1.4 This international standard was developed in accordance with internationally recognized principles on standardization
established in the Decision on Principles for the Development of International Standards, Guides and Recommendations issued
by the World Trade Organization Technical Barriers to Trade (TBT) Committee.
2. Referenced Documents
2.1 ASTM Standards:
A193/A193M Specification for Alloy-Steel and Stainless Steel Bolting for High Temperature or High Pressure Service and Other
Special Purpose Applications
B637 Specification for Precipitation-Hardening and Cold Worked Nickel Alloy Bars, Forgings, and Forging Stock for Moderate
or High Temperature Service
D3040 Practice for Preparing Precision Statements for Standards Related to Rubber and Rubber Testing (Withdrawn 1987)
F104 Classification System for Nonmetallic Gasket Materials
F436/F436M Specification for Hardened Steel Washers Inch and Metric Dimensions
2.2 ASTM Adjuncts:
Relaxometer, Method A (F38)
Relaxometer, Method B (F38)
3. Summary of Test Methods
3.1 In both test methods the specimen is subjected to a compressive stress between two platens, with the stress applied by a nut
and bolt.
3.2 In Test Method A, normally run at room temperature, the stress is measured by a calibrated strain gauge on the bolt. In
running the test, strain indicator readings are taken at intervals of time, beginning at the loading time, to the end of the test. The
strain indicator readings are converted to percentages of the initial stress which are then plotted against the log of time in hours.
The percentage of initial stress loss or relaxation can be read off the curve at any given time, within the limits of the total test time.
These test methods are under the jurisdiction of ASTM Committee F03 on Gaskets and are the direct responsibility of Subcommittee F03.20 on Mechanical Test Methods.
Current edition approved March 1, 2014Aug. 1, 2018. Published April 2014November 2018. Originally approved in 1962. Last previous edition approved in 20062014
as F38 – 00 (2006).(2014). DOI: 10.1520/F0038-00R14. 10.1520/F0038-18.
For referenced ASTM standards, visit the ASTM website, www.astm.org, or contact ASTM Customer Service at service@astm.org. For Annual Book of ASTM Standards
volume information, refer to the standard’s Document Summary page on the ASTM website.
The last approved version of this historical standard is referenced on www.astm.org.
A print of this apparatus is available at a nominal cost from ASTM International Headquarters. Order Adjunct No. ADJF003801. Original adjunct produced in 1965.
Detailed working drawings of this apparatus are available from ASTM International Headquarters. Order Adjunct No. ADJF003802. Original adjunct produced in 1965.
Copyright © ASTM International, 100 Barr Harbor Drive, PO Box C700, West Conshohocken, PA 19428-2959. United States
F38 − 18
3.3 In Test Method B, run at room or elevated temperatures, the stress is determined by measuring the change in length of the
calibrated bolt with a dial indicator. The bolt length is measured at the beginning of the test and at the end of the test; from this
the percentage of relaxation is calculated.
4. Significance and Use
4.1 These test methods are designed to compare related materials under controlled conditions and their ability to maintain a
given compressive stress as a function of time. A portion of the torque loss on the bolted flange is a result of creep relaxation.
Torque loss can also be caused by elongation of the bolts, distortion of the flanges, and vibration; therefore, the results obtained
should be correlated with field results. These test methods may be used as a routine test when agreed upon between the consumer
and the producer.
NOTE 1—Test Method B was developed using asbestos gasket materials and at issuance substantiating data were not available for other gasket materials.
5. Apparatus
5.1 Test Method A:
5.1.1 Strain Indicator.
5.1.2 Timer.
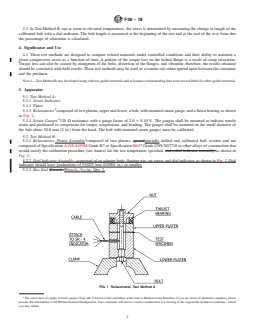
5.1.3 Relaxometer, composed of two platens, upper and lower; a bolt, with mounted strain gauge; and a thrust bearing as shown
in Fig. 1.
5.1.4 Strain Gauges, 120 Ω resistance with a gauge factor of 2.0 6 0.10 %. The gauges shall be mounted to indicate tensile
strain and positioned to compensate for torque, temperature, and bending. The gauges shall be mounted on the small diameter of
the bolt about 50.8 mm (2 in.) from the head. The bolt with mounted strain gauges must be calibrated.
5.2 Test Method B:
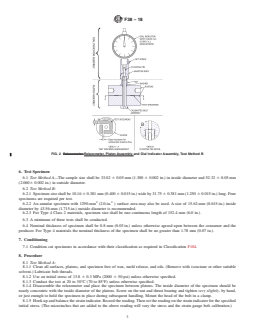
5.2.1 Relaxometer, Platen Assembly composed of two platens, specialspecially drilled and calibrated bolt, washer and nut
composed of Specification A193/A193M Grade B7 or Specification B637 Grade UNS N07718 or other alloys of construction that
would satisfy the calibration procedure (see Annex) for the test temperature specified, and a dial indicator assembly as shown in
Fig. 2.
5.2.2 Dial Indicator Assembly, composed of an adaptor body, floating pin, set screw, and dial indicator, as shown in Fig. 2. Dial
indicator should have graduations of 0.0025 mm (0.0001 in.) or smaller.
5.2.3 Box End Wrench. Wrench— ⁄16 in., Qty. 2.
FIG. 1 Relaxometer, Test Method A
The sole source of supply of strain gauges (Type AB-7) known to the committee at this time is Baldwin-Lima-Hamilton. If you are aware of alternative suppliers, please
provide this information to ASTM International Headquarters. Your comments will receive careful consideration at a meeting of the responsible technical committee, which
you may attend.
F38 − 18
FIG. 2 Relaxometer Relaxometer, Platen Assembly and Dial Indicator Assembly, Test Method B
6. Test Specimen
6.1 Test Method A—The sample size shall be 33.02 6 0.05 mm (1.300 6 0.002 in.) in inside diameter and 52.32 6 0.05 mm
(2.0606 0.002 in.) in outside diameter.
6.2 Test Method B:
6.2.1 Specimen size shall be 10.16 6 0.381 mm (0.400 6 0.015 in.) wide by 31.75 6 0.381 mm (1.250 6 0.015 in.) long. Four
specimens are required per test.
2 2
6.2.2 An annular specimen with 1290-mm (2.0-in. ) surface area may also be used. A size of 15.62-mm (0.615-in.) inside
diameter by 43.56-mm (1.715-in.) outside diameter is recommended.
6.2.3 For Type 4 Class 2 materials, specimen size shall be one continuous length of 152.4 mm (6.0 in.).
6.3 A minimum of three tests shall be conducted.
6.4 Nominal thickness of specimen shall be 0.8 mm (0.03 in.) unless otherwise agreed upon between the consumer and the
producer. For Type 4 materials the nominal thickness of the specimen shall be no greater than 1.78 mm (0.07 in.).
7. Conditioning
7.1 Condition cut specimens in accordance with their classification as required in Classification F104.
8. Procedure
8.1 Test Method A:
8.1.1 Clean all surfaces, platens, and specimen free of wax, mold release, and oils. (Remove with isooctane or other suitable
solvent.) Lubricate bolt threads.
8.1.2 Use an initial stress of 13.8 6 0.3 MPa (2000 6 50 psi) unless otherwise specified.
8.1.3 Conduct the test at 20 to 30°C (70 to 85°F) unless otherwise specified.
8.1.4 Disassemble the relaxometer and place the specimen between platens. The inside diameter of the specimen should be
nearly concentric with the inside diameter of the platens. Screw on the nut and thrust bearing and tighten very slightly, by hand,
or just enough to hold the specimen in place during subsequent handling. Mount the head of the bolt in a clamp.
8.1.5 Hook up and balance the strain indicator. Record the reading. Then set the reading on the strain indicator for the specified
initial stress. (The microinches that are added to the above reading will vary the stress and the strain gauge bolt calibration.)
F38 − 18
8.1.6 Apply stress to the gasket by tightening the nut with a solid wrench until the strain indicator reaches a balance. A torque
of approximately 30 N·m (22 lbf·ft) is required for a compressive force of 17.8 kN (4000 lbf). The stress should be applied at
uniform rate such that at the end of 10 6 2 s the specified stress is reached. This is called the “initial stress.”
8.1.7 Beginning at the time of “initial stress,” take strain indicator readings at intervals of 10 s, 1 min, 6 min, 30 min, 1 h, 5
h, 24 h, etc., or until the end of the test. (Check the zero of the strain indicator after the test.)
8.1.8 Convert the strain indicator readings of 8.1.7 to a percentage of “initial stress.” Then plot this percentage on semilog paper
against the log of time in hours.
8.2 Test Method B:
8.2.1 Clean all surfaces and lightly lubricate the washer and bolt threads; graphite and molybdenum disulfide have been found
to be acceptable lubricants.
8.2.2 Place rectangular specimens between the platens in accordance with Fig. 2 and making sure they are no closer than 2 mm
(0.078 in.) to the other pieces and the edge of the platens. If an annular specimen is used, center the specimen around the bolt hole
between the platens. If a Type 4 Class 2 specimen is used, center the specimen around the bolt hole between the platens, being
certain that the two ends overlap by a minimum of 6.35 mm (0.25 in.).
8.2.3 Place the washer in position and screw on the nut, finger tight.
8.2.4 Screw on the dial indicator assembly, finger tight, and set the dial indicator at the zero reading.
8.2.5 Apply stress to the specimens by tightening the nut with a wrench until the desired dial indicator reading is reached.
Record the reading (D ). Apply the stress in one continuous motion with a maximum loading time of 3 s. A bolt elongation of
0.1222 to 0.1270 mm (0.00481 to 0.00500 in.) is typical for a compressive force of 26.7 kN (6000 lbf). Remove the dial indicator
assembly. (The calibration procedure is outlined in Annex A1.)
NOTE 2—When testing materials thicker than 0.8 mm (0.03 in.), the time to tighten the nut may be extended to 5 s maximum to allow for the longer
arc required to apply the test load.
8.2.6 Place the specimen unit in a hot air-circulating oven for 22 h at 100 6 2°C (212 6 3.6°F), unless otherwise specified. The
maximum test temperature for Specification A193/A193M Grade B7 shall not exceed 204.4°C (400°F) and the maximum test
temperature for Specification B637 Grade UNS N07718 shall not exceed 482.2°C (900°F).
8.2.7 Remove from the oven and cool to room temperature.
8.2.8 Replace the dial indicator assembly, finger tight, and set the dial indicator at the zero reading. Loosen the nut, without
disturbing the dial indicator assembly, and record the dial reading (D ).
f
8.2.9 Calculate the percentage relaxation as follows:
Relaxation, %5 ~D 2 D ! / D 3100 (1)
@ #
0 f 0
9. Report
9.1 Report the following information:
9.1.1 Identification and designation number of the material tested,
9.1.2 Test temperature,
9.1.3 Length of the test, in hours,
9.1.4 “Initial stress” used, and the specimen thickness,
9.1.5 Percentage stress loss for each specimen, and
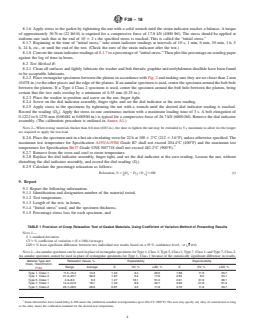
TABLE 1 Precision of Creep Relaxation Test of Gasket Materials, Using Coefficient of Variation Method of Presenting Results
NOTE 1—
S = standard deviation.
CV = % coefficient of variation = (S × 100) ⁄(average).
LSD = % least significant difference between two individual test results based on a 95 % confidence level, 52 2 CV .
s d
œ
NOTE 2—An annular specimen can be used in place of rectangular specimens for Type 1, Class 2; Type 5, Class 1; Type 7, Class 1; and Type 7, Class 2.
An annular specimen cannot be used in place
...
Questions, Comments and Discussion
Ask us and Technical Secretary will try to provide an answer. You can facilitate discussion about the standard in here.
Loading comments...