ASTM D3917-15e1
(Specification)Standard Specification for Dimensional Tolerance of Thermosetting Glass-Reinforced Plastic Pultruded Shapes
Standard Specification for Dimensional Tolerance of Thermosetting Glass-Reinforced Plastic Pultruded Shapes
ABSTRACT
This specification defines the dimensional tolerances of standard rods, bars, and shapes pultruded from thermosetting glass-reinforced plastics. Tolerances cover dimensional criteria for cross sections, width or diameter, straightness, twist, surface flatness, angularity, and camber.
SCOPE
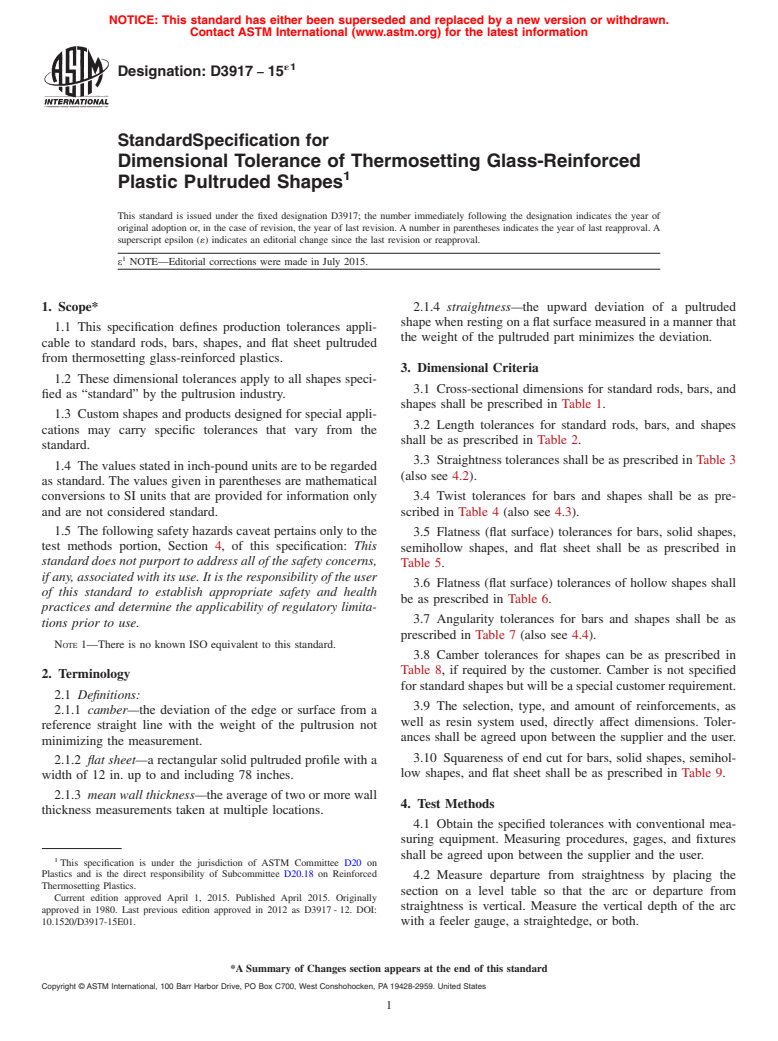
1.1 This specification defines production tolerances applicable to standard rods, bars, shapes, and flat sheet pultruded from thermosetting glass-reinforced plastics.
1.2 These dimensional tolerances apply to all shapes specified as “standard” by the pultrusion industry.
1.3 Custom shapes and products designed for special applications may carry specific tolerances that vary from the standard.
1.4 The values stated in inch-pound units are to be regarded as standard. The values given in parentheses are mathematical conversions to SI units that are provided for information only and are not considered standard.
1.5 The following safety hazards caveat pertains only to the test methods portion, Section 4, of this specification: This standard does not purport to address all of the safety concerns, if any, associated with its use. It is the responsibility of the user of this standard to establish appropriate safety and health practices and determine the applicability of regulatory limitations prior to use.
Note 1: There is no known ISO equivalent to this standard.
General Information
Relations
Buy Standard
Standards Content (Sample)
NOTICE: This standard has either been superseded and replaced by a new version or withdrawn.
Contact ASTM International (www.astm.org) for the latest information
´1
Designation:D3917 −15
StandardSpecification for
Dimensional Tolerance of Thermosetting Glass-Reinforced
1
Plastic Pultruded Shapes
This standard is issued under the fixed designation D3917; the number immediately following the designation indicates the year of
original adoption or, in the case of revision, the year of last revision. A number in parentheses indicates the year of last reapproval. A
superscript epsilon (´) indicates an editorial change since the last revision or reapproval.
1
ε NOTE—Editorial corrections were made in July 2015.
1. Scope* 2.1.4 straightness—the upward deviation of a pultruded
shape when resting on a flat surface measured in a manner that
1.1 This specification defines production tolerances appli-
the weight of the pultruded part minimizes the deviation.
cable to standard rods, bars, shapes, and flat sheet pultruded
from thermosetting glass-reinforced plastics.
3. Dimensional Criteria
1.2 These dimensional tolerances apply to all shapes speci-
3.1 Cross-sectional dimensions for standard rods, bars, and
fied as “standard” by the pultrusion industry.
shapes shall be prescribed in Table 1.
1.3 Custom shapes and products designed for special appli-
3.2 Length tolerances for standard rods, bars, and shapes
cations may carry specific tolerances that vary from the
shall be as prescribed in Table 2.
standard.
3.3 Straightness tolerances shall be as prescribed in Table 3
1.4 The values stated in inch-pound units are to be regarded
(also see 4.2).
as standard. The values given in parentheses are mathematical
conversions to SI units that are provided for information only 3.4 Twist tolerances for bars and shapes shall be as pre-
and are not considered standard. scribed in Table 4 (also see 4.3).
1.5 The following safety hazards caveat pertains only to the
3.5 Flatness (flat surface) tolerances for bars, solid shapes,
test methods portion, Section 4, of this specification: This
semihollow shapes, and flat sheet shall be as prescribed in
standard does not purport to address all of the safety concerns,
Table 5.
if any, associated with its use. It is the responsibility of the user
3.6 Flatness (flat surface) tolerances of hollow shapes shall
of this standard to establish appropriate safety and health
be as prescribed in Table 6.
practices and determine the applicability of regulatory limita-
3.7 Angularity tolerances for bars and shapes shall be as
tions prior to use.
prescribed in Table 7 (also see 4.4).
NOTE 1—There is no known ISO equivalent to this standard.
3.8 Camber tolerances for shapes can be as prescribed in
Table 8, if required by the customer. Camber is not specified
2. Terminology
for standard shapes but will be a special customer requirement.
2.1 Definitions:
3.9 The selection, type, and amount of reinforcements, as
2.1.1 camber—the deviation of the edge or surface from a
well as resin system used, directly affect dimensions. Toler-
reference straight line with the weight of the pultrusion not
ances shall be agreed upon between the supplier and the user.
minimizing the measurement.
3.10 Squareness of end cut for bars, solid shapes, semihol-
2.1.2 flat sheet—a rectangular solid pultruded profile with a
low shapes, and flat sheet shall be as prescribed in Table 9.
width of 12 in. up to and including 78 inches.
2.1.3 mean wall thickness—the average of two or more wall
4. Test Methods
thickness measurements taken at multiple locations.
4.1 Obtain the specified tolerances with conventional mea-
suring equipment. Measuring procedures, gages, and fixtures
shall be agreed upon between the supplier and the user.
1
This specification is under the jurisdiction of ASTM Committee D20 on
Plastics and is the direct responsibility of Subcommittee D20.18 on Reinforced
4.2 Measure departure from straightness by placing the
Thermosetting Plastics.
section on a level table so that the arc or departure from
Current edition approved April 1, 2015. Published April 2015. Originally
straightness is vertical. Measure the vertical depth of the arc
approved in 1980. Last previous edition approved in 2012 as D3917 - 12. DOI:
10.1520/D3917-15E01. with a feeler gauge, a straightedge, or both.
*A Summary of Changes section appears at the end of this standard
Copyright © ASTM International, 100 Barr Harbor Drive, PO Box C700, West Conshohocken, PA 19428-2959. United States
1
---------------------- Page: 1 ----------------------
´1
D3917−15
4.3 Measure twist by placing the pultruded section on a flat 5. Keywords
surface and using an inclinometer. An inclinometer is a
5.1 dimensional tolerance; pultruded shapes; thermosetting
commercially available device used to measure the angle of
plastic
inclination.
4.4 Measure angles with protractors or gauges.
TABLE 1 Cross-Sectional Dimensions—Standard Rods, Bars, and Shapes
NOTE 1—The minimum tolerances are applicable for thic
...
This document is not an ASTM standard and is intended only to provide the user of an ASTM standard an indication of what changes have been made to the previous version. Because
it may not be technically possible to adequately depict all changes accurately, ASTM recommends that users consult prior editions as appropriate. In all cases only the current version
of the standard as published by ASTM is to be considered the official document.
´1
Designation: D3917 − 15 D3917 − 15
Standard Specification for
Dimensional Tolerance of Thermosetting Glass-Reinforced
1
Plastic Pultruded Shapes
This standard is issued under the fixed designation D3917; the number immediately following the designation indicates the year of
original adoption or, in the case of revision, the year of last revision. A number in parentheses indicates the year of last reapproval. A
superscript epsilon (´) indicates an editorial change since the last revision or reapproval.
1
ε NOTE—Editorial corrections were made in July 2015.
1. Scope*
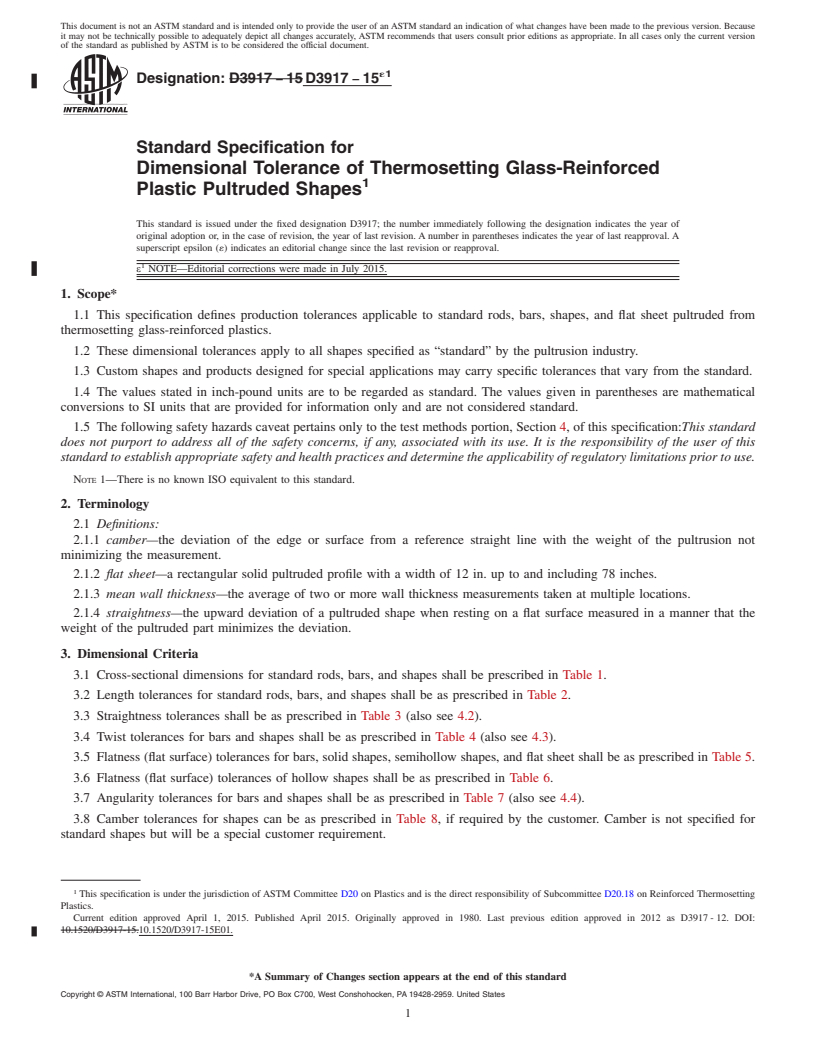
1.1 This specification defines production tolerances applicable to standard rods, bars, shapes, and flat sheet pultruded from
thermosetting glass-reinforced plastics.
1.2 These dimensional tolerances apply to all shapes specified as “standard” by the pultrusion industry.
1.3 Custom shapes and products designed for special applications may carry specific tolerances that vary from the standard.
1.4 The values stated in inch-pound units are to be regarded as standard. The values given in parentheses are mathematical
conversions to SI units that are provided for information only and are not considered standard.
1.5 The following safety hazards caveat pertains only to the test methods portion, Section 4, of this specification:This standard
does not purport to address all of the safety concerns, if any, associated with its use. It is the responsibility of the user of this
standard to establish appropriate safety and health practices and determine the applicability of regulatory limitations prior to use.
NOTE 1—There is no known ISO equivalent to this standard.
2. Terminology
2.1 Definitions:
2.1.1 camber—the deviation of the edge or surface from a reference straight line with the weight of the pultrusion not
minimizing the measurement.
2.1.2 flat sheet—a rectangular solid pultruded profile with a width of 12 in. up to and including 78 inches.
2.1.3 mean wall thickness—the average of two or more wall thickness measurements taken at multiple locations.
2.1.4 straightness—the upward deviation of a pultruded shape when resting on a flat surface measured in a manner that the
weight of the pultruded part minimizes the deviation.
3. Dimensional Criteria
Table 1.
3.1 Cross-sectional dimensions for standard rods, bars, and shapes shall be prescribed in
3.2 Length tolerances for standard rods, bars, and shapes shall be as prescribed in Table 2.
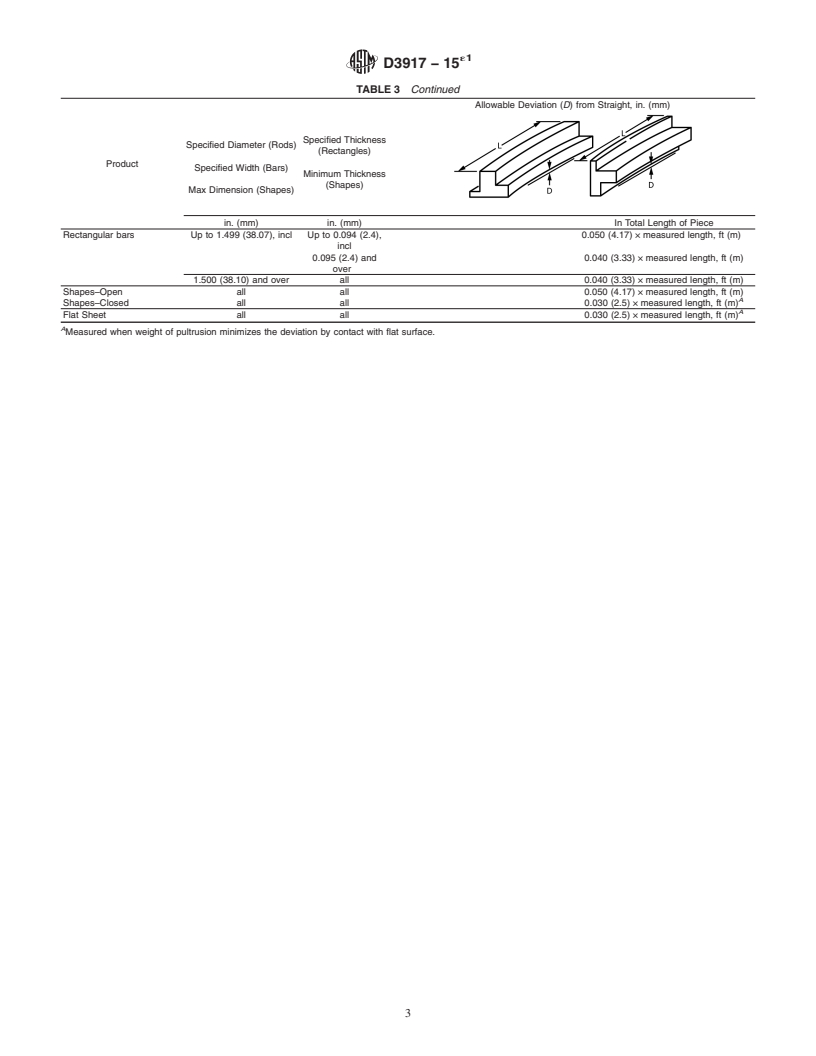
3.3 Straightness tolerances shall be as prescribed in Table 3 (also see 4.2).
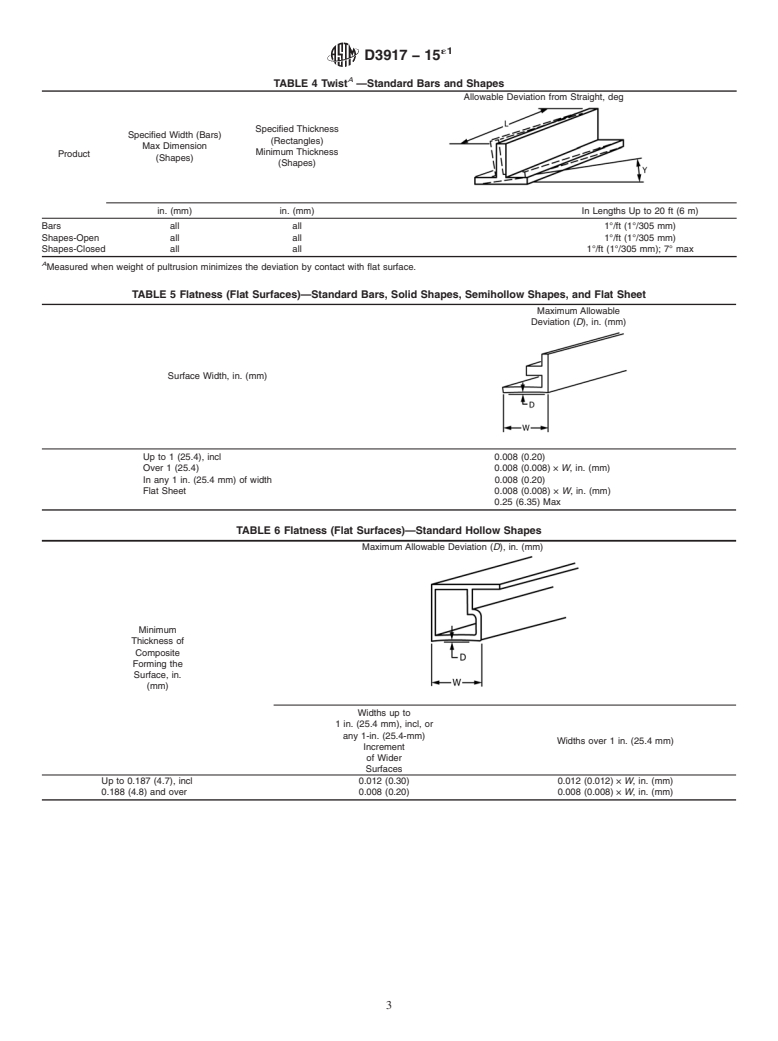
3.4 Twist tolerances for bars and shapes shall be as prescribed in Table 4 (also see 4.3).
3.5 Flatness (flat surface) tolerances for bars, solid shapes, semihollow shapes, and flat sheet shall be as prescribed in Table 5.
3.6 Flatness (flat surface) tolerances of hollow shapes shall be as prescribed in Table 6.
3.7 Angularity tolerances for bars and shapes shall be as prescribed in Table 7 (also see 4.4).
3.8 Camber tolerances for shapes can be as prescribed in Table 8, if required by the customer. Camber is not specified for
standard shapes but will be a special customer requirement.
1
This specification is under the jurisdiction of ASTM Committee D20 on Plastics and is the direct responsibility of Subcommittee D20.18 on Reinforced Thermosetting
Plastics.
Current edition approved April 1, 2015. Published April 2015. Originally approved in 1980. Last previous edition approved in 2012 as D3917 - 12. DOI:
10.1520/D3917-15.10.1520/D3917-15E01.
*A Summary of Changes section appears at the end of this standard
Copyright © ASTM International, 100 Barr Harbor Drive, PO Box C700, West Conshohocken, PA 19428-2959. United States
1
---------------------- Page: 1 ----------------------
´1
D3917 − 15
3.9 The selection, type, and amount of reinforcements, as well as resin system used, directly affect dimensions. Tolerances shall
be agreed upon between the supplier and the user.
3.10 Squareness of end cut for bars, solid shapes, semihollow shapes, and flat sheet shall be as prescribed in Table 9.
4. Test Methods
4.1 Obtain the specified tolerances with conventional measuring equipment. Measuring procedures, gages, and fixtures shall be
agreed upon between the supplier and the user.
4.2 Measure departure from straightness by placing the section on a level table so that the arc or departure from straightness
is vertical. Measure the vertical depth of the arc with a feeler gauge, a straightedge, or both.
4.3 Measure twist by placing the pultruded section on a flat surface and using an inclinometer. An inclinometer is a
commercially available
...


Questions, Comments and Discussion
Ask us and Technical Secretary will try to provide an answer. You can facilitate discussion about the standard in here.