ASTM C336-71(2020)
(Test Method)Standard Test Method for Annealing Point and Strain Point of Glass by Fiber Elongation
Standard Test Method for Annealing Point and Strain Point of Glass by Fiber Elongation
SIGNIFICANCE AND USE
4.1 This test method provides data useful for (1) estimating stress release, (2) the development of proper annealing schedules, and (3) estimating setting points for seals. Accordingly, its usage is widespread throughout manufacturing, research, and development. It can be utilized for specification acceptance.
SCOPE
1.1 This test method covers the determination of the annealing point and the strain point of a glass by measuring the viscous elongation rate of a fiber of the glass under prescribed condition.
1.2 The annealing and strain points shall be obtained by following the specified procedure after calibration of the apparatus using fibers of standard glasses having known annealing and strain points, such as those specified and certified by the National Institute of Standards and Technology (NIST)2 (see Appendix X1).
1.3 This standard does not purport to address all of the safety concerns, if any, associated with its use. It is the responsibility of the user of this standard to establish appropriate safety, health, and environmental practices and determine the applicability of regulatory limitations prior to use.
1.4 This international standard was developed in accordance with internationally recognized principles on standardization established in the Decision on Principles for the Development of International Standards, Guides and Recommendations issued by the World Trade Organization Technical Barriers to Trade (TBT) Committee.
General Information
- Status
- Published
- Publication Date
- 31-Jul-2020
- Technical Committee
- C14 - Glass and Glass Products
- Drafting Committee
- C14.04 - Physical and Mechanical Properties
Relations
- Effective Date
- 01-Aug-2020
- Effective Date
- 01-Aug-2019
- Effective Date
- 01-Aug-2019
- Effective Date
- 01-Oct-2013
- Effective Date
- 01-Oct-2013
- Effective Date
- 01-Apr-2008
- Effective Date
- 01-Apr-2008
- Effective Date
- 10-Apr-2003
- Effective Date
- 10-Oct-1998
- Effective Date
- 10-Oct-1998
- Effective Date
- 15-Nov-1993
- Effective Date
- 01-Aug-2020
- Effective Date
- 01-Aug-2020
- Effective Date
- 01-Aug-2020
- Referred By
ASTM C770-16(2020) - Standard Test Method for Measurement of Glass Stress—Optical Coefficient - Effective Date
- 01-Aug-2020
Overview
ASTM C336-71(2020), "Standard Test Method for Annealing Point and Strain Point of Glass by Fiber Elongation," is a globally recognized standard developed by ASTM International. This test method details procedures to determine critical thermal characteristics of glass-specifically its annealing point and strain point-by measuring the viscous elongation rate of a glass fiber under controlled temperature conditions. Use of this method is widespread in manufacturing, research, and development, providing essential data for ensuring glass quality, optimizing thermal treatments, and facilitating specification acceptance.
Key Topics
- Annealing Point: The temperature at which internal stresses in glass are substantially relieved within minutes. Determining this point is essential for stress relief and preventing thermal shock during manufacturing processes.
- Strain Point: The temperature where internal stresses in glass are relieved over hours, indicating the lower threshold for effective stress removal. It is derived by extrapolating data from annealing point measurements.
- Viscous Elongation Rate Measurement: The procedure involves drawing a fine glass fiber and subjecting it to controlled heating and cooling while measuring elongation rates with precise instrumentation.
- Calibration: The method requires calibration of test apparatus using fibers of standard glasses with known annealing and strain points, often referencing materials certified by the National Institute of Standards and Technology (NIST).
- Safety and Compliance: The standard advises that all users establish safe practices and consider relevant health, safety, and environmental regulations before implementing the test.
- International Alignment: Developed following the World Trade Organization’s Technical Barriers to Trade (TBT) principles, supporting global interoperability and acceptance.
Applications
Implementing ASTM C336-71(2020) offers practical benefits throughout the glass industry:
- Estimating Stress Release: Determines the most effective thermal treatment schedules for minimizing residual internal stresses in glass products.
- Developing Annealing Schedules: Provides critical data for optimizing kiln programming, ensuring structural integrity, transparency, and longevity of glass components.
- Setting Points for Seals: Aids in accurately identifying the correct temperatures for glass seals, crucial for processes such as lampworking, scientific glassware production, or hermetic sealing in electronics.
- Quality Assurance: Supports compliance with customer and industry specifications by validating product consistency and performance.
- Manufacturing Optimization: Offers valuable parameters for production lines manufacturing specialty glass, architectural panes, automotive glass, and optical components.
- Research and Development: Used in material studies to evaluate new glass compositions or processing techniques.
Related Standards
To further enhance glass testing and characterization, the following ASTM standards are commonly referenced in conjunction with ASTM C336:
- ASTM C338 – Test Method for Softening Point of Glass
- ASTM C598 – Test Method for Annealing Point and Strain Point of Glass by Beam Bending
These standards, along with references to NIST-certified viscosity glasses, help ensure robust calibration, facilitate method comparison, and support extensive material qualification across diverse glass types and industries.
Keywords: annealing point, strain point, fiber elongation, glass, ASTM C336, glass stress relief, glass manufacturing standards, NIST calibration, thermal treatment, glass fiber testing, quality assurance.
Buy Documents
ASTM C336-71(2020) - Standard Test Method for Annealing Point and Strain Point of Glass by Fiber Elongation
Frequently Asked Questions
ASTM C336-71(2020) is a standard published by ASTM International. Its full title is "Standard Test Method for Annealing Point and Strain Point of Glass by Fiber Elongation". This standard covers: SIGNIFICANCE AND USE 4.1 This test method provides data useful for (1) estimating stress release, (2) the development of proper annealing schedules, and (3) estimating setting points for seals. Accordingly, its usage is widespread throughout manufacturing, research, and development. It can be utilized for specification acceptance. SCOPE 1.1 This test method covers the determination of the annealing point and the strain point of a glass by measuring the viscous elongation rate of a fiber of the glass under prescribed condition. 1.2 The annealing and strain points shall be obtained by following the specified procedure after calibration of the apparatus using fibers of standard glasses having known annealing and strain points, such as those specified and certified by the National Institute of Standards and Technology (NIST)2 (see Appendix X1). 1.3 This standard does not purport to address all of the safety concerns, if any, associated with its use. It is the responsibility of the user of this standard to establish appropriate safety, health, and environmental practices and determine the applicability of regulatory limitations prior to use. 1.4 This international standard was developed in accordance with internationally recognized principles on standardization established in the Decision on Principles for the Development of International Standards, Guides and Recommendations issued by the World Trade Organization Technical Barriers to Trade (TBT) Committee.
SIGNIFICANCE AND USE 4.1 This test method provides data useful for (1) estimating stress release, (2) the development of proper annealing schedules, and (3) estimating setting points for seals. Accordingly, its usage is widespread throughout manufacturing, research, and development. It can be utilized for specification acceptance. SCOPE 1.1 This test method covers the determination of the annealing point and the strain point of a glass by measuring the viscous elongation rate of a fiber of the glass under prescribed condition. 1.2 The annealing and strain points shall be obtained by following the specified procedure after calibration of the apparatus using fibers of standard glasses having known annealing and strain points, such as those specified and certified by the National Institute of Standards and Technology (NIST)2 (see Appendix X1). 1.3 This standard does not purport to address all of the safety concerns, if any, associated with its use. It is the responsibility of the user of this standard to establish appropriate safety, health, and environmental practices and determine the applicability of regulatory limitations prior to use. 1.4 This international standard was developed in accordance with internationally recognized principles on standardization established in the Decision on Principles for the Development of International Standards, Guides and Recommendations issued by the World Trade Organization Technical Barriers to Trade (TBT) Committee.
ASTM C336-71(2020) is classified under the following ICS (International Classification for Standards) categories: 81.040.10 - Raw materials and raw glass. The ICS classification helps identify the subject area and facilitates finding related standards.
ASTM C336-71(2020) has the following relationships with other standards: It is inter standard links to ASTM C336-71(2015), ASTM C598-93(2019), ASTM C338-93(2019), ASTM C598-93(2013), ASTM C338-93(2013), ASTM C598-93(2008), ASTM C338-93(2008), ASTM C598-93(2003), ASTM C598-93(1998), ASTM C338-93(1998), ASTM C338-93(2003), ASTM F79-69(2019), ASTM F105-72(2019), ASTM C1350M-96(2019), ASTM C770-16(2020). Understanding these relationships helps ensure you are using the most current and applicable version of the standard.
ASTM C336-71(2020) is available in PDF format for immediate download after purchase. The document can be added to your cart and obtained through the secure checkout process. Digital delivery ensures instant access to the complete standard document.
Standards Content (Sample)
This international standard was developed in accordance with internationally recognized principles on standardization established in the Decision on Principles for the
Development of International Standards, Guides and Recommendations issued by the World Trade Organization Technical Barriers to Trade (TBT) Committee.
Designation: C336 − 71 (Reapproved 2020)
Standard Test Method for
Annealing Point and Strain Point of Glass by Fiber
Elongation
This standard is issued under the fixed designation C336; the number immediately following the designation indicates the year of
original adoption or, in the case of revision, the year of last revision. A number in parentheses indicates the year of last reapproval. A
superscript epsilon (´) indicates an editorial change since the last revision or reapproval.
This standard has been approved for use by agencies of the U.S. Department of Defense.
1. Scope 3. Terminology
3.1 Definitions:
1.1 This test method covers the determination of the anneal-
3.1.1 annealing point, n—that temperature at which internal
ing point and the strain point of a glass by measuring the
stresses in a glass are substantially relieved in a matter of
viscous elongation rate of a fiber of the glass under prescribed
4,5,6
condition. minutes. During a test in accordance with the requirements
of this method, the viscous elongation rate is measured by a
1.2 The annealing and strain points shall be obtained by
suitable extensometer while the specimen fiber is cooling at a
following the specified procedure after calibration of the
rateof4 61°C/min.Theelongationrateattheannealingpoint
apparatus using fibers of standard glasses having known
is approximately 0.14 mm/min for a fiber of 0.65 mm diam-
annealing and strain points, such as those specified and
eter.
certified by the National Institute of Standards and Technology
3.1.2 annealing range, n—the range of glass temperature in
(NIST) (see Appendix X1).
which stresses in glass articles can be relieved at a commer-
1.3 This standard does not purport to address all of the
cially desirable rate. For purposes of comparing glasses, the
safety concerns, if any, associated with its use. It is the
annealing range is assumed to correspond with the tempera-
responsibility of the user of this standard to establish appro-
tures between the annealing point (AP) and the strain point
priate safety, health, and environmental practices and deter-
(StP).
mine the applicability of regulatory limitations prior to use.
3.1.3 strain point, n—that temperature at which the internal
1.4 This international standard was developed in accor-
stresses in a glass are substantially relieved in a matter of
dance with internationally recognized principles on standard-
hours. The strain point is determined by extrapolation of the
ization established in the Decision on Principles for the
annealing point data and is the temperature at which the
Development of International Standards, Guides and Recom-
viscous elongation rate is 0.0316 times that observed at the
mendations issued by the World Trade Organization Technical
annealing point.
Barriers to Trade (TBT) Committee.
4. Significance and Use
2. Referenced Documents
3 4.1 This test method provides data useful for (1) estimating
2.1 ASTM Standards:
stress release, (2) the development of proper annealing
C338 Test Method for Softening Point of Glass
schedules, and (3) estimating setting points for seals.
C598 Test Method for Annealing Point and Strain Point of
Accordingly, its usage is widespread throughout
Glass by Beam Bending
manufacturing, research, and development. It can be utilized
for specification acceptance.
This test method is under the jurisdiction of ASTM Committee C14 on Glass
and Glass Products and is the direct responsibility of Subcommittee C14.04 on
Physical and Mechanical Properties. Littleton, J. T., and Roberts, E. H., “A Method for Determining the Annealing
Current edition approved Aug. 1, 2020. Published August 2020. Originally Temperature of Glass,” Journal of the Optical Society of America, Vol 4, 1920, p.
approved in 1954. Last previous edition approved in 2015 as C336 – 71 (2015). 224.
DOI: 10.1520/C0336-71R20. Lillie, H. R., “Viscosity of Glass Between the Strain Point and Melting
Available from National Institute of Standards and Technology (NIST), 100 Temperature,” Journal of American Ceramic Society, Vol 14, 1931, p. 502;
Bureau Dr., Stop 1070, Gaithersburg, MD 20899-1070, http://www.nist.gov. “Re-Evaluation of Glass Viscosities at Annealing and Strain Points,” Journal of
For referenced ASTM standards, visit the ASTM website, www.astm.org, or American Ceramic Society, Vol 37, 1954, p. 111.
contact ASTM Customer Service at service@astm.org. For Annual Book of ASTM McGraw, D. A. and Babcock, C. L., “Effect of Viscosity and Stress Level on
Standards volume information, refer to the standard’s Document Summary page on Rate of Stress Release in Soda-Lime, Potash-Barium and Borosilicate Glasses,”
the ASTM website. Journal of the American Ceramic Society, Vol 42, 1959, p. 330.
Copyright © ASTM International, 100 Barr Harbor Drive, PO Box C700, West Conshohocken, PA 19428-2959. United States
C336 − 71 (2020)
5. Apparatus of the couple. The cold junction of the thermocouple shall be
maintained in an ice bath during tests.
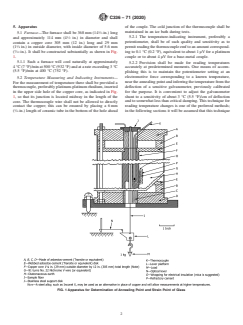
5.1 Furnace—The furnace shall be 368 mm (14 ⁄2-in.) long
5.2.1 The temperature-indicating instrument, preferably a
and approximately 114 mm (4 ⁄2 in.) in diameter and shall
potentiometer, shall be of such quality and sensitivity as to
contain a copper core 305 mm (12 in.) long and 29 mm
permitreadingthethermocoupleemftoanamountcorrespond-
(1 ⁄8 in.) in outside diameter, with inside diameter of 5.6 mm
ing to 0.1 °C (0.2 °F), equivalent to about 1 µV for a platinum
( ⁄32 in.). It shall be constructed substantially as shown in Fig.
1. couple or to about 4 µV for a base-metal couple.
5.1.1 Such a furnace will cool naturally at approximately
5.2.2 Provision shall be made for reading temperatures
4 °C (7 °F)/min at 500 °C (932 °F) and at a rate exceeding 3 °C
accurately at predetermined moments. One means of accom-
(5.5 °F)/min at 400 °C (752 °F).
plishing this is to maintain the potentiometer setting at an
electromotive force corresponding to a known temperature,
5.2 Temperature Measuring and Indicating Instruments—
near the annealing point and inferring the temperature from the
For the measurement of temperature there shall be provided a
deflection of a sensitive galvanometer, previously calibrated
thermocouple, preferably platinum-platinum rhodium, inserted
in the upper side hole of the copper core, as indicated in Fig. for the purpose. It is convenient to adjust the galvanometer
shunt to a sensitivity of about 3 °C (5.5 °F)/cm of deflection
1, so that its junction is located midway in the length of the
core. The thermocouple wire shall not be allowed to directly and to somewhat less than critical damping. This technique for
contact the copper; this can be ensured by placing a 6 mm reading temperature changes is one of the preferred methods;
( ⁄4-in.) length of ceramic tube in the bottom of the hole ahead in the following sections it will be assumed that this technique
FIG. 1 Apparatus for Determination of Annealing Point and Strain Point of Glass
C336 − 71 (2020)
has been used, although any other equally sensitive and precise end, which is thereafter to be regarded as the top end,
method of following the temperature of the thermocouple may remeasure the fiber for diameter at 1 in. intervals over the
be used. remaining fiber length or up to a maximum of 305 mm (12 in.).
Record the average diameter for subsequent calculations.
5.3 Furnace Control—Suitable means shall be provided for
idling the furnace, controlling its heating rate, and, in the case
7. Calibration with Standard Glass
of very hard glasses, limiting the cooling rate to not more than
7.1 Calibration—Prepare at least four fibers of the calibrat-
5 °C (9 °F)/min.Avariable transformer is a convenient device
ing or standard glass, with diameters covering the diameter
for this purpose. The transformer can also be employed as a
range 0.55 to 0.75 mm. In accordance with procedures in
switch for interrupting the furnace current.
Sections 8 and 9.1, determine the elongation rates at the
5.4 Device for Measuring Elongation—The means of ob-
specified annealing point temperature, and make a calibration
serving the rate of elongation of the fiber should be such as to
plot as in Fig. 2, of the rate of elongation versus the reciprocal
indicate reliably over a range of about 6 mm ( ⁄4-in.) change in
square of the fiber diameter. Then use this calibration plot to
fiber length with an uncertainty not greater than about 0.01 mm
determine the annealing points of unknown glasses with
(0.0004in.).AconvenientmethodisshowninFig.1,wherethe
similar annealing ranges. It is recommended that the apparatus
arm of the optical lever, N, bears upon a platform, L, incorpo-
be calibrated periodically depending upon usage.
rated in the loading linkage.The fulcrum of the lever should be
mounted on a rigid (but height-adjustable) member, substan- 8. Procedure
tially free of vibration. With an optical lever arm about 38 mm
8.1 Method A:
(1 ⁄2 in.) long and a scale distance of about 1 m (40 in.), the
8.1.1 Long Fiber, Furnace Support—The recommended
multiplying factor is about 50. Readings can be made to
method of fiber support and loading is as shown in Fig. 1,in
0.5 mm on the scale and, if the scale is 508 mm in length, a
which the top of a long fiber is supported on the furnace top
sufficient range is attained. The scale is curved with its center
itself and the fiber extends entirely through the furnace to the
of curvature at the mirror location. The system may be
lever platform, L, or to the attachment of the load.
calibrated by mounting a micrometer screw in place of the
8.1.2 LongFiber,IndependentSupport—Analternativelong
platform, L.
fiber method is that shown in Fig. 3, in which the top of the
5.4.1 Any other extensometer arrangement, such as a lin-
fiber is supported independently of the furnace. This method
early variable differential transformer (LVDT) or a travelling
requires the application of a corr
...


Questions, Comments and Discussion
Ask us and Technical Secretary will try to provide an answer. You can facilitate discussion about the standard in here.
Loading comments...