ASTM D5397-07(2012)
(Test Method)Standard Test Method for Evaluation of Stress Crack Resistance of Polyolefin Geomembranes Using Notched Constant Tensile Load Test
Standard Test Method for Evaluation of Stress Crack Resistance of Polyolefin Geomembranes Using Notched Constant Tensile Load Test
SIGNIFICANCE AND USE
5.1 This test method does not purport to interpret the resulting response curve. Such interpretation is left to the parties involved in the commissioning and reporting of the test results.
5.2 This test method is intended as an index test and may be used for grading polyolefin geomembrane sheets in regard to their stress cracking sensitivity.
5.2.1 Conditions that can affect stress cracking include: level of loading, test temperature and environment, microstructure, polymer additive package, processing history, and thermal history.
SCOPE
1.1 This test method is used to develop test data from which the susceptibility of polyolefin geomembrane sheet material to stress cracking under a constant tensile load condition and an accelerated environmental condition can be evaluated.
1.2 This test method measures the failure time associated with a given test specimen at a specified tensile load level. Results from a series of such tests utilizing a range of load levels can be used to construct a stress-time plot on a log-log axis.
1.3 The values stated in SI units are to be regarded as the standard. The inch-pound units given in parentheses are provided for information only.
1.4 This standard does not purport to address all of the safety concerns, if any, associated with its use. It is the responsibility of the user of this standard to establish appropriate safety and health practices and determine the applicability of regulatory limitations prior to use.
General Information
Relations
Standards Content (Sample)
NOTICE: This standard has either been superseded and replaced by a new version or withdrawn.
Contact ASTM International (www.astm.org) for the latest information
Designation:D5397 −07 (Reapproved 2012)
Standard Test Method for
Evaluation of Stress Crack Resistance of Polyolefin
Geomembranes Using Notched Constant Tensile Load Test
This standard is issued under the fixed designation D5397; the number immediately following the designation indicates the year of
original adoption or, in the case of revision, the year of last revision. A number in parentheses indicates the year of last reapproval. A
superscript epsilon (´) indicates an editorial change since the last revision or reapproval.
1. Scope neering related material so as to control fluid migration in a
man-made project, structure, or system (see Test Method
1.1 This test method is used to develop test data from which
D4833).
the susceptibility of polyolefin geomembrane sheet material to
3.1.2 stress crack, n—an external or internal crack in a
stress cracking under a constant tensile load condition and an
plastic caused by tensile stresses less than its short-time
accelerated environmental condition can be evaluated.
mechanical strength (see Definitions D883).
1.2 This test method measures the failure time associated
3.1.2.1 Discussion—The development of such cracks is
with a given test specimen at a specified tensile load level.
frequently accelerated by the environment to which the plastic
Results from a series of such tests utilizing a range of load
is exposed. The stresses that cause cracking may be present
levels can be used to construct a stress-time plot on a log-log
internally or externally or may be combinations of these
axis.
stresses.
1.3 The values stated in SI units are to be regarded as the
standard. The inch-pound units given in parentheses are 4. Summary of Test Method
provided for information only.
4.1 This test method consists of subjecting a dumbbell
1.4 This standard does not purport to address all of the
shaped notched test specimen from a polyolefin sheet to a
safety concerns, if any, associated with its use. It is the
constant tensile load in the presence of a surface-active agent
responsibility of the user of this standard to establish appro-
and at an elevated temperature. The time to failure of the test
priate safety and health practices and determine the applica-
specimen is recorded. The results of a series of such tests
bility of regulatory limitations prior to use.
conducted at different stress levels are presented by plotting
stress level against failure time for each stress level on a
2. Referenced Documents
log-log axis.
2.1 ASTM Standards:
5. Significance and Use
D638 Test Method for Tensile Properties of Plastics
D883 Terminology Relating to Plastics
5.1 This test method does not purport to interpret the
D4354 Practice for Sampling of Geosynthetics and Rolled
resulting response curve. Such interpretation is left to the
Erosion Control Products (RECPs) for Testing
parties involved in the commissioning and reporting of the test
D4833 Test Method for Index Puncture Resistance of
results.
Geomembranes and Related Products
5.2 This test method is intended as an index test and may be
used for grading polyolefin geomembrane sheets in regard to
3. Terminology
their stress cracking sensitivity.
3.1 Definitions:
5.2.1 Conditions that can affect stress cracking include:
3.1.1 geomembrane, n—very low permeability synthetic
level of loading, test temperature and environment,
membrane liners or barriers used with any geotechnical engi-
microstructure, polymer additive package, processing history,
and thermal history.
This test method is under the jurisdiction of ASTM Committee D35 on
Geosynthetics and is the direct responsibility of Subcommittee D35.02 on Endur- 6. Apparatus
ance Properties.
6.1 Blanking Die—Adie suitable for cutting test specimens
CurrenteditionapprovedJuly1,2012.PublishedJuly2012.Originallyapproved
in 1993. Last previous edition approved in 2007 as D5397 – 07. DOI: 10.1520/ to the dimensions and tolerances shown in Fig. 1.
D5397-07R12.
NOTE 1—The length of the specimen can be changed to suit the design
For referenced ASTM standards, visit the ASTM website, www.astm.org, or
of the test apparatus. However, there should be a constant neck section
contact ASTM Customer Service at service@astm.org. For Annual Book of ASTM
Standards volume information, refer to the standard’s Document Summary page on with length at least 13 mm (0.5 in.) long. The width should be 3.20 mm
the ASTM website. (0.125 in.).
Copyright © ASTM International, 100 Barr Harbor Drive, PO Box C700, West Conshohocken, PA 19428-2959. United States
D5397−07 (2012)
NOTE 1—The number of positions in the test frame is optional.
FIG. 2Constant Stress Loading Apparatus Consisting of Twenty
NOTE 1—Dimensioned in millimetres to an accuracy of 0.02 mm.
Specimen Test Positions
FIG. 1Dimensions of Test Method D1822 Type “L” Test Speci-
mens
that is nonylphenoxy poly(ethyleneoxy)ethanol. The reagent
6.2 Notching Device—Adeviceormachinethatcanproduce
should be stored in a closed container. The reagent in the bath
a consistent notch depth.
should be replaced every two weeks to maintain a constant
concentration.
NOTE 2—An evaluation of the notching technique can be performed by
quenching a notched specimen in liquid nitrogen and then fracturing it.
NOTE 5—In case of dispute, the water should be distilled or deionized
The notch depth can readily be measured by examining the fracture
at the discretion of the parties involved.
surface under a reflected light microscope. Other methods of verifying
NOTE 6—Other incubation solutions may also be used in the test,
notch depth include viewing the cut specimen on its side in a microscope
provided that the parties involved mutually agree to the changes and state
with the aid of a eyepiece micrometer or a calibrated reticle.
the specific details in the final report.
6.3 Blade—A single-edged razor made of carbon steel. The
8. Sampling
tip profile is that of an arrow rather than that of a chisel point.
The sharpness of the point is critical to the cleanliness of the
8.1 Lot Sample—Divide the product into lots and take the
cut which effects the results of the test significantly.
lot sample as directed in Practice D4354.
6.4 Stress Cracking Apparatus—Equipment suitable for
8.2 Laboratory Sample—As a laboratory sample for accep-
subjecting test specimens to a tensile stress of up to 13.8 MPa
tance testing, take a full-width swatch approximately1m(40
(2000 lb/in. ). The specimens shall be maintained at a constant
in.) long in the machine direction from each roll in the lot
temperature of 50 6 1°C (122 6 2°F) while being totally
sample.Thesamplemaybetakenfromtheendportionofaroll
immersed in a surface-active agent. The solution should be
provided there is no evidence it is distorted or different from
constantlyagitatedtoprovideauniformconcentrationthrough-
other portions of the roll.
out the bath.
8.3 Test Specimens—At least thirty test specimens are cut
NOTE 3—The apparatus shown in Fig. 2 is one type that has been used
from each swatch in the laboratory sample. For each set of
andiscapableoftestingupto20specimensatatime.Thisequipmentuses
tests, all specimens must be taken from one direction.
a lever system with a mechanical advantage (MA) of three to impose the
desired loading on each specimen. The surface-active agent in which the
NOTE 7—Quite often the test is required to challenge the weakest
specimens are immersed is contained in an open stainless steel tank. A
direction of the sheet material. If this is the cross machine direction, the
submersionheaterandcontrollerareusedtomaintainthetesttemperature.
test specimens should be cut in this direction. Hence the notch is placed
Apumpkeepstheliquidinaconstantstateofagitation.Atimingclockfor
in the machine direction so that the specimens are stressed in the desired
eachtestspecimenisalsoprovidedtorecordautomaticallythefailuretime
cross machine direction.
of the test specimens to the nearest 0.1 h.
NOTE8—Ithasbeenfoundthatinsertingagrommetoreyeletinthetwo
NOTE 4—If “on/off” switches are used to control the timing clock, the
holes at the end tabs of the test specimen helps to reduce the number of
switch must be sensitive enough to be turned off under 200 g of the force.
“grip failures” or failures occurring outside of the neck section of the
specimen.
7. Reagent
9. Procedure
7.1 The reagent should consist of 10 % surface-active agent
with 90 % water. The surface-active agent is Igepal CO-630
9.1 Measure the thickness of each individual test specimen
at its minimum cross section to the nearest 0.013 mm (0.001
in.). The variation in thickness should not be greater than 6
Notching equipment is available through REMCO Industrial Machine Co.,
0.026 mm (6 0.002 in.) of the nominal thickness of the
Manville, NJ 08850.
This equipment is available through Custom Scientific Instruments Co., Cedar geomembrane.
Knolls,NJ07927,andBTTechnologyInc.,613W.ClintonSt.,Rushville,IL62681.
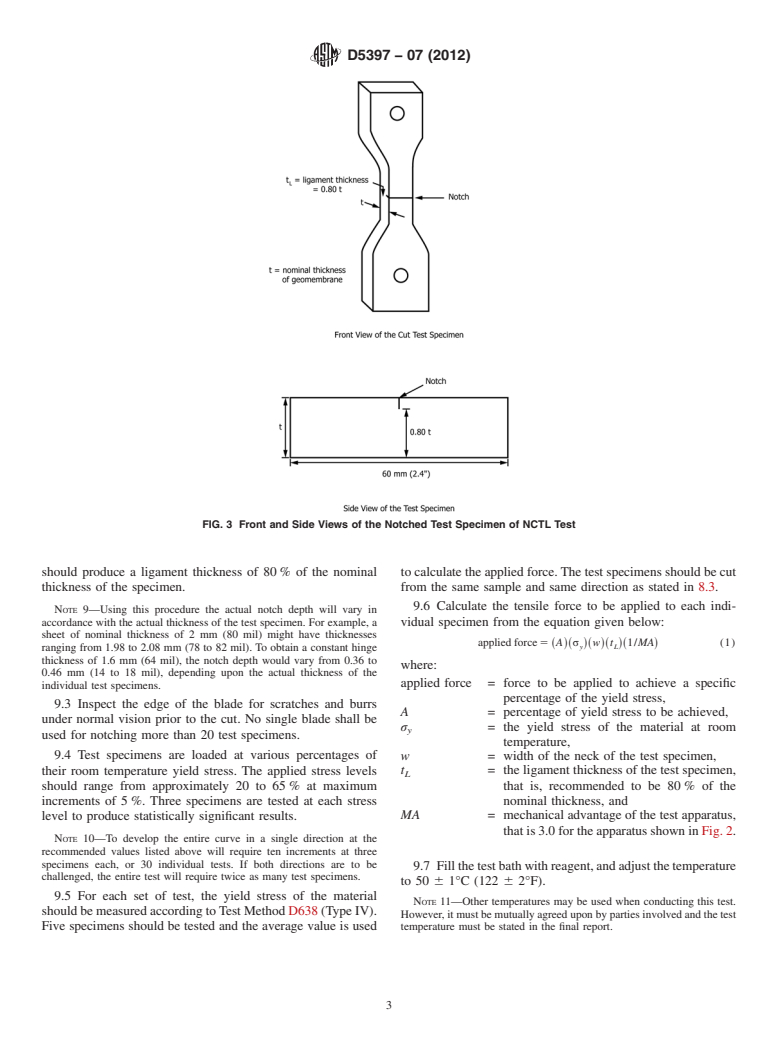
9.2 Cut into each specimen a control imperfection (notch)
Igepal CO-630 may be obtained from Rhone-Poulenc, CN 7500, Prospect
Plains Road, Cranbury, NJ 08512-7500. on one surface as shown in Fig. 3. The depth of the notch
D5397−07 (2012)
FIG. 3 Front and Side Views of the Notched Test Specimen of NCTL Test
should produce a ligament thickness of 80 % of the nominal to calculate the applied force.The test specimens should be cut
thickness of the specimen. from the same sample and same dir
...


Questions, Comments and Discussion
Ask us and Technical Secretary will try to provide an answer. You can facilitate discussion about the standard in here.