ASTM D3658-01(2008)
(Test Method)Standard Test Method for Determining the Torque Strength of Ultraviolet (UV) Light-Cured Glass/Metal Adhesive Joints
Standard Test Method for Determining the Torque Strength of Ultraviolet (UV) Light-Cured Glass/Metal Adhesive Joints
SIGNIFICANCE AND USE
This test method provides reasonably accurate information with regard to the ability of UV curing adhesives to withstand torsional shearing forces. It may be used to determine the effect of environment on torsional shear strength.
SCOPE
1.1 This test method covers the simplistic comparison of strengths of glass/metal joints when the adhesive is cured by ultraviolet (UV) radiation and standard specimens are used and tested under specified conditions of preparation, radiation, and load.
1.2 This test method involves torque loading UV-bonded hexagonal metal blocks to glass plates.
1.3 This test method may be used to obtain comparative torque strength-to-failure data for other bonded joint systems, radiation cured or not.
1.4 The values stated in inch-pound units are to be regarded as standard. The values given in parentheses are mathematical conversions to SI units that are provided for information only and are not considered standard.
1.5 This standard does not purport to address all of the safety concerns, if any, associated with its use. It is the responsibility of the user of this standard to establish appropriate safety and health practices and determine the applicability of regulatory limitations prior to use.
General Information
Relations
Buy Standard
Standards Content (Sample)
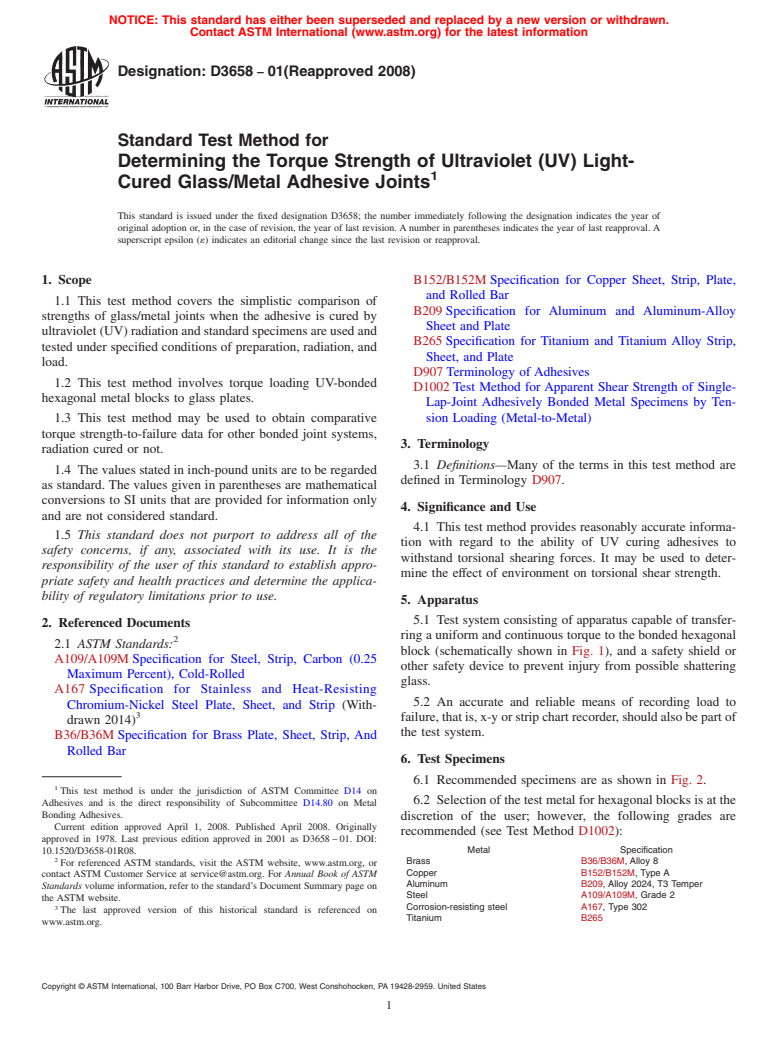
NOTICE: This standard has either been superseded and replaced by a new version or withdrawn.
Contact ASTM International (www.astm.org) for the latest information
Designation: D3658 − 01(Reapproved 2008)
Standard Test Method for
Determining the Torque Strength of Ultraviolet (UV) Light-
Cured Glass/Metal Adhesive Joints
This standard is issued under the fixed designation D3658; the number immediately following the designation indicates the year of
original adoption or, in the case of revision, the year of last revision. A number in parentheses indicates the year of last reapproval. A
superscript epsilon (´) indicates an editorial change since the last revision or reapproval.
1. Scope B152/B152M Specification for Copper Sheet, Strip, Plate,
and Rolled Bar
1.1 This test method covers the simplistic comparison of
B209 Specification for Aluminum and Aluminum-Alloy
strengths of glass/metal joints when the adhesive is cured by
Sheet and Plate
ultraviolet (UV) radiation and standard specimens are used and
B265 Specification for Titanium and Titanium Alloy Strip,
tested under specified conditions of preparation, radiation, and
Sheet, and Plate
load.
D907 Terminology of Adhesives
1.2 This test method involves torque loading UV-bonded
D1002 Test Method for Apparent Shear Strength of Single-
hexagonal metal blocks to glass plates.
Lap-Joint Adhesively Bonded Metal Specimens by Ten-
sion Loading (Metal-to-Metal)
1.3 This test method may be used to obtain comparative
torque strength-to-failure data for other bonded joint systems,
3. Terminology
radiation cured or not.
3.1 Definitions—Many of the terms in this test method are
1.4 The values stated in inch-pound units are to be regarded
defined in Terminology D907.
as standard. The values given in parentheses are mathematical
conversions to SI units that are provided for information only
4. Significance and Use
and are not considered standard.
4.1 This test method provides reasonably accurate informa-
1.5 This standard does not purport to address all of the
tion with regard to the ability of UV curing adhesives to
safety concerns, if any, associated with its use. It is the
withstand torsional shearing forces. It may be used to deter-
responsibility of the user of this standard to establish appro-
mine the effect of environment on torsional shear strength.
priate safety and health practices and determine the applica-
bility of regulatory limitations prior to use.
5. Apparatus
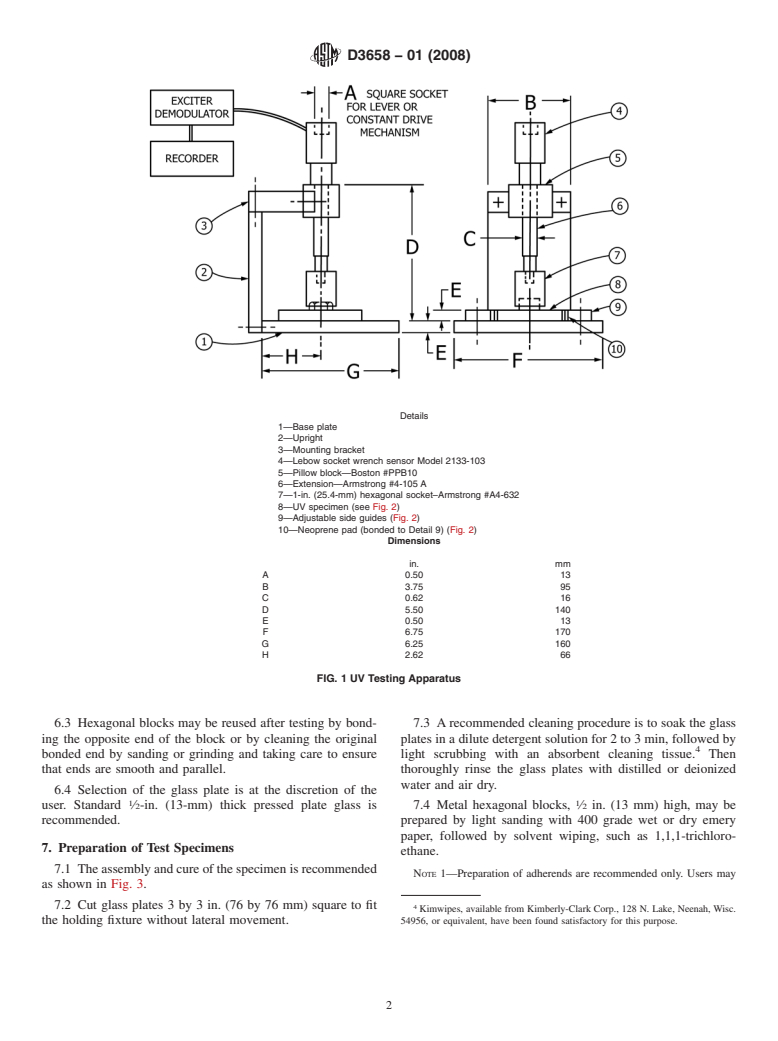
5.1 Test system consisting of apparatus capable of transfer-
2. Referenced Documents
ring a uniform and continuous torque to the bonded hexagonal
2.1 ASTM Standards:
block (schematically shown in Fig. 1), and a safety shield or
A109/A109M Specification for Steel, Strip, Carbon (0.25
other safety device to prevent injury from possible shattering
Maximum Percent), Cold-Rolled
glass.
A167 Specification for Stainless and Heat-Resisting
5.2 An accurate and reliable means of recording load to
Chromium-Nickel Steel Plate, Sheet, and Strip (With-
failure, that is, x-y or strip chart recorder, should also be part of
drawn 2014)
the test system.
B36/B36M Specification for Brass Plate, Sheet, Strip, And
Rolled Bar
6. Test Specimens
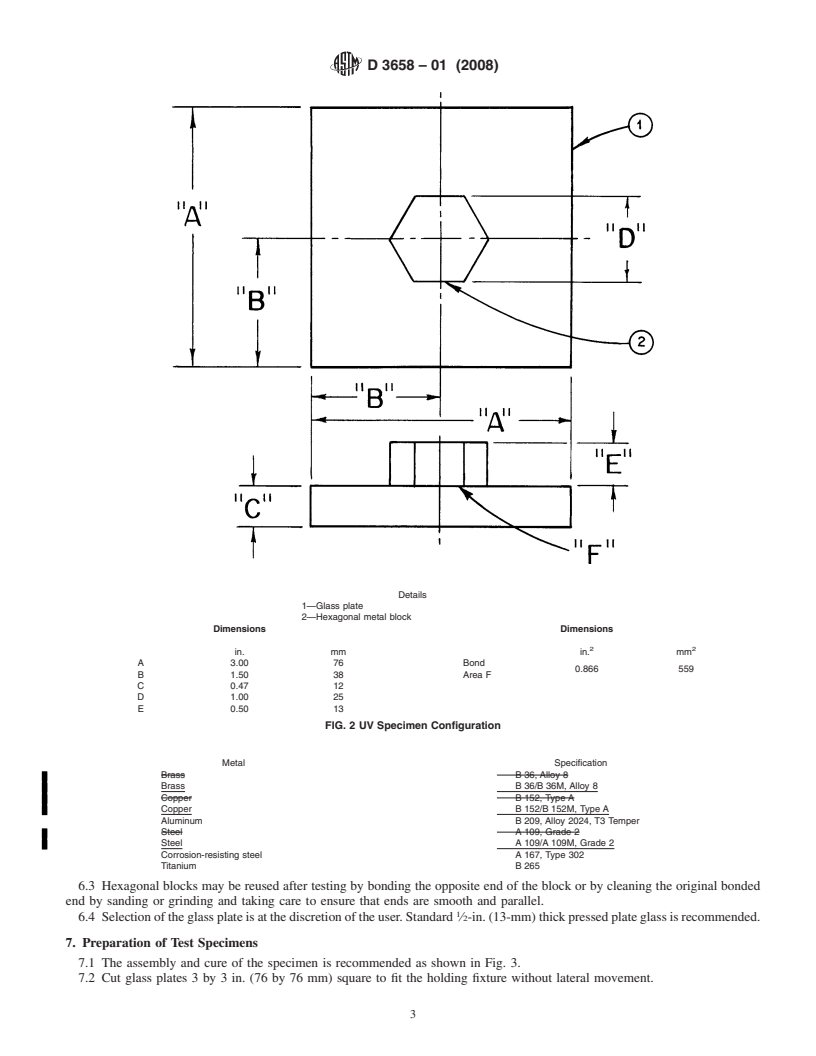
6.1 Recommended specimens are as shown in Fig. 2.
This test method is under the jurisdiction of ASTM Committee D14 on
6.2 Selection of the test metal for hexagonal blocks is at the
Adhesives and is the direct responsibility of Subcommittee D14.80 on Metal
Bonding Adhesives.
discretion of the user; however, the following grades are
Current edition approved April 1, 2008. Published April 2008. Originally
recommended (see Test Method D1002):
approved in 1978. Last previous edition approved in 2001 as D3658 – 01. DOI:
10.1520/D3658-01R08. Metal Specification
Brass B36/B36M, Alloy 8
For referenced ASTM standards, visit the ASTM website, www.astm.org, or
Copper B152/B152M, Type A
contact ASTM Customer Service at service@astm.org. For Annual Book of ASTM
Aluminum B209, Alloy 2024, T3 Temper
Standards volume information, refer to the standard’s Document Summary page on
Steel A109/A109M, Grade 2
the ASTM website.
Corrosion-resisting steel A167, Type 302
The last approved version of this historical standard is referenced on
Titanium B265
www.astm.org.
Copyright © ASTM International, 100 Barr Harbor Drive, PO Box C700, West Conshohocken, PA 19428-2959. United States
D3658 − 01(Reapproved 2008)
D3658 − 01 (2008)
Details
1—Base plate
2—Upright
3—Mounting bracket
4—Lebow socket wrench sensor Model 2133-103
5—Pillow block—Boston #PPB10
6—Extension—Armstrong #4-105 A
7—1-in. (25.4-mm) hexagonal socket–Armstrong #A4-632
8—UV specimen (see Fig. 2)
9—Adjustable side guides (Fig. 2)
10—Neoprene pad (bonded to Detail 9) (Fig. 2)
Dimensions
in. mm
A 0.50 13
B 3.75 95
C 0.62 16
D 5.50 140
E 0.50 13
F 6.75 170
G 6.25 160
H 2.62 66
FIG. 1 UV Testing Apparatus
6.3 Hexagonal blocks may be reused after testing by bond- 7.3 Arecommended cleaning procedure is to soak the glass
ing the opposite end of the block or by cleaning the original plates in a dilute detergent solution for 2 to 3 min, followed by
bonded end by sanding or grinding and taking care to ensure light scrubbing with an absorbent cleaning tissue. Then
that ends are smooth and parallel. thoroughly rinse the glass plates with distilled or deionized
water and air dry.
6.4 Select
...
This document is not an ASTM standard and is intended only to provide the user of an ASTM standard an indication of what changes have been made to the previous version. Because
it may not be technically possible to adequately depict all changes accurately, ASTM recommends that users consult prior editions as appropriate. In all cases only the current version
of the standard as published by ASTM is to be considered the official document.
Designation:D3658–90(Reapproved 1995) Designation: D 3658 – 01 (Reapproved 2008)
Standard Test Method for
Determining the Torque Strength of Ultraviolet (UV) Light-
Cured Glass/Metal Adhesive Joints
This standard is issued under the fixed designation D 3658; the number immediately following the designation indicates the year of
original adoption or, in the case of revision, the year of last revision. A number in parentheses indicates the year of last reapproval. A
superscript epsilon (e) indicates an editorial change since the last revision or reapproval.
1. Scope
1.1 Thistestmethodcoversthesimplisticcomparisonofstrengthsofglass/metaljointswhentheadhesiveiscuredbyultraviolet
(UV) radiation and standard specimens are used and tested under specified conditions of preparation, radiation, and load.
1.2 This test method involves torque loading UV-bonded hexagonal metal blocks to glass plates.
1.3 This test method may be used to obtain comparative torque strength-to-failure data for other bonded joint systems, radiation
cured or not.
1.4
1.4 The values stated in inch-pound units are to be regarded as standard. The values given in parentheses are mathematical
conversions to SI units that are provided for information only and are not considered standard.
1.5 This standard does not purport to address all of the safety concerns, if any, associated with its use. It is the responsibility
of the user of this standard to establish appropriate safety and health practices and determine the applicability of regulatory
limitations prior to use.
2. Referenced Documents
2.1 ASTM Standards:
A109Specification for Steel, Strip, Carbon, Cold-Rolled 109/A 109M Specification for Steel, Strip, Carbon (0.25 Maximum
Percent), Cold-Rolled
A 167 Specification for Stainless and Heat-Resisting Chromium-Nickel Steel Plate, Sheet, and Strip
B 36/B 36M Specification for Brass Plate, Sheet, Strip, andAnd Rolled Bar
B 152/B 152M Specification for Copper Sheet, Strip, Plate, and Rolled Bar
B 209 Specification for Aluminum and Aluminum-Alloy Sheet and Plate
B 265 Specification for Titanium and Titanium Alloy Strip, Sheet, and Plate
D 907 Terminology of Adhesives
D 1002 TestMethodforApparentShearStrengthofSingle-Lap-JointAdhesivelyBondedMetalSpecimensbyTensionLoading
(Metal-to-Metal)
3. Terminology
3.1 Definitions—Definitions—Many of the terms in this test method may be foundare defined in Terminology D 907.
4. Significance and Use
4.1 This test method provides reasonably accurate information with regard to the ability of UV curing adhesives to withstand
torsional shearing forces. It may be used to determine the effect of environment on torsional shear strength.
5. Apparatus
5.1The apparatus is schematically shown in
5.1 Test system consisting of apparatus capable of transferring a uniform and continuous torque to the bonded hexagonal block
(schematically shown in Fig. 1.
5.2The apparatus shall be capable of transferring a uniform and continuous torque to the bonded hexagonal block.
This test method is under the jurisdiction ofASTM Committee D-14 onAdhesives and is the direct responsibility of Subcommittee D14.80 on Metal BondingAdhesives.
Current edition approved March 30, 1990. Published May 1990. Originally published as D3658–78. Last previous edition D3658–78(1984).
This test method is under the jurisdiction ofASTM Committee D14 onAdhesives and is the direct responsibility of Subcommittee D14.80 on Metal BondingAdhesives.
Current edition approved April 1, 2008. Published April 2008. Originally approved in 1978. Last previous edition approved in 2001 as D 3658 – 01.
For referencedASTM standards, visit theASTM website, www.astm.org, or contactASTM Customer Service at service@astm.org. For Annual Book of ASTM Standards
, Vol 01.03.volume information, refer to the standard’s Document Summary page on the ASTM website.
Copyright © ASTM International, 100 Barr Harbor Drive, PO Box C700, West Conshohocken, PA 19428-2959, United States.
D 3658 – 01 (2008)
Details
1—Base plate
2—Upright
3—Mounting bracket
4—Lebow socket wrench sensor Model 2133-103
5—Pillow block—Boston #PPB10
6—Extension—Armstrong #4-105 A
7—1-in. (25.4-mm) hexagonal socket–Armstrong #A4-632
8—UV specimen (see Fig. 2)
9—Adjustable side guides (Fig. 2)
10—Neoprene pad (bonded to Detail 9) (Fig. 2)
Dimensions
in. mm
A 0.50 13
B 3.75 95
C 0.62 16
D 5.50 140
E 0.50 13
F 6.75 170
G 6.25 160
H 2.62 66
FIG. 1 UV Testing Apparatus
5.3An accurate and reliable means of recording load to failure, that is, x-y or strip chart recorder, should also be a part of the
test system.
5.4A safety shield or other safety device shall be incorporated as part of the system to prevent injury from possible shattering
glass. ), and a safety shield or other safety device to prevent injury from possible shattering glass.
5.2 An accurate and reliable means of recording load to failure, that is, x-y or strip chart recorder, should also be part of the
test system.
6. Test Specimens
6.1 Recommended specimens are as shown in Fig. 2.
6.2 Selection of the test metal for hexagonal blocks is at the discretion of the user; however, the following grades are
recommended (see Test Method D 1002):
D 3658 – 01 (2008)
Details
1—Glass plate
2—Hexagonal metal block
Dimensions Dimensions
2 2
in. mm in. mm
A 3.00 76 Bond
0.866 559
B 1.50 38 Area F
C 0.47 12
D 1.00 25
E 0.50 13
FIG. 2 UV Specimen Configuration
Metal Specification
Brass B 36, Alloy 8
Brass B 36/B 36M, Allo
...


Questions, Comments and Discussion
Ask us and Technical Secretary will try to provide an answer. You can facilitate discussion about the standard in here.