ASTM D5853-16
(Test Method)Standard Test Method for Pour Point of Crude Oils
Standard Test Method for Pour Point of Crude Oils
SIGNIFICANCE AND USE
5.1 The pour point of a crude oil is an index of the lowest temperature of handleability for certain applications.
5.2 This is the only pour point method specifically designed for crude oils.
5.3 The maximum and minimum pour point temperatures provide a temperature window where a crude oil, depending on its thermal history, might appear in the liquid as well as the solid state.
5.4 The test method can be used to supplement other measurements of cold flow behavior. It is especially useful for the screening of the effect of wax interaction modifiers on the flow behavior of crude oils.
SCOPE
1.1 This test method covers two procedures for the determination of the pour point temperatures of crude oils down to −36 °C. Procedure A provides a measure of the maximum (upper) pour point temperature and is described in 9.1. Procedure B provides a measure of the minimum (lower) pour point temperature and is described in 9.2.
1.2 The use of this test method is limited to use for crude oils. Pour point temperatures of other petroleum products can be determined by Test Method D97.
1.3 The values stated in SI units are to be regarded as standard. No other units of measurement are included in this standard.
1.4 WARNING—Mercury has been designated by many regulatory agencies as a hazardous material that can cause central nervous system, kidney, and liver damage. Mercury, or its vapor, may be hazardous to health and corrosive to materials. Caution should be taken when handling mercury and mercury-containing products. See the applicable product Material Safety Data Sheet (MSDS) for details and EPA’s website—http://www.epa.gov/mercury/faq.htm—for additional information. Users should be aware that selling mercury and/or mercury containing products in your state or country may be prohibited by law.
1.5 This standard does not purport to address all of the safety concerns, if any, associated with its use. It is the responsibility of the user of this standard to establish appropriate safety and health practices and determine the applicability of regulatory limitations prior to use. For specific hazard statements, see Section 7.
General Information
Relations
Standards Content (Sample)
NOTICE: This standard has either been superseded and replaced by a new version or withdrawn.
Contact ASTM International (www.astm.org) for the latest information
Designation: D5853 − 16
Designation: 441/99
Standard Test Method for
1
Pour Point of Crude Oils
This standard is issued under the fixed designation D5853; the number immediately following the designation indicates the year of
original adoption or, in the case of revision, the year of last revision.Anumber in parentheses indicates the year of last reapproval.A
superscript epsilon (´) indicates an editorial change since the last revision or reapproval.
1. Scope* 2. Referenced Documents
2
1.1 This test method covers two procedures for the deter- 2.1 ASTM Standards:
mination of the pour point temperatures of crude oils down to D97Test Method for Pour Point of Petroleum Products
−36°C. Procedure A provides a measure of the maximum D130Test Method for Corrosiveness to Copper from Petro-
(upper) pour point temperature and is described in 9.1. Proce- leum Products by Copper Strip Test
dure B provides a measure of the minimum (lower) pour point D323TestMethodforVaporPressureofPetroleumProducts
temperature and is described in 9.2. (Reid Method)
D4057Practice for Manual Sampling of Petroleum and
1.2 The use of this test method is limited to use for crude
Petroleum Products
oils. Pour point temperatures of other petroleum products can
D4177Practice for Automatic Sampling of Petroleum and
be determined by Test Method D97.
Petroleum Products
1.3 The values stated in SI units are to be regarded as
D7962Practice for Determination of Minimum Immersion
standard. No other units of measurement are included in this
Depth and Assessment of Temperature Sensor Measure-
standard.
ment Drift
1.4 WARNING—Mercury has been designated by many E1Specification for ASTM Liquid-in-Glass Thermometers
E77Test Method for Inspection and Verification of Ther-
regulatory agencies as a hazardous material that can cause
central nervous system, kidney, and liver damage. Mercury, or mometers
E1137SpecificationforIndustrialPlatinumResistanceTher-
its vapor, may be hazardous to health and corrosive to
mometers
materials.Cautionshouldbetakenwhenhandlingmercuryand
mercury-containing products. See the applicable product Ma- E2251Specification for Liquid-in-Glass ASTM Thermom-
eters with Low-Hazard Precision Liquids
terial Safety Data Sheet (MSDS) for details and EPA’s
website—http://www.epa.gov/mercury/faq.htm—for addi- E2877Guide for Digital Contact Thermometers
tional information. Users should be aware that selling mercury
3. Terminology
and/or mercury containing products in your state or country
3.1 Definitions of Terms Specific to This Standard:
may be prohibited by law.
3.1.1 digital contact thermometer (DCT), n—an electronic
1.5 This standard does not purport to address all of the
device consisting of a digital display and associated tempera-
safety concerns, if any, associated with its use. It is the
ture sensing probe.
responsibility of the user of this standard to establish appro-
priate safety and health practices and determine the applica-
3.1.1.1 Discussion—This device consists of a temperature
bility of regulatory limitations prior to use. For specific hazard
sensor connected to a measuring instrument; this instrument
statements, see Section 7.
measures the temperature-dependent quantity of the sensor,
computes the temperature from the measured quantity, and
provides a digital output. This digital output goes to a digital
1
This test method is under the jurisdiction of ASTM Committee D02 on
Petroleum Products, Liquid Fuels, and Lubricants and is the direct responsibility of
2
Subcommittee D02.07 on Flow Properties. For referenced ASTM standards, visit the ASTM website, www.astm.org, or
Current edition approved Dec. 1, 2016. Published January 2017. Originally contact ASTM Customer Service at service@astm.org. For Annual Book of ASTM
approved in 1995. Last previous edition approved in 2011 as D5853–11. DOI: Standards volume information, refer to the standard’s Document Summary page on
10.1520/D5853-16. the ASTM website.
*A Summary of Changes section appears at the end of this standard
Copyright © ASTM International, 100 Barr Harbor Drive, PO Box C700, West Conshohocken, PA 19428-2959. United States
1
---------------------- Page: 1 ----------------------
D5853 − 16
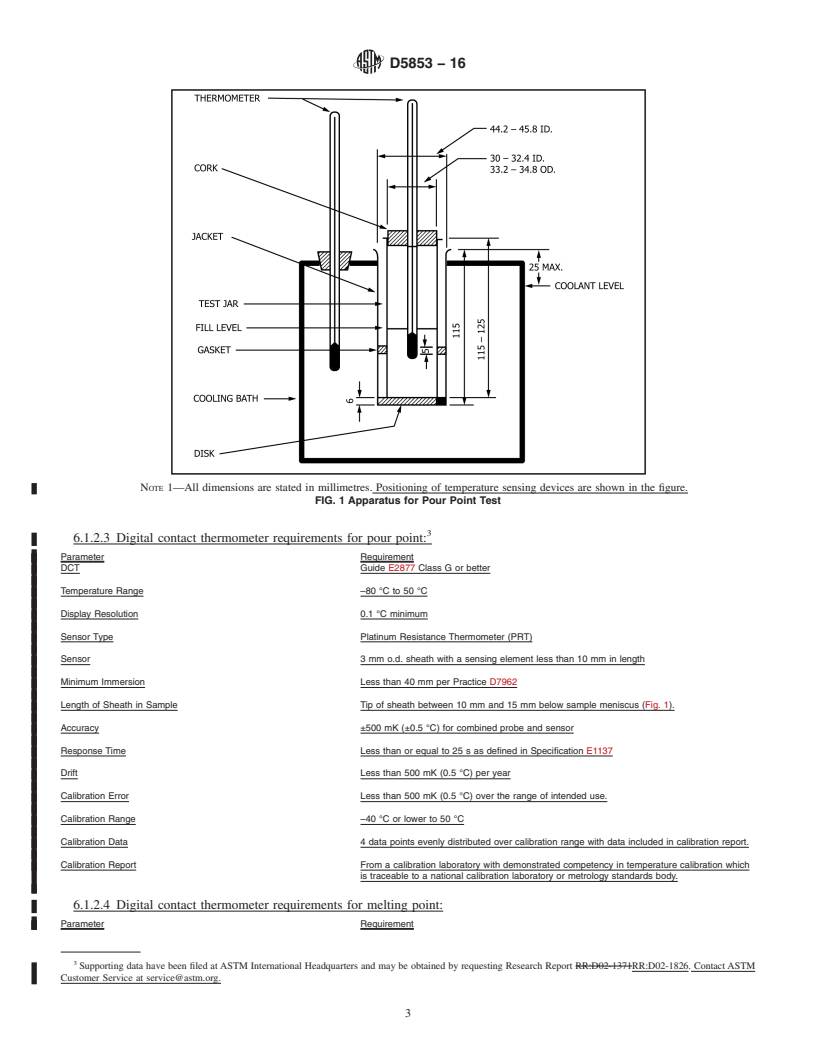
NOTE 1—All dimensions are stated in millimetres. Positioning of temperature sensing devices are shown in the figure.
FIG. 1 Apparatus for Pour Point Test
displayand/orrecordingdevicethatmaybeinternalorexternal 5.2 Thisistheonlypourpointmethodspecificallydesigned
to the device. These devices are sometimes referred to as a
for crude oils.
“digital thermometer.”
5.3 The maximum and minimum pour point temperatures
3.1.1.2 Discussion—PET is an acronym for portable elec-
provideatemperaturewindowwhereacrudeoil,dependingon
tronic thermometers, a subset of digital contact thermometers
its thermal history, might appear in the liquid as wel
...
This document is not an ASTM standard and is intended only to provide the user of an ASTM standard an indication of what changes have been made to the previous version. Because
it may not be technically possible to adequately depict all changes accurately, ASTM recommends that users consult prior editions as appropriate. In all cases only the current version
of the standard as published by ASTM is to be considered the official document.
Designation: D5853 − 11 D5853 − 16
Designation: 441/99
Standard Test Method for
1
Pour Point of Crude Oils
This standard is issued under the fixed designation D5853; the number immediately following the designation indicates the year of
original adoption or, in the case of revision, the year of last revision. A number in parentheses indicates the year of last reapproval. A
superscript epsilon (´) indicates an editorial change since the last revision or reapproval.
1. Scope*
1.1 This test method covers two procedures for the determination of the pour point temperatures of crude oils down to
−36°C.−36 °C. Procedure A provides a measure of the maximum (upper) pour point temperature and is described in 9.1. Procedure
B provides a measure of the minimum (lower) pour point temperature and is described in 9.2.
1.2 The use of this test method is limited to use for crude oils. Pour point temperatures of other petroleum products can be
determined by Test Method D97.
1.3 The values stated in SI units are to be regarded as standard. No other units of measurement are included in this standard.
1.4 WARNING—Mercury has been designated by many regulatory agencies as a hazardous material that can cause central
nervous system, kidney, and liver damage. Mercury, or its vapor, may be hazardous to health and corrosive to materials. Caution
should be taken when handling mercury and mercury containing mercury-containing products. See the applicable product Material
Safety Data Sheet (MSDS) for details and EPA’s website—http://www.epa.gov/mercury/faq.htm—for additional information.
Users should be aware that selling mercury and/or mercury containing products intoin your state or country may be prohibited by
law.
1.5 This standard does not purport to address all of the safety concerns, if any, associated with its use. It is the responsibility
of the user of this standard to establish appropriate safety and health practices and determine the applicability of regulatory
limitations prior to use. For specific hazard statements, see Section 7.
2. Referenced Documents
2
2.1 ASTM Standards:
D97 Test Method for Pour Point of Petroleum Products
D130 Test Method for Corrosiveness to Copper from Petroleum Products by Copper Strip Test
D323 Test Method for Vapor Pressure of Petroleum Products (Reid Method)
D4057 Practice for Manual Sampling of Petroleum and Petroleum Products
D4177 Practice for Automatic Sampling of Petroleum and Petroleum Products
D7962 Practice for Determination of Minimum Immersion Depth and Assessment of Temperature Sensor Measurement Drift
E1 Specification for ASTM Liquid-in-Glass Thermometers
E77 Test Method for Inspection and Verification of Thermometers
E1137 Specification for Industrial Platinum Resistance Thermometers
E2251 Specification for Liquid-in-Glass ASTM Thermometers with Low-Hazard Precision Liquids
E2877 Guide for Digital Contact Thermometers
3. Terminology
3.1 Definitions of Terms Specific to This Standard:
3.1.1 digital contact thermometer (DCT), n—an electronic device consisting of a digital display and associated temperature
sensing probe.
1
This test method is under the jurisdiction of ASTM Committee D02 on Petroleum Products, Liquid Fuels, and Lubricants and is the direct responsibility of Subcommittee
D02.07 on Flow Properties.
Current edition approved June 1, 2011Dec. 1, 2016. Published July 2011January 2017. Originally approved in 1995. Last previous edition approved in 20092011 as
D5853D5853 – 11.–09. DOI: 10.1520/D5853-11.10.1520/D5853-16.
2
For referenced ASTM standards, visit the ASTM website, www.astm.org, or contact ASTM Customer Service at service@astm.org. For Annual Book of ASTM Standards
volume information, refer to the standard’s Document Summary page on the ASTM website.
*A Summary of Changes section appears at the end of this standard
Copyright © ASTM International, 100 Barr Harbor Drive, PO Box C700, West Conshohocken, PA 19428-2959. United States
1
---------------------- Page: 1 ----------------------
D5853 − 16
3.1.1.1 Discussion—
This device consists of a temperature sensor connected to a measuring instrument; this instrument measures the temperature-
dependent quantity of the sensor, computes the temperature from the measured quantity, and provides a digital output. This digital
output goes to a digital display and/or recording device that may be internal or external to the device. These devices are sometimes
referred to as a “digital thermometer.”
3.1.1.2 Discussion—
PET is an acronym for portable electronic thermometers, a subset of digital contact
...


Questions, Comments and Discussion
Ask us and Technical Secretary will try to provide an answer. You can facilitate discussion about the standard in here.