ASTM A877/A877M-17(2023)
(Specification)Standard Specification for Steel Wire, Chromium-Silicon Alloys, Chrome-Silicon-Vanadium Alloy Valve Spring Quality
Standard Specification for Steel Wire, Chromium-Silicon Alloys, Chrome-Silicon-Vanadium Alloy Valve Spring Quality
ABSTRACT
This specification covers the highest quality of round chromium-silicon alloy steel valve spring wires, uniform in quality and temper, intended for the manufacture of valve springs and other springs requiring high-fatigue properties when used at moderately elevated temperatures. This wire shall be either in the annealed and cold-drawn or oil-tempered condition. The steel may be made by any commercially accepted steel making process, shall be continuously cast, and shall be free from detrimental pipe and undue segregation and surface imperfections. Heat analysis, tensile testing, wrap testing, and surface inspection by magnetic or eddy current defect analysis shall be done. Both heat and product analysis shall conform to the chemical composition requirements specified for carbon, manganese, phosphorus, sulfur, silicon, and chromium. The mechanical requirements for the steel wire including cooling, heat treatment, and tensile strength, and the metallurgical requirements including etched surface testing, decarburization, and inclusion content are detailed.
SCOPE
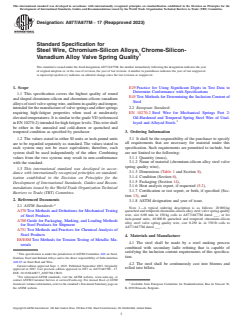
1.1 This specification covers the highest quality of round and shaped chromium-silicon and chromium-silicon-vanadium alloys of steel valve spring wire, uniform in quality and temper, intended for the manufacture of valve springs and other springs requiring high-fatigue properties when used at moderately elevated temperatures. It is similar to the grade VD (referenced in EN 10270-2) intended for high fatigue levels. This wire shall be either in the annealed and cold-drawn or quenched and tempered condition as specified by purchaser.
1.2 The values stated in either SI units or inch-pound units are to be regarded separately as standard. The values stated in each system may not be exact equivalents; therefore, each system shall be used independently of the other. Combining values from the two systems may result in non-conformance with the standard.
1.3 This international standard was developed in accordance with internationally recognized principles on standardization established in the Decision on Principles for the Development of International Standards, Guides and Recommendations issued by the World Trade Organization Technical Barriers to Trade (TBT) Committee.
General Information
- Status
- Published
- Publication Date
- 31-Aug-2023
- Technical Committee
- A01 - Steel, Stainless Steel and Related Alloys
- Drafting Committee
- A01.03 - Steel Rod and Wire
Relations
- Effective Date
- 01-Mar-2024
- Effective Date
- 01-Jan-2024
- Effective Date
- 01-Nov-2023
- Effective Date
- 01-Nov-2019
- Effective Date
- 01-Jul-2019
- Refers
ASTM A370-17a - Standard Test Methods and Definitions for Mechanical Testing of Steel Products - Effective Date
- 15-Nov-2017
- Effective Date
- 01-Jan-2017
- Effective Date
- 15-Jul-2016
- Effective Date
- 01-Nov-2015
- Effective Date
- 01-Feb-2015
- Effective Date
- 01-Nov-2014
- Effective Date
- 15-May-2014
- Effective Date
- 01-Mar-2014
- Effective Date
- 15-Nov-2013
- Effective Date
- 01-Jun-2013
Overview
ASTM A877/A877M-17(2023) is the internationally recognized standard specification for round and shaped steel wire made from chromium-silicon alloys and chrome-silicon-vanadium alloys, classified as "valve spring quality." Established by ASTM International, this standard outlines quality and testing requirements for steel wire intended for performance-critical applications such as valve springs and other high-fatigue springs, particularly those operating at moderately elevated temperatures. The specification ensures uniformity in chemical composition, mechanical and metallurgical properties, and surface quality, covering both SI and inch-pound units.
Key Topics
1. Material Types and Conditions
- Applies to round and shaped chromium-silicon and chromium-silicon-vanadium alloy steel wire.
- Suitable for both annealed and cold-drawn, or quenched and tempered conditions as specified by the purchaser.
- Focuses on valve spring quality for high fatigue and demanding environments.
2. Chemical and Mechanical Properties
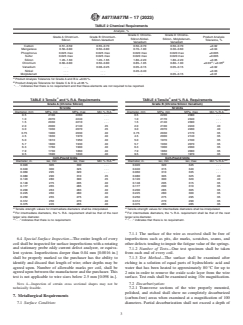
- Wire must conform to strict chemical composition requirements for elements like carbon, manganese, phosphorus, sulfur, silicon, chromium, vanadium, nickel, and molybdenum.
- Includes heat and product analysis to verify composition.
- Specifies minimum and maximum tensile strength values and reduction of area for different diameters and grades.
- Enforces metallurgical requirements for decarburization and nonmetallic inclusion content.
3. Quality Assurance and Testing
- Mandatory heat analysis, tensile testing, wrap testing, and surface inspection using magnetic or eddy current defect analysis.
- Surface condition requirements ensure the wire is free from impurities and surface imperfections that could impact fatigue performance.
- Dimensions and permissible variations are clearly specified.
- Strict requirements for surface quality, with non-permitted welds and continuous coil lengths.
4. Packaging and Certification
- Requirements for proper marking and documentation to ensure traceability.
- Certification and test reports provided upon request to document compliance.
- Packaging and shipping follow ASTM A700 guidelines unless otherwise agreed upon.
Applications
ASTM A877/A877M steel wires are designed for:
- Automotive and industrial valve springs: Where high fatigue strength and durability at moderately elevated temperatures are essential.
- Other high-performance coil and flat springs: In applications like engines, industrial machinery, compressors, and heavy equipment.
- Precision springs: Where uniform surface quality and mechanical properties contribute to reliable, long-term performance in critical systems.
- Any application requiring enhanced fatigue resistance: Especially where springs are exposed to repeated loading and elevated service temperatures.
Industries served include:
- Automotive
- Aerospace
- Heavy Equipment
- Power Generation
- Mechanical engineering and manufacturing
Related Standards
Organizations and manufacturers working to ASTM A877/A877M should also consider the following related standards:
- ASTM A370: Test Methods and Definitions for Mechanical Testing of Steel Products
- ASTM A700: Packaging, Marking, and Loading Methods for Steel Products for Shipment
- ASTM A751: Test Methods and Practices for Chemical Analysis of Steel Products
- ASTM E45: Methods for Determining Inclusion Content of Steel
- ASTM E8/E8M: Methods for Tension Testing of Metallic Materials
- EN 10270-2: Steel Wire for Mechanical Springs - Oil-Hardened and Tempered Spring Steel Wire (European equivalent for high fatigue spring wire)
Keywords: ASTM A877, chromium-silicon steel wire, chrome-silicon-vanadium wire, valve spring quality, high fatigue wire, mechanical springs, steel wire specification, surface inspection, tensile testing, spring manufacturing standards.
Buy Documents
ASTM A877/A877M-17(2023) - Standard Specification for Steel Wire, Chromium-Silicon Alloys, Chrome-Silicon-Vanadium Alloy Valve Spring Quality
Get Certified
Connect with accredited certification bodies for this standard

Element Materials Technology
Materials testing and product certification.

Inštitut za kovinske materiale in tehnologije
Institute of Metals and Technology. Materials testing, metallurgical analysis, NDT.
Sponsored listings
Frequently Asked Questions
ASTM A877/A877M-17(2023) is a technical specification published by ASTM International. Its full title is "Standard Specification for Steel Wire, Chromium-Silicon Alloys, Chrome-Silicon-Vanadium Alloy Valve Spring Quality". This standard covers: ABSTRACT This specification covers the highest quality of round chromium-silicon alloy steel valve spring wires, uniform in quality and temper, intended for the manufacture of valve springs and other springs requiring high-fatigue properties when used at moderately elevated temperatures. This wire shall be either in the annealed and cold-drawn or oil-tempered condition. The steel may be made by any commercially accepted steel making process, shall be continuously cast, and shall be free from detrimental pipe and undue segregation and surface imperfections. Heat analysis, tensile testing, wrap testing, and surface inspection by magnetic or eddy current defect analysis shall be done. Both heat and product analysis shall conform to the chemical composition requirements specified for carbon, manganese, phosphorus, sulfur, silicon, and chromium. The mechanical requirements for the steel wire including cooling, heat treatment, and tensile strength, and the metallurgical requirements including etched surface testing, decarburization, and inclusion content are detailed. SCOPE 1.1 This specification covers the highest quality of round and shaped chromium-silicon and chromium-silicon-vanadium alloys of steel valve spring wire, uniform in quality and temper, intended for the manufacture of valve springs and other springs requiring high-fatigue properties when used at moderately elevated temperatures. It is similar to the grade VD (referenced in EN 10270-2) intended for high fatigue levels. This wire shall be either in the annealed and cold-drawn or quenched and tempered condition as specified by purchaser. 1.2 The values stated in either SI units or inch-pound units are to be regarded separately as standard. The values stated in each system may not be exact equivalents; therefore, each system shall be used independently of the other. Combining values from the two systems may result in non-conformance with the standard. 1.3 This international standard was developed in accordance with internationally recognized principles on standardization established in the Decision on Principles for the Development of International Standards, Guides and Recommendations issued by the World Trade Organization Technical Barriers to Trade (TBT) Committee.
ABSTRACT This specification covers the highest quality of round chromium-silicon alloy steel valve spring wires, uniform in quality and temper, intended for the manufacture of valve springs and other springs requiring high-fatigue properties when used at moderately elevated temperatures. This wire shall be either in the annealed and cold-drawn or oil-tempered condition. The steel may be made by any commercially accepted steel making process, shall be continuously cast, and shall be free from detrimental pipe and undue segregation and surface imperfections. Heat analysis, tensile testing, wrap testing, and surface inspection by magnetic or eddy current defect analysis shall be done. Both heat and product analysis shall conform to the chemical composition requirements specified for carbon, manganese, phosphorus, sulfur, silicon, and chromium. The mechanical requirements for the steel wire including cooling, heat treatment, and tensile strength, and the metallurgical requirements including etched surface testing, decarburization, and inclusion content are detailed. SCOPE 1.1 This specification covers the highest quality of round and shaped chromium-silicon and chromium-silicon-vanadium alloys of steel valve spring wire, uniform in quality and temper, intended for the manufacture of valve springs and other springs requiring high-fatigue properties when used at moderately elevated temperatures. It is similar to the grade VD (referenced in EN 10270-2) intended for high fatigue levels. This wire shall be either in the annealed and cold-drawn or quenched and tempered condition as specified by purchaser. 1.2 The values stated in either SI units or inch-pound units are to be regarded separately as standard. The values stated in each system may not be exact equivalents; therefore, each system shall be used independently of the other. Combining values from the two systems may result in non-conformance with the standard. 1.3 This international standard was developed in accordance with internationally recognized principles on standardization established in the Decision on Principles for the Development of International Standards, Guides and Recommendations issued by the World Trade Organization Technical Barriers to Trade (TBT) Committee.
ASTM A877/A877M-17(2023) is classified under the following ICS (International Classification for Standards) categories: 77.140.25 - Spring steels. The ICS classification helps identify the subject area and facilitates finding related standards.
ASTM A877/A877M-17(2023) has the following relationships with other standards: It is inter standard links to ASTM A370-24, ASTM E8/E8M-24, ASTM E45-18a(2023), ASTM A700-14(2019), ASTM A370-19, ASTM A370-17a, ASTM A370-17, ASTM E8/E8M-16, ASTM A370-15, ASTM E8/E8M-15, ASTM A700-14, ASTM A370-14, ASTM A751-14, ASTM A370-13, ASTM E8/E8M-13. Understanding these relationships helps ensure you are using the most current and applicable version of the standard.
ASTM A877/A877M-17(2023) is available in PDF format for immediate download after purchase. The document can be added to your cart and obtained through the secure checkout process. Digital delivery ensures instant access to the complete standard document.
Standards Content (Sample)
This international standard was developed in accordance with internationally recognized principles on standardization established in the Decision on Principles for the
Development of International Standards, Guides and Recommendations issued by the World Trade Organization Technical Barriers to Trade (TBT) Committee.
Designation: A877/A877M − 17 (Reapproved 2023)
Standard Specification for
Steel Wire, Chromium-Silicon Alloys, Chrome-Silicon-
Vanadium Alloy Valve Spring Quality
This standard is issued under the fixed designation A877/A877M; the number immediately following the designation indicates the year
of original adoption or, in the case of revision, the year of last revision. A number in parentheses indicates the year of last reapproval.
A superscript epsilon (´) indicates an editorial change since the last revision or reapproval.
1. Scope E29 Practice for Using Significant Digits in Test Data to
Determine Conformance with Specifications
1.1 This specification covers the highest quality of round
E45 Test Methods for Determining the Inclusion Content of
and shaped chromium-silicon and chromium-silicon-vanadium
Steel
alloys of steel valve spring wire, uniform in quality and temper,
2.2 European Standard:
intended for the manufacture of valve springs and other springs
requiring high-fatigue properties when used at moderately EN 10270-2 Steel Wire for Mechanical Springs Part 2:
Oil-Hardened and Tempered Spring Steel Wire of Unal-
elevated temperatures. It is similar to the grade VD (referenced
in EN 10270-2) intended for high fatigue levels. This wire shall loyed and Alloyed Steels.
be either in the annealed and cold-drawn or quenched and
tempered condition as specified by purchaser. 3. Ordering Information
3.1 It shall be the responsibility of the purchaser to specify
1.2 The values stated in either SI units or inch-pound units
are to be regarded separately as standard. The values stated in all requirements that are necessary for material under this
specification. Such requirements are permitted to include, but
each system may not be exact equivalents; therefore, each
system shall be used independently of the other. Combining are not limited to the following:
3.1.1 Quantity (mass),
values from the two systems may result in non-conformance
with the standard. 3.1.2 Name of material (chromium-silicon alloy steel valve
spring quality wire),
1.3 This international standard was developed in accor-
3.1.3 Dimensions (Table 1 and Section 8),
dance with internationally recognized principles on standard-
3.1.4 Condition (Section 6),
ization established in the Decision on Principles for the
3.1.5 Packaging (Section 14),
Development of International Standards, Guides and Recom-
3.1.6 Heat analysis report, if requested (5.2),
mendations issued by the World Trade Organization Technical
3.1.7 Certification or test report, or both, if specified (Sec-
Barriers to Trade (TBT) Committee.
tion 13), and
2. Referenced Documents
3.1.8 ASTM designation and year of issue.
2.1 ASTM Standards:
NOTE 1—A typical ordering description is as follows: 20 000 kg
A370 Test Methods and Definitions for Mechanical Testing
quenched and tempered chromium-silicon alloy steel valve spring quality
wire, size 6.00 mm in 150 kg coils to A877/A877M dated ___, or for
of Steel Products
inch-pound units, 40 000 lb quenched and tempered chromium-silicon
A700 Guide for Packaging, Marking, and Loading Methods
alloy steel valve spring quality wire, size 0.250 in. in 350 lb coils to
for Steel Products for Shipment
A877/A877M dated ___ .
A751 Test Methods and Practices for Chemical Analysis of
Steel Products
4. Materials and Manufacture
E8/E8M Test Methods for Tension Testing of Metallic Ma-
4.1 The steel shall be made by a steel making process
terials
combined with secondary ladle refining that is capable of
satisfying the inclusion content requirements of this specifica-
This specification is under the jurisdiction of ASTM Committee A01 on Steel,
tion.
Stainless Steel and Related Alloys and is the direct responsibility of Subcommittee
A01.03 on Steel Rod and Wire.
4.2 The steel shall be continuously cast into blooms and
Current edition approved Sept. 1, 2023. Published September 2023. Originally
rolled into billets.
approved in 1987. Last previous edition approved in 2017 as A877/A877M – 17.
DOI: 10.1520/A0877_A0877M-17R23.
For referenced ASTM standards, visit the ASTM website, www.astm.org, or
contact ASTM Customer Service at service@astm.org. For Annual Book of ASTM
Standards volume information, refer to the standard’s Document Summary page on Available from European Committee for Standardization, Rue de Stassart 36,
the ASTM website. B-1050 Brussels, Belgium.
Copyright © ASTM International, 100 Barr Harbor Drive, PO Box C700, West Conshohocken, PA 19428-2959. United States
A877/A877M − 17 (2023)
A
TABLE 1 Permissible Variations in Wire Diameter
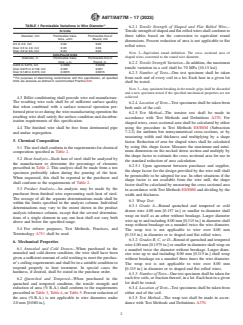
6.2.1 Tensile Strength of Shaped and Flat Rolled Wire—
SI Units
Tensile strength of shaped and flat rolled wires shall conform to
Diameter, mm Permissible Varia- Permissible Out-of
these tables based on the conversion to equivalent round
tions, ±mm Round, mm
dimensions. Percent reduction of area is not applicable to flat
0.5 to 2.0, incl 0.02 0.02
rolled wires.
Over 2.0 to 4.0, incl 0.03 0.03
Over 4.0 to 9.5, incl 0.04 0.04
NOTE 2—Equivalent round definition: The cross sectional area of
Inch-Pound Units
shaped wires converted to the round wire diameter.
Diameter, in. Permissible Varia- Permissible Out-of
tions, ± in. Round, in.
6.2.2 Tensile Strength Variation—In addition, the maximum
0.020 to 0.075, incl 0.0008 0.0008
tensile variation in a coil shall be 70 MPa [10.15 ksi].
Over 0.075 to 0.148, incl 0.001 0.001
Over 0.148 to 0.375, incl 0.0015 0.0015
6.2.3 Number of Tests—One test specimen shall be taken
A
For purposes of determining conformance with this specification, all specified from each end of every coil in a lot. Each heat in a given lot
limits are absolute as defined in recommended Practice E29.
shall be tested.
NOTE 3—Any specimen breaking in the tensile grips shall be discarded
and a new specimen tested if the specified mechanical properties are not
achieved.
4.3 Billet conditioning shall precede wire rod manufacture.
The resulting wire rods shall be of sufficient surface quality
6.2.4 Location of Tests—Test specimens shall be taken from
that when combined with a surface removal operation per-
both ends of the coil.
formed prior to or during the wire manufacturing operation the
6.2.5 Test Method—The tension test shall be made in
resulting wire shall satisfy the surface condition and decarbur-
accordance with Test Methods and Definitions A370. For
ization requirements of this specification.
shaped wires, cross sectional area shall be calculated by either
4.4 The finished wire shall be free from detrimental pipe using the procedure in Test Methods E8/E8M (Subsection
7.2.2) for uniform but nonsymmetrical cross-sections, or by
and undue segregation.
measuring width and thickness and multiplying by a shape
5. Chemical Composition
factor. Reduction of area for shaped wires shall be calculated
by using this shape factor. Measure the maximum and mini-
5.1 The steel shall conform to the requirements for chemical
mum dimension on the necked down section and multiply by
composition specified in Table 2.
the shape factor to estimate the cross sectional area for use in
5.2 Heat Analysis—Each heat of steel shall be analyzed by
the standard reduction of area calculation.
the manufacturer to determine the percentage of elements
6.2.5.1 Upon agreement between purchaser and supplier,
prescribed in Table 2. This analysis shall be made from a test
the shape factor for the design provided by the wire mill shall
specimen preferably taken during the pouring of the heat.
be permissible to be adopted for use. In other situations if the
When requested, this shall be reported to the purchaser and
shape factor is not available from the wire mill, the shape
shall conform to the requirements of Table 2.
factor shall be calculated by measuring the cross sectional area
5.3 Product Analysis—An analysis may be made by the
in accordance with Test Methods E8/E8M and dividing by the
purchaser from finished wire representing each heat of steel.
width and thickness.
The average of all the separate determinations made shall be
6.3 Wrap Test:
within the limits specified in the analysis column. Individual
6.3.1 Grade A—Round quenched and tempered or cold
determinations may vary to the extent shown in the product
drawn wire 4.00 mm [0.157 in.] or smaller in diameter shall
analysis tolerance column, except that the several determina-
wrap on itself as an arbor without breakage. Larger diameter
tions of a single element in any one heat shall not vary both
wire up to and including 8.00 mm [0.315 in.] in diameter shall
above and below the specified range.
wrap without breakage on a mandrel twice the wire diameter.
5.4 For referee purposes, Test Methods, Practices, and
The wrap test is not applicable to wire over 8.00 mm
Terminology A751 shall be used.
[0.315 in.] in diameter or to shaped and flat rolled wires.
6.3.2 Grades B, C, or D—Round of quenched and tempered
6. Mechanical Properties
wire 4.00 mm [0.1575 in.] or smaller in diameter shall wrap on
6.1 Annealed and Cold Drawn—When purchased in the
a mandrel twice the diameter without breakage. Larger diam-
annealed and cold-drawn condition, the wire shall have been
eter wire up to and including 8.00 mm [0.315 in.] shall wrap
given a sufficient amount of cold working to meet the purchas-
without breakage on a mandrel three times the wire diameter.
er’s coiling requirements and shall be in a suitable condition to
The wrap test is not applicable to wire over 8.00 mm
respond properly to heat treatment. In special cases the
[0.315 in.] in diameter or to shaped and flat rolled wires.
hardness, if desired, shall be stated in the purchase order.
6.3.3 Number of Tests—One test specimen shall be taken for
each five coils, or fraction thereof, in a lot. Each heat in a given
6.2 Quenched and Tempered—When purchased in the
lot shall be tested.
quenched and tempered condition, the tensile strength and
6.3.4 Location of Tests—Test specimens shall be taken from
reduction of area (% R.A.) shall conform to the requirements
either end of the coil.
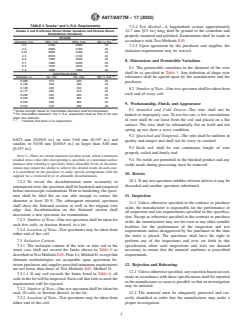
prescribed in Table 3, Table 4, or Table 5. Percent reduction of
the area (% R.A.) is not applicable to wire diameters under 6.3.5 Test Method—The wrap test shall be made in accor-
2.0 mm [0.080 in.]. dance with Test Methods and Definitions A370.
A877/A877M − 17 (2023)
TABLE 2 Chemical Requirements
Analysis, %
Grade C Chrome- Grade D Chrome-
Grade A Chromium- Grade B Chromium- Product Analysis
Silicon-Nickel- Silicon- Molybdenum-
Silicon Silicon-Vanadium Tolerance, %
Vanadium Vanadium
Carbon 0.51–0.59 0.55–0.70 0.50–0.70 0.50–0.70 ±0.02
Manganese 0.50–0.80 0.50–0.80 0.70–1.00 0.30–0.60 ±0.04
Phosphorus 0.025 max 0.025 max 0.020 max 0.020 max ±0.005
Sulfur 0.025 max 0.025 max 0.020 max 0.020 max ±0.005
Silicon 1.20–1.60 1.20–1.65 1.80–2.20 1.80–2.20 ±0.05
A B
Chromium 0.60–0.80 0.50–0.80 0.85–1.05 0.80–1.00 ±0.03 / ±0.05
Vanadium . . . 0.08–0.25 0.05–0.15 0.05–0.15 ±0.02
Nickel . . . . . . 0.20–0.40 . . . ±0.03
Molybdenum . . . . . . . . . 0.05–0.15 ±0.01
A
Product Analysis Tolerance for Grade A and B is ±0.03 %.
B
Product Analysis Tolerance for Grade
...


Questions, Comments and Discussion
Ask us and Technical Secretary will try to provide an answer. You can facilitate discussion about the standard in here.
Loading comments...