ASTM G99-23
(Test Method)Standard Test Method for Wear and Friction Testing with a Pin-on-Disk or Ball-on-Disk Apparatus
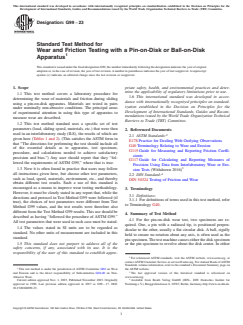
Standard Test Method for Wear and Friction Testing with a Pin-on-Disk or Ball-on-Disk Apparatus
SIGNIFICANCE AND USE
5.1 The amount of wear in any system will, in general, depend upon the number of system factors such as the applied load, machine characteristics, sliding speed, sliding distance, the environment, and the material properties. The value of any wear test method lies in predicting the relative ranking of material combinations. Since the pin-on-disk test method does not attempt to duplicate all the conditions that may be experienced in service (for example, lubrication, load, pressure, contact geometry, removal of wear debris, and presence of corrosive environment), there is no insurance that the test will predict the wear rate of a given material under conditions differing from those in the test.
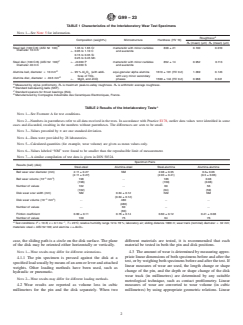
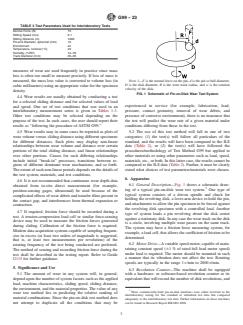
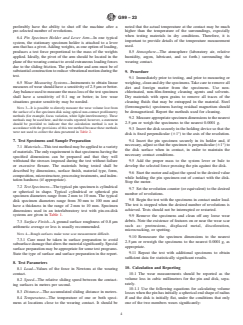
5.2 The use of this test method will fall in one of two categories: (1) the test(s) will follow all particulars of the standard, and the results will have been compared to the ILS data (Table 2), or (2) the test(s) will have followed the procedures/methodology of Test Method G99 but applied to other materials or using other parameters such as load, speed, materials, etc., or both. In this latter case, the results cannot be compared to the ILS data (Table 2). Further, it must be clearly stated what choices of test parameters/materials were chosen.
SCOPE
1.1 This test method covers a laboratory procedure for determining the wear of materials and friction during sliding using a pin-on-disk apparatus. Materials are tested in pairs under nominally non-abrasive conditions. The principal areas of experimental attention in using this type of apparatus to measure wear are described.
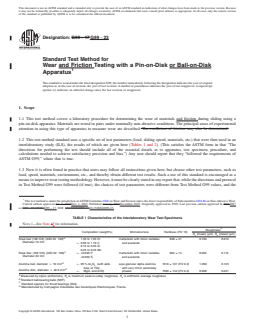
1.2 This test method standard uses a specific set of test parameters (load, sliding speed, materials, etc.) that were then used in an interlaboratory study (ILS), the results of which are given here (Tables 1 and 2). (This satisfies the ASTM form in that “The directions for performing the test should include all of the essential details as to apparatus, test specimen, procedure, and calculations needed to achieve satisfactory precision and bias.”) Any user should report that they “followed the requirements of ASTM G99,” where that is true.
1.3 Now it is often found in practice that users may follow all instructions given here, but choose other test parameters, such as load, speed, materials, environment, etc., and thereby obtain different test results. Such a use of this standard is encouraged as a means to improve wear testing methodology. However, it must be clearly stated in any report that, while the directions and protocol in Test Method G99 were followed (if true), the choices of test parameters were different from Test Method G99 values, and the test results were therefore also different from the Test Method G99 results. This use should be described as having “followed the procedure of ASTM G99.” All test parameters that were used in such case must be stated.
1.4 The values stated in SI units are to be regarded as standard. No other units of measurement are included in this standard.
1.5 This standard does not purport to address all of the safety concerns, if any, associated with its use. It is the responsibility of the user of this standard to establish appropriate safety, health, and environmental practices and determine the applicability of regulatory limitations prior to use.
1.6 This international standard was developed in accordance with internationally recognized principles on standardization established in the Decision on Principles for the Development of International Standards, Guides and Recommendations issued by the World Trade Organization Technical Barriers to Trade (TBT) Committee.
General Information
- Status
- Published
- Publication Date
- 31-Oct-2023
- Technical Committee
- G02 - Wear and Erosion
- Drafting Committee
- G02.40 - Non-Abrasive Wear
Relations
- Effective Date
- 01-Nov-2023
- Effective Date
- 01-Nov-2023
- Effective Date
- 01-Nov-2023
- Effective Date
- 01-Nov-2023
- Effective Date
- 01-Nov-2023
- Effective Date
- 01-Nov-2023
Overview
ASTM G99-23: Standard Test Method for Wear and Friction Testing with a Pin-on-Disk or Ball-on-Disk Apparatus provides a widely recognized laboratory procedure to determine the wear and friction characteristics of material pairs under sliding contact. Using a pin-on-disk or ball-on-disk configuration, this standardized method helps researchers, engineers, and manufacturers evaluate the relative performance of materials under controlled, reproducible, and nominally non-abrasive conditions.
The primary value of ASTM G99-23 is in ranking material combinations for wear resistance and friction behavior, contributing to better material selection and product formulation in applications where sliding contact occurs. Results help guide decisions in product design, quality assurance, and research and development.
Key Topics
- Test Method Principles: The standard outlines a procedure using either a pin or ball pressed against a rotating disk under controlled load, speed, and environment to measure material wear and friction coefficient.
- Test Parameters: Critical variables include applied load, sliding speed, sliding distance, contact geometry, environmental conditions (temperature, humidity, atmosphere), and material properties such as hardness and composition.
- Assessment Metrics: Wear is typically reported as volume loss (in cubic millimetres) for both pin/ball and disk, while the friction coefficient is measured and reported to assess frictional performance during the test.
- Comparability and Flexibility: Users may fully adhere to the standard test parameters, enabling comparison to established interlaboratory study (ILS) data, or adopt the procedures with modified parameters for broader material evaluation-with full disclosure of any deviations in reporting.
- Precision and Reproducibility: The method includes guidance on ensuring repeatability and statistical robustness, referencing interlaboratory test data for standard materials such as steel and alumina.
- Reporting Requirements: Full documentation of test conditions, material properties, surface finish, specimen preparation, and any deviations from the standard parameters is required for transparency and comparability.
Applications
ASTM G99 is used across industries to:
- Evaluate Material Combinations: Assess metals, ceramics, polymers, or composites for comparative wear resistance and friction properties.
- Aid Product Development: Guide the selection of bearing materials, coatings, lubricants, and contact surfaces in automotive, aerospace, medical devices, and industrial machinery.
- Quality Control: Ensure material consistency and performance in high-wear applications.
- Academic and Industrial Research: Establish baseline data on wear and friction for new materials or processes under controlled laboratory conditions.
- Specification Compliance: Demonstrate compliance with procurement or regulatory requirements for wear resistance.
The versatility of the pin-on-disk and ball-on-disk wear testing approach makes ASTM G99 particularly valuable for both routine material screening and advanced tribological research.
Related Standards
- ASTM E178: Practice for Dealing With Outlying Observations-statistical guidance for handling test data.
- ASTM G40: Terminology Relating to Wear and Erosion-provides definitions for terms used.
- ASTM G115: Guide for Measuring and Reporting Friction Coefficients-supplements friction measurement methodology.
- ASTM G117: Guide for Calculating and Reporting Measures of Precision Using Data from Interlaboratory Wear or Erosion Tests.
- DIN 50324: Testing of Friction and Wear-comparable international guidance for friction and wear testing.
Keywords: ASTM G99, wear test, friction test, pin-on-disk, ball-on-disk, materials testing, tribology, wear resistance, friction coefficient, laboratory procedure, material ranking, standard test method.
Buy Documents
ASTM G99-23 - Standard Test Method for Wear and Friction Testing with a Pin-on-Disk or Ball-on-Disk Apparatus
REDLINE ASTM G99-23 - Standard Test Method for Wear and Friction Testing with a Pin-on-Disk or Ball-on-Disk Apparatus
Get Certified
Connect with accredited certification bodies for this standard

BSMI (Bureau of Standards, Metrology and Inspection)
Taiwan's standards and inspection authority.
Sponsored listings
Frequently Asked Questions
ASTM G99-23 is a standard published by ASTM International. Its full title is "Standard Test Method for Wear and Friction Testing with a Pin-on-Disk or Ball-on-Disk Apparatus". This standard covers: SIGNIFICANCE AND USE 5.1 The amount of wear in any system will, in general, depend upon the number of system factors such as the applied load, machine characteristics, sliding speed, sliding distance, the environment, and the material properties. The value of any wear test method lies in predicting the relative ranking of material combinations. Since the pin-on-disk test method does not attempt to duplicate all the conditions that may be experienced in service (for example, lubrication, load, pressure, contact geometry, removal of wear debris, and presence of corrosive environment), there is no insurance that the test will predict the wear rate of a given material under conditions differing from those in the test. 5.2 The use of this test method will fall in one of two categories: (1) the test(s) will follow all particulars of the standard, and the results will have been compared to the ILS data (Table 2), or (2) the test(s) will have followed the procedures/methodology of Test Method G99 but applied to other materials or using other parameters such as load, speed, materials, etc., or both. In this latter case, the results cannot be compared to the ILS data (Table 2). Further, it must be clearly stated what choices of test parameters/materials were chosen. SCOPE 1.1 This test method covers a laboratory procedure for determining the wear of materials and friction during sliding using a pin-on-disk apparatus. Materials are tested in pairs under nominally non-abrasive conditions. The principal areas of experimental attention in using this type of apparatus to measure wear are described. 1.2 This test method standard uses a specific set of test parameters (load, sliding speed, materials, etc.) that were then used in an interlaboratory study (ILS), the results of which are given here (Tables 1 and 2). (This satisfies the ASTM form in that “The directions for performing the test should include all of the essential details as to apparatus, test specimen, procedure, and calculations needed to achieve satisfactory precision and bias.”) Any user should report that they “followed the requirements of ASTM G99,” where that is true. 1.3 Now it is often found in practice that users may follow all instructions given here, but choose other test parameters, such as load, speed, materials, environment, etc., and thereby obtain different test results. Such a use of this standard is encouraged as a means to improve wear testing methodology. However, it must be clearly stated in any report that, while the directions and protocol in Test Method G99 were followed (if true), the choices of test parameters were different from Test Method G99 values, and the test results were therefore also different from the Test Method G99 results. This use should be described as having “followed the procedure of ASTM G99.” All test parameters that were used in such case must be stated. 1.4 The values stated in SI units are to be regarded as standard. No other units of measurement are included in this standard. 1.5 This standard does not purport to address all of the safety concerns, if any, associated with its use. It is the responsibility of the user of this standard to establish appropriate safety, health, and environmental practices and determine the applicability of regulatory limitations prior to use. 1.6 This international standard was developed in accordance with internationally recognized principles on standardization established in the Decision on Principles for the Development of International Standards, Guides and Recommendations issued by the World Trade Organization Technical Barriers to Trade (TBT) Committee.
SIGNIFICANCE AND USE 5.1 The amount of wear in any system will, in general, depend upon the number of system factors such as the applied load, machine characteristics, sliding speed, sliding distance, the environment, and the material properties. The value of any wear test method lies in predicting the relative ranking of material combinations. Since the pin-on-disk test method does not attempt to duplicate all the conditions that may be experienced in service (for example, lubrication, load, pressure, contact geometry, removal of wear debris, and presence of corrosive environment), there is no insurance that the test will predict the wear rate of a given material under conditions differing from those in the test. 5.2 The use of this test method will fall in one of two categories: (1) the test(s) will follow all particulars of the standard, and the results will have been compared to the ILS data (Table 2), or (2) the test(s) will have followed the procedures/methodology of Test Method G99 but applied to other materials or using other parameters such as load, speed, materials, etc., or both. In this latter case, the results cannot be compared to the ILS data (Table 2). Further, it must be clearly stated what choices of test parameters/materials were chosen. SCOPE 1.1 This test method covers a laboratory procedure for determining the wear of materials and friction during sliding using a pin-on-disk apparatus. Materials are tested in pairs under nominally non-abrasive conditions. The principal areas of experimental attention in using this type of apparatus to measure wear are described. 1.2 This test method standard uses a specific set of test parameters (load, sliding speed, materials, etc.) that were then used in an interlaboratory study (ILS), the results of which are given here (Tables 1 and 2). (This satisfies the ASTM form in that “The directions for performing the test should include all of the essential details as to apparatus, test specimen, procedure, and calculations needed to achieve satisfactory precision and bias.”) Any user should report that they “followed the requirements of ASTM G99,” where that is true. 1.3 Now it is often found in practice that users may follow all instructions given here, but choose other test parameters, such as load, speed, materials, environment, etc., and thereby obtain different test results. Such a use of this standard is encouraged as a means to improve wear testing methodology. However, it must be clearly stated in any report that, while the directions and protocol in Test Method G99 were followed (if true), the choices of test parameters were different from Test Method G99 values, and the test results were therefore also different from the Test Method G99 results. This use should be described as having “followed the procedure of ASTM G99.” All test parameters that were used in such case must be stated. 1.4 The values stated in SI units are to be regarded as standard. No other units of measurement are included in this standard. 1.5 This standard does not purport to address all of the safety concerns, if any, associated with its use. It is the responsibility of the user of this standard to establish appropriate safety, health, and environmental practices and determine the applicability of regulatory limitations prior to use. 1.6 This international standard was developed in accordance with internationally recognized principles on standardization established in the Decision on Principles for the Development of International Standards, Guides and Recommendations issued by the World Trade Organization Technical Barriers to Trade (TBT) Committee.
ASTM G99-23 is classified under the following ICS (International Classification for Standards) categories: 17.040.20 - Properties of surfaces. The ICS classification helps identify the subject area and facilitates finding related standards.
ASTM G99-23 has the following relationships with other standards: It is inter standard links to ASTM G99-17, ASTM G115-10(2018), ASTM G133-22, ASTM G132-96(2018), ASTM D7027-20, ASTM G204-21. Understanding these relationships helps ensure you are using the most current and applicable version of the standard.
ASTM G99-23 is available in PDF format for immediate download after purchase. The document can be added to your cart and obtained through the secure checkout process. Digital delivery ensures instant access to the complete standard document.
Standards Content (Sample)
This international standard was developed in accordance with internationally recognized principles on standardization established in the Decision on Principles for the
Development of International Standards, Guides and Recommendations issued by the World Trade Organization Technical Barriers to Trade (TBT) Committee.
Designation: G99 − 23
Standard Test Method for
Wear and Friction Testing with a Pin-on-Disk or Ball-on-Disk
Apparatus
This standard is issued under the fixed designation G99; the number immediately following the designation indicates the year of original
adoption or, in the case of revision, the year of last revision. A number in parentheses indicates the year of last reapproval. A superscript
epsilon (´) indicates an editorial change since the last revision or reapproval.
1. Scope priate safety, health, and environmental practices and deter-
mine the applicability of regulatory limitations prior to use.
1.1 This test method covers a laboratory procedure for
1.6 This international standard was developed in accor-
determining the wear of materials and friction during sliding
dance with internationally recognized principles on standard-
using a pin-on-disk apparatus. Materials are tested in pairs
ization established in the Decision on Principles for the
under nominally non-abrasive conditions. The principal areas
Development of International Standards, Guides and Recom-
of experimental attention in using this type of apparatus to
mendations issued by the World Trade Organization Technical
measure wear are described.
Barriers to Trade (TBT) Committee.
1.2 This test method standard uses a specific set of test
parameters (load, sliding speed, materials, etc.) that were then
2. Referenced Documents
used in an interlaboratory study (ILS), the results of which are
2.1 ASTM Standards:
given here (Tables 1 and 2). (This satisfies the ASTM form in
E178 Practice for Dealing With Outlying Observations
that “The directions for performing the test should include all
G40 Terminology Relating to Wear and Erosion
of the essential details as to apparatus, test specimen,
G115 Guide for Measuring and Reporting Friction Coeffi-
procedure, and calculations needed to achieve satisfactory
cients
precision and bias.”) Any user should report that they “fol-
G117 Guide for Calculating and Reporting Measures of
lowed the requirements of ASTM G99,” where that is true.
Precision Using Data from Interlaboratory Wear or Ero-
1.3 Now it is often found in practice that users may follow
sion Tests (Withdrawn 2016)
all instructions given here, but choose other test parameters, 4
2.2 DIN Standard:
such as load, speed, materials, environment, etc., and thereby
DIN 50324 Testing of Friction and Wear
obtain different test results. Such a use of this standard is
encouraged as a means to improve wear testing methodology.
3. Terminology
However, it must be clearly stated in any report that, while the
3.1 Definitions:
directions and protocol in Test Method G99 were followed (if
3.1.1 For definitions of terms used in this test method, refer
true), the choices of test parameters were different from Test
to Terminology G40.
Method G99 values, and the test results were therefore also
different from the Test Method G99 results. This use should be
4. Summary of Test Method
described as having “followed the procedure of ASTM G99.”
4.1 For the pin-on-disk wear test, two specimens are re-
All test parameters that were used in such case must be stated.
quired. One, a pin with a radiused tip, is positioned perpen-
1.4 The values stated in SI units are to be regarded as
dicular to the other, usually a flat circular disk. A ball, rigidly
standard. No other units of measurement are included in this
held to ensure no rotation about any axis, is often used as the
standard.
pin specimen. The test machine causes either the disk specimen
1.5 This standard does not purport to address all of the
or the pin specimen to revolve about the disk center. In either
safety concerns, if any, associated with its use. It is the
responsibility of the user of this standard to establish appro-
For referenced ASTM standards, visit the ASTM website, www.astm.org, or
contact ASTM Customer Service at service@astm.org. For Annual Book of ASTM
Standards volume information, refer to the standard’s Document Summary page on
This test method is under the jurisdiction of ASTM Committee G02 on Wear the ASTM website.
and Erosion and is the direct responsibility of Subcommittee G02.40 on Non- The last approved version of this historical standard is referenced on
Abrasive Wear. www.astm.org.
Current edition approved Nov. 1, 2023. Published November 2023. Originally Available from Beuth Verlag GmbH (DIN-- DIN Deutsches Institut fur
approved in 1990. Last previous edition approved in 2017 as G99 – 17. DOI: Normung e.V.), Burggrafenstrasse 6, 10787, Berlin, Germany, http://www.en.din.de.
10.1520/G0099-23.
Copyright © ASTM International, 100 Barr Harbor Drive, PO Box C700, West Conshohocken, PA 19428-2959. United States
G99 − 23
TABLE 1 Characteristics of the Interlaboratory Wear Test Specimens
NOTE 1—See Note 5 for information.
A
Roughness
Composition (weight%) Microstructure Hardness (HV 10)
R (mean) (μm) R (mean) (μm)
z a
B
Steel ball (100 Cr6) (AISI 52 100) 1.35 to 1.65 Cr martensitic with minor carbides 838 ± 21 0.100 0.010
Diameter 10 mm
← 0.95 to 1.10 C and austenite
0.15 to 0.35 Si
0.25 to 0.45 Mn
C
Steel disc (100 Cr6) (AISI 52 100) ← <0.030 P martensitic with minor carbides 852 ± 14 0.952 0.113
Diameter 40 mm
<0.030 S and austenite
D
Alumina ball, diameter = 10 mm ← 95 % Al O (with addi- equi-granular alpha alumina 1610 ± 101 (HV 0.2) 1.369 0.123
2 3
tives of TiO , with very minor secondary
D
Alumina disc, diameter = 40.6 mm
← MgO, and ZnO) phases 1599 ± 144 (HV 0.2) 0.968 0.041
A
Measured by stylus profilometry. R is maximum peak-to-valley roughness. R is arithmetic average roughness.
z a
B
Standard ball-bearing balls (SKF).
C
Standard spacers for thrust bearings (INA).
D
Manufactured by Compagnie Industrielle des Ceramiques Electroniques, France.
A
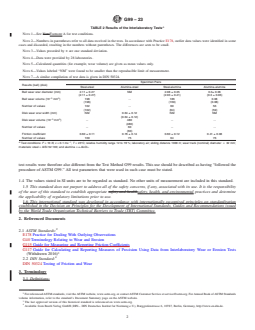
TABLE 2 Results of the Interlaboratory Tests
NOTE 1—See Footnote A for test conditions.
NOTE 2—Numbers in parentheses refer to all data received in the tests. In accordance with Practice E178, outlier data values were identified in some
cases and discarded, resulting in the numbers without parentheses. The differences are seen to be small.
NOTE 3—Values preceded by ± are one standard deviation.
NOTE 4—Data were provided by 28 laboratories.
NOTE 5—Calculated quantities (for example, wear volume) are given as mean values only.
NOTE 6—Values labeled “NM” were found to be smaller than the reproducible limit of measurement.
NOTE 7—A similar compilation of test data is given in DIN 50324.
Specimen Pairs
Results (ball) (disk)
Steel-steel Alumina-steel Steel-alumina Alumina-alumina
Ball wear scar diameter (mm) 2.11 ± 0.27 NM 2.08 ± 0.35 0.3± 0.06
(2.11 ± 0.27) (2.03 ± 0.41) (0.3 ± 0.06)
−3 3
Ball wear volume (10 mm ) 198 . 186 0.08
(198) (169) (0.08)
Number of values 102 . 60 56
(102) (64) (59)
Disk wear scar width (mm) NM 0.64 ± 0.12 NM NM
(0.64 ± 0.12)
−3 3
Disk wear volume (10 mm ) . 480 . .
(480)
Number of values . 60 . .
(60)
Friction coefficient 0.60 ± 0.11 0.76 ± 0.14 0.60 ± 0.12 0.41 ± 0.08
Number of values 109 75 64 76
A −1
Test conditions: F = 10 N; v = 0.1 ms , T = 23°C; relative humidity range 12 to 78 %; laboratory air; sliding distance 1000 m; wear track (nominal) diameter = 32 mm;
materials: steel = AISI 52 100; and alumina = α-Al O .
2 3
case, the sliding path is a circle on the disk surface. The plane different materials are tested, it is recommended that each
of the disk may be oriented either horizontally or vertically. material be tested in both the pin and disk positions.
NOTE 1—Wear results may differ for different orientations. 4.3 The amount of wear is determined by measuring appro-
priate linear dimensions of both specimens before and after the
4.1.1 The pin specimen is pressed against the disk at a
test, or by weighing both specimens before and after the test. If
specified load usually by means of an arm or lever and attached
linear measures of wear are used, the length change or shape
weights. Other loading methods have been used, such as
change of the pin, and the depth or shape change of the disk
hydraulic or pneumatic.
wear track (in millimetres) are determined by any suitable
NOTE 2—Wear results may differ for different loading methods.
metrological technique, such as contact profilometry. Linear
4.2 Wear results are reported as volume loss in cubic measures of wear are converted to wear volume (in cubic
millimetres for the pin and the disk separately. When two millimetres) by using appropriate geometric relations. Linear
G99 − 23
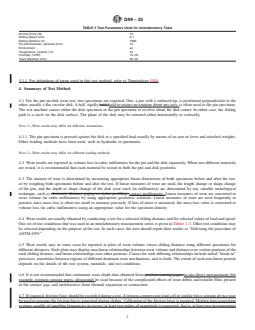
TABLE 3 Test Parameters Used for Interlaboratory Tests
Normal Force (N) 10
Sliding Speed (m/s) 0.1
Sliding Distance (m) 1000
Pin-end Diameter, spherical (mm) 10
Environment air
Temperature, nominal (°C) 23
Humidity, (%RH) 12–78
Track Diameter (mm) 25–35
measures of wear are used frequently in practice since mass
loss is often too small to measure precisely. If loss of mass is
measured, the mass loss value is converted to volume loss (in
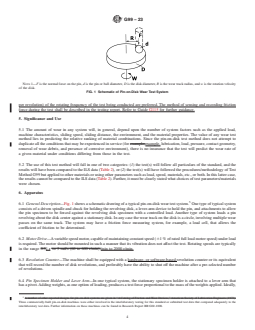
NOTE 1—F is the normal force on the pin, d is the pin or ball diameter,
D is the disk diameter, R is the wear track radius, and w is the rotation
cubic millimetres) using an appropriate value for the specimen
velocity of the disk.
density.
FIG. 1 Schematic of Pin-on-Disk Wear Test System
4.4 Wear results are usually obtained by conducting a test
for a selected sliding distance and for selected values of load
and speed. One set of test conditions that was used in an experienced in service (for example, lubrication, load,
interlaboratory measurement series is given in Tables 1-3. pressure, contact geometry, removal of wear debris, and
Other test conditions may be selected depending on the presence of corrosive environment), there is no insurance that
the test will predict the wear rate of a given material under
purpose of the test. In such cases, the user should report their
results as “following the procedure of ASTM G99.” conditions differing from those in the test.
5.2 The use of this test method will fall in one of two
4.5 Wear results may in some cases be reported as plots of
wear volume versus sliding distance using different specimens categories: (1) the test(s) will follow all particulars of the
standard, and the results will have been compared to the ILS
for different distances. Such plots may display non-linear
relationships between wear volume and distance over certain data (Table 2), or (2) the test(s) will have followed the
procedures/methodology of Test Method G99 but applied to
portions of the total sliding distance, and linear relationships
over other portions. Causes for such differing relationships other materials or using other parameters such as load, speed,
include initial “break-in” processes, transitions between re- materials, etc., or both. In this latter case, the results cannot be
gions of different dominant wear mechanisms, and so forth. compared to the ILS data (Table 2). Further, it must be clearly
The extent of such non-linear periods depends on the details of stated what choices of test parameters/materials were chosen.
the test system, materials, and test conditions.
6. Apparatus
4.6 It is not recommended that continuous wear depth data
6.1 General Description—Fig. 1 shows a schematic draw-
obtained from in-situ direct measurement (for example,
ing of a typical pin-on-disk wear test system. One type of
position-sensing gages, ultrasound) be used because of the
typical system consists of a driven spindle and chuck for
complicated effects of wear debris and transfer films present in
holding the revolving disk, a lever-arm device to hold the pin,
the contact gap, and interferences from thermal expansion or
and attachments to allow the pin specimen to be forced against
contraction.
the revolving disk specimen with a controlled load. Another
4.7 If required, friction force should be recorded during a
type of system loads a pin revolving about the disk center
test. A tension-compression load cell or similar force-sensing
against a stationary disk. In any case the wear track on the disk
device may be used to measure the friction forces generated
is a circle, involving multiple wear passes on the same track.
during sliding. Calibration of the friction force is required.
The system may have a friction force measuring system, for
Modern data acquisition systems capable of sampling frequen-
example, a load cell, that allows the coefficient of friction to be
cies in excess (at least two orders of magnitude is suggested,
determined.
that is, at least two measurements per revolution) of the
6.2 Motor Drive—A variable speed motor, capable of main-
rotating frequency of the test being conducted are preferred.
taining constant speed (61 % of rated full load motor speed)
The method of sensing and recording friction force during the
under load is required. The motor should be mounted in such
test shall be described in the testing report. Refer to Guide
a manner that its vibration does not affect the test. Rotating
G115 for further guidance.
speeds are typically in the range 1 r ⁄min to 2000 r/min.
5. Significance and Use
6.3 Revolution Counter—The machine shall be equipped
5.1 The amount of wear in any system will, in general,
with a hardware- or software-based revolution counter or its
depend upon the number of system factors such as the applied equivalent that will record the number of disk revolutions, and
load, machine characteristics, sliding speed, sliding distance,
the environment, and the material properties. The value of any
Three commercially-built pin-on-disk machines were either involved in the
wear test method lies in predicting the relative ranking of
interlaboratory testing for this standard or submitted test data that compared
material combinations. Since the pin-on-disk test method does
adequately to the interlaboratory
...
This document is not an ASTM standard and is intended only to provide the user of an ASTM standard an indication of what changes have been made to the previous version. Because
it may not be technically possible to adequately depict all changes accurately, ASTM recommends that users consult prior editions as appropriate. In all cases only the current version
of the standard as published by ASTM is to be considered the official document.
Designation: G99 − 17 G99 − 23
Standard Test Method for
Wear and Friction Testing with a Pin-on-Disk or Ball-on-Disk
Apparatus
This standard is issued under the fixed designation G99; the number immediately following the designation indicates the year of original
adoption or, in the case of revision, the year of last revision. A number in parentheses indicates the year of last reapproval. A superscript
epsilon (´) indicates an editorial change since the last revision or reapproval.
1. Scope
1.1 This test method covers a laboratory procedure for determining the wear of materials and friction during sliding using a
pin-on-disk apparatus. Materials are tested in pairs under nominally non-abrasive conditions. The principal areas of experimental
attention in using this type of apparatus to measure wear are described. The coefficient of friction may also be determined.
1.2 This test method standard uses a specific set of test parameters (load, sliding speed, materials, etc.) that were then used in an
interlaboratory study (ILS), the results of which are given here (Tables 1 and 2). (This satisfies the ASTM form in that “The
directions for performing the test should include all of the essential details as to apparatus, test specimen, procedure, and
calculations needed to achieve satisfactory precision and bias.”) Any user should report that they “followed the requirements of
ASTM G99,” where that is true.
1.3 Now it is often found in practice that users may follow all instructions given here, but choose other test parameters, such as
load, speed, materials, environment, etc., and thereby obtain different test results. Such a use of this standard is encouraged as a
means to improve wear testing methodology. However, it must be clearly stated in any report that, while the directions and protocol
in Test Method G99 were followed (if true), the choices of test parameters were different from Test Method G99 values, and the
This test method is under the jurisdiction of ASTM Committee G02 on Wear and Erosion and is the direct responsibility of Subcommittee G02.40 on Non-Abrasive Wear.
Current edition approved Jan. 1, 2017Nov. 1, 2023. Published January 2017November 2023. Originally approved in 1990. Last previous edition approved in 20162017
as G99 – 05 (2016).G99 – 17. DOI: 10.1520/G0099-17.10.1520/G0099-23.
TABLE 1 Characteristics of the Interlaboratory Wear Test Specimens
NOTE 1—See Note 45 for information.
A
Roughness
Composition (weight%) Microstructure Hardness (HV 10)
R (mean) (μm) R (mean) (μm)
z a
B
Steel ball (100 Cr6) (AISI 52 100) 1.35 to 1.65 Cr martensitic with minor carbides 838 ± 21 0.100 0.010
Diameter 10 mm
← 0.95 to 1.10 C and austenite
0.15 to 0.35 Si
0.25 to 0.45 Mn
C
Steel disc (100 Cr6) (AISI 52 100) ← <0.030 P martensitic with minor carbides 852 ± 14 0.952 0.113
Diameter 40 mm
<0.030 S and austenite
D
Alumina ball, diameter = 10 mm ← 95 % Al O (with addi- equi-granular alpha alumina 1610 ± 101 (HV 0.2) 1.369 0.123
2 3
tives of TiO , with very minor secondary
D
Alumina disc, diameter = 40.6 mm
← MgO, and ZnO) phases 1599 ± 144 (HV 0.2) 0.968 0.041
A
Measured by stylus profilometry. R is maximum peak-to-valley roughness. R is arithmetic average roughness.
z a
B
Standard ball-bearing balls (SKF).
C
Standard spacers for thrust bearings (INA).
D
Manufactured by Compagnie Industrielle des Ceramiques Electroniques, France.
Copyright © ASTM International, 100 Barr Harbor Drive, PO Box C700, West Conshohocken, PA 19428-2959. United States
G99 − 23
A
TABLE 2 Results of the Interlaboratory Tests
NOTE 1—See NoteFootnote A for test conditions.
NOTE 2—Numbers in parentheses refer to all data received in the tests. In accordance with Practice E178, outlier data values were identified in some
cases and discarded, resulting in the numbers without parentheses. The differences are seen to be small.
NOTE 3—Values preceded by ± are one standard deviation.
NOTE 4—Data were provided by 28 laboratories.
NOTE 5—Calculated quantities (for example, wear volume) are given as mean values only.
NOTE 6—Values labeled “NM” were found to be smaller than the reproducible limit of measurement.
NOTE 7—A similar compilation of test data is given in DIN 50324.
Specimen Pairs
Results (ball) (disk)
Steel-steel Alumina-steel Steel-alumina Alumina-alumina
Ball wear scar diameter (mm) 2.11 ± 0.27 NM 2.08 ± 0.35 0.3± 0.06
(2.11 ± 0.27) (2.03 ± 0.41) (0.3 ± 0.06)
−3 3
Ball wear volume (10 mm ) 198 . 186 0.08
(198) (169) (0.08)
Number of values 102 . 60 56
(102) (64) (59)
Disk wear scar width (mm) NM 0.64 ± 0.12 NM NM
(0.64 ± 0.12)
−3 3
Disk wear volume (10 mm ) . 480 . .
(480)
Number of values . 60 . .
(60)
Friction coefficient 0.60 ± 0.11 0.76 ± 0.14 0.60 ± 0.12 0.41 ± 0.08
Number of values 109 75 64 76
A −1
Test conditions: F = 10 N; v = 0.1 ms , T = 23°C; relative humidity range 12 to 78 %; laboratory air; sliding distance 1000 m; wear track (nominal) diameter = 32 mm;
materials: steel = AISI 52 100; and alumina = α-Al O .
2 3
test results were therefore also different from the Test Method G99 results. This use should be described as having “followed the
procedure of ASTM G99.” All test parameters that were used in such case must be stated.
1.4 The values stated in SI units are to be regarded as standard. No other units of measurement are included in this standard.
1.5 This standard does not purport to address all of the safety concerns, if any, associated with its use. It is the responsibility
of the user of this standard to establish appropriate safety and healthsafety, health, and environmental practices and determine
the applicability of regulatory limitations prior to use.
1.6 This international standard was developed in accordance with internationally recognized principles on standardization
established in the Decision on Principles for the Development of International Standards, Guides and Recommendations issued
by the World Trade Organization Technical Barriers to Trade (TBT) Committee.
2. Referenced Documents
2.1 ASTM Standards:
E178 Practice for Dealing With Outlying Observations
G40 Terminology Relating to Wear and Erosion
G115 Guide for Measuring and Reporting Friction Coefficients
G117 Guide for Calculating and Reporting Measures of Precision Using Data from Interlaboratory Wear or Erosion Tests
(Withdrawn 2016)
2.2 DIN Standard:
DIN 50324 Testing of Friction and Wear
3. Terminology
3.1 Definitions:
For referenced ASTM standards, visit the ASTM website, www.astm.org, or contact ASTM Customer Service at service@astm.org. For Annual Book of ASTM Standards
volume information, refer to the standard’s Document Summary page on the ASTM website.
The last approved version of this historical standard is referenced on www.astm.org.
Available from Beuth Verlag GmbH (DIN-- DIN Deutsches Institut fur Normung e.V.), Burggrafenstrasse 6, 10787, Berlin, Germany, http://www.en.din.de.
G99 − 23
TABLE 3 Test Parameters Used for Interlaboratory Tests
Normal Force (N) 10
Sliding Speed (m/s) 0.1
Sliding Distance (m) 1000
Pin-end Diameter, spherical (mm) 10
Environment air
Temperature, nominal (°C) 23
Humidity, (%RH) 12–78
Track Diameter (mm) 25–35
3.1.1 For definitions of terms used in this test method, refer to Terminology G40.
4. Summary of Test Method
4.1 For the pin-on-disk wear test, two specimens are required. One, a pin with a radiused tip, is positioned perpendicular to the
other, usually a flat circular disk. A ball, rigidly held, held to ensure no rotation about any axis, is often used as the pin specimen.
The test machine causes either the disk specimen or the pin specimen to revolve about the disk center. In either case, the sliding
path is a circle on the disk surface. The plane of the disk may be oriented either horizontally or vertically.
NOTE 1—Wear results may differ for different orientations.
4.1.1 The pin specimen is pressed against the disk at a specified load usually by means of an arm or lever and attached weights.
Other loading methods have been used, such as hydraulic or pneumatic.
NOTE 2—Wear results may differ for different loading methods.
4.2 Wear results are reported as volume loss in cubic millimetres for the pin and the disk separately. When two different materials
are tested, it is recommended that each material be tested in both the pin and disk positions.
4.3 The amount of wear is determined by measuring appropriate linear dimensions of both specimens before and after the test,
or by weighing both specimens before and after the test. If linear measures of wear are used, the length change or shape change
of the pin, and the depth or shape change of the disk wear track (in millimetres) are determined by any suitable metrological
technique, such as electronic distance gaging or stylus profiling. contact profilometry. Linear measures of wear are converted to
wear volume (in cubic millimetres) by using appropriate geometric relations. Linear measures of wear are used frequently in
practice since mass loss is often too small to measure precisely. If loss of mass is measured, the mass loss value is converted to
volume loss (in cubic millimetres) using an appropriate value for the specimen density.
4.4 Wear results are usually obtained by conducting a test for a selected sliding distance and for selected values of load and speed.
One set of test conditions that was used in an interlaboratory measurement series is given in Tables 1-3. Other test conditions may
be selected depending on the purpose of the test. In such cases, the user should report their results as “following the procedure of
ASTM G99.”
4.5 Wear results may in some cases be reported as plots of wear volume versus sliding distance using different specimens for
different distances. Such plots may display non-linear relationships between wear volume and distance over certain portions of the
total sliding distance, and linear relationships over other portions. Causes for such differing relationships include initial “break-in”
processes, transitions between regions of different dominant wear mechanisms, and so forth. The extent of such non-linear periods
depends on the details of the test system, materials, and test conditions.
4.6 It is not recommended that continuous wear depth data obtained from position-sensing gages in-situ direct measurement (for
example, position-sensing gages, ultrasound) be used because of the complicated effects of wear debris and transfer films present
in the contact gap, and interferences from thermal expansion or contraction.
4.7 If required, friction force should be recorded during a test. A tension-compression load cell or similar force-sensing device may
be used to measure the friction forces generated during sliding. Calibration of the friction force is required. Modern data acquisition
systems capable of sampling frequencies in excess (at least two orders of magnitude is suggested, that is, at least two measurements
G99 − 23
NOTE 1—F is the normal force on the pin, d is the pin or ball diameter, D is the disk diameter, R is the wear track radius, and w is the rotation velocity
of the disk.
FIG. 1 Schematic of Pin-on-Disk Wear Test System
per revolution) of the rotating frequency of the test being conducted are preferred. The method of sensing and recording friction
force during the test shall be described in the testing report. Refer to Guide G115 for further guidance.
5. Significance and Use
5.1 The amount of wear in any system will, in general, depend upon the number of system factors such as the applied load,
machine characteristics, sliding speed, sliding distance, the environment, and the material properties. The value of any wear test
method lies in predicting the relative ranking of material combinations. Since the pin-on-disk test method does not attempt to
duplicate all the conditions that may be experienced in service (for example;example, lubrication, load, pressure, contact geometry,
removal of wear debris, and presence of corrosive environment), there is no insurance that the test will predict the wear rate of
a given material under conditions differing from those in the test.
5.2 The use of this test method will fall in one of two categories: (1) the test(s) will follow all particulars of the standard, and the
results will have been compared to the ILS data (Table 2), or (2) the test(s) will have followed the procedures/methodology of Test
Method G99 but applied to other materials or using other parameters such as load, speed, materials, etc., or both. In this latter case,
the results cannot be compared to the ILS data (Table 2). Further, it must be clearly stated what choices of test parameters/materials
were chosen.
6. Apparatus
6.1 General Description—Fig. 1 shows a schematic drawing of a typical pin-on-disk wear test system. One type of typical system
consists of a driven spindle and chuck for holding the revolving disk, a lever-arm device to hold the pin, and attachments to allow
the pin specimen to be forced against the revolving disk specimen with a controlled load. Another type of system loads a pin
revolving about the disk center against a stationary disk. In any case the wear track on the disk is a circle, involving multiple wear
passes on the same track. The system may have a friction force measuring system, for example, a load cell, that allows the
coefficient of friction to be determined.
6.2 Motor Drive—A variable speed motor, capable of maintaining constant speed (61 % of rated full load motor speed) under load
is required. The motor should be mounted in such a manner that its vibration does not affect the test. Rotating speeds are typically
in the range 0.31 r to 3 rad/s (60 to 600 r/min).⁄min to 2000 r/min.
6.3 Revolution Counter—The machine shall be equipped with a hardware- or software-based revolution counter or its equivalent
that will record the number of disk revolutions, and preferably have the ability to shut off the machine after a pre-selected number
of revolutions.
6.4 Pin
...
Questions, Comments and Discussion
Ask us and Technical Secretary will try to provide an answer. You can facilitate discussion about the standard in here.
Loading comments...