ASTM B762-90(2010)
(Test Method)Standard Test Method of Variables Sampling of Metallic and Inorganic Coatings
Standard Test Method of Variables Sampling of Metallic and Inorganic Coatings
SIGNIFICANCE AND USE
Sampling inspection permits the estimation of the overall quality of a group of product articles through the inspection of a relatively small number of product articles drawn from the group.
The specification of a sampling plan provides purchasers and sellers a means of identifying the minimum quality level that is considered to be satisfactory.
Because sampling plans yield estimates of the quality of a product, the results of the inspection are subject to error. Through the selection of a sampling plan, the potential error is known and controlled.
Sampling inspection is used when a decision must be made about what to do with a quantity of articles. This quantity may be a shipment from a supplier, articles that are ready for a subsequent manufacturing operation, or articles ready for shipment to a customer.
In sampling inspection, a relatively small number of articles (the sample) is selected randomly from a larger number of articles (the inspection lot); the sample is inspected for conformance to the requirements placed on the articles. Based on the results, a decision is made whether or not the lot conforms to the requirements.
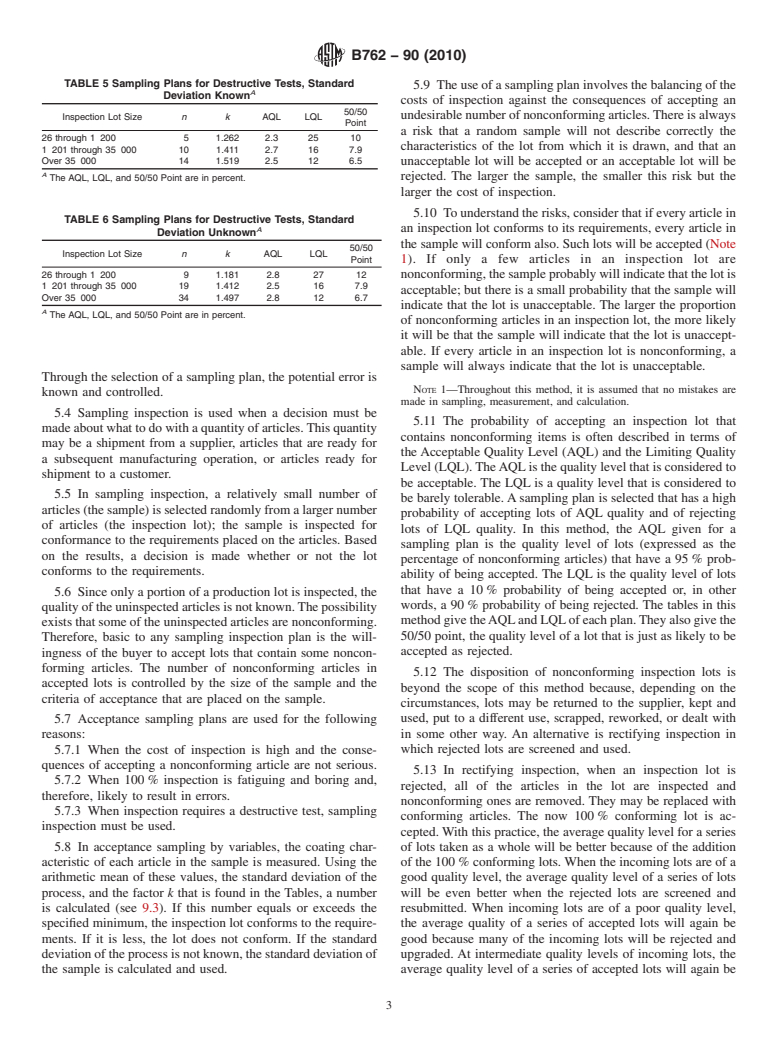
Since only a portion of a production lot is inspected, the quality of the uninspected articles is not known. The possibility exists that some of the uninspected articles are nonconforming. Therefore, basic to any sampling inspection plan is the willingness of the buyer to accept lots that contain some nonconforming articles. The number of nonconforming articles in accepted lots is controlled by the size of the sample and the criteria of acceptance that are placed on the sample.
Acceptance sampling plans are used for the following reasons:
When the cost of inspection is high and the consequences of accepting a nonconforming article are not serious.
When 100 % inspection is fatiguing and boring and, therefore, likely to result in errors.
When inspection requires a destructive test, sampling inspection must be used.
In acc...
SCOPE
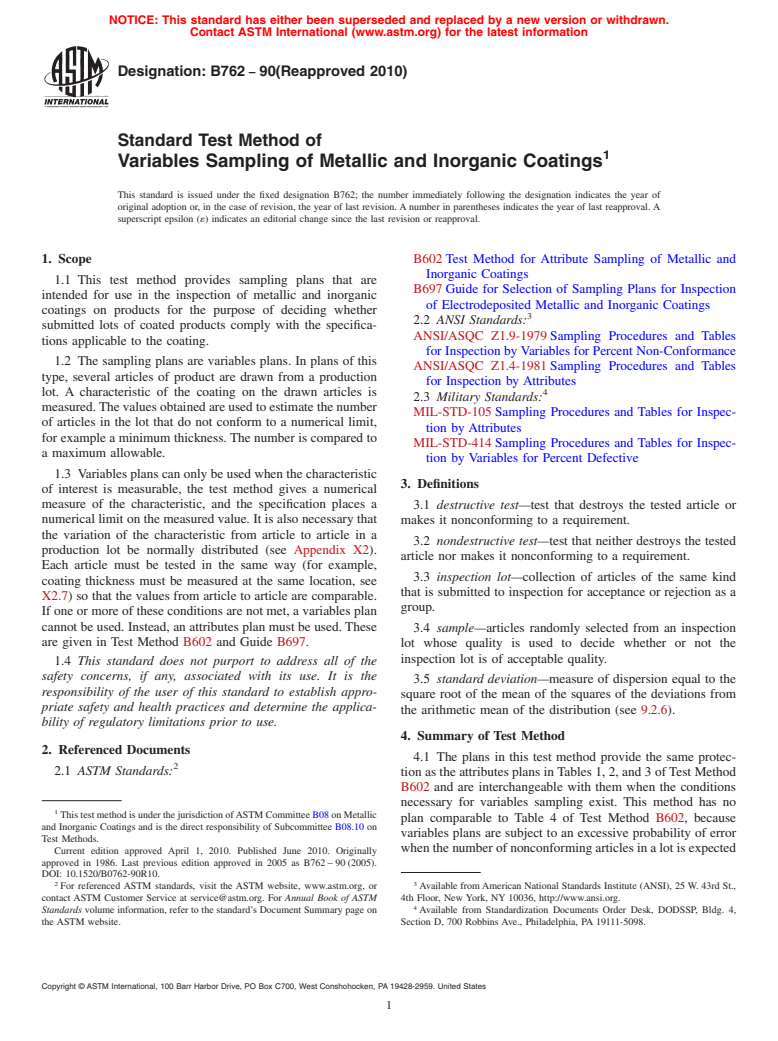
1.1 This test method provides sampling plans that are intended for use in the inspection of metallic and inorganic coatings on products for the purpose of deciding whether submitted lots of coated products comply with the specifications applicable to the coating.
1.2 The sampling plans are variables plans. In plans of this type, several articles of product are drawn from a production lot. A characteristic of the coating on the drawn articles is measured. The values obtained are used to estimate the number of articles in the lot that do not conform to a numerical limit, for example a minimum thickness. The number is compared to a maximum allowable.
1.3 Variables plans can only be used when the characteristic of interest is measurable, the test method gives a numerical measure of the characteristic, and the specification places a numerical limit on the measured value. It is also necessary that the variation of the characteristic from article to article in a production lot be normally distributed (see Appendix X2). Each article must be tested in the same way (for example, coating thickness must be measured at the same location, see X2.7) so that the values from article to article are comparable. If one or more of these conditions are not met, a variables plan cannot be used. Instead, an attributes plan must be used. These are given in Test Method B602 and Guide B697.
1.4 This standard does not purport to address all of the safety concerns, if any, associated with its use. It is the responsibility of the user of this standard to establish appropriate safety and health practices and determine the applicability of regulatory limitations prior to use.
General Information
Relations
Standards Content (Sample)
NOTICE: This standard has either been superseded and replaced by a new version or withdrawn.
Contact ASTM International (www.astm.org) for the latest information
Designation: B762 − 90(Reapproved 2010)
Standard Test Method of
1
Variables Sampling of Metallic and Inorganic Coatings
This standard is issued under the fixed designation B762; the number immediately following the designation indicates the year of
original adoption or, in the case of revision, the year of last revision. A number in parentheses indicates the year of last reapproval. A
superscript epsilon (´) indicates an editorial change since the last revision or reapproval.
1. Scope B602 Test Method for Attribute Sampling of Metallic and
Inorganic Coatings
1.1 This test method provides sampling plans that are
B697 Guide for Selection of Sampling Plans for Inspection
intended for use in the inspection of metallic and inorganic
of Electrodeposited Metallic and Inorganic Coatings
coatings on products for the purpose of deciding whether
3
2.2 ANSI Standards:
submitted lots of coated products comply with the specifica-
ANSI/ASQC Z1.9-1979 Sampling Procedures and Tables
tions applicable to the coating.
for Inspection by Variables for Percent Non-Conformance
1.2 The sampling plans are variables plans. In plans of this
ANSI/ASQC Z1.4-1981 Sampling Procedures and Tables
type, several articles of product are drawn from a production
for Inspection by Attributes
4
lot. A characteristic of the coating on the drawn articles is
2.3 Military Standards:
measured.Thevaluesobtainedareusedtoestimatethenumber
MIL-STD-105 Sampling Procedures and Tables for Inspec-
of articles in the lot that do not conform to a numerical limit,
tion by Attributes
for example a minimum thickness. The number is compared to
MIL-STD-414 Sampling Procedures and Tables for Inspec-
a maximum allowable.
tion by Variables for Percent Defective
1.3 Variables plans can only be used when the characteristic
3. Definitions
of interest is measurable, the test method gives a numerical
measure of the characteristic, and the specification places a
3.1 destructive test—test that destroys the tested article or
numerical limit on the measured value. It is also necessary that makes it nonconforming to a requirement.
the variation of the characteristic from article to article in a
3.2 nondestructive test—test that neither destroys the tested
production lot be normally distributed (see Appendix X2).
article nor makes it nonconforming to a requirement.
Each article must be tested in the same way (for example,
3.3 inspection lot—collection of articles of the same kind
coating thickness must be measured at the same location, see
that is submitted to inspection for acceptance or rejection as a
X2.7) so that the values from article to article are comparable.
group.
If one or more of these conditions are not met, a variables plan
cannot be used. Instead, an attributes plan must be used. These
3.4 sample—articles randomly selected from an inspection
are given in Test Method B602 and Guide B697.
lot whose quality is used to decide whether or not the
inspection lot is of acceptable quality.
1.4 This standard does not purport to address all of the
safety concerns, if any, associated with its use. It is the
3.5 standard deviation—measure of dispersion equal to the
responsibility of the user of this standard to establish appro-
square root of the mean of the squares of the deviations from
priate safety and health practices and determine the applica-
the arithmetic mean of the distribution (see 9.2.6).
bility of regulatory limitations prior to use.
4. Summary of Test Method
2. Referenced Documents
4.1 The plans in this test method provide the same protec-
2
2.1 ASTM Standards:
tion as the attributes plans inTables 1, 2, and 3 ofTest Method
B602 and are interchangeable with them when the conditions
necessary for variables sampling exist. This method has no
1
ThistestmethodisunderthejurisdictionofASTMCommitteeB08onMetallic
plan comparable to Table 4 of Test Method B602, because
and Inorganic Coatings and is the direct responsibility of Subcommittee B08.10 on
variables plans are subject to an excessive probability of error
Test Methods.
whenthenumberofnonconformingarticlesinalotisexpected
Current edition approved April 1, 2010. Published June 2010. Originally
approved in 1986. Last previous edition approved in 2005 as B762 – 90 (2005).
DOI: 10.1520/B0762-90R10.
2 3
For referenced ASTM standards, visit the ASTM website, www.astm.org, or Available fromAmerican National Standards Institute (ANSI), 25 W. 43rd St.,
contact ASTM Customer Service at service@astm.org. For Annual Book of ASTM 4th Floor, New York, NY 10036, http://www.ansi.org.
4
Standards volume information, refer to the standard’s Document Summary page on Available from Standardization Documents Order Desk, DODSSP, Bldg. 4,
the ASTM website. Section D, 700 Robbins Ave., Philadelphia, PA 19111-5098.
Copyright © ASTM International, 100 Barr Harbor Drive, PO Box C700, We
...


Questions, Comments and Discussion
Ask us and Technical Secretary will try to provide an answer. You can facilitate discussion about the standard in here.