ASTM A987-07
(Practice)Standard Practice for Measuring Shape Characteristics of Tin Mill Products
Standard Practice for Measuring Shape Characteristics of Tin Mill Products
SIGNIFICANCE AND USE
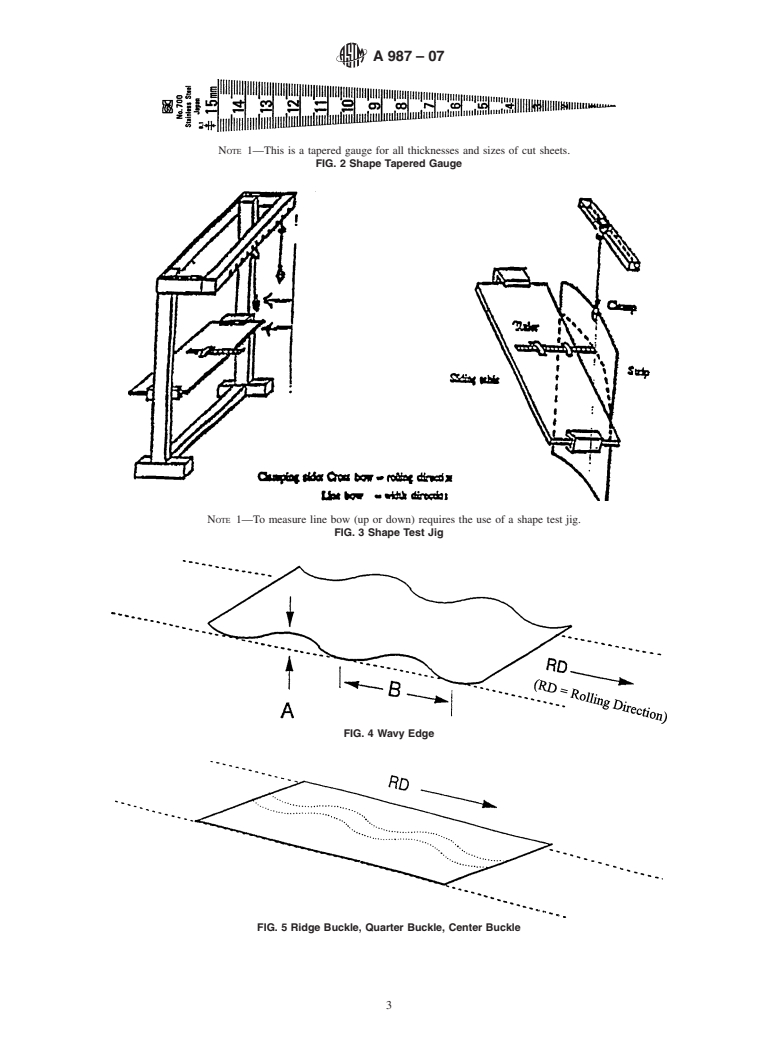
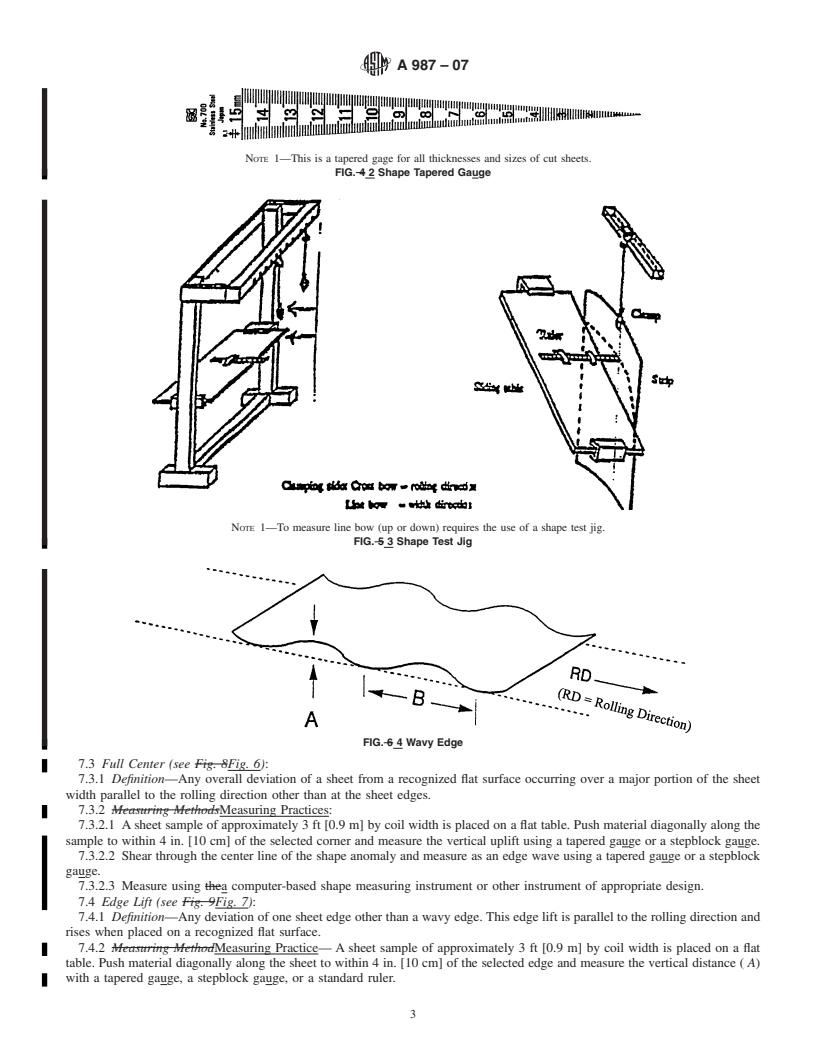
4.1 The definitions and procedures for measuring shape characteristics of tin mill products are provided so that purchasers and suppliers have common measuring procedures and definitions of shape characteristics. These procedures provide definitions and measuring techniques of shape characteristics. The intention of these definitions and measuring practices is not to provide a dimensional specification for shape characteristics, but rather common procedure(s) for quantifying shape anomalies.
SCOPE
1.1 Shape is a significant quality characteristic for tin mill products. Plate-shape is affected by mill process factors plus the temper, thickness and width of the material supplied. It is the purpose of this practice to define accurately the different plate shape characteristics and to describe the practice(s) most commonly used to measure particular characteristics.
1.2 Quantitative limits are not addressed and should be established on an individual producer and user basis, where appropriate.
1.3 This standard does not purport to address the safety concerns, if any, associated with its use. It is the responsibility of the user of this standard to establish appropriate safety and health practices and to determine the applicability of regulatory limitations prior to use.
General Information
Relations
Buy Standard
Standards Content (Sample)
NOTICE: This standard has either been superseded and replaced by a new version or withdrawn.
Contact ASTM International (www.astm.org) for the latest information
Designation:A987–07
Standard Practice for
1
Measuring Shape Characteristics of Tin Mill Products
This standard is issued under the fixed designation A 987; the number immediately following the designation indicates the year of
original adoption or, in the case of revision, the year of last revision. A number in parentheses indicates the year of last reapproval. A
superscript epsilon (e) indicates an editorial change since the last revision or reapproval.
1. Scope* A 650/A 650M Specification for Tin Mill Products, Black
Plate, Double Reduced
1.1 Shape is a significant quality characteristic for tin mill
A 657/A 657M Specification for Tin Mill Products, Black
products. Plate-shape is affected by mill process factors plus
Plate Electrolytic Chromium-Coated, Single and Double
the temper, thickness and width of the material supplied. It is
Reduced
the purpose of this practice to define accurately the different
plate shape characteristics and to describe the practice(s) most
3. Classification
commonly used to measure particular characteristics.
3.1 The substrate shall conform to all the requirements of
1.2 Quantitative limits are not addressed and should be
the appropriate specifications as follows: SpecificationsA 623,
established on an individual producer and user basis, where
A 623M, A 599/A 599M, A 624/A 624M, A 625/A 625M,
appropriate.
A 626/A 626M, A 650/A 650M, and A 657.
1.3 This standard does not purport to address the safety
concerns, if any, associated with its use. It is the responsibility
4. Significance and Use
of the user of this standard to establish appropriate safety and
4.1 The definitions and procedures for measuring shape
health practices and to determine the applicability of regula-
characteristics of tin mill products are provided so that pur-
tory limitations prior to use.
chasers and suppliers have common measuring procedures and
2. Referenced Documents definitions of shape characteristics. These procedures provide
2 definitions and measuring techniques of shape characteristics.
2.1 ASTM Standards:
The intention of these definitions and measuring practices is
A 599/A 599M Specification forTin Mill Products, Electro-
not to provide a dimensional specification for shape character-
lytic Tin-Coated, Cold-Rolled Sheet
istics, but rather common procedure(s) for quantifying shape
A 623 SpecificationforTinMillProducts,GeneralRequire-
anomalies.
ments
A 623M Specification for Tin Mill Products, General Re-
5. Interferences
quirements [Metric]
5.1 Measurementofshapeoftenhasbeensubjective,atbest.
A 624/A 624M Specification forTin Mill Products, Electro-
Successful measurement of various shape anomalies on quan-
lytic Tin Plate, Single Reduced
titative terms requires recognition of several factors that can
A 625/A 625M Specification for Tin Mill Products, Black
interfere with accurate measurements.
Plate, Single-Reduced
5.1.1 Flat surfaces are required. Measurement of several
A 626/A 626M Specification forTin Mill Products, Electro-
anomalies require laying of the sample on a flat surface. A
lytic Tin Plate, Double Reduced
machined flat surface is recommended. Laying a sample on a
floor may introduce error due to areas on a floor that are not
flat.
1
This practice is under the jurisdiction of ASTM Committee A01 on Steel,
5.1.2 Several anomalies are measured by hanging the sheet.
Stainless Steel and Related Alloys and is the direct responsibility of Subcommittee
Hanging by holding the sample with a hand can introduce error
A01.20 on Tin Mill Products.
from pressures exerted by fingers. A mechanical single device
Current edition approved Nov. 1, 2007. Published December 2007. Originally
approved in 1998. Last previous edition approved in 2005 as A 987 - 05.
clamp to help hold these samples is recommended.
2
For referenced ASTM standards, visit the ASTM website, www.astm.org, or
5.1.3 Stepblock gauges or tapered gauges should be
contact ASTM Customer Service at service@astm.org. For Annual Book of ASTM
checked regularly with a calibrated hand micrometer. Wear or
Standards volume information, refer to the standard’s Document Summary page on
the ASTM website. dirt build up could affect accuracy.
*A Summary of Changes section appears at the end of this standard.
Copyright © ASTM International, 100 Barr Harbor Drive, PO Box C700, West Conshohocken, PA 19428-2959, United States.
1
---------------------- Page: 1 ----------------------
A987–07
5.1.4 Computer-basedshapemeasuringinstrumentsmustbe 7.2.1 Definition—These buckles are continuous deviations
clean and the sensors must be in good condition. The sheet from a recognized flat surface occurring usually in narrow
sample must be damage free. width areas parallel to the rolling direction other than at the
sheet edges.
6. Apparatus
7.2.2 Measuring Practices:
6.1 Appropriate tools to measure shape anomalies are de-
7.2.2.1
...
This document is not an ASTM standard and is intended only to provide the user of an ASTM standard an indication of what changes have been made to the previous version. Because
it may not be technically possible to adequately depict all changes accurately, ASTM recommends that users consult prior editions as appropriate. In all cases only the current version
of the standard as published by ASTM is to be considered the official document.
Designation:A987–05
Standard Test Method for Designation:A987–07
Standard Practice for
1
Measuring Shape Characteristics of Tin Mill Products
This standard is issued under the fixed designation A 987; the number immediately following the designation indicates the year of
original adoption or, in the case of revision, the year of last revision. A number in parentheses indicates the year of last reapproval. A
superscript epsilon (e) indicates an editorial change since the last revision or reapproval.
1. Scope*
1.1 Shape is a significant quality characteristic for tin mill products. Plate-shape is affected by mill process factors plus the
temper, thickness and width of the material supplied. It is the purpose of this test method practice to define accurately the different
plate shape characteristics and to describe the method(s)practice(s) most commonly used to measure particular characteristics.
1.2 Quantitative limits are not addressed and should be established on an individual producer and user basis, where appropriate.
1.3 This standard does not purport to address the safety concerns, if any, associated with its use. It is the responsibility of the
user of this standard to establish appropriate safety and health practices and to determine the applicability of regulatory
limitations prior to use.
2. Referenced Documents
2
2.1 ASTM Standards:
A 599/A 599M Specification for Tin Mill Products, Electrolytic Tin Coated, Cold-Rolled Sheet Specification for Tin Mill
Products, Electrolytic Tin-Coated, Cold-Rolled Sheet
A 623 Specification for Tin Mill Products, General Requirements
A 623M Specification for Tin Mill Products, General Requirements [Metric]
A 624/A 624M Specification for Tin Mill Products, Electrolytic Tin Plate, Single Reduced
A 625/A 625M Specification for Tin Mill Products, Black Plate, Single Reduced Specification for Tin Mill Products, Black
Plate, Single-Reduced
A 626/A 626M Specification for Tin Mill Products, Electrolytic Tin Plate, Double Reduced
A 650/A 650M Specification for Tin Mill Products, Black Plate, Double Reduced
A 657/A 657M Specification for Tin Mill Products, Black Plate Electrolytic Chromium-Coated, Single and Double Reduced
3. Classification
3.1 The substrate shall conform to all the requirements of the appropriate specifications as follows: Specifications A 623,
A 623M, A 599/A 599M, A 624/A 624M, A 625/A 625M, A 626/A 626M, A 650/A 650M, and A 657.
4. Significance and Use
4.1 The definitions and procedures for measuring shape characteristics of tin mill products are provided so that purchasers and
suppliers have common measuring procedures and definitions of shape characteristics. These procedures provide definitions and
measuring techniques of shape characteristics. The intention of these definitions and measuring methodspractices is not to provide
a dimensional specification for shape characteristics, but rather common procedure(s) for quantifying shape anomalies.
5. Interferences
5.1 Measurement of shape often has been subjective, at best. Successful measurement of various shape anomalies on
quantitative terms requires recognition of several factors that can interfere with accurate measurements.
5.1.1 Flat surfaces are required. Measurement of several anomalies require laying of the sample on a flat surface. A machined
1
This test method practice is under the jurisdiction of ASTM Committee A01 on Steel, Stainless Steel,Steel and Related Alloys and is the direct responsibility of
Subcommittee A01.20 on Tin Mill Products.
Current edition approved MarchNov. 1, 2005.2007. Published March 2005.December 2007. Originally approved in 1998. Last previous edition approved in 20002005 as
A 987 - 005.
2
For referencedASTM standards, visit theASTM website, www.astm.org, or contactASTM Customer Service at service@astm.org. For Annual Book of ASTM Standards
volume information, refer to the standard’s Document Summary page on the ASTM website.
*A Summary of Changes section appears at the end of this standard.
Copyright © ASTM International, 100 Barr Harbor Drive, PO Box C700, West Conshohocken, PA 19428-2959, United States.
1
---------------------- Page: 1 ----------------------
A987–07
flat surface is recommended. Laying a sample on a floor may introduce error due to areas on a floor that are not flat.
5.1.2 Several anomalies are measured by hanging the sheet. Hanging by holding the sample with a hand can introduce error
from pressures exerted by fingers. A mechanical single device clamp to help hold these samples is recommended.
5.1.3 Stepblock gauges or tapered gauges should
...


Questions, Comments and Discussion
Ask us and Technical Secretary will try to provide an answer. You can facilitate discussion about the standard in here.