ASTM E2001-18
(Guide)Standard Guide for Resonant Ultrasound Spectroscopy for Defect Detection in Both Metallic and Non-metallic Parts
Standard Guide for Resonant Ultrasound Spectroscopy for Defect Detection in Both Metallic and Non-metallic Parts
SIGNIFICANCE AND USE
5.1 The primary advantage of RUS is its ability of making numerous measurements in a single test. In addition, it can examine rough ground parts. It requires little sample preparation, no couplants, and generally will work with soiled items; however, it has limited capability with soft materials. Soft metals, polymers, rubbers, and wood parts must be considered on a case by case basis.
SCOPE
1.1 This guide describes a procedure for detecting defects in metallic and non-metallic parts using the resonant ultrasound spectroscopy method. The procedure is intended for use with instruments capable of exciting and recording whole body resonant states within parts which exhibit acoustical or ultrasonic ringing. It is used to distinguish acceptable parts from those containing defects, such as cracks, voids, chips, density defects, tempering changes, and dimensional variations that are closely correlated with the parts' mechanical system dynamic response.
1.2 The values stated in SI units are to be regarded as standard. No other units of measurement are included in this standard.
1.3 This standard does not purport to address all of the safety concerns, if any, associated with its use. It is the responsibility of the user of this standard to establish appropriate safety, health, and environmental practices and determine the applicability of regulatory limitations prior to use.
1.4 This international standard was developed in accordance with internationally recognized principles on standardization established in the Decision on Principles for the Development of International Standards, Guides and Recommendations issued by the World Trade Organization Technical Barriers to Trade (TBT) Committee.
General Information
- Status
- Published
- Publication Date
- 31-Oct-2018
- Technical Committee
- E07 - Nondestructive Testing
- Drafting Committee
- E07.06 - Ultrasonic Method
Relations
- Effective Date
- 01-Nov-2018
- Effective Date
- 01-Feb-2024
- Effective Date
- 01-Dec-2019
- Effective Date
- 01-Mar-2019
- Effective Date
- 01-Jan-2018
- Effective Date
- 15-Jun-2017
- Effective Date
- 01-Feb-2017
- Effective Date
- 01-Aug-2016
- Effective Date
- 01-Feb-2016
- Effective Date
- 01-Dec-2015
- Effective Date
- 01-Sep-2015
- Effective Date
- 01-Jun-2014
- Effective Date
- 01-Jun-2014
- Effective Date
- 01-Dec-2013
- Effective Date
- 15-Jun-2013
Overview
ASTM E2001-18: Standard Guide for Resonant Ultrasound Spectroscopy (RUS) for Defect Detection in Both Metallic and Non-metallic Parts provides comprehensive guidance for utilizing resonant ultrasound spectroscopy as a nondestructive testing (NDT) technique. The standard is developed by ASTM International and aims to ensure reliable defect detection in a variety of manufactured components, particularly where rapid, quantitative, and non-invasive evaluation is necessary.
RUS operates by exciting and recording whole-body resonant states in a part, relying on how mechanical vibrations are altered in the presence of flaws or material variations. This guide is significant for industries seeking to sort parts for cracks, voids, density anomalies, tempering issues, and dimensional inconsistencies efficiently and accurately.
Key Topics
Defect Detection: RUS is capable of detecting various defects, including:
- Cracks and chips
- Voids and inclusions
- Density and dimensional variations
- Heat-treatment changes and hardness inconsistencies
Testing Versatility: RUS stands out for requiring minimal sample preparation, no couplants, and the ability to examine soiled or rough-finished items. However, its effectiveness can be limited with soft materials-compatibility with soft metals, polymers, rubbers, or wood needs individual assessment.
Modes of Operation:
- Swept Sine Method: Excites the part over a range of frequencies and analyzes the resonance amplitude response spectrum.
- Impulse Excitation Method: Simultaneously stimulates multiple resonances via a mechanical or electromagnetic impact; frequently used for rapid broadband analysis.
Resonance Analysis: The testing process measures shifts, splits, or changes in resonance frequencies and patterns, which correlate with the presence and type of defect.
Statistical and Automated Evaluation: RUS enables rapid data collection and can be fully automated, with computer algorithms making conclusive pass/fail decisions, reducing human judgment variability.
Applications
Resonant ultrasound spectroscopy is widely implemented for:
- Production Quality Assurance: Rapid, full-body examinations enable manufacturers to screen every part for structural integrity without destructive testing, crucial in automotive, aerospace, and electronics sectors.
- Process Monitoring: RUS data support root-cause analysis and process optimization by providing real-time feedback during manufacturing operations.
- Dimensional Measurements: Beyond general defect detection, RUS can quantify parameters such as weight, thickness, length, and density-particularly valuable for ceramics and powder-metals.
- Material Characterization: RUS helps in assessing elastic properties, detecting phase and magnetic transitions, and evaluating suitability for critical applications where mechanical property variations must be tightly controlled.
- Statistical Process Control: Archival and analysis of RUS data facilitate ongoing evaluation of production trends and early detection of deviations.
Related Standards
ASTM E2001-18 references and aligns with several related standards, broadening its context within the nondestructive evaluation ecosystem:
- ASTM E1316: Terminology for Nondestructive Examinations
- ASTM E1876: Test Method for Dynamic Young’s Modulus, Shear Modulus, and Poisson’s Ratio by Impulse Excitation of Vibration
- ASTM E2534: Practice for Process Compensated Resonance Testing Via Swept Sine Input
- ASTM E3081: Practice for Outlier Screening Using Process Compensated Resonance Testing
- Other relevant ultrasonic and acoustic resonance standards for specific materials and applications
Practical Value
Adopting ASTM E2001-18 ensures that organizations:
- Improve defect detection rates while minimizing false positives and negatives.
- Achieve 100% inspection coverage at high throughput, cutting down waste and rework.
- Reduce dependence on destructive tests and manual inspections.
- Enhance their quality systems in line with internationally accepted standardization principles.
By embedding resonant ultrasound spectroscopy as guided by ASTM E2001-18, industries reinforce compliance, reliability, and operational excellence in nondestructive testing of metallic and non-metallic components.
Buy Documents
ASTM E2001-18 - Standard Guide for Resonant Ultrasound Spectroscopy for Defect Detection in Both Metallic and Non-metallic Parts
REDLINE ASTM E2001-18 - Standard Guide for Resonant Ultrasound Spectroscopy for Defect Detection in Both Metallic and Non-metallic Parts
Get Certified
Connect with accredited certification bodies for this standard

IMP NDT d.o.o.
Non-destructive testing services. Radiography, ultrasonic, magnetic particle, penetrant, visual inspection.

Inštitut za kovinske materiale in tehnologije
Institute of Metals and Technology. Materials testing, metallurgical analysis, NDT.

Q Techna d.o.o.
NDT and quality assurance specialist. 30+ years experience. NDT personnel certification per ISO 9712, nuclear and thermal power plant inspections, QA/
Sponsored listings
Frequently Asked Questions
ASTM E2001-18 is a guide published by ASTM International. Its full title is "Standard Guide for Resonant Ultrasound Spectroscopy for Defect Detection in Both Metallic and Non-metallic Parts". This standard covers: SIGNIFICANCE AND USE 5.1 The primary advantage of RUS is its ability of making numerous measurements in a single test. In addition, it can examine rough ground parts. It requires little sample preparation, no couplants, and generally will work with soiled items; however, it has limited capability with soft materials. Soft metals, polymers, rubbers, and wood parts must be considered on a case by case basis. SCOPE 1.1 This guide describes a procedure for detecting defects in metallic and non-metallic parts using the resonant ultrasound spectroscopy method. The procedure is intended for use with instruments capable of exciting and recording whole body resonant states within parts which exhibit acoustical or ultrasonic ringing. It is used to distinguish acceptable parts from those containing defects, such as cracks, voids, chips, density defects, tempering changes, and dimensional variations that are closely correlated with the parts' mechanical system dynamic response. 1.2 The values stated in SI units are to be regarded as standard. No other units of measurement are included in this standard. 1.3 This standard does not purport to address all of the safety concerns, if any, associated with its use. It is the responsibility of the user of this standard to establish appropriate safety, health, and environmental practices and determine the applicability of regulatory limitations prior to use. 1.4 This international standard was developed in accordance with internationally recognized principles on standardization established in the Decision on Principles for the Development of International Standards, Guides and Recommendations issued by the World Trade Organization Technical Barriers to Trade (TBT) Committee.
SIGNIFICANCE AND USE 5.1 The primary advantage of RUS is its ability of making numerous measurements in a single test. In addition, it can examine rough ground parts. It requires little sample preparation, no couplants, and generally will work with soiled items; however, it has limited capability with soft materials. Soft metals, polymers, rubbers, and wood parts must be considered on a case by case basis. SCOPE 1.1 This guide describes a procedure for detecting defects in metallic and non-metallic parts using the resonant ultrasound spectroscopy method. The procedure is intended for use with instruments capable of exciting and recording whole body resonant states within parts which exhibit acoustical or ultrasonic ringing. It is used to distinguish acceptable parts from those containing defects, such as cracks, voids, chips, density defects, tempering changes, and dimensional variations that are closely correlated with the parts' mechanical system dynamic response. 1.2 The values stated in SI units are to be regarded as standard. No other units of measurement are included in this standard. 1.3 This standard does not purport to address all of the safety concerns, if any, associated with its use. It is the responsibility of the user of this standard to establish appropriate safety, health, and environmental practices and determine the applicability of regulatory limitations prior to use. 1.4 This international standard was developed in accordance with internationally recognized principles on standardization established in the Decision on Principles for the Development of International Standards, Guides and Recommendations issued by the World Trade Organization Technical Barriers to Trade (TBT) Committee.
ASTM E2001-18 is classified under the following ICS (International Classification for Standards) categories: 19.100 - Non-destructive testing. The ICS classification helps identify the subject area and facilitates finding related standards.
ASTM E2001-18 has the following relationships with other standards: It is inter standard links to ASTM E2001-13, ASTM E1316-24, ASTM E1316-19b, ASTM E1316-19, ASTM E1316-18, ASTM E1316-17a, ASTM E1316-17, ASTM E1316-16a, ASTM E1316-16, ASTM E1316-15a, ASTM E1316-15, ASTM E1316-14e1, ASTM E1316-14, ASTM E1316-13d, ASTM E1316-13c. Understanding these relationships helps ensure you are using the most current and applicable version of the standard.
ASTM E2001-18 is available in PDF format for immediate download after purchase. The document can be added to your cart and obtained through the secure checkout process. Digital delivery ensures instant access to the complete standard document.
Standards Content (Sample)
This international standard was developed in accordance with internationally recognized principles on standardization established in the Decision on Principles for the
Development of International Standards, Guides and Recommendations issued by the World Trade Organization Technical Barriers to Trade (TBT) Committee.
Designation: E2001 − 18
Standard Guide for
Resonant Ultrasound Spectroscopy for Defect Detection in
Both Metallic and Non-metallic Parts
This standard is issued under the fixed designation E2001; the number immediately following the designation indicates the year of
original adoption or, in the case of revision, the year of last revision.Anumber in parentheses indicates the year of last reapproval.A
superscript epsilon (´) indicates an editorial change since the last revision or reapproval.
1. Scope* E2534PracticeforProcessCompensatedResonanceTesting
Via Swept Sine Input for Metallic and Non-Metallic Parts
1.1 Thisguidedescribesaprocedurefordetectingdefectsin
E3081Practice for Outlier Screening Using Process Com-
metallic and non-metallic parts using the resonant ultrasound
pensated Resonance Testing via Swept Sine Input for
spectroscopy method. The procedure is intended for use with
Metallic and Non-Metallic Parts
instruments capable of exciting and recording whole body
resonant states within parts which exhibit acoustical or ultra-
3. Terminology
sonic ringing. It is used to distinguish acceptable parts from
3.1 Definitions—Thedefinitionsoftermsrelatingtoconven-
those containing defects, such as cracks, voids, chips, density
tional ultrasonics can be found in Terminology E1316.
defects,temperingchanges,anddimensionalvariationsthatare
closely correlated with the parts’ mechanical system dynamic
3.2 Definitions of Terms Specific to This Standard:
response.
3.2.1 resonant ultrasonic spectroscopy (RUS), n—a nonde-
structive examination method, which employs resonant ultra-
1.2 The values stated in SI units are to be regarded as
sound methodology for the detection and assessment of varia-
standard. No other units of measurement are included in this
tions and mechanical properties of a test object. In this
standard.
procedure, whereby a rigid part is caused to resonate, the
1.3 This standard does not purport to address all of the
resonances are compared to a previously defined resonance
safety concerns, if any, associated with its use. It is the
pattern.Basedonthiscomparisonthepartisjudgedtobeeither
responsibility of the user of this standard to establish appro-
acceptable or unacceptable.
priate safety, health, and environmental practices and deter-
3.2.2 swept sine method, n—the use of an excitation source
mine the applicability of regulatory limitations prior to use.
to create a transient vibration in a test object over a range of
1.4 This international standard was developed in accor-
frequencies. Specifically, the input frequency is swept over a
dance with internationally recognized principles on standard-
range of frequencies and the output is characterized by a
ization established in the Decision on Principles for the
resonant amplitude response spectrum.
Development of International Standards, Guides and Recom-
mendations issued by the World Trade Organization Technical
3.2.3 impulse excitation method, n—striking an object with
Barriers to Trade (TBT) Committee.
a mechanical impact, or electromagnetic field (laser and/or
Electromagnetic Acoustic Transducer (EMAT)) causing mul-
2. Referenced Documents
tiple resonances to be simultaneously stimulated.
2.1 ASTM Standards:
3.2.4 resonant inspection (RI), n—any induced resonant
E1316Terminology for Nondestructive Examinations
nondestructive examination method employing an excitation
E1876Test Method for Dynamic Young’s Modulus, Shear
force to create mechanical resonances for the purpose of
Modulus, and Poisson’s Ratio by Impulse Excitation of
identifying a test object’s conformity to an established accept-
Vibration
able pattern.
4. Summary of the Technology (1)
This guide is under the jurisdiction of ASTM Committee E07 on Nondestruc-
4.1 Introduction:
tive Testing and is the direct responsibility of Subcommittee E07.06 on Ultrasonic
4.1.1 In addition to its basic research applications in
Method.
Current edition approved Nov. 1, 2018. Published November 2018. Originally
physics, materials science, and geophysics, Resonant Ultra-
approved in 1998. Last previous edition approved in 2013 as E2001-13. DOI:
sound Spectroscopy (RUS) has been used successfully as an
10.1520/E2001-18.
For referenced ASTM standards, visit the ASTM website, www.astm.org, or
contact ASTM Customer Service at service@astm.org. For Annual Book of ASTM
Standards volume information, refer to the standard’s Document Summary page on Theboldfacenumbersinparenthesesrefertothelistofreferencesattheendof
the ASTM website. this guide.
*A Summary of Changes section appears at the end of this standard
Copyright © ASTM International, 100 Barr Harbor Drive, PO Box C700, West Conshohocken, PA 19428-2959. United States
E2001 − 18
applied nondestructive testing tool. Resonant ultrasound spec- studiesinultrasonicattenuation,modulusdeterminations,ther-
troscopy in commercial, nondestructive testing has a few modynamic properties, structural phase transitions, supercon-
recognizable names including, RUS Nondestructive Testing, ducting transitions, magnetic transitions, and the electronic
AcousticResonanceSpectroscopy(ARS),ResonantInspection properties of solids.Acompendium of these applications may
(RI) and Process Compensated Resonance Testing (PCRT). be found in the Migliori (1) text. Resonant ultrasound spec-
Early references to this body of science often are termed the troscopy also found use in the study of the elastic properties of
“swept sine method.” It was not until 1990 (2) that the name the Apollo moon rocks (6).
Resonant Ultrasound Spectroscopy appeared, but the two
4.1.2 This guide is intended to provide a practical introduc-
techniques are synonymous. Additionally, impulse methods,
tion to RUS-based nondestructive testing (NDT), highlighting
like the striking of a rail car wheel with a hammer, and
successful applications and outlining failures, limitations, and
listening for the responses, have been used for over 100 years
potential weaknesses. Vibrational resonances are considered
to detect the existence of large cracks. RUS based techniques
from the perspective of defect detection in 4.2.In 4.3 and 4.4,
are commonly used to evaluate metallic and nonmetallic
a review of some of the types of RUS measurements are given
material and finished parts made from a variety of processes
and 4.6 examines the common practice of using the impulse
including casting, forging, sintering, machining and additive
excitation method. In 4.6, some example implementations and
manufacturing. In these situations, a part is vibrated
configurations of RUS systems and their applications are
mechanically, and defects are detected based on changes in the
presented. Finally, the guide concludes with a discussion of
patternofresonancesorvariationsfromanalyticallyornumeri-
constraints, which limit the effectiveness of RUS.
callycalculatedormeasuredacceptablespectra.RUSmeasures
4.2 Mode Shapes and Defects:
all resonances of the part in a defined frequency range rather
4.2.1 Resonant ultrasound spectroscopy/NDT techniques,
than scanning for individual defects. In a single measurement,
operatebydrivingapartatgivenfrequenciesandmeasuringits
RUS-based techniques can test for numerous defects including
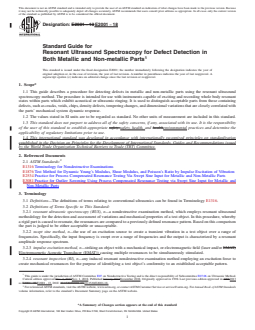
mechanical response (Fig. 1 contains a schematic one embodi-
cracks, chips, cold shuts, inclusions, voids, posority, oxides,
ment of a RUS apparatus). The process proceeds in small
contaminants,missedprocessesoroperations,andvariationsin
frequency steps over some previously determined region of
dimension, hardness, porosity, nodularity, density, and heat
interest. During such a sweep, the drive frequency typically
treatment. Since the RUS measurement yields a whole-body
brackets a resonance. When the excitation frequency is not
response, it is often difficult to discriminate between defect
matched to one of the part’s resonance frequencies, very little
types. The technique is effective for detecting parts with
energy is coupled to the part; that is, there is little mechanical
structuralanomalies,butlesseffectivefordiagnosingtheexact
vibration. At resonance, however, the energy delivered to the
locationorcauseofananomalywithinapart.Nevertheless,for
part is coupled generating much larger mechanical vibrations.
an expansive range of parts RUS provides accurate, fast,
Apart’s resonance frequencies are determined by the standard
quantitative and cost-effective results that require no human
dynamic equations of motion, which include variables for
judgment, making 100% examination of a part population
mass,stiffness,anddamping.Themass,stiffness,anddamping
possible. Many theoretical texts (3) discuss the relationship
properties are determined by geometry, density, and material
between resonances and elastic constants and include the
elastic constants of the part. The required frequency window
specific application of RUS to the determination of elastic
and data collection parameters for a scan depend on the part
constants (4). The technology received a quantum increase in
geometry, mass, material properties, and the characteristics of
attention when Migliori published a review article, including
the defects of interest.
the requisite inexpensive electronic designs and procedures
from which materials properties could be measured quickly 4.2.2 Exciting a part at its resonance frequencies will cause
and accurately (5). The most recent applications include the part to deform in an array of patterns that correspond to
FIG. 1 Schematic of the Essential Electronic Building Blocks to Employ RUS in a Manufacturing Environment
E2001 − 18
different frequencies. These deformation patterns are called may require using the frequency corresponding to the fiftieth,
mode shapes. Bending, torsional (twisting) and extensional orevenhigher,mode.Inthecylinderexample,somemodesdo
(breathing) modes are common shapes in simple geometries not produce strain in the end of the cylinder, therefore, they
like cylinders. More complex and/or localized variations on cannot detect end defects.To detect this type of defect, a more
these shapes will be excited in more complex geometries. A complex mode is required, the description of which is beyond
large enough frequency range excited by either a swept sine or thescopeofthisspecification.Adefectinthecylinderendwill
impulseinputwillexcitemultipleharmonicsofthesamemode reduce the effective stiffness for this type of mode, and thus,
shape (first bending mode, second bending mode, and so on). willshiftdownwardthefrequencyoftheresonance.Ingeneral,
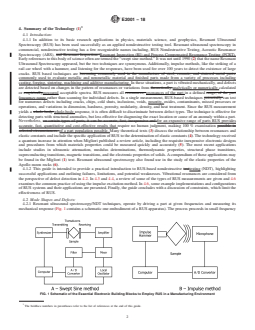
Fig. 2 shows an example of mode shapes excited in a portion it must be remembered that most modes will exhibit complex
oftheresonancespectraforabasiccylinder.Modes7and8are motions, and for highly symmetric objects, can be linear
a pair of degenerate bending modes (see 4.3.4.1 for a descrip- combinations of several degenerate modes, as discussed in
tion of degenerate modes). Mode 9 is a torsional mode. Mode 4.3.2.
10 is an extensional mode. Modes 11 and 12 are the next
4.3 General Approaches to RUS/NDT:
harmonic of the bending mode. Mode 13 is the next harmonic
4.3.1 Test Evaluation Methods (1)—Once a fingerprint has
of the torsional mode.
been established, for conforming parts, numerous algorithms
4.2.3 Different mode shapes have varying sensitivities to
can be employed to either accept or reject the part. For
geometric variations, material state variations, and flaws in
example, if a frequency 650 Hz can be identified for all
parts. Knowledge of the mode shape helps to determine what
conforming parts, the detection of a peak outside of this
qualities of the part affect those frequencies. The resonance
boundary condition will cause the computer code to signal a
frequencies of a part correlate directly to its stiffness (resis-
“test reject” condition. The code, rather than the inspector,
tance to deformation). Reducing the part stiffness by reducing
makes the accept/reject decision. The following sections will
the relevant elastic constant lowers the associated resonant
expand on some of these sorting criteria.
frequency for most modes. If a defect, such as a crack, is
4.3.2 Frequency Shifts:
introduced into a region under strain, it will reduce the
4.3.2.1 Resonant ultrasound spectroscopy measurements
effective stiffness in that area and cause a downward shift of
generally produce strains (even on resonance) that are well
the frequency of resonant modes that introduce strain at the
within the elastic limit of the materials under test, that is, the
crack. For example, a crack may reduce the ability of the part
atomic displacements are small in keeping with the “nonde-
to resist twisting, thereby reducing the effective stiffness and
structive” aspect of the testing. If strains are applied above the
frequencyofatorsionalmode.Geometricvariationsalsoaffect
elasticlimit,acrackwilltendtopropagate,causingamechani-
resonance modes to varying degrees. For example, increasing
cal failure. Note that certain important engineering properties,
the length of a cylinder will lower resonant frequencies of
for example, the onset of plastic deformation, yield strength,
bending modes more than torsional or extensional modes.
etc., generally are not derivable from low-strain elastic prop-
Torsionalmodesinacylinderremainconstantforfixedlength,
erties. Sensitivity of the elastic properties of an object to the
independent of diameter variation. Variation in the size of a
presence of a crack depends on the stiffness and geometry of
given defect also changes which modes are affected and the
the sample under test. This concept is expanded upon under
magnitude of that effect.Alarge defect can be detected readily
4.4.3.
by its effect on the first few modes. Smaller defects have more
subtle effects on stiffness, requiring higher frequencies (high- 4.3.2.2 Fig. 3 shows an example of the resonance spectrum
order modes) to be detected. Detection of very small defects for a conical ceramic part. Several specific types of modes are
FIG. 2 Examples of Modes of Vibration Matched to Their Peaks in a Resonance Spectrum
E2001 − 18
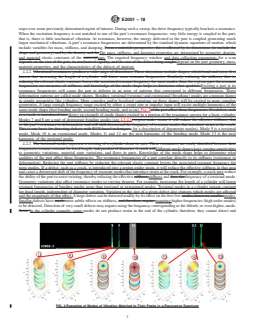
FIG. 3 Typical Broad-Spectrum Scan
present in this scan, and their relative shifts could be used to Fig. 4, which shows spectra for a good part and two defective
detect defects as discussed above; however, the complexity is parts. The part is a steel cylinder. Fig. 4 also demonstrates a
such that, for NDTpurposes, some selections must be made so
usefulfeatureofthisparticulartechnique,thatis,thesizeofthe
that only a portion of such a large amount of information is splittingisproportionaltothesizeofthedefect.Itisimportant
used.Forsimplepartgeometries,themodetypeandfrequency
to recognize that not all resonance peaks are degenerate. Pure
can be calculated, and selection of diagnostic modes can be
torsional modes, for example, are not degenerate, so they
based on these results. For complex geometries, empirical
cannot be used for splitting.
approaches have been developed to identify efficiently diag-
4.3.4 Phase Information and Peak Splittings:
nostic modes for specific defects. In this process, a technician
4.3.4.1 Degenerate modes all have the same phase at low-
measures the spectra for a batch of known good and bad parts.
symmetry points; therefore, if one mode is shifted slightly
The spectra are compared to identify diagnostic modes whose
destructive interference occurs between them, showing up as a
shift correlates with the presence of the defect. The key is to
splittingifthesamplerigidityissufficient.Modepairs7and8,
isolate a few resonances, which differ from one another, when
11 and 12 from Fig. 2 are examples of degenerate mode pairs.
known defects are present in the faulty parts.
The frequency difference between the two resulting peaks
4.3.3 Peak Splitting—One of the techniques employed for
increases in direct proportion to the defect size. This does not
axially symmetric parts is identified in texts on basic wave
hold for accidental degeneracies, which are modes that by
physics (7). Some test procedures are based on simple fre-
coincidenceratherthanbysymmetryhavethesamefrequency.
quency changes while others include the recognition that
The actual shift in frequency is no more than would be
symmetry is broken when a defect is present in a
expected for an isolated mode, but the interference enhances
homogeneous, isotropic symmetrical part. These techniques
the visibility.
employ splitting of degeneracies or simply “splitting.” A
4.3.4.2 In practice, the same empirical approach described
cylinder actually has two degenerate bending modes, both
forfrequencyshiftsisusedtoidentifydiagnosticmodeswhose
orthogonal to its axis. The bending stiffness for both of these
splitting correlates with the size of a defect of interest. The
modes,andthereforetheirresonancefrequency,isproportional
sensitivity of this type of measurement is enhanced by the
to the diameter of the cylinder. Because the part is symmetric,
interference, which occurs between closely-spaced peaks. The
both modes have the same stiffness, and therefore, the same
destructive interference develops into a visible spectral split-
frequency (the modes are said to be degenerate and appear to
be a single resonance). When the symmetry is broken by a ting which would not be noticeable with the amplitude spec-
trum (the real and quadrature components add to form the
chip, however, the effective diameter is reduced for one of the
orthogonal modes. This increases the frequency for that mode, amplitude response). Most commercial systems function rea-
sobothmodesareseen.Inaddition,acrackorinclusionaffects sonably well without this attribute, but the problem can be
the symmetry. This splitting of the resonances is illustrated in exacerbated when the material exhibits resonance line widths
E2001 − 18
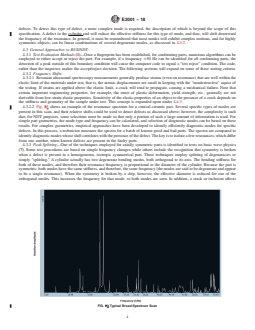
FIG. 4 Shown is a Bending Mode Within a Resonance Spectrum of an Acceptable Steel Cylinder (a), One With a Small Defect (b), and
One With a Large Crack (c).
which are greater than 1% of the frequency. Under such 5illustratestheabilitytodeterminethethicknessofanalumina
circumstances, it may be impossible to detect splitting without washer. Twenty washers were measured with an accuracy of
phase information. ;1 µm and the results are plotted against the frequency of
4.3.5 Dimensional Measurements:
specific resonances.
4.3.5.1 Industrial evaluation of parts often occurs in several
4.4 Practical Considerations:
sectors: defect detection, screening of outlier spectrum, manu-
4.4.1 Implementation:
facturingorrepairprocessmonitoring,anddimensionalexami-
4.4.1.1 An integration of RUS techniques into a manufac-
nation.ItisarelativelysimplemattertouseRUStechniquesto
turing process is illustrated in Fig. 6 as an example of how the
measure physical parameters, such as weight, density, and
ideas of 4.3 are integrated into a commercial swept sine
dimensions. In practice, one measures all the physical attri-
product. The key element is the synthesizer/receiver of which
butes possible. For a ring, these would include weight,
thickness, outer diameter, and inner diameter. It is imperative severalcommercialinstrumentsexist.Itgeneratesasweptsine
oscillation over a defined range as a continuous wave (CW)
touse“good”,thatis,asfreeofdefectsaspossible,partsinthis
study. One measures a suitable number of the lowest reso- electricalsignal,andthenmovestothenextdefinedrange.This
nances and either plots each resonance frequency as a function pattern is replicated until the scan is completed. Either a
of each parameter or uses the correlation feature of standard piezoelectricoranEMAT (8)transducerconvertstheelectrical
spreadsheet programs. The best res
...
This document is not an ASTM standard and is intended only to provide the user of an ASTM standard an indication of what changes have been made to the previous version. Because
it may not be technically possible to adequately depict all changes accurately, ASTM recommends that users consult prior editions as appropriate. In all cases only the current version
of the standard as published by ASTM is to be considered the official document.
Designation: E2001 − 13 E2001 − 18
Standard Guide for
Resonant Ultrasound Spectroscopy for Defect Detection in
Both Metallic and Non-metallic Parts
This standard is issued under the fixed designation E2001; the number immediately following the designation indicates the year of
original adoption or, in the case of revision, the year of last revision. A number in parentheses indicates the year of last reapproval. A
superscript epsilon (´) indicates an editorial change since the last revision or reapproval.
1. Scope*
1.1 This guide describes a procedure for detecting defects in metallic and non-metallic parts using the resonant ultrasound
spectroscopy method. The procedure is intended for use with instruments capable of exciting and recording whole body resonant
states within parts which exhibit acoustical or ultrasonic ringing. It is used to distinguish acceptable parts from those containing
defects, such as cracks, voids, chips, density defects, tempering changes, and dimensional variations that are closely correlated with
the parts’ mechanical system dynamic response.
1.2 The values stated in SI units are to be regarded as standard. No other units of measurement are included in this standard.
1.3 This standard does not purport to address all of the safety concerns, if any, associated with its use. It is the responsibility
of the user of this standard to establish appropriate safety safety, health, and healthenvironmental practices and determine the
applicability of regulatory limitations prior to use.
1.4 This international standard was developed in accordance with internationally recognized principles on standardization
established in the Decision on Principles for the Development of International Standards, Guides and Recommendations issued
by the World Trade Organization Technical Barriers to Trade (TBT) Committee.
2. Referenced Documents
2.1 ASTM Standards:
E1316 Terminology for Nondestructive Examinations
E1876 Test Method for Dynamic Young’s Modulus, Shear Modulus, and Poisson’s Ratio by Impulse Excitation of Vibration
E2534 Practice for Process Compensated Resonance Testing Via Swept Sine Input for Metallic and Non-Metallic Parts
E3081 Practice for Outlier Screening Using Process Compensated Resonance Testing via Swept Sine Input for Metallic and
Non-Metallic Parts
3. Terminology
3.1 Definitions—The definitions of terms relating to conventional ultrasonics can be found in Terminology E1316.
3.2 Definitions of Terms Specific to This Standard:
3.2.1 resonant ultrasonic spectroscopy (RUS), n—a nondestructive examination method, which employs resonant ultrasound
methodology for the detection and assessment of variations and mechanical properties of a test object. In this procedure, whereby
a rigid part is caused to resonate, the resonances are compared to a previously defined resonance pattern. Based on this comparison
the part is judged to be either acceptable or unacceptable.
3.2.2 swept sine method, n—the use of an excitation source to create a transient vibration in a test object over a range of
frequencies. Specifically, the input frequency is swept over a range of frequencies and the output is characterized by a resonant
amplitude response spectrum.
3.2.3 impulse excitation method, n—striking an object with a mechanical impact, or electromagnetic field (laser and/or EMAT)
Electromagnetic Acoustic Transducer (EMAT)) causing multiple resonances to be simultaneously stimulated.
3.2.4 resonant inspection (RI), n—any induced resonant nondestructive examination method employing an excitation force to
create mechanical resonances for the purpose of identifying a test object’s conformity to an established acceptable pattern.
This guide is under the jurisdiction of ASTM Committee E07 on Nondestructive Testing and is the direct responsibility of Subcommittee E07.06 on Ultrasonic Method.
Current edition approved Dec. 1, 2013Nov. 1, 2018. Published January 2014November 2018. Originally approved in 1998. Last previous edition approved in 20082013
as E2001 - 08.E2001 - 13. DOI: 10.1520/E2001-13.10.1520/E2001-18.
For referenced ASTM standards, visit the ASTM website, www.astm.org, or contact ASTM Customer Service at service@astm.org. For Annual Book of ASTM Standards
volume information, refer to the standard’s Document Summary page on the ASTM website.
*A Summary of Changes section appears at the end of this standard
Copyright © ASTM International, 100 Barr Harbor Drive, PO Box C700, West Conshohocken, PA 19428-2959. United States
E2001 − 18
4. Summary of the Technology (1)
4.1 Introduction:
4.1.1 In addition to its basic research applications in physics, materials science, and geophysics, Resonant Ultrasound
Spectroscopy (RUS) has been used successfully as an applied nondestructive testing tool. Resonant ultrasound spectroscopy in
commercial, nondestructive testing has a few recognizable names including, RUS Nondestructive Testing, Acoustic Resonance
Spectroscopy (ARS), and Resonant Inspection. Resonant Inspection (RI) and Process Compensated Resonance Testing (PCRT).
Early references to this body of science often are termed the “swept sine method.” It was not until 1990 (2) that the name Resonant
Ultrasound Spectroscopy appeared, but the two techniques are synonymous. Additionally, impulse methods, like the striking of a
rail car wheel with a hammer, and listening for the responses, have been used for over 100 years to detect the existence of large
cracks. RUS based techniques are becoming commonly used in the manufacture of steel, ceramic, and sintered metal parts.
commonly used to evaluate metallic and nonmetallic material and finished parts made from a variety of processes including
casting, forging, sintering, machining and additive manufacturing. In these situations, a part is vibrated mechanically, and defects
are detected based on changes in the pattern of resonances or variations from theoretically analytically or numerically calculated
or empiricallymeasured acceptable spectra. RUS measures all resonances, resonances of the part in a defined range, of the part
frequency range rather than scanning for individual defects. In a single measurement, RUS-based techniques potentially can test
for numerous defects including cracks, chips, cold shuts, inclusions, voids, posority, oxides, contaminants, missed processes or
operations, and variations in dimension, hardness, porosity, nodularity, density, and heat treatment. Since the RUS measurement
yields a whole body whole-body response, it is often difficult to discriminate between defect types. The technique is effective for
detecting parts with structural anomalies, but less effective for diagnosing the exact location or cause of an anomaly within a part.
Nevertheless, on certain types of parts, it can be accurate, fast, inexpensive and for an expansive range of parts RUS provides
accurate, fast, quantitative and cost-effective results that require no human judgment, making 100 % examination possible in
selected circumstances. of a part population possible. Many theoretical texts (3) discuss the relationship between resonances and
elastic constants and include the specific application of RUS to the determination of elastic constants (4). The technology received
a quantum increase in attention when Migliori published a review article, including the requisite inexpensive electronic designs
and procedures from which materials properties could be measured quickly and accurately (5). The most recent applications
include studies in ultrasonic attenuation, modulus determinations, thermodynamic properties, structural phase transitions,
superconducting transitions, magnetic transitions, and the electronic properties of solids. A compendium of these applications may
be found in the Migliori (1) text. Resonant ultrasound spectroscopy also found use in the study of the elastic properties of the
Apollo moon rocks (6).
4.1.2 This guide is intended to provide a practical introduction to RUS-based nondestructive testtesting (NDT), highlighting
successful applications and outlining failures, limitations, and potential weaknesses. Vibrational resonances are considered from
the perspective of defect detection in 4.2. In 4.3 and 4.4, a review of some of the types of RUS measurements are given and 4.6
examines the common practice of using the impulse excitation method. In 4.6, some example implementations and configurations
of RUS systems and their applications are presented. Finally, the guide concludes with a discussion of constraints, which limit the
effectiveness of RUS.
4.2 Mode Shapes and Defects:
4.2.1 Resonant ultrasound spectroscopy/NDT techniques, operate by driving a part at given frequencies and measuring its
mechanical response (Fig. 1 contains a schematic one embodiment of a RUS apparatus). The process proceeds in small frequency
FIG. 1 Schematic of the Essential Electronic Building Blocks to Employ RUS in a Manufacturing Environment
The boldface numbers in parentheses refer to the list of references at the end of this guide.
E2001 − 18
steps over some previously determined region of interest. During such a sweep, the drive frequency typically brackets a resonance.
When the excitation frequency is not matched to one of the part’s resonance frequencies, very little energy is coupled to the part;
that is, there is little mechanical vibration. At resonance, however, the energy delivered to the part is coupled generating much
larger mechanical vibrations. A part’s resonance frequencies are determined by the standard dynamic equations of motion, which
include variables for mass, stiffness, and damping. From a materials perspective, this is affected by its dimensions (to include the
shape and geometry) and by the density and theThe mass, stiffness, and damping properties are determined by geometry, density,
and material elastic constants of the material.part. The required frequency window and data collection parameters for a scan
depends on the size of the part, its mechanical rigidity, and the size of the defect being sought.depend on the part geometry, mass,
material properties, and the characteristics of the defects of interest.
4.2.2 Vibrational resonances produce a wide range of distortions. These distortions include shapes, which bend and twist. It is
known that increasing the length of a cylinder will lower some resonant frequencies. Similarly, reducing the stiffness, that is,
reducing the relevant elastic constant, lowers the associated resonant frequency for most modes; thus, for a given part, the resonant
frequencies are measures of stiffness, and knowledge of the mode shape helps to determine what qualities Exciting a part at its
resonance frequencies will cause the part to deform in an array of patterns that correspond to different frequencies. These
deformation patterns are called mode shapes. Bending, torsional (twisting) and extensional (breathing) modes are common shapes
in simple geometries like cylinders. More complex and/or localized variations on these shapes will be excited in more complex
geometries. A large enough frequency range excited by either a swept sine or impulse input will excite multiple harmonics of the
same mode shape (first bending mode, second bending mode, and so on). Fig. 2of the part affect those frequencies. If a defect, such
as a crack, is introduced into shows an example of mode shapes excited in a portion of the resonance spectra for a basic cylinder.
Modes 7 and 8 are a pair of degenerate bending modes (see 4.3.4.1a region under strain, it will reduce the effective stiffness, that
is, the part’s resistance to deformation, and will shift downward the frequency of resonant modes that introduce strain at the crack.
This is one basis for detecting defects with RUS-based techniques. for a description of degenerate modes). Mode 9 is a torsional
mode. Mode 10 is an extensional mode. Modes 11 and 12 are the next harmonic of the bending mode. Mode 13 is the next
harmonic of the torsional mode.
4.2.3 The torsional modes represent a twisting of a cylinder about its axis. These resonances are easily identified because their
frequencies remain constant for fixed length, independent of diameter. A crack willDifferent mode shapes have varying sensitivities
to geometric variations, material state variations, and flaws in parts. Knowledge of the mode shape helps to determine what
qualities of the part affect those frequencies. The resonance frequencies of a part correlate directly to its stiffness (resistance to
deformation). Reducing the part stiffness by reducing the relevant elastic constant lowers the associated resonant frequency for
most modes. If a defect, such as a crack, is introduced into a region under strain, it will reduce the effective stiffness in that area
and cause a downward shift of the frequency of resonant modes that introduce strain at the crack. For example, a crack may reduce
the ability of the part to resist twisting, thereby reducing the effective stiffness,stiffness and thus, the frequency of a torsional mode.
Geometric variations also affect resonance modes to varying degrees. For example, increasing the length of a cylinder will lower
resonant frequencies of bending modes more than torsional or extensional modes. Torsional modes in a cylinder remain constant
for fixed length, independent of diameter variation. Variation in the size of a given defect also changes which modes are affected
and the magnitude of that effect. A large defect can be detected readily by its effect on the first few modes; however, smaller modes.
Smaller defects have much more subtle effects on stiffness, and therefore, require requiring higher frequencies (high-order modes)
to be detected. Detection of very small defects may require using the frequency corresponding to the fiftieth, or even higher, mode.
Some In the cylinder example, some modes do not produce strain in the end of the cylinder, therefore, they cannot detect end
FIG. 2 Examples of Modes of Vibration Matched to Their Peaks in a Resonance Spectrum
E2001 − 18
defects. To detect this type of defect, a more complex mode is required, the description of which is beyond the scope of this
specification. A defect in the cylinder end will reduce the effective stiffness for this type of mode, and thus, will shift downward
the frequency of the resonance. In general, it must be remembered that most modes will exhibit complex motions, and for highly
symmetric objects, can be linear combinations of several degenerate modes, as discussed in 4.3.2.
4.3 General Approaches to RUS/NDT:
4.3.1 Test Evaluation Methods (1)—Once a fingerprint has been established, for conforming parts, numerous algorithms can be
employed to either accept or reject the part. For example, if a frequency 650 Hz can be identified for all conforming parts, the
detection of a peak outside of this boundary condition will cause the computer code to signal a “test reject” condition. The code,
rather than the inspector, makes the accept/reject decision. The following sections will expand on some of these sorting criteria.
4.3.2 Frequency Shifts:
4.3.2.1 Resonant ultrasound spectroscopy measurements generally produce strains (even on resonance) that are well within the
elastic limit of the materials under test, that is, the atomic displacements are small in keeping with the “nondestructive” aspect of
the testing. If strains are applied above the elastic limit, a crack will tend to propagate, causing a mechanical failure. Note that
certain important engineering properties, for example, the onset of plastic deformation, yield strength, etc., generally are not
derivable from low-strain elastic properties. Sensitivity of the elastic properties of an object to the presence of a crack depends on
the stiffness and geometry of the sample under test. This concept is expanded upon under 4.4.3.
4.3.2.2 Fig. 23 shows an example of the resonance spectrum for a conical ceramic part. Several specific types of modes are
present in this scan, and their relative shifts could be used to detect defects as discussed above; however, the complexity is such
that, for NDT purposes, some selections must be made so that only a portion of such a large amount of information is used. For
simple part geometries, the mode type and frequency can be calculated, and selection of diagnostic modes can be based on these
results. For complex geometries, empirical approaches have been developed to identify efficiently diagnostic modes for specific
defects. In this process, a technician measures the spectra for a batch of known good and bad parts. The spectra are compared to
identify diagnostic modes whose shift correlates with the presence of the defect. The key is to isolate a few resonances, which differ
from one another, when known defects are present in the faulty parts.
4.3.3 Peak Splitting—One of the techniques employed for axially symmetric parts is identified in texts on basic wave physics
(7). Some test procedures are based on simple frequency changes while others include the recognition that symmetry is broken
when a defect is present in a homogeneous, isotropic symmetrical part. These techniques employ splitting of degeneracies or
simply “splitting.” A cylinder actually has two degenerate bending modes, both orthogonal to its axis. The bending stiffness for
both of these modes, and therefore their resonance frequency, is proportional to the diameter of the cylinder. Because the part is
symmetric, both modes have the same stiffness, and therefore, the same frequency (the modes are said to be degenerate and appear
to be a single resonance). When the symmetry is broken by a chip, however, the effective diameter is reduced for one of the
orthogonal modes. This increases the frequency for that mode, so both modes are seen. In addition, a crack or inclusion affects
FIG. 23 Typical Broad-Spectrum Scan
E2001 − 18
the symmetry. This splitting of the resonances is illustrated in Fig. 34, which shows spectra for a good part and two defective parts.
The part is a steel cylinder. Fig. 34 also demonstrates a useful feature of this particular technique, that is, the size of the splitting
is proportional to the size of the defect. It is important to recognize that not all resonance peaks are degenerate. Pure torsional
modes, for example, are not degenerate, so they cannot be used for splitting.
4.3.4 Phase Information and Peak Splittings:
4.3.4.1 Degenerate modes all have the same phase at low-symmetry points; therefore, if one mode is shifted slightly destructive
interference occurs between them, showing up as a splitting if the sample rigidity is sufficient. Mode pairs 7 and 8, 11 and 12 from
Fig. 2 are examples of degenerate mode pairs. The frequency difference between the two resulting peaks increases in direct
proportion to the defect size. This does not hold for accidental degeneracies, which are modes that by coincidence rather than by
symmetry have the same frequency. The actual shift in frequency is no more than would be expected for an isolated mode, but
the interference enhances the visibility.
4.3.4.2 In practice, the same empirical approach described for frequency shifts is used to identify diagnostic modes whose
splittings correlatesplitting correlates with the size of a defect of interest. The sensitivity of this type of measurement is enhanced
by the interference, which occurs between closely-spaced peaks. The destructive interference develops into a visible spectral
splitting which would not be noticeable with the amplitude spectrum (the real and quadrature components add to form the
amplitude response). Most commercial systems function reasonably well without this attribute, but the problem can be exacerbated
when the material exhibits resonance line widths which are greater than 1 % of the frequency. Under such circumstances, it may
be impossible to detect splittingssplitting without phase information.
4.3.4.2 Degenerate modes all have the same phase at low-symmetry points; therefore, if one mode is shifted slightly destructive
interference occurs between them, showing up as a splitting if the sample rigidity is sufficient. The frequency difference between
the two resulting peaks increases in direct proportion to the defect size. This does not hold for accidental degeneracies, which are
modes that by coincidence rather than by symmetry have the same frequency. The actual shift in frequency is no more than would
be expected for an isolated mode, but the interference enhances the visibility.
4.3.5 Dimensional Measurements:
4.3.5.1 Industrial sortingevaluation of parts often occurs in two sectors: defect detection and dimensional examination. Ceramic
plants often spend more resources on the latter than crack and chip investigations. several sectors: defect detection, screening of
outlier spectrum, manufacturing or repair process monitoring, and dimensional examination. It is a relatively simple matter to use
RUS techniques to measure physical parameters, such as weight, density, and dimensions. In practice, one measures all the physical
attributes possible. For a ring, these would include weight, thickness, outer diameter, and inner diameter. It is imperative to use
FIG. 34 Shown is a Bending Mode Within a Resonance Spectrum of an Acceptable Steel Cylinder (a), One With a Small Defect (b), and
One With a Large Crack (c).
E2001 − 18
“good”, that is, as free of defects as possible, parts in this study. One measures a suitable number of the lowest resonances and
either plots each resonance frequency as a function
...
Questions, Comments and Discussion
Ask us and Technical Secretary will try to provide an answer. You can facilitate discussion about the standard in here.
Loading comments...