Standard Test Method for Compressive Properties of Polymer Matrix Composite Materials with Unsupported Gage Section by Shear Loading

SCOPE
1.1 This test method determines the in-plane compressive properties of polymer matrix composite materials reinforced by high-modulus fibers. The composite material forms are limited to continuous-fiber or discontinuous-fiber reinforced composites for which the elastic properties are specially orthotropic with respect to the test direction. This test procedure introduces the compressive load into the specimen through shear at wedge grip interfaces. This type of load transfer differs from the procedure in Test Method D5467 where compressive load is transmitted into the specimen by subjecting a honeycomb core sandwich beam with thin skins to four-point bending, or Test Method D695 where compressive load is transmitted into the specimen by endloading.
1.2 This procedure is applicable primarily to laminates made from prepreg or similar product forms. Other product forms may require deviations from the test method.
1.3 This standard does not purport to address all of the safety concerns, if any, associated with its use. It is the responsibility of the user of this standard to establish appropriate safety and health practices and determine the applicability of regulatory limitations prior to use.  
1.4 The values stated in either SI units or inch-pound units are to be regarded separately as standard. Within the text the inch-pounds units are shown in brackets. The values stated in each system are not exact equivalents; therefore, each system must be used independently of the other. Combining values from the two systems may result in nonconformance with the standard.  Note 1-Additional procedures for determining compressive properties of resin-matrix composites may be found in Test Methods D5467 and D695.

General Information

Status
Historical
Publication Date
31-Dec-1994
Current Stage
Ref Project

Relations

Buy Standard

Standard
ASTM D3410/D3410M-95 - Standard Test Method for Compressive Properties of Polymer Matrix Composite Materials with Unsupported Gage Section by Shear Loading
English language
16 pages
sale 15% off
Preview
sale 15% off
Preview

Standards Content (Sample)


NOTICE: This standard has either been superceded and replaced by a new version or discontinued.
Contact ASTM International (www.astm.org) for the latest information.
Designation: D 3410/D 3410M – 95
Standard Test Method for
Compressive Properties of Polymer Matrix Composite
Materials with Unsupported Gage Section by Shear
Loading
This standard is issued under the fixed designation D 3410/D 3410M; the number immediately following the designation indicates the
year of original adoption or, in the case of revision, the year of last revision. A number in parentheses indicates the year of last
reapproval. A superscript epsilon (e) indicates an editorial change since the last revision or reapproval.
This standard has been approved for use by agencies of the Department of Defense.
1. Scope D 695 Test Method for Compressive Properties of Rigid
Plastics
1.1 This test method determines the in-plane compressive
D 792 Test Method for Density and Specific Gravity (Rela-
properties of polymer matrix composite materials reinforced by
tive Density) of Plastics by Displacement
high-modulus fibers. The composite material forms are limited
D 883 Terminology Relating to Plastics
to continuous-fiber or discontinuous-fiber reinforced compos-
D 2584 Test Method for Ignition Loss of Cured Reinforced
ites for which the elastic properties are specially orthotropic
Resins
with respect to the test direction. This test procedure introduces
D 2734 Test Methods for Void Content of Reinforced Plas-
the compressive load into the specimen through shear at wedge
tics
grip interfaces. This type of load transfer differs from the
D 3171 Test Method for Fiber Content of Resin-Matrix
procedure in Test Method D 5467 where compressive load is
Composites by Matrix Digestion
transmitted into the specimen by subjecting a honeycomb core
D 3878 Terminology of High-Modulus Reinforced Fibers
sandwich beam with thin skins to four-point bending, or Test
and Their Composites
Method D 695 where compressive load is transmitted into the
D 5229/D 5229M Test Method for Moisture Absorption
specimen by end-loading.
Properties and Equilibrium Conditioning of Polymer Ma-
1.2 This procedure is applicable primarily to laminates
trix Composite Materials
made from prepreg or similar product forms. Other product
D 5379/D 5379M Test Method for Shear Properties of
forms may require deviations from the test method.
Composite Materials by the V-Notched Beam Method
1.3 This standard does not purport to address all of the
D 5467 Test Method for Compressive Properties of Unidi-
safety concerns, if any, associated with its use. It is the
rectional Polymer Matrix Composites Using a Sandwich
responsibility of the user of this standard to establish appro-
Beam
priate safety and health practices and determine the applica-
E 4 Practices for Force Verification of Testing Machines
bility of regulatory limitations prior to use.
E 6 Terminology Relating to Methods of Mechanical Test-
1.4 The values stated in either SI units or inch-pound units
ing
are to be regarded separately as standard. Within the text the
E 83 Practice for Verification and Classification of Exten-
inch-pounds units are shown in brackets. The values stated in
someters
each system are not exact equivalents; therefore, each system
E 111 Test Method for Young’s Modulus, Tangent Modulus,
must be used independently of the other. Combining values
and Chord Modulus
from the two systems may result in nonconformance with the
E 122 Practice for Choice of Sample Size to Estimate a
standard.
Measure of Quality for a Lot or Process
NOTE 1—Additional procedures for determining compressive proper-
E 132 Test Method for Poisson’s Ratio at Room Tempera-
ties of resin-matrix composites may be found in Test Methods D 5467 and
ture
D 695.
E 177 Practice for Use of the Terms Precision and Bias in
ASTM Test Methods
2. Referenced Documents
E 251 Test Methods for Performance Characteristics of
2.1 ASTM Standards:
Metallic Bonded Resistance Strain Gages
1 2
This specification is under the jurisdiction of ASTM Committee D-30 on Annual Book of ASTM Standards, Vol 08.01.
Composite Materials and is the direct responsibility of Subcommittee D30.04 on Annual Book of ASTM Standards, Vol 08.02.
Lamina and Laminate Test Methods. Annual Book of ASTM Standards, Vol 15.03.
Current edition approved. Sept. 10, 1995. Published November 1995. Originally Annual Book of ASTM Standards, Vol 03.01.
published as D 3410 – 75. Last previous edition D 3410/D 3410M – 94. Annual Book of ASTM Standards, Vol 14.02.
Copyright © ASTM, 100 Barr Harbor Drive, West Conshohocken, PA 19428-2959, United States.
NOTICE: This standard has either been superceded and replaced by a new version or discontinued.
Contact ASTM International (www.astm.org) for the latest information.
D 3410/D 3410M
transition
E 456 Terminology Relating to Quality and Statistics 3.2.6 transition strain, e , n—the strain value at the
E 1237 Guide for Installing Bonded Resistance Strain mid-range of the transition region between the two essentially
Gages linear portions of a bilinear stress-strain or strain-strain curve
E 1309 Guide for the Identification of Composite Materials (a transverse strain-longitudinal strain curve as used for deter-
in Computerized Material Property Databases mining Poisson’s ratio).
E 1313 Guide for the Development of Standard Data 3.3 Symbols:
Records for Computerization of Material Property Data 3.3.1 A—cross-sectional area of coupon.
E 1434 Guide for the Development of Standard Data 3.3.2 B —percent bending in specimen.
y
Records for Computerization of Mechanical Test Data for 3.3.3 CV—sample coefficient of variation, in percent.
High-Modulus Fiber-Reinforced Composite Materials 3.3.4 E—modulus of elasticity in the test direction.
cu
E 1471 Guide for the Identification of Fibers, Fillers, and 3.3.5 F —ultimate compressive strength.
Core Materials in Computerized Material Property Data- 3.3.6 G —through-thickness shear modulus of elasticity.
xz
bases 3.3.7 h—coupon thickness.
2.2 ASTM Adjunct: 3.3.8 i, j, n—as used in a layup code, the number of repeats
Compression Fixture, D3410 Method B for a ply or group of plies of a material.
2.3 Other Documents: 3.3.9 l —specimen gage length.
g
ANSI Y14.5M-1982 3.3.10 s—as used in a layup code, denotes that the preced-
ANSI/ASME B46.1-1985 ing ply description for the laminate is repeated symetrically
about its midplane.
3. Terminology
3.3.11 n—number of specimens.
3.1 Terminology D 3878 defines terms relating to high-
3.3.12 P—load carried by test specimen.
f
modulus fibers and their composites. Terminology D 883
3.3.13 P —load carried by test specimen at failure.
max
defines terms relating to plastics. Terminology E 6 defines
3.3.14 P —maximum load before failure.
terms relating to mechanical testing. Terminology E 456 and
3.3.15 s —sample standard deviation.
n−1
Practice E 177 define terms relating to statistics. In the event of
3.3.16 w—coupon width.
a conflict between terms, Terminology D 3878 shall have
3.3.17 x —measured or derived property.
i
precedence over the other Terminology standards.
3.3.18 x¯—indicated normal strain from strain transducer.
3.2 Definitions of Terms Specific to This Standard:
3.3.19 e—sample mean (average).
c
3.2.1 nominal value, n—a value, existing in name only,
3.3.20 s —compressive normal stress.
c
assigned to a measurable property for the purpose of conve-
3.3.21 v —compressive Poisson’s ratio.
nient designation. Tolerances may be applied to a nominal
4. Summary of Test Method
value to define an acceptable range for the property.
3.2.2 orthotropic material, n—a material with a property of
4.1 A flat strip of material having a constant rectangular
interest that, at a given point, possesses three mutually perpen-
cross section, as shown in the specimen drawings of Figs. 1 and
dicular planes of symmetry defining the principal material
2, is loaded in compression by a shear load acting along the
coordinate system for that property.
grips. The shear load is applied via wedge grips in a specially
3.2.3 principal material coordinate system, n—a coordinate
designed fixture; shown in Fig. 3 for Procedure A, and Fig. 4
system with axes that are normal to the planes of symmetry that
for Procedure B. The influence of this wedge grip design on
exist within the material.
fixture characteristics is discussed in 6.1.
3.2.4 reference coordinate system, n—a coordinate system
4.2 To obtain compression test results, the specimen is
for laminated composites used to define ply orientations. One
inserted into the desired test fixture which is then placed
of the reference coordinate system axes (normally the Carte-
between the platens of the testing machine and loaded in
sian x-axis) is designated the reference axis, assigned a
compression. The ultimate compressive strength of the mate-
position, and the ply principal axis of each ply in the laminate
rial, as obtained with these test fixtures and specimens, can be
is referenced relative to the reference axis to define the ply
obtained from the maximum load carried before failure. Strain
orientation for that ply.
is monitored with strain or displacement transducers so the
3.2.5 specially orthotropic, adj—a description of an ortho-
stress-strain response of the material can be determined, from
tropic material as viewed in its principal material coordinate
which the ultimate compressive strain, the compressive modu-
system. In laminated composites a specially orthotropic lami-
lus of elasticity, Poisson’s ratio in compression, and transition
nate is a balanced and symmetric laminate of the [0 /90 ]
i j ns strain can be derived.
family as viewed from the reference coordinate system, such
5. Significance and Use
that the membrane-bending coupling terms of the stress-strain
relation are zero.
5.1 This test method is designed to produce compressive
property data for material specifications, research and devel-
opment, quality assurance, and structural design and analysis.
Annual Book of ASTM Standards, Vol 14.01.
A blueprint of the detailed drawing for the construction of the fixture shown in
Factors that influence the compressive response and should
Fig. 4 is available at a nominal cost from ASTM Headquarters, 100 Barr Harbor Dr.,
therefore be reported include the following: material, methods
PO Box C700, West Conshohocken, PA 19428–2959. Order Adjunct ADJD3410.
of material preparation and layup, specimen stacking sequence,
Available from American National Standards Institute, 11 W. 42nd St., 13th
floor, New York, NY 10036. specimen preparation, specimen conditioning, environment of
NOTICE: This standard has either been superceded and replaced by a new version or discontinued.
Contact ASTM International (www.astm.org) for the latest information.
D 3410/D 3410M
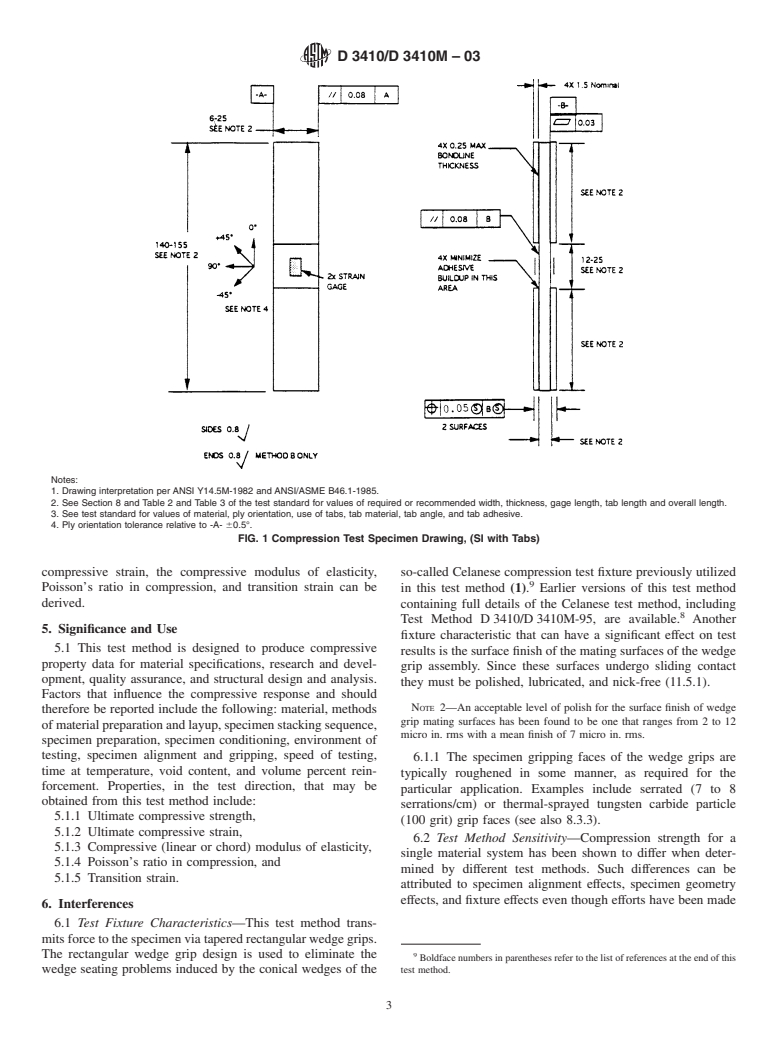
Notes:
1. Drawing interpretation per ANSI Y14.5M-1982 and ANSI/ASME B46.1-1985.
2. See Section 8 and Table 2 and Table 3 of the test standard for values of required or recommended width, thickness, gage length, tab length and overall length.
3. See test standard for values of material, ply orientation, use of tabs, tab material, tab angle, and tab adhesive.
4. Ply orientation tolerance relative to -A- 60.5°.
FIG. 1 Compression Test Specimen Drawing, (SI with Tabs)
testing, specimen alignment and gripping, speed of testing, surfaces undergo sliding contact they must be polished, lubri-
time at temperature, void content, and volume percent rein- cated, and nick free (11.5.1).
forcement. Properties, in the test direction, that may be
NOTE 2—An acceptable level of polish for the surface finish of wedge
obtained from this test method include:
grip mating surfaces has been found to be one that ranges from 2 to 12
5.1.1 Ultimate compressive strength,
micro in. rms with a mean finish of 7 micro in. rms.
5.1.2 Ultimate compressive strain,
6.2 Test Method Sensitivity—Compression strength for a
5.1.3 Compressive (linear or chord) modulus of elasticity,
single material system has been shown to differ when deter-
5.1.4 Poisson’s ratio in compression, and
mined by different test methods. Such differences can be
5.1.5 Transition strain.
attributed to specimen alignment effects, specimen geometry
effects, and fixture effects even though efforts have been made
6. Interferences
to minimize these effects. Examples of the difference in test
6.1 Test Fixture Characteristics—Although both methods in
results between Procedures A and B of this test method and
this test method transmit load to the specimen via tapered
Test Method D 5467 can be found in Refs (1) and (2).
wedge grips, the wedges in Procedure A are conical and the
6.3 Material and Specimen Preparation—Compression
wedges in Procedure B are rectangular. The conical wedges
modulus, and especially compression strength, are sensitive to
from Procedure A are known to be prone to cone-to-cone
10 poor material fabrication practices, damage induced by im-
seating problems (1). The rectangular wedge grip design used
proper coupon machining, and lack of control of fiber align-
in Procedure B was employed to eliminate this wedge seating
ment. Fiber alignment relative to the specimen coordinate axis
problem (1). In addition to these differences, the fixture used
should be maintained as carefully as possible, although no
for Procedure A is much smaller in size and weight than the
standard procedure to ensure this alignment exists. Procedures
fixture used for Procedure B. A fixture characteristic that can
found satisfactory include the following: fracturing a cured
have a significant effect on test results is the surface finish of
unidirectional laminate near one edge parallel to the fiber
the mating surfaces of the wedge grip assembly. Since these
direction to establish the 0° direction, or laying in small
filament count tows of contrasting color fiber (aramid in carbon
laminates and carbon in aramid or glass laminates) parallel to
Boldface numbers in parentheses refer to the list of references at the end of this
test method. the 0° direction either as part of the prepreg production or as
NOTICE: This standard has either been superceded and replaced by a new version or discontinued.
Contact ASTM International (www.astm.org) for the latest information.
D 3410/D 3410M
FIG. 2 Compression Test Specimen Drawing, (SI without Tabs)
part of panel fabrication. thickness. The gage length must be short enough to be free
6.4 Tabbing and Tolerances—The data resulting from these from Euler (column) buckling, yet long enough to allow stress
test methods have been shown to be sensitive to the flatness decay to uniaxial compression and to minimize Poisson re-
and parallelism of the tabs, so care should be taken to assure straint effects as a result of the grips. Minimum thickness
that the specimen tolerance requir
...

Questions, Comments and Discussion

Ask us and Technical Secretary will try to provide an answer. You can facilitate discussion about the standard in here.