ASTM A842-11A(2018)e1
(Specification)Standard Specification for Compacted Graphite Iron Castings
Standard Specification for Compacted Graphite Iron Castings
ABSTRACT
This specification deals with compacted graphite iron castings. These materials shall be examined metallographically for the acceptance graphite formation. The acceptable graphite formation in the microstructure of the test coupon or casting lug shall contain 80% minimum Type IV graphite. The iron shall conform to the requirements for tensile properties: tensile strength, yield strength, and elongation. Test bars and test coupons shall be cast in dried, baked, or chemically bonded molds consisting of an aggregate of silica sand with appropriate bonders and shall be subjected to the same thermal treatment as the castings they represent.
SCOPE
1.1 This specification covers castings made of compacted graphite iron, which is described as cast iron with the graphite in compacted (vermiform) shapes and essentially free of flake graphite in the bulk of the casting.
1.2 No precise quantitative relationship can be stated between the properties of iron in the various locations of the same casting and those of a test bar cast from the same iron (see Appendix X1).
1.3 The values stated in SI units are to be regarded as standard. No other units of measurement are included in this standard.
1.3.1 Exception—The inch-pound units in Figs. 1-3 are standard. SI units are added for information only.
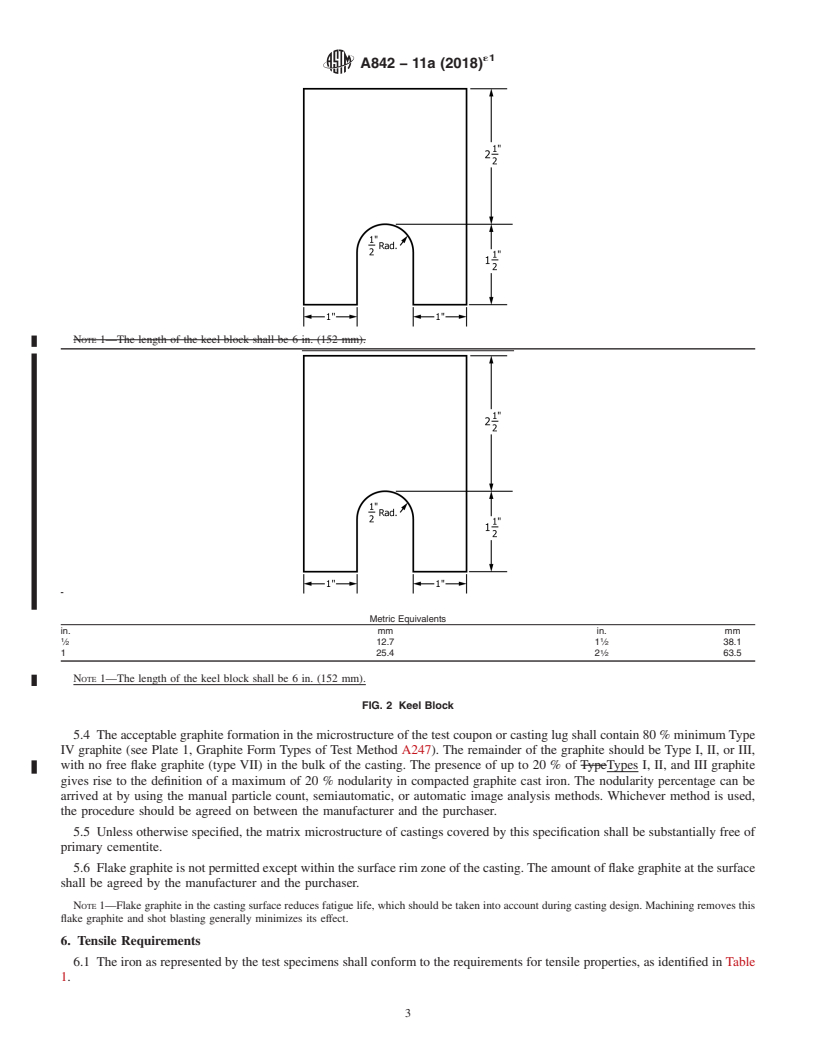
Note 1: The length of the keel block shall be 6 in. (152 mm).
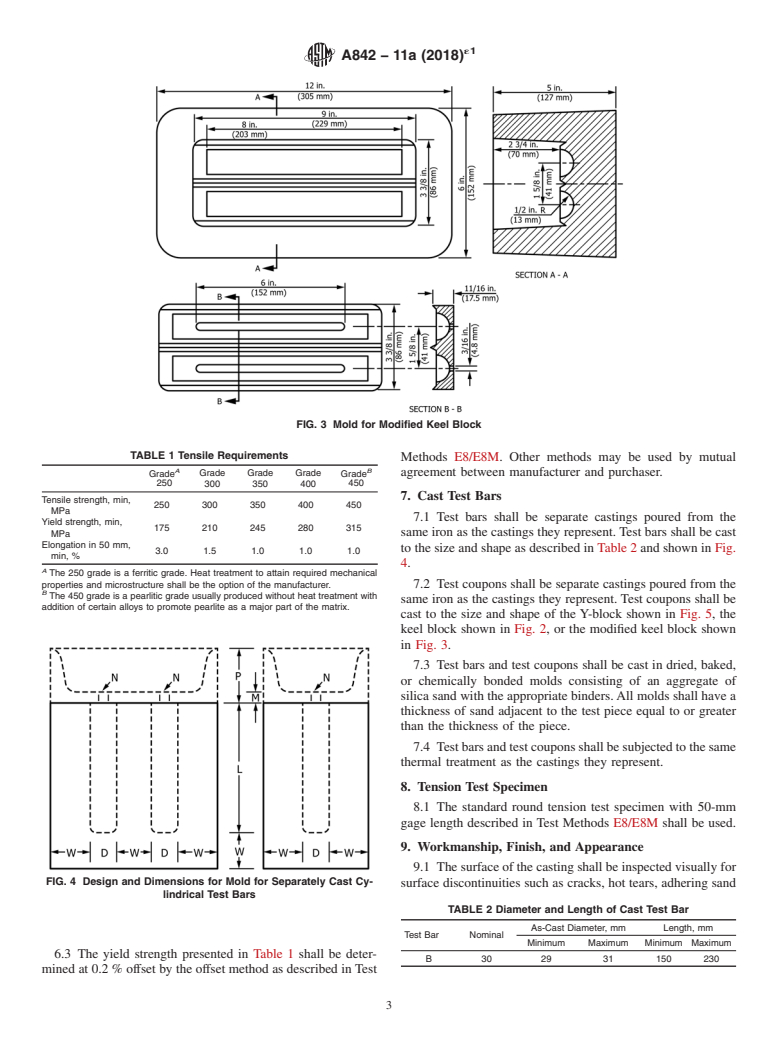
FIG. 3 Mold for Modified Keel Block
1.4 This standard does not purport to address all of the safety concerns, if any, associated with its use. It is the responsibility of the user of this standard to establish appropriate safety, health, and environmental practices and determine the applicability of regulatory limitations prior to use.
1.5 This international standard was developed in accordance with internationally recognized principles on standardization established in the Decision on Principles for the Development of International Standards, Guides and Recommendations issued by the World Trade Organization Technical Barriers to Trade (TBT) Committee.
General Information
Buy Standard
Standards Content (Sample)
NOTICE: This standard has either been superseded and replaced by a new version or withdrawn.
Contact ASTM International (www.astm.org) for the latest information
´1
Designation:A842 −11a (Reapproved 2018)
Standard Specification for
Compacted Graphite Iron Castings
This standard is issued under the fixed designation A842; the number immediately following the designation indicates the year of
original adoption or, in the case of revision, the year of last revision. A number in parentheses indicates the year of last reapproval. A
superscript epsilon (´) indicates an editorial change since the last revision or reapproval.
ε NOTE—Footnote 3 was updated editorially in November 2018.
1. Scope 2.2 Federal Standard:
Federal Standard No. 123 Marking for Shipment (Civil
1.1 This specification covers castings made of compacted
Agencies)
graphite iron, which is described as cast iron with the graphite
2.3 American National Standard:
in compacted (vermiform) shapes and essentially free of flake
MIL-STD-129 Marking for Shipment and Storage
graphite in the bulk of the casting.
1.2 No precise quantitative relationship can be stated be-
3. Ordering Information
tweenthepropertiesofironinthevariouslocationsofthesame
3.1 Orders for material to this specification shall include the
casting and those of a test bar cast from the same iron (see
following information:
Appendix X1).
3.1.1 ASTM designation and year of issue,
1.3 The values stated in SI units are to be regarded as
3.1.2 Grade of compacted graphite iron required as identi-
standard. No other units of measurement are included in this
fied in Table 1,
standard.
3.1.3 Special properties, if required (see 4.1 and 10.1),
1.3.1 Exception—The inch-pound units in Figs. 1-3 are
3.1.4 If samples other than those identified in Section 9 are
standard. SI units are added for information only.
required,
3.1.5 Certification if so designated by the purchaser, and
1.4 This standard does not purport to address all of the
3.1.6 Special preparation for delivery, if required.
safety concerns, if any, associated with its use. It is the
responsibility of the user of this standard to establish appro-
4. Chemical Composition
priate safety, health, and environmental practices and deter-
4.1 It is the intent of this specification to subordinate
mine the applicability of regulatory limitations prior to use.
chemical composition to mechanical properties; however, any
1.5 This international standard was developed in accor-
dance with internationally recognized principles on standard- chemical requirement may be specified by agreement between
the manufacturer and the purchaser.
ization established in the Decision on Principles for the
Development of International Standards, Guides and Recom-
5. Requirements
mendations issued by the World Trade Organization Technical
Barriers to Trade (TBT) Committee.
5.1 Compacted graphite cast iron shall be examined metal-
lographically for the acceptable graphite formation. Nonde-
2. Referenced Documents
structive testing such as ultrasonic velocity or resonance
2.1 ASTM Standards: frequency may also be used to determine the graphite nodu-
A247 Test Method for Evaluating the Microstructure of
larity. However, in cases of dispute, the metallographic exami-
Graphite in Iron Castings nation shall prevail.
E8/E8M Test Methods for Tension Testing of Metallic Ma-
5.2 Themetallographicexaminationshallbeperformedona
terials
sample sectioned from the casting, on a separately cast test
coupon as shown in Fig. 1, or on a test lug from a casting. The
This specification is under the jurisdiction of ASTM Committee A04 on Iron
location on the casting from which the metallographic speci-
Castings and is the direct responsibility of Subcommittee A04.02 on Malleable and
men is sectioned shall be agreed by the manufacturer and the
Ductile Iron Castings.
purchaser. In the case of a test coupon or test lug, the specimen
Current edition approved Nov. 1, 2018. Published November 2018. Originally
approved in 1985. Last previous edition approved in 2011 as A842 – 11a. DOI:
10.1520/A0842-11AR18E01.
2 3
For referenced ASTM standards, visit the ASTM website, www.astm.org, or Available from General Services Administration – Vendor Support Center,
contact ASTM Customer Service at service@astm.org. For Annual Book of ASTM https://vsc.gsa.gov/administration/files/Compliance-with-FED-STD123H.pdf.
Standards volume information, refer to the standard’s Document Summary page on Available fromAmerican National Standards Institute (ANSI), 25 W. 43rd St.,
the ASTM website. 4th Floor, New York, NY 10036, http://www.ansi.org.
Copyright © ASTM International, 100 Barr Harbor Drive, PO Box C700, West Conshohocken, PA 19428-2959. United States
´1
A842−11a (2018)
FIG. 1 Test Coupon for Microscopical Examination of Compacted Graphite Iron
shall make the choice. When test specimens are to be taken
from a casting, the location shall be agreed on by the purchaser
and the manufacturer and documented on the casting drawing.
It is the manufacturer’s required responsibility to maintain
adequate controls and documentation to assure the customer
that test specimen microstructures are representative of micro-
structure in the castings shipped.
5.4 The acceptable graphite formation in the microstructure
of the test coupon or casting lug shall contain 80 % minimum
Type IV graphite (see Plate 1, Graphite Form Types of Test
Method A247). The remainder of the graphite should be Type
I, II, or III, with no free flake graphite (type VII) in the bulk of
the casting. The presence of up to 20 % of Types I, II, and III
graphite gives rise to the definition of a maximum of 20 %
nodularity in compacted graphite cast iron. The nodularity
percentage can be arrived at by using the manual particle
Metric Equivalents count, semiautomatic, or automatic image analysis methods.
in. mm in. mm
Whichever method is used, the procedure should be agreed on
1 1
⁄2 12.7 1 ⁄2 38.1
1 between the manufacturer and the purchaser.
1 25.4 2 ⁄2 63.5
5.5 Unless otherwise specified, the matrix microstructure of
NOTE 1—The length of the keel block shall be 6 in. (152 mm).
castingscoveredbythisspecificationshallbesubstantiallyfree
of primary cementite.
FIG. 2 Keel Block
5.6 Flake graphite is not permitted except within the surface
rim zone of the casting. The amount of flake graphite at the
shall represent the last metal from the treated batch. The
surface shall be agreed by the manufacturer and the purchaser.
casting lug dimension and location shall be agreed by manu-
NOTE 1—Flake graphite in the casting surface reduces fatigue life,
facturer and purchaser.
which should be taken into account during casting design. Machining
5.3 When castings are produced to this specification by
removes this flake graphite and shot blasting generally minimizes its
treating the iron in the mold for graphite form control, the
effect.
manufacturer may use separately cast test coupons or cut test
specimens from castings to qualify conformance of the micro- 6. Tensile Requirements
structure requirements. When separately cast test coupons are
6.1 The iron as represented by the test specimens shall
used, the test coupons shall have a chemical composition
conform to the requirements for tensile properties, as identified
representative of that in the castings, produced from that iron
in Table 1.
poured, and having a cooling rate equivalent to that obtained
through use of test molds as shown in Figs. 1-4.The size of the 6.2 Tensile properties shall be determined using the test bar
cast coupon representing the castings shall be the option of the described in 7.1 or one of the test coupons described in 7.2,
purchaser. In case no option is expressed, the manufacturer except as provided in 10.4.
´1
A842−11a (2018)
FIG. 3 Mold for Modified Keel Block
TABLE 1 Tensile Requirements
Methods E8/E8M. Other methods may be used by mutual
A B
Grade Grade Grade agreement between manufacturer and purchaser.
Grade Grade
250 450
300 350 400
7. Cast Test Bars
Tensile strength, min,
250 300 350 400 450
MPa
7.1 Test bars shall be separate castings poured from the
Yield strength, min,
175 210 245 280 315
same iron as the castings they represent. Test bars shall be cast
MPa
Elongation in 50 mm,
to the size and shape as described in Table 2 and shown in Fig.
3.0 1.5 1.0 1.0 1.0
min, %
4.
A
The 250 grade is a ferritic grade. Heat treatment to attain required mechanical
properties and microstructure shall be the option of the manufacturer. 7.2 Test coupons shall be separate castings poured from the
B
The 450 grade is a pearlitic grade usually produced without heat treatment with
same iron as the castings they represent. Test coupons shall be
addition of certain alloys to promote pearlite as a major part of the matrix.
cast to the size and shape of the Y-block shown in Fig. 5, the
keel block shown in Fig. 2, or the modified keel block shown
in Fig. 3.
7.3 Test bars and test coupons shall be cast in dried, baked,
or chemically bonded molds consisting of an aggregate of
silica sand with the appropriate binders.All molds sha
...
This document is not an ASTM standard and is intended only to provide the user of an ASTM standard an indication of what changes have been made to the previous version. Because
it may not be technically possible to adequately depict all changes accurately, ASTM recommends that users consult prior editions as appropriate. In all cases only the current version
of the standard as published by ASTM is to be considered the official document.
´1
Designation: A842 − 11a A842 − 11a (Reapproved 2018)
Standard Specification for
Compacted Graphite Iron Castings
This standard is issued under the fixed designation A842; the number immediately following the designation indicates the year of
original adoption or, in the case of revision, the year of last revision. A number in parentheses indicates the year of last reapproval. A
superscript epsilon (´) indicates an editorial change since the last revision or reapproval.
ε NOTE—Footnote 3 was updated editorially in November 2018.
1. Scope
1.1 This specification covers castings made of compacted graphite iron, which is described as cast iron with the graphite in
compacted (vermiform) shapes and essentially free of flake graphite in the bulk of the casting.
1.2 No precise quantitative relationship can be stated between the properties of iron in the various locations of the same casting
and those of a test bar cast from the same iron (see Appendix X1).
1.3 The values stated in SI units are to be regarded as standard. No other units of measurement are included in this standard.
1.3.1 Exception—The inch-pound units in Figs. 1-3 and are standard. SI units are added for information only.
1.4 This standard does not purport to address all of the safety concerns, if any, associated with its use. It is the responsibility
of the user of this standard to establish appropriate safety safety, health, and healthenvironmental practices and determine the
applicability of regulatory limitations prior to use.
1.5 This international standard was developed in accordance with internationally recognized principles on standardization
established in the Decision on Principles for the Development of International Standards, Guides and Recommendations issued
by the World Trade Organization Technical Barriers to Trade (TBT) Committee.
2. Referenced Documents
2.1 ASTM Standards:
A247 Test Method for Evaluating the Microstructure of Graphite in Iron Castings
E8/E8M Test Methods for Tension Testing of Metallic Materials
2.2 Federal Standard:
Federal Standard No. 123 Marking for Shipment (Civil Agencies)
This specification is under the jurisdiction of ASTM Committee A04 on Iron Castings and is the direct responsibility of Subcommittee A04.02 on Malleable and Ductile
Iron Castings.
Current edition approved May 1, 2011Nov. 1, 2018. Published June 2011November 2018. Originally approved in 1985. Last previous edition approved in 2011 as
A842 – 11.A842 – 11a. DOI: 10.1520/A0842-11A.10.1520/A0842-11AR18E01.
For referenced ASTM standards, visit the ASTM website, www.astm.org, or contact ASTM Customer Service at service@astm.org. For Annual Book of ASTM Standards
volume information, refer to the standard’s Document Summary page on the ASTM website.
Available from Standardization Documents Order Desk, DODSSP, Bldg. 4, Section D, 700 Robbins Ave., Philadelphia, PA 19111-5098, http://
dodssp.daps.dla.mil.General Services Administration – Vendor Support Center, https://vsc.gsa.gov/administration/files/Compliance-with-FED-STD123H.pdf.
Copyright © ASTM International, 100 Barr Harbor Drive, PO Box C700, West Conshohocken, PA 19428-2959. United States
´1
A842 − 11a (2018)
FIG. 1 Test Coupon for Microscopical Examination of Compacted Graphite Iron
2.3 American National Standard:
MIL-STD-129 Marking for Shipment and Storage
3. Ordering Information
3.1 Orders for material to this specification shall include the following information:
3.1.1 ASTM designation and year of issue,
3.1.2 Grade of compacted graphite iron required as identified in Table 1,
3.1.3 Special properties, if required,required (see 4.1 and 10.1),
3.1.4 If samples other than those identified in Section 9 are required,
3.1.5 Certification if so designated by the purchaser, and
3.1.6 Special preparation for delivery, if required.
4. Chemical Composition
4.1 It is the intent of this specification to subordinate chemical composition to mechanical properties; however, any chemical
requirement may be specified by agreement between the manufacturer and the purchaser.
5. Requirements
5.1 Compacted graphite cast iron shall be examined metallographically for the acceptable graphite formation. Nondestructive
testing such as ultrasonic velocity or resonance frequency may also be used to determine the graphite nodularity. However, in cases
of dispute, the metallographic examination shall prevail.
5.2 The metallographic examination shall be performed on a sample sectioned from the casting, on a separately cast test
coupon,coupon as shown in Fig. 1, or on a test lug from a casting. The location on the casting from which the metallographic
specimen is sectioned shall be agreed by the manufacturer and the purchaser. In the case of a test coupon or test lug, the specimen
shall represent the last metal from the treated batch. The casting lug dimension and location shall be agreed by manufacturer and
purchaser.
5.3 When castings are produced to this specification by treating the iron in the mold for graphite form control, the manufacturer
may use separately cast test coupons or cut test specimens from castings to qualify conformance of the microstructure
requirements. When separately cast test coupons are used, the test coupons shall have a chemical composition representative of
that in the castings, produced from that iron poured, and having a cooling rate equivalent to that obtained through use of test molds
as shown in Figs. 1-34. The size of the cast coupon representing the castings shall be the option of the purchaser. In case no option
is expressed, the manufacturer shall make the choice. When test specimens are to be taken from a casting, the location shall be
agreed on by the purchaser and the manufacturer and documented on the casting drawing. It is the manufacturer’s required
responsibility to maintain adequate controls and documentation to assure the customer that test specimen microstructures are
representative of microstructure in the castings shipped.
Available from American National Standards Institute (ANSI), 25 W. 43rd St., 4th Floor, New York, NY 10036, http://www.ansi.org.
´1
A842 − 11a (2018)
NOTE 1—The length of the keel block shall be 6 in. (152 mm).
Metric Equivalents
in. mm in. mm
1 1
⁄2 12.7 1 ⁄2 38.1
1 25.4 2 ⁄2 63.5
NOTE 1—The length of the keel block shall be 6 in. (152 mm).
FIG. 2 Keel Block
5.4 The acceptable graphite formation in the microstructure of the test coupon or casting lug shall contain 80 % minimum Type
IV graphite (see Plate 1, Graphite Form Types of Test Method A247). The remainder of the graphite should be Type I, II, or III,
with no free flake graphite (type VII) in the bulk of the casting. The presence of up to 20 % of TypeTypes I, II, and III graphite
gives rise to the definition of a maximum of 20 % nodularity in compacted graphite cast iron. The nodularity percentage can be
arrived at by using the manual particle count, semiautomatic, or automatic image analysis methods. Whichever method is used,
the procedure should be agreed on between the manufacturer and the purchaser.
5.5 Unless otherwise specified, the matrix microstructure of castings covered by this specification shall be substantially free of
primary cementite.
5.6 Flake graphite is not permitted except within the surface rim zone of the casting. The amount of flake graphite at the surface
shall be agreed by the manufacturer and the purchaser.
NOTE 1—Flake graphite in the casting surface reduces fatigue life, which should be taken into account during casting design. Machining removes this
flake graphite and shot blasting generally minimizes its effect.
6. Tensile Requirements
6.1 The iron as represented by the test specimens shall conform to the requirements for tensile properties, as identified in Table
1.
´1
A842 − 11a (2018)
FIG. 3 Mold for Modified Keel Block
TABLE 1 Tensile Requirements
A B
Grade Grade Grade
Grade Grade
250 450
300 350 400
Tensile strength, min,
250 300 350 400 450
MPa
Yield strength, min,
175 210 245 280 315
MPa
Elongation in 50 mm,
3.0 1.5 1.0 1.0 1.0
min, %
A
The 250 grade is a ferritic grade. Heat treatment to attain required mechanical
properties and microstructure shall be the option of the manufacturer.
B
The 450 grade is a pearlitic grade usually produced without heat treatment with
addition of certain alloys to promote pearlite as a major part of the matrix.
FIG. 4 Design and Dimensions for Mold for Separately Cast Cylindrical Test Bars
6.2 Tensile properties shall be determined using the test bar described in 7.1 or one of the test coupons described in 7.2, except
as provided in 10.4.
6.3 The yield strength presented in Table 1 shall be determined at 0.2 % offset by the offset method as described in Test Methods
E8/E8M. Other methods may be used by mutual agreement between manufacturer and purchaser.
´1
A842 − 11a (2018)
7. Cast Test Bars
7.1 Test bars shall be separate castings poured from the same iron as the castings they represent. Test bars shall be cast to the
size and sha
...


Questions, Comments and Discussion
Ask us and Technical Secretary will try to provide an answer. You can facilitate discussion about the standard in here.