ASTM E2422-05
(Reference)Standard Digital Reference Images for Inspection of Aluminum Castings
Standard Digital Reference Images for Inspection of Aluminum Castings
SCOPE
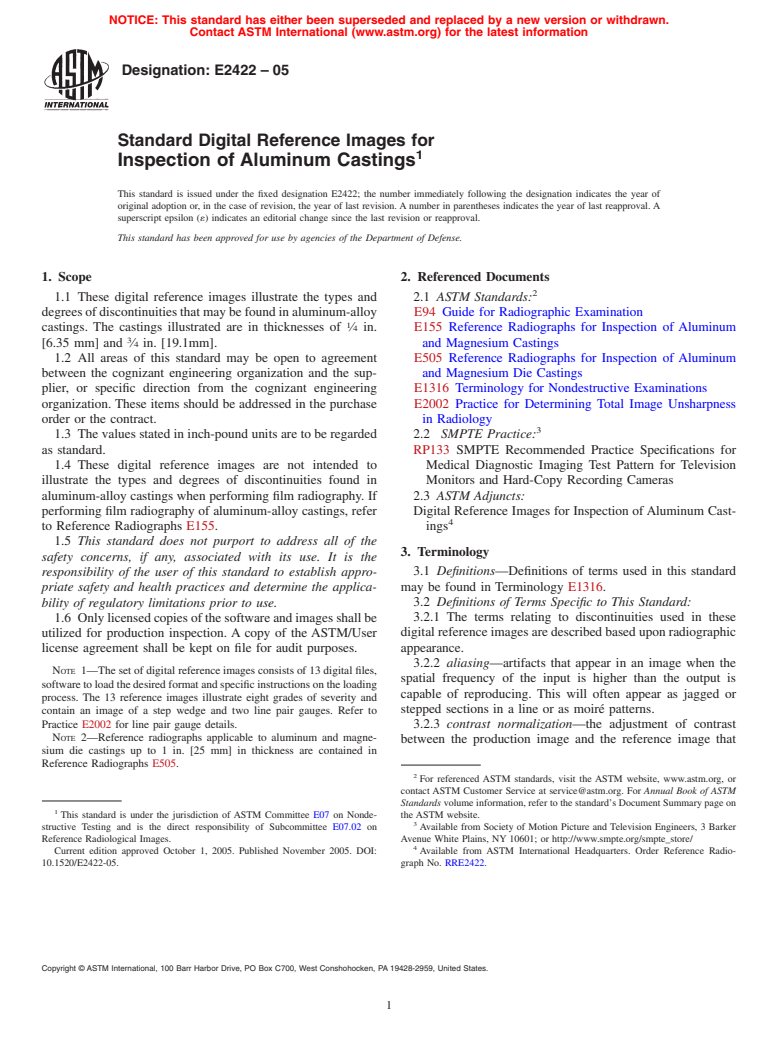
1.1 These digital reference images illustrate the types and degrees of discontinuities that may be found in aluminum-alloy castings. The castings illustrated are in thicknesses of 1/ 4 in. [6.35 mm] and 3/4 in. [19.1mm].
1.2 All areas of this standard may be open to agreement between the cognizant engineering organization and the supplier, or specific direction from the cognizant engineering organization. These items should be addressed in the purchase order or the contract.
1.3 The values stated in inch-pound units are to be regarded as standard.
1.4 These digital reference images are not intended to illustrate the types and degrees of discontinuities found in aluminum-alloy castings when performing film radiography. If performing film radiography of aluminum-alloy castings, refer to Reference Radiographs E 155.
This standard does not purport to address all of the safety concerns, if any, associated with its use. It is the responsibility of the user of this standard to establish appropriate safety and health practices and determine the applicability of regulatory limitations prior to use.
1.5 Only licensed copies of the software and images shall be utilized for production inspection. A copy of the ASTM/User license agreement shall be kept on file for audit purposes.Note 1
The set of digital reference images consists of 13 digital files, software to load the desired format and specific instructions on the loading process. The 13 reference images illustrate eight grades of severity and contain an image of a step wedge and two line pair gauges. Refer to Practice E 2002 for line pair gauge details.Note 2
Reference radiographs applicable to aluminum and magnesium die castings up to 1 in. [25 mm] in thickness are contained in Reference Radiographs E 505.
General Information
Relations
Standards Content (Sample)
NOTICE: This standard has either been superseded and replaced by a new version or withdrawn.
Contact ASTM International (www.astm.org) for the latest information
Designation:E2422–05
Standard Digital Reference Images for
Inspection of Aluminum Castings
This standard is issued under the fixed designation E2422; the number immediately following the designation indicates the year of
original adoption or, in the case of revision, the year of last revision. A number in parentheses indicates the year of last reapproval. A
superscript epsilon (´) indicates an editorial change since the last revision or reapproval.
This standard has been approved for use by agencies of the Department of Defense.
1. Scope 2. Referenced Documents
1.1 These digital reference images illustrate the types and 2.1 ASTM Standards:
degreesofdiscontinuitiesthatmaybefoundinaluminum-alloy E94 Guide for Radiographic Examination
castings. The castings illustrated are in thicknesses of ⁄4 in. E155 Reference Radiographs for Inspection of Aluminum
[6.35 mm] and ⁄4 in. [19.1mm]. and Magnesium Castings
1.2 All areas of this standard may be open to agreement E505 Reference Radiographs for Inspection of Aluminum
between the cognizant engineering organization and the sup- and Magnesium Die Castings
plier, or specific direction from the cognizant engineering E1316 Terminology for Nondestructive Examinations
organization. These items should be addressed in the purchase E2002 Practice for Determining Total Image Unsharpness
order or the contract. in Radiology
1.3 The values stated in inch-pound units are to be regarded 2.2 SMPTE Practice:
as standard. RP133 SMPTE Recommended Practice Specifications for
1.4 These digital reference images are not intended to Medical Diagnostic Imaging Test Pattern for Television
illustrate the types and degrees of discontinuities found in Monitors and Hard-Copy Recording Cameras
aluminum-alloy castings when performing film radiography. If 2.3 ASTM Adjuncts:
performing film radiography of aluminum-alloy castings, refer Digital Reference Images for Inspection ofAluminum Cast-
to Reference Radiographs E155. ings
1.5 This standard does not purport to address all of the
3. Terminology
safety concerns, if any, associated with its use. It is the
3.1 Definitions—Definitions of terms used in this standard
responsibility of the user of this standard to establish appro-
priate safety and health practices and determine the applica- may be found in Terminology E1316.
3.2 Definitions of Terms Specific to This Standard:
bility of regulatory limitations prior to use.
1.6 Onlylicensedcopiesofthesoftwareandimagesshallbe 3.2.1 The terms relating to discontinuities used in these
digital reference images are described based upon radiographic
utilized for production inspection. A copy of the ASTM/User
license agreement shall be kept on file for audit purposes. appearance.
3.2.2 aliasing—artifacts that appear in an image when the
NOTE 1—The set of digital reference images consists of 13 digital files,
spatial frequency of the input is higher than the output is
softwaretoloadthedesiredformatandspecificinstructionsontheloading
capable of reproducing. This will often appear as jagged or
process. The 13 reference images illustrate eight grades of severity and
stepped sections in a line or as moiré patterns.
contain an image of a step wedge and two line pair gauges. Refer to
Practice E2002 for line pair gauge details. 3.2.3 contrast normalization—the adjustment of contrast
NOTE 2—Reference radiographs applicable to aluminum and magne-
between the production image and the reference image that
sium die castings up to 1 in. [25 mm] in thickness are contained in
Reference Radiographs E505.
For referenced ASTM standards, visit the ASTM website, www.astm.org, or
contact ASTM Customer Service at service@astm.org. For Annual Book of ASTM
Standards volume information, refer to the standard’s Document Summary page on
This standard is under the jurisdiction of ASTM Committee E07 on Nonde- the ASTM website.
structive Testing and is the direct responsibility of Subcommittee E07.02 on Available from Society of Motion Picture and Television Engineers, 3 Barker
Reference Radiological Images. Avenue White Plains, NY 10601; or http://www.smpte.org/smpte_store/
Current edition approved October 1, 2005. Published November 2005. DOI: Available from ASTM International Headquarters. Order Reference Radio-
10.1520/E2422-05. graph No. RRE2422.
Copyright © ASTM International, 100 Barr Harbor Drive, PO Box C700, West Conshohocken, PA 19428-2959, United States.
E2422–05
makes the change in digital driving level versus change in 5. Basis for Application
thickness equal for both images.
5.1 The digital reference images may be applied as accep-
3.2.4 DDL—digital driving level also known as monitor
tance standards tailored to the end use of the product. Appli-
pixel value.
cationofthesedigitalreferenceimagesasacceptancestandards
3.2.5 foreign materials—appear as isolated, irregular, or
should be based on the intended use of the product and the
elongated variations in brightness, not corresponding to varia-
following considerations (see Note 3).
tions in thickness of material, nor to cavities. They may be due
5.1.1 An area of like size to that of the digital reference
to the presence of sand, slag, oxide or dross, or metal of
image shall be the unit areas by which the production digital
different density.
image is evaluated, and any such area shall meet the require-
3.2.6 gas holes—appear as round or elongated, smooth-
ments as defined for acceptability.
edgeddarkspotsinanegativeimage,occurringindividually,in
5.1.2 Any combination or subset of these digital reference
clusters, or distributed throughout the casting.
images may be used as is relevant to the particular application.
3.2.7 gas porosity—represented by round or elongated dark
Different grades or acceptance limits may be specified for each
spots in a negative image corresponding to minute voids
discontinuity type. Furthermore, different grades may be speci-
usually distributed through the entire casting.
fied for different regions or zones of a component.
3.2.8 measured resolution—the characteristic resolution of
5.1.3 Special considerations may be required where more
a digital radiographic system as measured in accordance with
than one discontinuity type is present in the same area. Any
8.5.
modifications to the acceptance criteria required on the basis of
3.2.9 shrinkage cavity—appears as a dendritic, filamentary,
multiple discontinuity types must be specified.
or jagged darkened area in a negative image. 5.1.4 Production digital images containing porosity, gas or
3.2.10 shrinkage porosity or sponge (nonferrous alloys)—a inclusions may be rated by the overall condition with regard to
localized lacy or honeycombed darkened area in a negative size, number, and distribution. These factors should be consid-
image. ered in balance.
5.1.5 As a minimum, the acceptance criteria should contain
3.2.11 system resolution—the detector-measured resolution
divided by the geometric magnification. information addressing: zoning of the part (if applicable), the
acceptance severity level for each discontinuity type, and the
4. Significance and Use specified area to which the digital reference images are to be
applied.
4.1 These digital reference images are intended for refer-
enceonly,butaresodesignedthatacceptancestandards,which
NOTE 3—Caution should be exercised in specifying the acceptance
may be developed for particular requirements, can be specified criteria to be met in a casting. Casting design coupled with foundry
practice should be considered. It is advisable to consult with the
in terms of these digital reference images. The illustrations are
manufacturer/foundry before establishing the acceptance criteria to ensure
digital images of castings that were produced under conditions
the desired quality level can be achieved.
designed to develop the discontinuities. The images of the
⁄4-in. [6.35-mm] castings are intended to be used in the
6. Procedure for Evaluation
thickness range up to and including ⁄2-in. [12.7 mm]. The
6.1 Select the appropriate Digital Reference Image.
imagesofthe ⁄4-in.[19.1-mm]castingsareintendedtobeused
6.2 Perform the contrast normalization (window width nor-
in the thickness range of over ⁄2 in., up to and including 2 in.
malization) between the production image and the reference
[51 mm].
image.
4.2 Image Deterioration—Many conditions can affect the
6.3 Once contrast normalization has been performed, con-
appearance and functionality of digital reference images. For
trast (window width) shall not be altered in either image
example, electrical interference, hardware incompatibilities,
without re-performing contrast normalization prior to product
and corrupted files or drivers may affect their appearance. The
evaluation.
ASTM E2002 line pair gauges located in the lower right hand
corner of each digital reference can be used as an aid to detect
7. Description
image deterioration by comparing the measured resolution
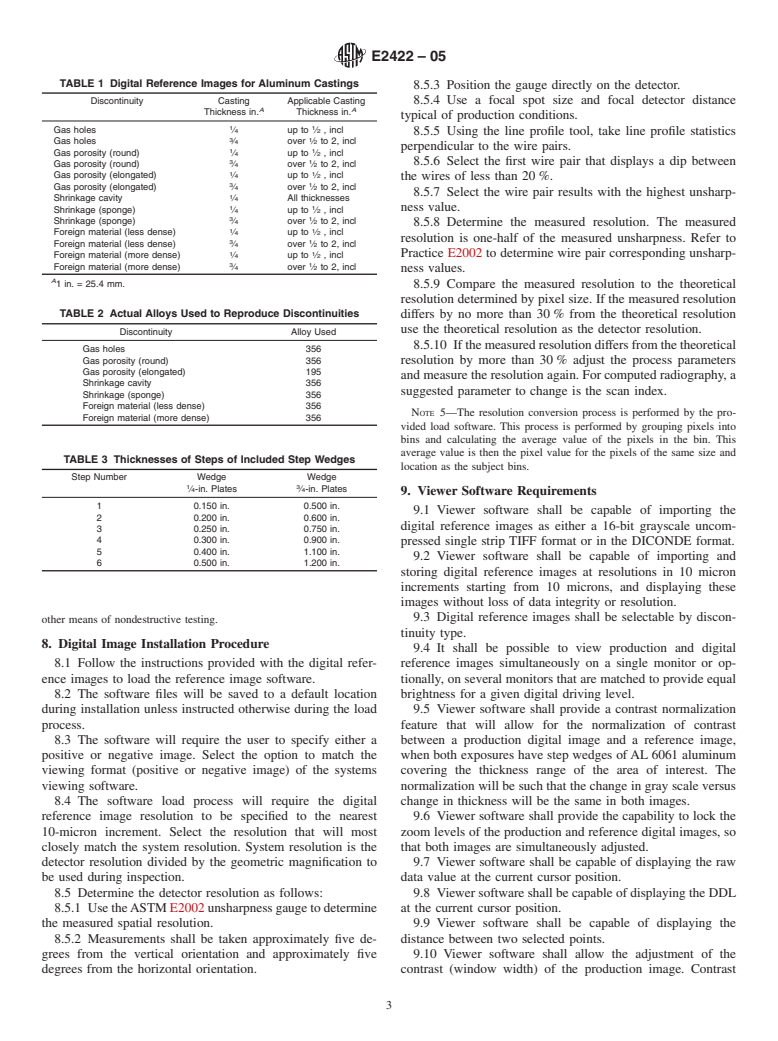
7.1 The digital reference images listed in Table 1 illustrate
usingthegaugestotheresolutionstatedonthedigitalreference
each type of discontinuity in eight grades. Although eight
image. Do not use the digital reference images if their
grades of each discontinuity are shown, a numerically smaller
appearance has been adversely affected such that the interpre-
graded set of discontinuities based on these digital reference
tation and use of the images could be influenced.
images could be used for acceptance standards. The radio-
4.3 Agreement should be reached between cognizant engi-
graphic technique used is in agreement with Guide E94.
neering organization and the supplier that the system used by
7.2 The alloys used to reproduce the various discontinuities
the supplier is capable of detecting and classifying the required
are as listed in Table 2.
discontinuities.
7.3 The step wedges shown in the digital reference images
are made of 6061 Alum
...


Questions, Comments and Discussion
Ask us and Technical Secretary will try to provide an answer. You can facilitate discussion about the standard in here.