ASTM A436-84(2015)
(Specification)Standard Specification for Austenitic Gray Iron Castings
Standard Specification for Austenitic Gray Iron Castings
ABSTRACT
This specification covers austenitic gray iron castings that are used primarily for their resistance to heat, corrosion, and wear. The types of castings covered here are: Type 1, Type 1b, Type 2, Type 2b, Type 3, Type 4, Type 5, and Type 6. The materials shall be manufactured by melting in any furnace that produces castings which includes cupolas, air furnaces, electric furnaces, crucible furnaces, and so forth. Heat and product analyses shall be performed wherein specimens shall conform to required chemical composition of carbon, silicon, manganese, nickel, copper, chromium, sulfur, and molybdenum. The materials shall undergo a nonmagnetic test which is based on the material's attraction to a small steel horseshoe-type magnet and a magnetic permeability test in the event that nonmagnetic castings are specified. Tension tests shall be performed wherein specimens shall conform to required tensile strength and Brinell hardness.
SCOPE
1.1 This specification covers austenitic gray iron castings that are used primarily for their resistance to heat, corrosion, and wear. Austenitic gray iron is characterized by uniformly distributed graphite flakes, some carbides, and the presence of sufficient alloy content to produce an austenitic structure.
1.2 The values stated in inch-pound units are to be regarded as standard. The values given in parentheses are mathematical conversions to SI units that are provided for information only and are not considered standard.
General Information
Relations
Buy Standard
Standards Content (Sample)
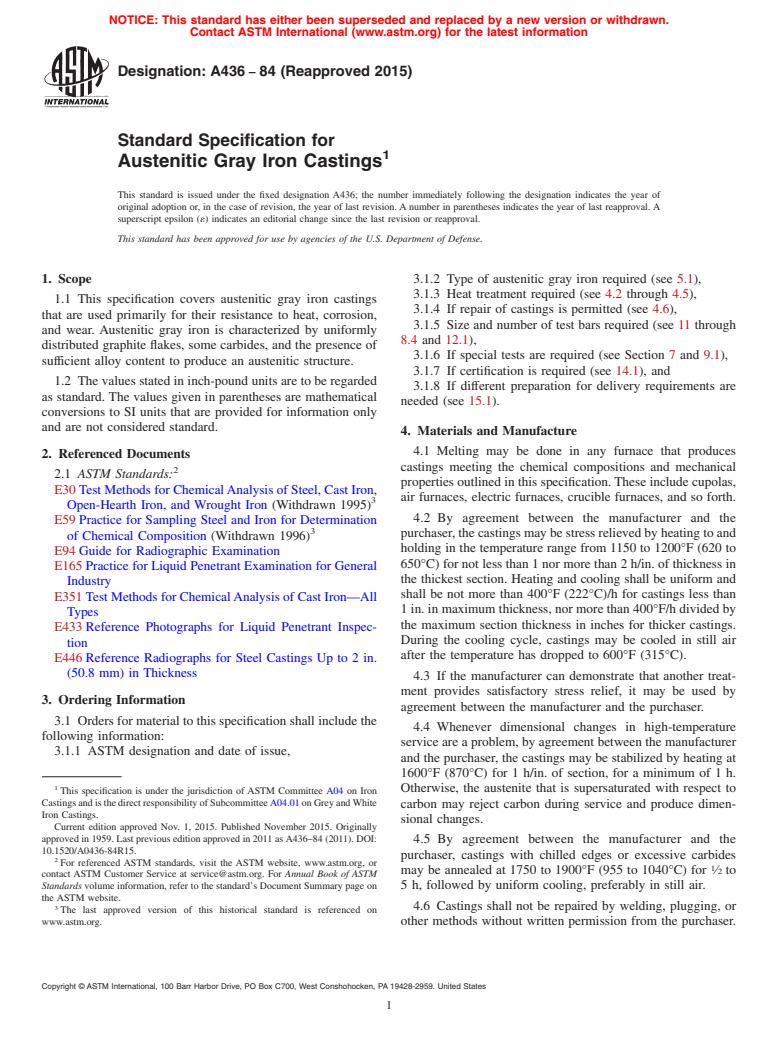
NOTICE: This standard has either been superseded and replaced by a new version or withdrawn.
Contact ASTM International (www.astm.org) for the latest information
Designation:A436 −84 (Reapproved 2015)
Standard Specification for
Austenitic Gray Iron Castings
This standard is issued under the fixed designation A436; the number immediately following the designation indicates the year of
original adoption or, in the case of revision, the year of last revision. A number in parentheses indicates the year of last reapproval. A
superscript epsilon (´) indicates an editorial change since the last revision or reapproval.
This standard has been approved for use by agencies of the U.S. Department of Defense.
1. Scope 3.1.2 Type of austenitic gray iron required (see 5.1),
3.1.3 Heat treatment required (see 4.2 through 4.5),
1.1 This specification covers austenitic gray iron castings
3.1.4 If repair of castings is permitted (see 4.6),
that are used primarily for their resistance to heat, corrosion,
3.1.5 Size and number of test bars required (see 11 through
and wear. Austenitic gray iron is characterized by uniformly
8.4 and 12.1),
distributed graphite flakes, some carbides, and the presence of
3.1.6 If special tests are required (see Section 7 and 9.1),
sufficient alloy content to produce an austenitic structure.
3.1.7 If certification is required (see 14.1), and
1.2 The values stated in inch-pound units are to be regarded
3.1.8 If different preparation for delivery requirements are
as standard. The values given in parentheses are mathematical
needed (see 15.1).
conversions to SI units that are provided for information only
and are not considered standard.
4. Materials and Manufacture
4.1 Melting may be done in any furnace that produces
2. Referenced Documents
castings meeting the chemical compositions and mechanical
2.1 ASTM Standards:
properties outlined in this specification. These include cupolas,
E30 Test Methods for ChemicalAnalysis of Steel, Cast Iron,
air furnaces, electric furnaces, crucible furnaces, and so forth.
Open-Hearth Iron, and Wrought Iron (Withdrawn 1995)
4.2 By agreement between the manufacturer and the
E59 Practice for Sampling Steel and Iron for Determination
purchaser, the castings may be stress relieved by heating to and
of Chemical Composition (Withdrawn 1996)
holding in the temperature range from 1150 to 1200°F (620 to
E94 Guide for Radiographic Examination
650°C) for not less than 1 nor more than 2 h/in. of thickness in
E165 Practice for Liquid Penetrant Examination for General
the thickest section. Heating and cooling shall be uniform and
Industry
shall be not more than 400°F (222°C)/h for castings less than
E351 Test Methods for ChemicalAnalysis of Cast Iron—All
1 in. in maximum thickness, nor more than 400°F/h divided by
Types
the maximum section thickness in inches for thicker castings.
E433 Reference Photographs for Liquid Penetrant Inspec-
During the cooling cycle, castings may be cooled in still air
tion
after the temperature has dropped to 600°F (315°C).
E446 Reference Radiographs for Steel Castings Up to 2 in.
(50.8 mm) in Thickness
4.3 If the manufacturer can demonstrate that another treat-
ment provides satisfactory stress relief, it may be used by
3. Ordering Information
agreement between the manufacturer and the purchaser.
3.1 Orders for material to this specification shall include the
4.4 Whenever dimensional changes in high-temperature
following information:
service are a problem, by agreement between the manufacturer
3.1.1 ASTM designation and date of issue,
and the purchaser, the castings may be stabilized by heating at
1600°F (870°C) for 1 h/in. of section, for a minimum of 1 h.
Otherwise, the austenite that is supersaturated with respect to
This specification is under the jurisdiction of ASTM Committee A04 on Iron
CastingsandisthedirectresponsibilityofSubcommitteeA04.01onGreyandWhite
carbon may reject carbon during service and produce dimen-
Iron Castings.
sional changes.
Current edition approved Nov. 1, 2015. Published November 2015. Originally
approved in 1959. Last previous edition approved in 2011 as A436–84 (2011). DOI:
4.5 By agreement between the manufacturer and the
10.1520/A0436-84R15.
purchaser, castings with chilled edges or excessive carbides
For referenced ASTM standards, visit the ASTM website, www.astm.org, or
may be annealed at 1750 to 1900°F (955 to 1040°C) for ⁄2 to
contact ASTM Customer Service at service@astm.org. For Annual Book of ASTM
Standards volume information, refer to the standard’s Document Summary page on 5 h, followed by uniform cooling, preferably in still air.
the ASTM website.
4.6 Castings shall not be repaired by welding, plugging, or
The last approved version of this historical standard is referenced on
www.astm.org. other methods without written permission from the purchaser.
Copyright © ASTM International, 100 Barr Harbor Drive, PO Box C700, West Conshohocken, PA 19428-2959. United States
A436−84 (2015)
5. Chemical Composition 8.3 It is recommended that test bars be poured immediately
after the castings and from the same ladle of metal. If castings
5.1 Many combinations of alloys can be used to obtain an
are to be heat treated, test bars shall be included in the same
austenitic gray iron. This specification includes only the six
furnace load.
types defined by the chemical composition limits specified in
Table 1. 8.4 By agreement between the manufacturer and the
purchaser, tension test specimens may be cut directly from
5.2 The chemical analysis for total carbon shall be made on
centrifugal or other permanent mold castings. The location and
chilled cast pencil-type specimens or from thin wafers approxi-
orientation of such tension test specimens cut from castings
mately ⁄32 in. (0.8 mm) thick cut from test coupons. Drillings
shall be specified as agreed upon by the manufacturer and the
are not reliable because of the probable loss of graphite.
purchaser.
5.3 Drillings taken from test coupons, broken test
specimens, or castings shall conform to the requirements for
9. Workmanship, Finish, and Appearance
chemical composition as given in Table 1. Sampling shall be
9.1 The castings shall conform substantially to the dimen-
conducted in accordance with Practice E59 and chemical
sions on the drawings furnished by the purchaser, or if no
analysis in accordance with Test Methods E351 and Test
drawing has been provided, to the dimensions predicated by
Methods E30. Test Methods E30 should only be used for
the pattern supplied by the purchaser.The castings shall be free
analyzing those elements for which specific coverage is not
of injurious defects. Surfaces of the castings shall be free of
provided for in Test Methods E351.
burnt-on sand and shall be reasonably smooth. In other
5.4 Spectrometric techniques may also be used for analysis,
respects, the castings shall conform to whatever points may be
but should a dispute arise concerning chemical composition, specifically agreed upon between the manufacturer and the
chemical analyses determined by Test Methods E351 and Test
purchaser.
Methods E30 shall be used for referee analysis.
10. Tension Test Specimens
6. Mechanical Properties
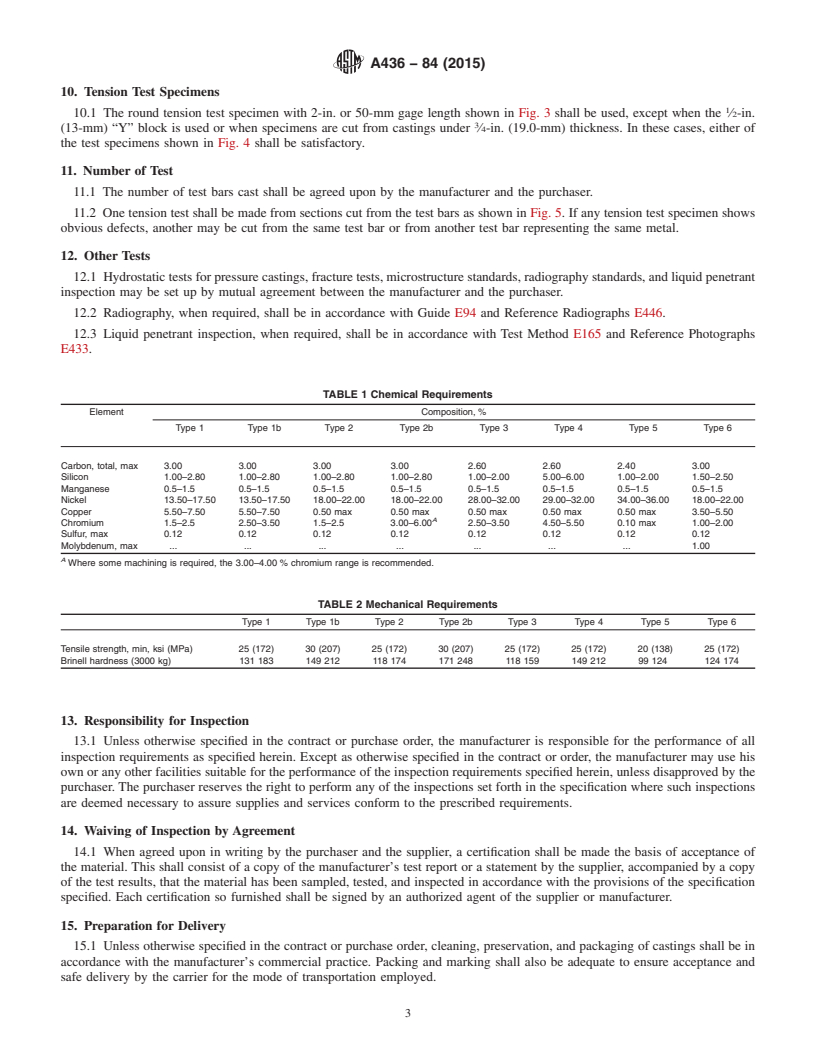
10.1 The round tension test specimen with 2-in. or 50-mm
6.1 Although these irons are not used primarily for their
gage length shown in Fig. 3 shall be used, except when the
strength,thetensilestrengthandBrinellhardnessareindicative 1
⁄2-in. (13-mm) “Y” block is used or when specimens are cut
of the correct metallurgical structure. The six types shall 3
from castings under ⁄4-in. (19.0-mm) thickness. In these cases,
conform to the requirements given in Table 2.
either of the test specimens shown in Fig. 4 shall be satisfac-
tory.
7. Magnetic Property Requirements
7.1 A convenient shop test for differentiating the various
11. Number of Test
types of austenitic gray iron is based on the fact that a ground
11.1 The number of test bars cast shall be agre
...
This document is not an ASTM standard and is intended only to provide the user of an ASTM standard an indication of what changes have been made to the previous version. Because
it may not be technically possible to adequately depict all changes accurately, ASTM recommends that users consult prior editions as appropriate. In all cases only the current version
of the standard as published by ASTM is to be considered the official document.
Designation: A436 − 84 (Reapproved 2011) A436 − 84 (Reapproved 2015)
Standard Specification for
Austenitic Gray Iron Castings
This standard is issued under the fixed designation A436; the number immediately following the designation indicates the year of
original adoption or, in the case of revision, the year of last revision. A number in parentheses indicates the year of last reapproval. A
superscript epsilon (´) indicates an editorial change since the last revision or reapproval.
This standard has been approved for use by agencies of the U.S. Department of Defense.
1. Scope
1.1 This specification covers austenitic gray iron castings that are used primarily for their resistance to heat, corrosion, and wear.
Austenitic gray iron is characterized by uniformly distributed graphite flakes, some carbides, and the presence of sufficient alloy
content to produce an austenitic structure.
1.2 The values stated in inch-pound units are to be regarded as standard. The values given in parentheses are mathematical
conversions to SI units that are provided for information only and are not considered standard.
2. Referenced Documents
2.1 ASTM Standards:
E30 Test Methods for Chemical Analysis of Steel, Cast Iron, Open-Hearth Iron, and Wrought Iron (Withdrawn 1995)
E59 Practice for Sampling Steel and Iron for Determination of Chemical Composition (Withdrawn 1996)
E94 Guide for Radiographic Examination
E165 Practice for Liquid Penetrant Examination for General Industry
E351 Test Methods for Chemical Analysis of Cast Iron—All Types
E433 Reference Photographs for Liquid Penetrant Inspection
E446 Reference Radiographs for Steel Castings Up to 2 in. (50.8 mm) in Thickness
3. Ordering Information
3.1 Orders for material to this specification shall include the following information:
3.1.1 ASTM designation and date of issue,
3.1.2 Type of austenitic gray iron required (see 5.1),
3.1.3 Heat treatment required (see 4.2 through 4.5),
3.1.4 If repair of castings is permitted (see 4.6),
3.1.5 Size and number of test bars required (see 11 through 8.4 and 12.1),
3.1.6 If special tests are required (see Section 7 and 9.1),
3.1.7 If certification is required (see 14.1), and
3.1.8 If different preparation for delivery requirements are needed (see 15.1).
4. Materials and Manufacture
4.1 Melting may be done in any furnace that produces castings meeting the chemical compositions and mechanical properties
outlined in this specification. These include cupolas, air furnaces, electric furnaces, crucible furnaces, and so forth.
4.2 By agreement between the manufacturer and the purchaser, the castings may be stress relieved by heating to and holding
in the temperature range from 1150 to 1200°F (620 to 650°C) for not less than 1 nor more than 2 h/in. of thickness in the thickest
section. Heating and cooling shall be uniform and shall be not more than 400°F (222°C)/h for castings less than 1 in. in maximum
This specification is under the jurisdiction of ASTM Committee A04 on Iron Castings and is the direct responsibility of Subcommittee A04.01 on Grey and White Iron
Castings.
Current edition approved March 1, 2011Nov. 1, 2015. Published September 2011November 2015. Originally approved in 1959. Last previous edition approved in 20062011
as A436–84 (2006).(2011). DOI: 10.1520/A0436-84R11.10.1520/A0436-84R15.
For referenced ASTM standards, visit the ASTM website, www.astm.org, or contact ASTM Customer Service at service@astm.org. For Annual Book of ASTM Standards
volume information, refer to the standard’s Document Summary page on the ASTM website.
The last approved version of this historical standard is referenced on www.astm.org.
Copyright © ASTM International, 100 Barr Harbor Drive, PO Box C700, West Conshohocken, PA 19428-2959. United States
A436 − 84 (2015)
thickness, nor more than 400°F/h divided by the maximum section thickness in inches for thicker castings. During the cooling
cycle, castings may be cooled in still air after the temperature has dropped to 600°F (315°C).
4.3 If the manufacturer can demonstrate that another treatment provides satisfactory stress relief, it may be used by agreement
between the manufacturer and the purchaser.
4.4 Whenever dimensional changes in high-temperature service are a problem, by agreement between the manufacturer and the
purchaser, the castings may be stabilized by heating at 1600°F (870°C) for 1 h/in. of section, for a minimum of 1 h. Otherwise,
the austenite that is supersaturated with respect to carbon may reject carbon during service and produce dimensional changes.
4.5 By agreement between the manufacturer and the purchaser, castings with chilled edges or excessive carbides may be
annealed at 1750 to 1900°F (955 to 1040°C) for ⁄2 to 5 h, followed by uniform cooling, preferably in still air.
4.6 Castings shall not be repaired by welding, plugging, or other methods without written permission from the purchaser.
5. Chemical Composition
5.1 Many combinations of alloys can be used to obtain an austenitic gray iron. This specification includes only the six types
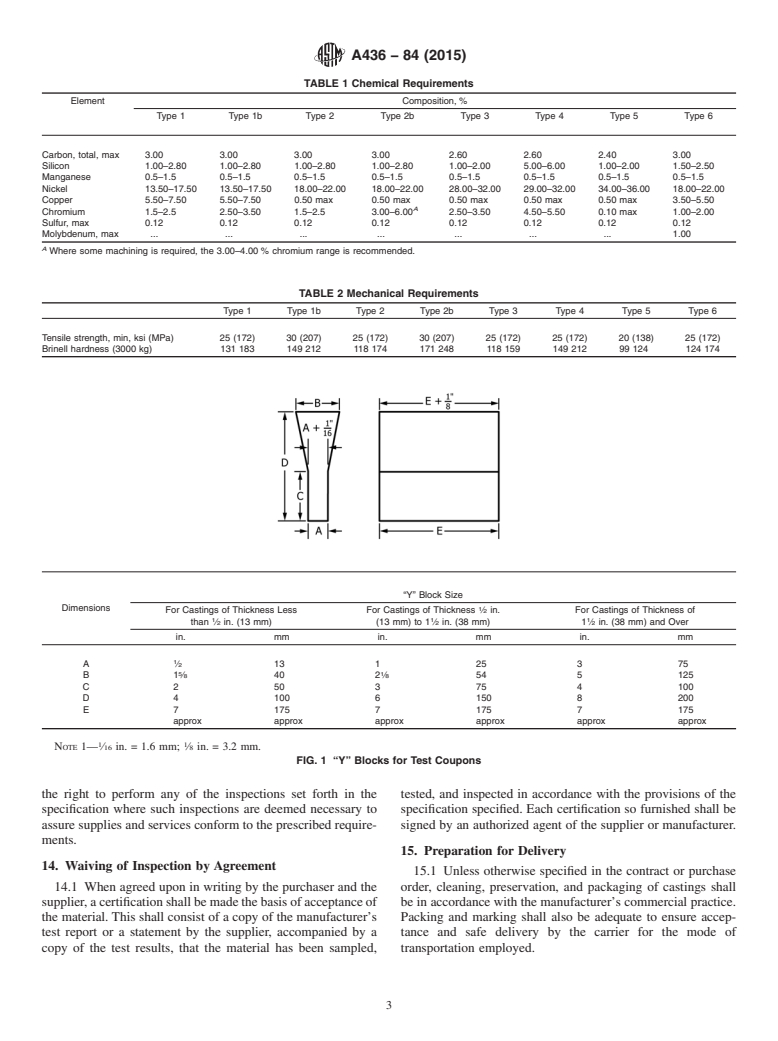
defined by the chemical composition limits specified in Table 1.
5.2 The chemical analysis for total carbon shall be made on chilled cast pencil-type specimens or from thin wafers
approximately ⁄32 in. (0.8 mm) thick cut from test coupons. Drillings are not reliable because of the probable loss of graphite.
5.3 Drillings taken from test coupons, broken test specimens, or castings shall conform to the requirements for chemical
composition as given in Table 1. Sampling shall be conducted in accordance with Practice E59 and chemical analysis in accordance
with Test Methods E351 and Test Methods E30. Test Methods E30 should only be used for analyzing those elements for which
specific coverage is not provided for in Test Methods E351.
5.4 Spectrometric techniques may also be used for analysis, but should a dispute arise concerning chemical composition,
chemical analyses determined by Test Methods E351 and Test Methods E30 shall be used for referee analysis.
6. Mechanical Properties
6.1 Although these irons are not used primarily for their strength, the tensile strength and Brinell hardness are indicative of the
correct metallurgical structure. The six types shall conform to the requirements given in Table 2.
7. Magnetic Property Requirements
7.1 A convenient shop test for differentiating the various types of austenitic gray iron is based on the fact that a ground face
of either the test bars or the castings of Types 1, 2, and 4 will not attract a small steel horseshoe-type magnet, that is normally
attracted to steel. Types 1b, 2b, 3, and 5 may be attracted to a magnet. This nonmagnetic test is a convenient qualitative test only
for Types 1, 2, and 4 and shall not be used as a basis for acceptance. In the event that nonmagnetic castings are specified, the
magnetic permeability test shall be used. The specific test conditions and magnetic permeability limits shall be agreed upon
between the manufacturer and the purchaser.
NOTE 1—Alnico magnets should not be used.
8. Test Bars
8.1 The separately cast test bars from which tension test specimens are to be machined shall be cast to the size and shape shown
in Fig. 1. The size of bar cast to represent the casting shall be at the option of the purchaser. In case no option is expressed, the
manufacturer shall make the choice. The test bars shall be cast in open molds made of suitable core sand with a minimum of 1 ⁄2
in. (38 mm) of sand on all sides and bottom of the ⁄2-in. (13-mm) and 1-in. (25-mm) sizes, and 3 in. (76 mm) of sand for the 3-in.
test bar.
8.2 By agreement between the manufacturer and the purchaser, the 1-in. (25-mm) keel block shown in Fig. 2 may be used. It
shall be an open mold made of suitable core sand with a min
...


Questions, Comments and Discussion
Ask us and Technical Secretary will try to provide an answer. You can facilitate discussion about the standard in here.