ASTM D3167-10(2017)
(Test Method)Standard Test Method for Floating Roller Peel Resistance of Adhesives
Standard Test Method for Floating Roller Peel Resistance of Adhesives
SIGNIFICANCE AND USE
5.1 Use this test method for acceptance and process control testing. This test method may be used as an alternative to Test Method D1781 when that facility is not available. This test method is considered more severe since the angle of peel is greater.
SCOPE
1.1 This test method covers the determination of the relative peel resistance of adhesive bonds between one rigid adherend and one flexible adherend when tested under specified conditions of preparation and testing.
1.2 A variation in thickness of the adherends will generally influence the test values. For this reason, the thickness of the sheets used to make the test specimens shall be specified in the material specification. When no thickness is specified, the flexible adherend shall be 0.63 mm (0.025 in.) thick and the rigid adherend shall be 1.63 mm (0.064 in.) thick.
1.3 The values stated in SI units are to be regarded as the standard. The values given in parentheses are for information only.
1.4 This standard does not purport to address all of the safety concerns, if any, associated with its use. It is the responsibility of the user of this standard to establish appropriate safety, health, and environmental practices and determine the applicability of regulatory limitations prior to use.
1.5 This international standard was developed in accordance with internationally recognized principles on standardization established in the Decision on Principles for the Development of International Standards, Guides and Recommendations issued by the World Trade Organization Technical Barriers to Trade (TBT) Committee.
General Information
- Status
- Published
- Publication Date
- 31-Oct-2017
- Technical Committee
- D14 - Adhesives
- Drafting Committee
- D14.80 - Metal Bonding Adhesives
Relations
- Effective Date
- 01-Nov-2017
- Effective Date
- 01-Jun-2014
- Effective Date
- 01-Jul-2012
- Effective Date
- 01-May-2012
- Effective Date
- 01-Dec-2011
- Effective Date
- 01-Jan-2011
- Effective Date
- 01-Nov-2010
- Effective Date
- 01-Jun-2010
- Effective Date
- 01-Nov-2009
- Effective Date
- 01-Apr-2009
- Effective Date
- 01-Dec-2008
- Effective Date
- 01-Oct-2008
- Effective Date
- 15-Aug-2008
- Effective Date
- 01-Mar-2008
- Effective Date
- 01-Aug-2007
Overview
ASTM D3167-10(2017): Standard Test Method for Floating Roller Peel Resistance of Adhesives is a widely recognized method developed by ASTM International for determining the peel resistance of adhesive bonds. This test is specifically designed to assess the relative peel strength of adhesives joining a rigid adherend to a flexible adherend. The floating roller peel test provides a consistent, more severe evaluation compared to other methods, such as ASTM D1781, making it useful for process control, quality assurance, and comparative analysis of adhesive performance.
This standard is applicable to industries where adhered metal, plastic, or composite materials require verification of bond integrity under specified preparation and testing conditions. The reproducibility, clarity, and relatively simple preparation make ASTM D3167 an essential tool for adhesive manufacturers, material engineers, and quality control professionals.
Key Topics
- Peel Resistance Measurement: Determines the average force required to separate a flexible adherend from a rigid one using a controlled peel angle.
- Sample Preparation Guidelines: Specifies the necessary preparation, including surface treatment, adhesive application, and recommended materials' thickness for consistent results.
- Testing Procedure: Details on the insertion of the test specimen into a roller peel test fixture, conducting the test at a constant rate of separation, and recording the peeling force.
- Result Reporting: Outlines comprehensive reporting requirements including adhesive details, test conditions, load averages, specimen dimensions, and type of failure.
- Severity and Comparability: The method is more severe than alternatives due to a higher peel angle, ensuring adhesive bonds are tested under demanding conditions. Direct comparison of adhesives is valid only when all test parameters are identical.
- Unit Standards: Specifies results in SI units as standard, with values in parentheses provided for informational purposes.
Applications
ASTM D3167 is essential in a variety of industrial and commercial applications, particularly where laminated or bonded assemblies must maintain structural integrity under stress. Key uses include:
- Quality Assurance in Manufacturing: Verifies adhesive bond strength in laminated metal, plastic, or composite assemblies often found in aerospace, automotive, electronics, and construction industries.
- Process Control: Enables manufacturers to monitor and adjust bonding processes for consistent adhesive performance across production batches.
- Material and Adhesive Development: Facilitates comparative testing during R&D to evaluate new adhesive formulations or alternate substrates.
- Failure Analysis: Helps identify failure modes (adhesive, cohesive, or substrate failure) for troubleshooting and process optimization.
Related Standards
- ASTM D1781 - Climbing Drum Peel Test for Adhesives: A comparative method for peel resistance, less severe than D3167.
- ASTM B209 - Specification for Aluminum and Aluminum-Alloy Sheet and Plate: Frequently referenced for material selection in test specimen preparation.
- ASTM D907 - Terminology of Adhesives: Provides standardized definitions used within ASTM D3167.
- ASTM E4 - Practices for Force Verification of Testing Machines: Ensures accuracy of the testing apparatus.
Practical Value
Implementing ASTM D3167-10(2017) ensures standardized assessment of adhesive peel strength, improving the reliability of bonded assemblies and enabling compliance with globally recognized test methods. By following this standard, organizations can make informed decisions regarding adhesive selection, process adjustments, and product quality, reducing the risk of bond failure and enhancing overall product performance in demanding applications.
Keywords: peel resistance, adhesive bonds, floating roller test, ASTM D3167, quality assurance, process control, laminated assemblies, bond strength testing, adhesive testing standard.
Buy Documents
ASTM D3167-10(2017) - Standard Test Method for Floating Roller Peel Resistance of Adhesives
Get Certified
Connect with accredited certification bodies for this standard

DIN CERTCO
DIN Group product certification.

Smithers Quality Assessments
US management systems and product certification.
Sponsored listings
Frequently Asked Questions
ASTM D3167-10(2017) is a standard published by ASTM International. Its full title is "Standard Test Method for Floating Roller Peel Resistance of Adhesives". This standard covers: SIGNIFICANCE AND USE 5.1 Use this test method for acceptance and process control testing. This test method may be used as an alternative to Test Method D1781 when that facility is not available. This test method is considered more severe since the angle of peel is greater. SCOPE 1.1 This test method covers the determination of the relative peel resistance of adhesive bonds between one rigid adherend and one flexible adherend when tested under specified conditions of preparation and testing. 1.2 A variation in thickness of the adherends will generally influence the test values. For this reason, the thickness of the sheets used to make the test specimens shall be specified in the material specification. When no thickness is specified, the flexible adherend shall be 0.63 mm (0.025 in.) thick and the rigid adherend shall be 1.63 mm (0.064 in.) thick. 1.3 The values stated in SI units are to be regarded as the standard. The values given in parentheses are for information only. 1.4 This standard does not purport to address all of the safety concerns, if any, associated with its use. It is the responsibility of the user of this standard to establish appropriate safety, health, and environmental practices and determine the applicability of regulatory limitations prior to use. 1.5 This international standard was developed in accordance with internationally recognized principles on standardization established in the Decision on Principles for the Development of International Standards, Guides and Recommendations issued by the World Trade Organization Technical Barriers to Trade (TBT) Committee.
SIGNIFICANCE AND USE 5.1 Use this test method for acceptance and process control testing. This test method may be used as an alternative to Test Method D1781 when that facility is not available. This test method is considered more severe since the angle of peel is greater. SCOPE 1.1 This test method covers the determination of the relative peel resistance of adhesive bonds between one rigid adherend and one flexible adherend when tested under specified conditions of preparation and testing. 1.2 A variation in thickness of the adherends will generally influence the test values. For this reason, the thickness of the sheets used to make the test specimens shall be specified in the material specification. When no thickness is specified, the flexible adherend shall be 0.63 mm (0.025 in.) thick and the rigid adherend shall be 1.63 mm (0.064 in.) thick. 1.3 The values stated in SI units are to be regarded as the standard. The values given in parentheses are for information only. 1.4 This standard does not purport to address all of the safety concerns, if any, associated with its use. It is the responsibility of the user of this standard to establish appropriate safety, health, and environmental practices and determine the applicability of regulatory limitations prior to use. 1.5 This international standard was developed in accordance with internationally recognized principles on standardization established in the Decision on Principles for the Development of International Standards, Guides and Recommendations issued by the World Trade Organization Technical Barriers to Trade (TBT) Committee.
ASTM D3167-10(2017) is classified under the following ICS (International Classification for Standards) categories: 83.180 - Adhesives. The ICS classification helps identify the subject area and facilitates finding related standards.
ASTM D3167-10(2017) has the following relationships with other standards: It is inter standard links to ASTM D3167-10, ASTM E4-14, ASTM D907-12a, ASTM D907-12, ASTM D907-11a, ASTM D907-11, ASTM B209-10, ASTM E4-10, ASTM E4-09a, ASTM E4-09, ASTM E4-08, ASTM D907-08b, ASTM D907-08a, ASTM D907-08, ASTM B209-07. Understanding these relationships helps ensure you are using the most current and applicable version of the standard.
ASTM D3167-10(2017) is available in PDF format for immediate download after purchase. The document can be added to your cart and obtained through the secure checkout process. Digital delivery ensures instant access to the complete standard document.
Standards Content (Sample)
This international standard was developed in accordance with internationally recognized principles on standardization established in the Decision on Principles for the
Development of International Standards, Guides and Recommendations issued by the World Trade Organization Technical Barriers to Trade (TBT) Committee.
Designation: D3167 − 10 (Reapproved 2017)
Standard Test Method for
Floating Roller Peel Resistance of Adhesives
This standard is issued under the fixed designation D3167; the number immediately following the designation indicates the year of
original adoption or, in the case of revision, the year of last revision. A number in parentheses indicates the year of last reapproval. A
superscript epsilon (´) indicates an editorial change since the last revision or reapproval.
INTRODUCTION
The purpose of this test method is to provide for the determination of the metal-to-metal peel
strength of adhesives by a method that will provide good reproducibility at low-, as well as at
highstrength levels and yet allow for a simple method of test specimen preparation and testing.
The accuracy of the results of strength tests of adhesive bonds will depend on the conditions under
which the bonding process is carried out. Unless otherwise agreed upon between the manufacturer and
the purchaser, the bonding conditions shall be prescribed by the manufacturer of the adhesive. In order
to ensure that complete information is available to the individual conducting the tests, the
manufacturer of the adhesive shall furnish numerical values and other specific information for each of
the following variables:
(1) Procedure for preparation of the surfaces prior to application of the adhesive, the cleaning and
drying of metal surfaces, and special surface treatments such as sanding, which are not specifically
limited by the pertinent test method.
(2) Complete mixing directions for the adhesive.
(3) Conditions for application of the adhesive, including the rate of spread or thickness of film,
number of coats to be applied whether to be applied to one or both surfaces, and the conditions of
drying where more than one coat is required.
(4) Assembly conditions before application of pressure, including the room temperature and length
of time.
(5) Curing conditions, including the amount of pressure to be applied, the length of time under
pressure, and the temperature of the assembly when under pressure. It should be stated whether this
temperature is that of the glue line, or of the atmosphere at which the assembly is to be maintained.
(6) Conditioning procedure before testing, unless a standard procedure is specified, including the
length of time, temperature, and relative humidity.
Arangemaybeprescribedforanyvariablebythemanufactureroftheadhesive,ifitcanbeassumed
by the test operator that any arbitrarily chosen value within such a range or any combination of such
values for several variables will be acceptable to both the manufacturer and the purchaser of the
adhesive.
1. Scope 1.2 A variation in thickness of the adherends will generally
influence the test values. For this reason, the thickness of the
1.1 This test method covers the determination of the relative
sheets used to make the test specimens shall be specified in the
peel resistance of adhesive bonds between one rigid adherend
material specification. When no thickness is specified, the
and one flexible adherend when tested under specified condi-
flexible adherend shall be 0.63 mm (0.025 in.) thick and the
tions of preparation and testing.
rigid adherend shall be 1.63 mm (0.064 in.) thick.
1.3 The values stated in SI units are to be regarded as the
This test method is under the jurisdiction of ASTM Committee D14 on
standard. The values given in parentheses are for information
Adhesives and is the direct responsibility of Subcommittee D14.80 on Metal
Bonding Adhesives.
only.
Current edition approved Nov. 1, 2017. Published November 2017. Originally
1.4 This standard does not purport to address all of the
approved in 1973. Last previous edition approved in 2010 as D3167 – 10. DOI:
10.1520/D3167-10R17. safety concerns, if any, associated with its use. It is the
Copyright © ASTM International, 100 Barr Harbor Drive, PO Box C700, West Conshohocken, PA 19428-2959. United States
D3167 − 10 (2017)
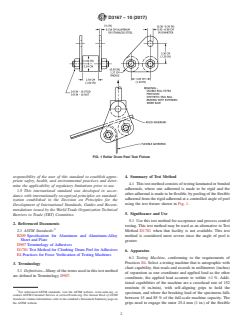
FIG. 1 Roller Drum Peel Test Fixture
responsibility of the user of this standard to establish appro- 4. Summary of Test Method
priate safety, health, and environmental practices and deter-
4.1 This test method consists of testing laminated or bonded
mine the applicability of regulatory limitations prior to use.
adherends, where one adherend is made to be rigid and the
1.5 This international standard was developed in accor-
other adherend is made to be flexible, by peeling of the flexible
dance with internationally recognized principles on standard-
adherend from the rigid adherend at a controlled angle of peel
ization established in the Decision on Principles for the
using the test fixture shown in Fig. 1.
Development of International Standards, Guides and Recom-
mendations issued by the World Trade Organization Technical
5. Significance and Use
Barriers to Trade (TBT) Committee.
5.1 Use this test method for acceptance and process control
2. Referenced Documents
testing. This test method may be used as an alternative to Test
2.1 ASTM Standards:
Method D1781 when that facility is not available. This test
B209 Specification for Aluminum and Aluminum-Alloy
method is considered more severe since the angle of peel is
Sheet and Plate
greater.
D907 Terminology of Adhesives
D1781 Test Method for Climbing Drum Peel for Adhesives
6. Apparatus
E4 Practices for Force Verification of Testing Machines
6.1 Testing Machine, conforming to the requirements of
Practices E4. Select a testing machine that is autographic with
3. Terminology
chart capability, that reads and records in millimetres (inches)
3.1 Definitions—Many of the terms used in this test method
of separation as one coordinate and applied load as the other
are defined in Terminology D907.
coordinate, the applied load accurate to within 61 %. Addi-
tional capabilities of the machine are a crosshead rate of 152
mm/min (6 in./min), with self-aligning grips to hold the
For referenced ASTM standards, visit the ASTM website, www.astm.org, or
specimen, and where the breaking load of the specimens falls
contact ASTM Customer Service at service@astm.org. For Annual Book of ASTM
between 15 and 85 % of the full-scale machine capacity. The
Standards volume information, refer to the standard’s Document Summary page on
the ASTM website. grips need to engage the outer 25.4 mm (1 in.) of the flexible
D3167 − 10 (2017)
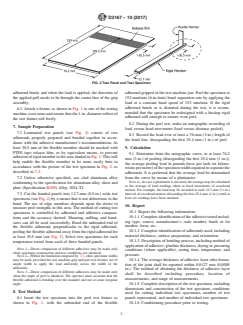
FIG. 2 Test Panel and Test Specimen
adherend firmly and when the load is applied, the direction of adherend gripped in the test machine ja
...


Questions, Comments and Discussion
Ask us and Technical Secretary will try to provide an answer. You can facilitate discussion about the standard in here.
Loading comments...