ASTM A536-84(2019)e1
(Specification)Standard Specification for Ductile Iron Castings
Standard Specification for Ductile Iron Castings
ABSTRACT
This specification covers ductile iron castings, also known as spheroidal or nodular iron, that is described as cast iron with the graphite substantially spheroidal in shape and essentially free of other forms of graphite. Appropriate heat treatment shall be identified according to grades, as follows: a full ferritizing anneal for 60-40-18; a quench and temper, or normalize and temper, or isothermal heat treatment for 100-70-03 and 120-90-02; and as-cast for 65-45-12 and 80-55-06. Castings shall be tested and conform to specified tensile requirements such as tensile strength, yield strength, and elongation. When indicated in the contract or purchase order, castings shall also adhere to special requirements like hardness, chemical composition, microstructure, pressure tightness, radiographic soundness, magnetic particle inspection dimensions, and surface finish.
SCOPE
1.1 This specification covers castings made of ductile iron, also known as spheroidal or nodular iron, which is described as cast iron with the graphite substantially spheroidal in shape and essentially free of other forms of graphite, as defined in Terminology A644.
1.2 No precise quantitative relationship can be stated between the properties of the iron in various locations of the same casting or between the properties of castings and those of a test specimen cast from the same iron (see Appendix X1).
1.3 The values stated in inch-pound units are to be regarded as standard. The values given in parentheses are mathematical conversions to SI units that are provided for information only and are not considered standard.
1.4 This international standard was developed in accordance with internationally recognized principles on standardization established in the Decision on Principles for the Development of International Standards, Guides and Recommendations issued by the World Trade Organization Technical Barriers to Trade (TBT) Committee.
General Information
- Status
- Published
- Publication Date
- 30-Apr-2019
- Technical Committee
- A04 - Iron Castings
- Drafting Committee
- A04.02 - Malleable and Ductile Iron Castings
Relations
- Effective Date
- 01-May-2019
- Effective Date
- 01-Mar-2024
- Effective Date
- 01-Jan-2024
- Effective Date
- 01-May-2020
- Effective Date
- 01-Jul-2019
- Refers
ASTM A370-17a - Standard Test Methods and Definitions for Mechanical Testing of Steel Products - Effective Date
- 15-Nov-2017
- Effective Date
- 01-Nov-2017
- Effective Date
- 01-Jan-2017
- Effective Date
- 15-Jul-2016
- Effective Date
- 01-Nov-2015
- Effective Date
- 01-Feb-2015
- Effective Date
- 01-Oct-2014
- Effective Date
- 15-May-2014
- Effective Date
- 01-Mar-2014
- Effective Date
- 15-Nov-2013
Overview
ASTM A536-84(2019)e1 is the internationally recognized standard specification for ductile iron castings, also known as spheroidal or nodular iron. Published by ASTM International, this standard outlines the key requirements for the manufacture and delivery of ductile iron castings where the graphite is predominantly spheroidal, providing excellent combination of tensile strength, ductility, and resilience. The standard defines the various grades of ductile iron, required mechanical properties, heat treatment processes, and optional special requirements depending on intended application. ASTM A536 ensures quality and consistency for ductile iron castings across global industries, supporting critical sectors such as automotive, construction, waterworks, machinery, and energy.
Key Topics
- Material Grades: Specifies several grades of ductile iron (such as 60-40-18, 65-45-12, 80-55-06, 100-70-03, and 120-90-02), covering a range of mechanical properties and applications.
- Mechanical Properties: Establishes minimum requirements for tensile strength, yield strength, and elongation. For example, Grade 60-40-18 must meet a minimum tensile strength of 60,000 psi (414 MPa), yield strength of 40,000 psi (276 MPa), and elongation of 18%.
- Heat Treatment: Details specific heat treatments for each grade, including full ferritizing anneal, quench and temper, normalize and temper, isothermal heat treatment, and as-cast condition.
- Test Methods: Requires representative test specimens and outlines procedures for casting test coupons, tension testing, and agreeing upon test bar locations and sample quantity.
- Special Requirements: Permits specifications for additional properties such as hardness, chemical composition, microstructure, pressure tightness, radiographic soundness, magnetic particle inspection, dimensional tolerance, and surface finish, as required by the customer.
Applications
ASTM A536 ductile iron castings are widely used owing to their unique mechanical properties, making them suitable for demanding engineering applications:
- Automotive Components: Suspension arms, steering knuckles, crankshafts, and brake parts where high strength and ductility are critical.
- Pipes and Fittings: Water and wastewater infrastructure benefit from ductile iron’s pressure tightness and durability.
- Industrial Machinery: Gearboxes, hydraulic components, valves, and pump bodies leverage the castings’ strength and fatigue resistance.
- Construction Equipment: Couplings, housings, and foundation components require the resilience and machinability offered by ductile iron.
- Energy Sector: Wind turbine components, power transmission, and oil & gas sector equipment often specify ductile iron for its reliability and cost efficiency.
Selecting the appropriate grade per ASTM A536 enables engineers and purchasers to optimize performance, material longevity, and ease of manufacturing for their specific application.
Related Standards
- ASTM A370 - Mechanical Testing of Steel Products: Provides referenced test methods for tensile and other mechanical tests.
- ASTM A644 - Terminology Relating to Iron Castings: Defines key terms used in ductile iron casting specifications.
- ASTM A732/A732M - Investment Castings, Carbon and Low Alloy Steel: Offers procedures and requirements for investment castings that can be referenced for relevant processes.
- MIL-STD-129 - Marking for Shipment and Storage: Referenced for government procurement and standardized marking practices.
Adherence to ASTM A536-84(2019)e1 ensures that ductile iron castings deliver consistent mechanical performance and quality, meeting both standard and specialized industry requirements. For any project involving ductile or nodular iron, referencing this standard supports optimal material selection and dependable manufacturing outcomes.
Buy Documents
ASTM A536-84(2019)e1 - Standard Specification for Ductile Iron Castings
Get Certified
Connect with accredited certification bodies for this standard

Element Materials Technology
Materials testing and product certification.

Inštitut za kovinske materiale in tehnologije
Institute of Metals and Technology. Materials testing, metallurgical analysis, NDT.
Sponsored listings
Frequently Asked Questions
ASTM A536-84(2019)e1 is a technical specification published by ASTM International. Its full title is "Standard Specification for Ductile Iron Castings". This standard covers: ABSTRACT This specification covers ductile iron castings, also known as spheroidal or nodular iron, that is described as cast iron with the graphite substantially spheroidal in shape and essentially free of other forms of graphite. Appropriate heat treatment shall be identified according to grades, as follows: a full ferritizing anneal for 60-40-18; a quench and temper, or normalize and temper, or isothermal heat treatment for 100-70-03 and 120-90-02; and as-cast for 65-45-12 and 80-55-06. Castings shall be tested and conform to specified tensile requirements such as tensile strength, yield strength, and elongation. When indicated in the contract or purchase order, castings shall also adhere to special requirements like hardness, chemical composition, microstructure, pressure tightness, radiographic soundness, magnetic particle inspection dimensions, and surface finish. SCOPE 1.1 This specification covers castings made of ductile iron, also known as spheroidal or nodular iron, which is described as cast iron with the graphite substantially spheroidal in shape and essentially free of other forms of graphite, as defined in Terminology A644. 1.2 No precise quantitative relationship can be stated between the properties of the iron in various locations of the same casting or between the properties of castings and those of a test specimen cast from the same iron (see Appendix X1). 1.3 The values stated in inch-pound units are to be regarded as standard. The values given in parentheses are mathematical conversions to SI units that are provided for information only and are not considered standard. 1.4 This international standard was developed in accordance with internationally recognized principles on standardization established in the Decision on Principles for the Development of International Standards, Guides and Recommendations issued by the World Trade Organization Technical Barriers to Trade (TBT) Committee.
ABSTRACT This specification covers ductile iron castings, also known as spheroidal or nodular iron, that is described as cast iron with the graphite substantially spheroidal in shape and essentially free of other forms of graphite. Appropriate heat treatment shall be identified according to grades, as follows: a full ferritizing anneal for 60-40-18; a quench and temper, or normalize and temper, or isothermal heat treatment for 100-70-03 and 120-90-02; and as-cast for 65-45-12 and 80-55-06. Castings shall be tested and conform to specified tensile requirements such as tensile strength, yield strength, and elongation. When indicated in the contract or purchase order, castings shall also adhere to special requirements like hardness, chemical composition, microstructure, pressure tightness, radiographic soundness, magnetic particle inspection dimensions, and surface finish. SCOPE 1.1 This specification covers castings made of ductile iron, also known as spheroidal or nodular iron, which is described as cast iron with the graphite substantially spheroidal in shape and essentially free of other forms of graphite, as defined in Terminology A644. 1.2 No precise quantitative relationship can be stated between the properties of the iron in various locations of the same casting or between the properties of castings and those of a test specimen cast from the same iron (see Appendix X1). 1.3 The values stated in inch-pound units are to be regarded as standard. The values given in parentheses are mathematical conversions to SI units that are provided for information only and are not considered standard. 1.4 This international standard was developed in accordance with internationally recognized principles on standardization established in the Decision on Principles for the Development of International Standards, Guides and Recommendations issued by the World Trade Organization Technical Barriers to Trade (TBT) Committee.
ASTM A536-84(2019)e1 is classified under the following ICS (International Classification for Standards) categories: 77.140.80 - Iron and steel castings. The ICS classification helps identify the subject area and facilitates finding related standards.
ASTM A536-84(2019)e1 has the following relationships with other standards: It is inter standard links to ASTM A536-84(2014), ASTM A370-24, ASTM E8/E8M-24, ASTM A732/A732M-20, ASTM A370-19, ASTM A370-17a, ASTM A644-17, ASTM A370-17, ASTM E8/E8M-16, ASTM A370-15, ASTM E8/E8M-15, ASTM A644-14, ASTM A370-14, ASTM A732/A732M-14, ASTM A370-13. Understanding these relationships helps ensure you are using the most current and applicable version of the standard.
ASTM A536-84(2019)e1 is available in PDF format for immediate download after purchase. The document can be added to your cart and obtained through the secure checkout process. Digital delivery ensures instant access to the complete standard document.
Standards Content (Sample)
This international standard was developed in accordance with internationally recognized principles on standardization established in the Decision on Principles for the
Development of International Standards, Guides and Recommendations issued by the World Trade Organization Technical Barriers to Trade (TBT) Committee.
´1
Designation: A536 −84 (Reapproved 2019)
Standard Specification for
Ductile Iron Castings
This standard is issued under the fixed designation A536; the number immediately following the designation indicates the year of
original adoption or, in the case of revision, the year of last revision. A number in parentheses indicates the year of last reapproval. A
superscript epsilon (´) indicates an editorial change since the last revision or reapproval.
This standard has been approved for use by agencies of the U.S. Department of Defense.
ε NOTE—Footnote 3 was editorially corrected in May 2019.
1. Scope 2.2 Military Standard:
MIL-STD-129 Marking for Shipment and Storage
1.1 This specification covers castings made of ductile iron,
alsoknownasspheroidalornodulariron,whichisdescribedas
3. Ordering Information
castironwiththegraphitesubstantiallyspheroidalinshapeand
essentially free of other forms of graphite, as defined in 3.1 Orders for material to this specification shall include the
Terminology A644. following information:
3.1.1 ASTM designation,
1.2 No precise quantitative relationship can be stated be-
3.1.2 Grade of ductile iron required (see Table 1, and
tweenthepropertiesoftheironinvariouslocationsofthesame
Sections 4 and 9),
casting or between the properties of castings and those of a test
3.1.3 Special properties, if required (see Section 7),
specimen cast from the same iron (see Appendix X1).
3.1.4 If a different number of samples is required (see
1.3 The values stated in inch-pound units are to be regarded
Section 10),
as standard. The values given in parentheses are mathematical
3.1.5 Certification, if required (see Section 14), and
conversions to SI units that are provided for information only
3.1.6 Special preparation for delivery, if required (see Sec-
and are not considered standard.
tion 15).
1.4 This international standard was developed in accor-
dance with internationally recognized principles on standard- 4. Tensile Requirements
ization established in the Decision on Principles for the
4.1 The iron represented by the test specimens shall con-
Development of International Standards, Guides and Recom-
form to the requirements as to tensile properties presented in
mendations issued by the World Trade Organization Technical
Tables 1 and 2. The irons listed in Table 1 cover those in
Barriers to Trade (TBT) Committee.
general use, while those listed in Table 2 are used for special
applications (such as pipes, fittings, etc.).
2. Referenced Documents
4.2 Theyieldstrengthshallbedeterminedat0.2 %offsetby
2.1 ASTM Standards:
the offset method (see Test Methods E8/E8M). Other methods
A370 Test Methods and Definitions for Mechanical Testing
may be used by mutual consent of the manufacturer and
of Steel Products
purchaser.
A644 Terminology Relating to Iron Castings
A732/A732M Specification for Castings, Investment, Car-
5. Heat Treatment
bon and Low Alloy Steel for General Application, and
Cobalt Alloy for High Strength at Elevated Temperatures
5.1 The 60-40-18 grade will normally require a full ferritiz-
E8/E8M Test Methods for Tension Testing of Metallic Ma-
ing anneal. The 120-90-02 and the 100-70-03 grades generally
terials
require a quench and temper or a normalize and temper, or an
isothermal heat treatment. The other two grades can be met
This specification is under the jurisdiction of the ASTM Committee A04 on
either as-cast or by heat treatment. Ductile iron, which is heat
Iron Castings and is the direct responsibility of Subcommittee A04.02 on Malleable
treated by quenching to martensite and tempering, may have
and Ductile Iron Castings.
substantially lower fatigue strength than as-cast material of the
Current edition approved May 1, 2019. Published May 2019. Originally
approved in 1965. Last previous edition approved in 2014 as A536 – 84 (2014). same hardness.
DOI: 10.1520/A0536-84R19E01.
For referenced ASTM standards, visit the ASTM website, www.astm.org, or
contact ASTM Customer Service at service@astm.org. For Annual Book of ASTM
Standards volume information, refer to the standard’s Document Summary page on Available from General Services Administration – Vendor Support Center,
the ASTM website. https://vsc.gsa.gov/administration/files/MIL-STD-129R.pdf.
Copyright © ASTM International, 100 Barr Harbor Drive, PO Box C700, West Conshohocken, PA 19428-2959. United States
´1
A536 − 84 (2019)
TABLE 1 Tensile Requirements
Grade Grade Grade Grade Grade
60-40-18 65-45-12 80-55-06 100-70-03 120-90-02
Tensile strength, min, psi 60 000 65 000 80 000 100 000 120 000
Tensile strength, min, MPa 414 448 552 689 827
Yield strength, min, psi 40 000 45 000 55 000 70 000 90 000
Yield strength, min, MPa 276 310 379 483 621
Elongation in 2 in. or 50 mm, min, % 18 12 6.0 3.0 2.0
TABLE 2 Tensile Requirements for Special Applications
Grade Grade Grade
60-42-10 70-50-05 80-60-03
Tensile strength, min, psi 60 000 70 000 80 000
Tensile strength, min, MPa 415 485 555
Yield strength, min, psi 42 000 50 000 60 000
Yield strength, min, MPa 290 345 415
Elongation in 2 in. or 50 mm, 10 5 3
min, %
Y-Block Size
6. Test Coupons
For Castings
For Castings For Castings
of Thickness
of Thickness of Thickness
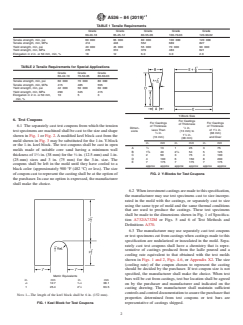
6.1 The separately cast test coupons from which the tension
Dimen- ⁄2 in.
Less Than of 1 ⁄2 in.
test specimens are machined shall be cast to the size and shape
sions (13 mm) to
⁄2 in. (38 mm)
1 ⁄2 in.
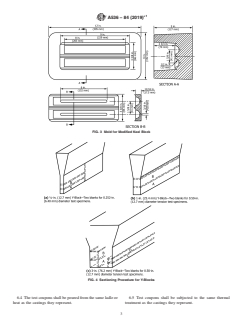
shown in Fig. 1 or Fig. 2.Amodified keel block cast from the
(13 mm) and Over
(38 mm)
mold shown in Fig. 3 may be substituted for the 1-in. Y-block
in. mm in. mm in. mm
or the 1-in. keel block. The test coupons shall be cast in open
A ⁄2 13 1 25 3 75
molds made of suitable core sand having a minimum wall
5 1
B1 ⁄8 40 2 ⁄8 54 5 125
1 1
thickness of 1 ⁄2 in. (38 mm) for the ⁄2-in. (12.5-mm) and 1-in. C 2 50 3 75 4 100
D 4 100 6 150 8 200
(25-mm) sizes and 3 in. (75 mm) for the 3-in. size. The
E 7 175 7 175 7 175
coupons shall be left in the mold until they have cooled to a
approx approx approx approx approx approx
black color (approximately 900 °F (482 °C) or less). The size
of coupon cast to represent the casting shall be at the option of FIG. 2 Y-Blocks for Test Coupons
the purchaser. In case no option is expressed, the manufacturer
shall make the choice.
6.2 Wheninvestmentcastingsaremadetothisspecification,
the manufacturer may use test specimens cast to size incorpo-
rated in the mold with the castings, or separately cast to size
using the same type of mold and the same thermal conditions
that are used to produce the castings. These test specimens
shall be made to the dimensions shown in Fig. 1 of Specifica-
tion A732/A732M or Figs. 5 and 6 of Test Methods and
Definitions A370.
6.3 The manufacturer may use separately cast test coupons
or test specimens cut from castings when castings made to this
specification are nodularized or inoculated in the mold. Sepa-
rately cast test coupons shall have a chemistry that is repre-
sentative of castings produced from the ladle poured and a
cooling rate equivalent to that obtained with the test molds
shown in Figs. 1 and 2, Figs. 4-6,or Appendix X2. The size
(cooling rate) of the coupon chosen to represent the casting
should be decided by the purchaser. If test coupon size is not
specified, the manufacturer shall make the choice. When test
Metric Equivalents
bars will be cut from castings, test bar location shall be agreed
in. mm in. mm
1 1
⁄2 12.7 1 ⁄2 38.1
on by the purchaser and manufacturer and indicated on the
1 25.4 2 ⁄2 63.5
casting drawing. The manufacturer shall maintain sufficient
controlsandcontroldocumentationtoassurethepurchaserthat
NOTE 1—The length of the keel block shall be 6 in. (152 mm).
properties determined from test coupons or test bars are
FIG. 1 Keel Block for Test Coupons representative of castings shipped.
...


Questions, Comments and Discussion
Ask us and Technical Secretary will try to provide an answer. You can facilitate discussion about the standard in here.
Loading comments...