ASTM D3763-06
(Test Method)Standard Test Method for High Speed Puncture Properties of Plastics Using Load and Displacement Sensors
Standard Test Method for High Speed Puncture Properties of Plastics Using Load and Displacement Sensors
SIGNIFICANCE AND USE
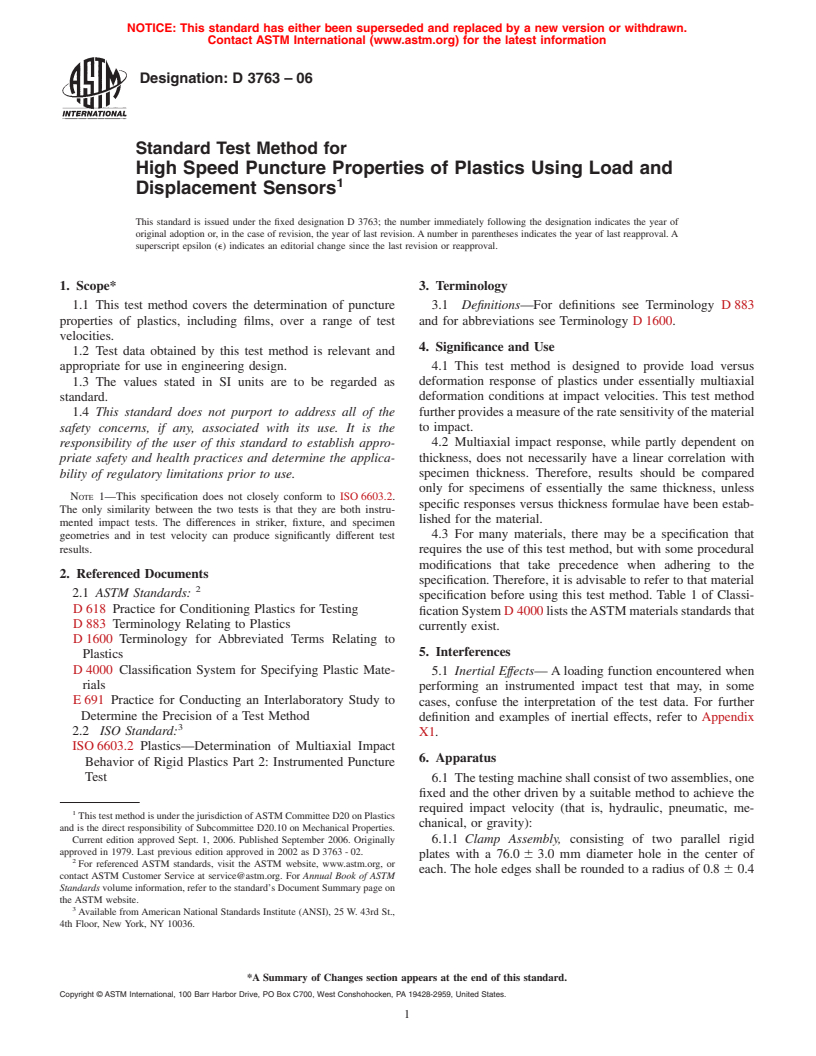
This test method is designed to provide load versus deformation response of plastics under essentially multiaxial deformation conditions at impact velocities. This test method further provides a measure of the rate sensitivity of the material to impact.
Multiaxial impact response, while partly dependent on thickness, does not necessarily have a linear correlation with specimen thickness. Therefore, results should be compared only for specimens of essentially the same thickness, unless specific responses versus thickness formulae have been established for the material.
For many materials, there may be a specification that requires the use of this test method, but with some procedural modifications that take precedence when adhering to the specification. Therefore, it is advisable to refer to that material specification before using this test method. Table 1 of Classification System D 4000 lists the ASTM materials standards that currently exist.
SCOPE
1.1 This test method covers the determination of puncture properties of plastics, including films, over a range of test velocities.
1.2 Test data obtained by this test method is relevant and appropriate for use in engineering design.
1.3 The values stated in SI units are to be regarded as standard.
This standard does not purport to address all of the safety concerns, if any, associated with its use. It is the responsibility of the user of this standard to establish appropriate safety and health practices and determine the applicability of regulatory limitations prior to use. Note 1
This specification does not closely conform to ISO 6603.2. The only similarity between the two tests is that they are both instrumented impact tests. The differences in striker, fixture, and specimen geometries and in test velocity can produce significantly different test results.
General Information
Relations
Standards Content (Sample)
NOTICE: This standard has either been superseded and replaced by a new version or withdrawn.
Contact ASTM International (www.astm.org) for the latest information
Designation: D 3763 – 06
Standard Test Method for
High Speed Puncture Properties of Plastics Using Load and
1
Displacement Sensors
This standard is issued under the fixed designation D 3763; the number immediately following the designation indicates the year of
original adoption or, in the case of revision, the year of last revision. A number in parentheses indicates the year of last reapproval. A
superscript epsilon (e) indicates an editorial change since the last revision or reapproval.
1. Scope* 3. Terminology
1.1 This test method covers the determination of puncture 3.1 Definitions—For definitions see Terminology D 883
properties of plastics, including films, over a range of test and for abbreviations see Terminology D 1600.
velocities.
4. Significance and Use
1.2 Test data obtained by this test method is relevant and
appropriate for use in engineering design. 4.1 This test method is designed to provide load versus
deformation response of plastics under essentially multiaxial
1.3 The values stated in SI units are to be regarded as
standard. deformation conditions at impact velocities. This test method
furtherprovidesameasureoftheratesensitivityofthematerial
1.4 This standard does not purport to address all of the
safety concerns, if any, associated with its use. It is the to impact.
4.2 Multiaxial impact response, while partly dependent on
responsibility of the user of this standard to establish appro-
priate safety and health practices and determine the applica- thickness, does not necessarily have a linear correlation with
specimen thickness. Therefore, results should be compared
bility of regulatory limitations prior to use.
only for specimens of essentially the same thickness, unless
NOTE 1—This specification does not closely conform to ISO 6603.2.
specific responses versus thickness formulae have been estab-
The only similarity between the two tests is that they are both instru-
lished for the material.
mented impact tests. The differences in striker, fixture, and specimen
4.3 For many materials, there may be a specification that
geometries and in test velocity can produce significantly different test
results.
requires the use of this test method, but with some procedural
modifications that take precedence when adhering to the
2. Referenced Documents
specification. Therefore, it is advisable to refer to that material
2
2.1 ASTM Standards:
specification before using this test method. Table 1 of Classi-
D 618 Practice for Conditioning Plastics for Testing
ficationSystemD 4000liststheASTMmaterialsstandardsthat
D 883 Terminology Relating to Plastics
currently exist.
D 1600 Terminology for Abbreviated Terms Relating to
5. Interferences
Plastics
D 4000 Classification System for Specifying Plastic Mate-
5.1 Inertial Effects— A loading function encountered when
rials
performing an instrumented impact test that may, in some
E 691 Practice for Conducting an Interlaboratory Study to
cases, confuse the interpretation of the test data. For further
Determine the Precision of a Test Method
definition and examples of inertial effects, refer to Appendix
3
2.2 ISO Standard:
X1.
ISO 6603.2 Plastics—Determination of Multiaxial Impact
6. Apparatus
Behavior of Rigid Plastics Part 2: Instrumented Puncture
Test
6.1 Thetestingmachineshallconsistoftwoassemblies,one
fixed and the other driven by a suitable method to achieve the
required impact velocity (that is, hydraulic, pneumatic, me-
1
This test method is under the jurisdiction ofASTM Committee D20 on Plastics
chanical, or gravity):
and is the direct responsibility of Subcommittee D20.10 on Mechanical Properties.
Current edition approved Sept. 1, 2006. Published September 2006. Originally 6.1.1 Clamp Assembly, consisting of two parallel rigid
approved in 1979. Last previous edition approved in 2002 as D 3763 - 02.
plates with a 76.0 6 3.0 mm diameter hole in the center of
2
For referenced ASTM standards, visit the ASTM website, www.astm.org, or
each. The hole edges shall be rounded to a radius of 0.8 6 0.4
contact ASTM Customer Service at service@astm.org. For Annual Book of ASTM
Standards volume information, refer to the standard’s Document Summary page on
the ASTM website.
3
Available fromAmerican National Standards Institute (ANSI), 25 W. 43rd St.,
4th Floor, New York, NY 10036.
*A Summary of Changes section appears at the end of this standard.
Copyright © ASTM International, 100 Barr Harbor Drive, PO Box C700, West Conshohocken, PA 19428-2959, United States.
1
---------------------- Page: 1 ----------------------
D 3763 – 06
mm. Sufficient force must be applied (mechanically, pneumati- 8.2 Test Conditions— Conduct tests in the standard labora-
cally, or hydraulically) to prevent slippage of the specimen in tory atmosphere of 23 6 2°C, and 50 6 5 % relative humidity,
the clamp during impact. If films are tested, some type
...


Questions, Comments and Discussion
Ask us and Technical Secretary will try to provide an answer. You can facilitate discussion about the standard in here.