ASTM E2076/E2076M-15(2022)
(Practice)Standard Practice for Examination of Fiberglass Reinforced Plastic Fan Blades Using Acoustic Emission
Standard Practice for Examination of Fiberglass Reinforced Plastic Fan Blades Using Acoustic Emission
SIGNIFICANCE AND USE
5.1 The AE examination method detects structurally significant flaws in FRP structures via test loading. The damage mechanisms that are detected in FRP include resin cracking, fiber debonding, fiber pullout, fiber breakage, delamination, and secondary bond failure.
5.2 Flaws in unstressed areas will not generate detectable AE.
5.3 Flaws located with AE may be examined by other methods.
SCOPE
1.1 This practice provides guidelines for acoustic emission (AE) examinations of fiberglass reinforced plastic (FRP) fan blades of the type used in industrial cooling towers and heat exchangers.
1.2 This practice uses simulated service loading to determine structural integrity.
1.3 This practice will detect sources of acoustic emission in areas of sensor coverage that are stressed during the course of the examination.
1.4 This practice applies to examinations of new and in-service fan blades.
1.5 This practice is limited to fan blades of FRP construction, with length (hub centerline to tip) of less than 3 m [10 ft], and with fiberglass content greater than 15 % by weight.
1.6 AE measurements are used to detect emission sources. Other nondestructive examination (NDE) methods may be used to evaluate the significance of AE sources. Procedures for other NDE methods are beyond the scope of this practice.
1.7 Units—The values stated in either SI units or inch-pound units are to be regarded separately as standard. The values stated in each system may not be exact equivalents; therefore, each system shall be used independently of the other. Combining values from the two systems may result in non-conformance with the standard.
1.8 This standard does not purport to address all of the safety concerns, if any, associated with its use. It is the responsibility of the user of this standard to establish appropriate safety, health, and environmental practices and determine the applicability of regulatory limitations prior to use.
1.9 This international standard was developed in accordance with internationally recognized principles on standardization established in the Decision on Principles for the Development of International Standards, Guides and Recommendations issued by the World Trade Organization Technical Barriers to Trade (TBT) Committee.
General Information
- Status
- Published
- Publication Date
- 30-Nov-2022
- Technical Committee
- E07 - Nondestructive Testing
- Drafting Committee
- E07.04 - Acoustic Emission Method
Relations
- Effective Date
- 01-Feb-2024
- Effective Date
- 01-Jun-2020
- Effective Date
- 01-Dec-2019
- Effective Date
- 01-Mar-2019
- Effective Date
- 01-Jan-2018
- Effective Date
- 15-Jun-2017
- Effective Date
- 01-Feb-2017
- Effective Date
- 01-Aug-2016
- Effective Date
- 01-Feb-2016
- Effective Date
- 01-Dec-2015
- Effective Date
- 01-Dec-2015
- Effective Date
- 01-Dec-2015
- Effective Date
- 01-Sep-2015
- Effective Date
- 01-Jun-2014
- Effective Date
- 01-Jun-2014
Overview
ASTM E2076/E2076M-15(2022), developed by ASTM International, provides comprehensive guidelines for the examination of fiberglass reinforced plastic (FRP) fan blades using acoustic emission (AE) testing. This standard practice is primarily applied to FRP fan blades used in industrial cooling towers and heat exchangers, including both new and in-service blades with lengths less than 3 meters (10 feet) and a fiberglass content greater than 15% by weight.
The AE method is a powerful nondestructive evaluation (NDE) technique that detects stress-induced flaws by interpreting acoustic signals generated during carefully controlled test loading. The standard supports structural integrity assessment by simulating service loads, helping maintenance teams, inspectors, and manufacturers identify critical flaws such as resin cracking, fiber debonding, delamination, and other failure mechanisms.
Key Topics
Scope and Applicability
- Applies to FRP fan blades less than 3 m in length and with fiberglass content above 15% by weight
- Suitable for both new and in-service blades in industrial cooling towers and heat exchangers
- Uses simulated service load (bending load) to assess structural condition
Acoustic Emission Testing Process
- Sensors monitor transient stress waves from growing flaws under load
- Test replicates normal blade loading conditions, focusing on areas covered by sensors
- Only flaws in stressed regions are detectable; other NDE methods may be required to further evaluate signals
Flaw Detection and Assessment
- Detects structurally significant flaws, including resin cracking, fiber breakage, fiber pullout, and delamination
- Background noise control and sensor calibration are critical for test accuracy
- AE data guides further examination, with acceptance criteria based on emission counts and amplitudes
Personnel and Equipment
- Operators should be qualified in accordance with recognized nondestructive testing certifications (e.g., ASNT, ISO 9712)
- Regular calibration and verification of AE sensors, preamplifiers, and related instrumentation are required
- Comprehensive documentation and reporting practices are emphasized
Applications
Industrial Heat Exchange and Cooling Systems
AE testing per ASTM E2076/E2076M is vital in maintaining safety and performance of FRP fan blades in large-scale cooling towers and heat exchangers. Regular application of this standard enables timely detection of critical flaws, preventing catastrophic failures and ensuring equipment uptime.Quality Control in Manufacturing
Manufacturers of FRP fan blades utilize this standard for quality assurance, verifying the integrity of new blades before shipment and ensuring compliance with structural performance requirements.Maintenance and Inspection Programs
Facility maintenance teams benefit by integrating AE testing into periodic blade inspection schedules, allowing evidence-based decisions for repair, replacement, or further analysis using complementary NDE techniques.
Related Standards
ASTM E2076/E2076M-15(2022) references several other key standards to ensure robust and reliable AE examination:
- ASTM E543: Agencies Performing Nondestructive Testing
- ASTM E650: Mounting Piezoelectric Acoustic Emission Sensors
- ASTM E750: Characterizing Acoustic Emission Instrumentation
- ASTM E976: Determining the Reproducibility of Acoustic Emission Sensor Response
- ASTM E1067: Acoustic Emission Examination of FRP Tanks/Vessels
- ASTM E1106: Primary Calibration of Acoustic Emission Sensors
- ASTM E1316: Terminology for Nondestructive Examinations
- ASTM E2374: Acoustic Emission System Performance Verification
- ASNT SNT-TC-1A, ANSI/ASNT CP-189, NAS 410, ISO 9712: Qualification and Certification of NDT Personnel
Practical Value
By following ASTM E2076/E2076M-15(2022), industries can greatly improve reliability, safety, and operational efficiency in systems reliant on FRP fan blades. Adoption of this acoustic emission standard reduces the risk of undetected structural degradation and ensures blades meet rigorous performance criteria throughout their service life.
Keywords: ASTM E2076, acoustic emission, FRP fan blades, nondestructive examination, structural integrity, industrial cooling, heat exchangers, fiberglass blade testing, NDE standard
Buy Documents
ASTM E2076/E2076M-15(2022) - Standard Practice for Examination of Fiberglass Reinforced Plastic Fan Blades Using Acoustic Emission
Get Certified
Connect with accredited certification bodies for this standard

IMP NDT d.o.o.
Non-destructive testing services. Radiography, ultrasonic, magnetic particle, penetrant, visual inspection.

Inštitut za kovinske materiale in tehnologije
Institute of Metals and Technology. Materials testing, metallurgical analysis, NDT.

Q Techna d.o.o.
NDT and quality assurance specialist. 30+ years experience. NDT personnel certification per ISO 9712, nuclear and thermal power plant inspections, QA/
Sponsored listings
Frequently Asked Questions
ASTM E2076/E2076M-15(2022) is a standard published by ASTM International. Its full title is "Standard Practice for Examination of Fiberglass Reinforced Plastic Fan Blades Using Acoustic Emission". This standard covers: SIGNIFICANCE AND USE 5.1 The AE examination method detects structurally significant flaws in FRP structures via test loading. The damage mechanisms that are detected in FRP include resin cracking, fiber debonding, fiber pullout, fiber breakage, delamination, and secondary bond failure. 5.2 Flaws in unstressed areas will not generate detectable AE. 5.3 Flaws located with AE may be examined by other methods. SCOPE 1.1 This practice provides guidelines for acoustic emission (AE) examinations of fiberglass reinforced plastic (FRP) fan blades of the type used in industrial cooling towers and heat exchangers. 1.2 This practice uses simulated service loading to determine structural integrity. 1.3 This practice will detect sources of acoustic emission in areas of sensor coverage that are stressed during the course of the examination. 1.4 This practice applies to examinations of new and in-service fan blades. 1.5 This practice is limited to fan blades of FRP construction, with length (hub centerline to tip) of less than 3 m [10 ft], and with fiberglass content greater than 15 % by weight. 1.6 AE measurements are used to detect emission sources. Other nondestructive examination (NDE) methods may be used to evaluate the significance of AE sources. Procedures for other NDE methods are beyond the scope of this practice. 1.7 Units—The values stated in either SI units or inch-pound units are to be regarded separately as standard. The values stated in each system may not be exact equivalents; therefore, each system shall be used independently of the other. Combining values from the two systems may result in non-conformance with the standard. 1.8 This standard does not purport to address all of the safety concerns, if any, associated with its use. It is the responsibility of the user of this standard to establish appropriate safety, health, and environmental practices and determine the applicability of regulatory limitations prior to use. 1.9 This international standard was developed in accordance with internationally recognized principles on standardization established in the Decision on Principles for the Development of International Standards, Guides and Recommendations issued by the World Trade Organization Technical Barriers to Trade (TBT) Committee.
SIGNIFICANCE AND USE 5.1 The AE examination method detects structurally significant flaws in FRP structures via test loading. The damage mechanisms that are detected in FRP include resin cracking, fiber debonding, fiber pullout, fiber breakage, delamination, and secondary bond failure. 5.2 Flaws in unstressed areas will not generate detectable AE. 5.3 Flaws located with AE may be examined by other methods. SCOPE 1.1 This practice provides guidelines for acoustic emission (AE) examinations of fiberglass reinforced plastic (FRP) fan blades of the type used in industrial cooling towers and heat exchangers. 1.2 This practice uses simulated service loading to determine structural integrity. 1.3 This practice will detect sources of acoustic emission in areas of sensor coverage that are stressed during the course of the examination. 1.4 This practice applies to examinations of new and in-service fan blades. 1.5 This practice is limited to fan blades of FRP construction, with length (hub centerline to tip) of less than 3 m [10 ft], and with fiberglass content greater than 15 % by weight. 1.6 AE measurements are used to detect emission sources. Other nondestructive examination (NDE) methods may be used to evaluate the significance of AE sources. Procedures for other NDE methods are beyond the scope of this practice. 1.7 Units—The values stated in either SI units or inch-pound units are to be regarded separately as standard. The values stated in each system may not be exact equivalents; therefore, each system shall be used independently of the other. Combining values from the two systems may result in non-conformance with the standard. 1.8 This standard does not purport to address all of the safety concerns, if any, associated with its use. It is the responsibility of the user of this standard to establish appropriate safety, health, and environmental practices and determine the applicability of regulatory limitations prior to use. 1.9 This international standard was developed in accordance with internationally recognized principles on standardization established in the Decision on Principles for the Development of International Standards, Guides and Recommendations issued by the World Trade Organization Technical Barriers to Trade (TBT) Committee.
ASTM E2076/E2076M-15(2022) is classified under the following ICS (International Classification for Standards) categories: 19.100 - Non-destructive testing. The ICS classification helps identify the subject area and facilitates finding related standards.
ASTM E2076/E2076M-15(2022) has the following relationships with other standards: It is inter standard links to ASTM E1316-24, ASTM E750-15(2020), ASTM E1316-19b, ASTM E1316-19, ASTM E1316-18, ASTM E1316-17a, ASTM E1316-17, ASTM E1316-16a, ASTM E1316-16, ASTM E2374-15, ASTM E1316-15a, ASTM E750-15, ASTM E1316-15, ASTM E1316-14, ASTM E1316-14e1. Understanding these relationships helps ensure you are using the most current and applicable version of the standard.
ASTM E2076/E2076M-15(2022) is available in PDF format for immediate download after purchase. The document can be added to your cart and obtained through the secure checkout process. Digital delivery ensures instant access to the complete standard document.
Standards Content (Sample)
This international standard was developed in accordance with internationally recognized principles on standardization established in the Decision on Principles for the
Development of International Standards, Guides and Recommendations issued by the World Trade Organization Technical Barriers to Trade (TBT) Committee.
Designation: E2076/E2076M − 15 (Reapproved 2022)
Standard Practice for
Examination of Fiberglass Reinforced Plastic Fan Blades
Using Acoustic Emission
ThisstandardisissuedunderthefixeddesignationE2076/E2076M;thenumberimmediatelyfollowingthedesignationindicatestheyear
of original adoption or, in the case of revision, the year of last revision. A number in parentheses indicates the year of last reapproval.
A superscript epsilon (´) indicates an editorial change since the last revision or reapproval.
1. Scope ization established in the Decision on Principles for the
Development of International Standards, Guides and Recom-
1.1 This practice provides guidelines for acoustic emission
mendations issued by the World Trade Organization Technical
(AE) examinations of fiberglass reinforced plastic (FRP) fan
Barriers to Trade (TBT) Committee.
blades of the type used in industrial cooling towers and heat
exchangers.
2. Referenced Documents
1.2 This practice uses simulated service loading to deter-
2.1 ASTM Standards:
mine structural integrity.
E543 Specification for Agencies Performing Nondestructive
Testing
1.3 This practice will detect sources of acoustic emission in
E650 Guide for Mounting Piezoelectric Acoustic Emission
areas of sensor coverage that are stressed during the course of
Sensors
the examination.
E750 Practice for Characterizing Acoustic Emission Instru-
1.4 This practice applies to examinations of new and in-
mentation
service fan blades.
E976 GuideforDeterminingtheReproducibilityofAcoustic
1.5 This practice is limited to fan blades of FRP
Emission Sensor Response
construction, with length (hub centerline to tip) of less than 3
E1067 PracticeforAcousticEmissionExaminationofFiber-
m [10 ft], and with fiberglass content greater than 15 % by
glass Reinforced Plastic Resin (FRP) Tanks/Vessels
weight.
E1106 Test Method for Primary Calibration of Acoustic
Emission Sensors
1.6 AE measurements are used to detect emission sources.
E1316 Terminology for Nondestructive Examinations
Other nondestructive examination (NDE) methods may be
E2374 Guide for Acoustic Emission System Performance
used to evaluate the significance ofAE sources. Procedures for
Verification
other NDE methods are beyond the scope of this practice.
2.2 ASNT Documents:
1.7 Units—The values stated in either SI units or inch-
SNT-TC-1A Recommended Practice for Nondestructive
pound units are to be regarded separately as standard. The
Testing Personnel Qualification and Certification
values stated in each system may not be exact equivalents;
ANSI/ASNT CP-189 Standard for Qualification and Certifi-
therefore,eachsystemshallbeusedindependentlyoftheother.
cation of Nondestructive Testing Personnel
Combining values from the two systems may result in non-
2.3 Aerospace Industries Association Document:
conformance with the standard.
NAS 410 Certification and Qualification of Nondestructive
1.8 This standard does not purport to address all of the
Testing Personnel
safety concerns, if any, associated with its use. It is the
2.4 ISO Standard:
responsibility of the user of this standard to establish appro-
ISO 9712 Non-Destructive Testing—Qualification and Cer-
priate safety, health, and environmental practices and deter-
tification of NDT Personnel
mine the applicability of regulatory limitations prior to use.
1.9 This international standard was developed in accor-
For referenced ASTM standards, visit the ASTM website, www.astm.org, or
dance with internationally recognized principles on standard-
contact ASTM Customer Service at service@astm.org. For Annual Book of ASTM
Standards volume information, refer to the standard’s Document Summary page on
the ASTM website.
AvailablefromAmericanSocietyforNondestructiveTesting(ASNT),P.O.Box
This practice is under the jurisdiction of ASTM Committee E07 on Nonde- 28518, 1711 Arlingate Ln., Columbus, OH 43228-0518, http://www.asnt.org.
structive Testing and is the direct responsibility of Subcommittee E07.04 on Available fromAerospace IndustriesAssociation ofAmerica, Inc. (AIA), 1000
Acoustic Emission Method. WilsonBlvd.,Suite1700,Arlington,VA22209-3928,http://www.aia-aerospace.org.
Current edition approved Dec. 1, 2022. Published December 2022. Originally Available from International Organization for Standardization (ISO), ISO
approved in 2000. Last previous edition approved in 2015 as E2076/E2076M – 15. Central Secretariat, BIBC II, Chemin de Blandonnet 8, CP 401, 1214 Vernier,
DOI: 10.1520/E2076_E2076M-15R22. Geneva, Switzerland, http://www.iso.org.
Copyright © ASTM International, 100 Barr Harbor Drive, PO Box C700, West Conshohocken, PA 19428-2959. United States
E2076/E2076M − 15 (2022)
3. Terminology ANSI/ASNT-CP-189, SNT-TC-1A, NAS-410, ISO 9712, or a
similar document and certified by the employer or certifying
3.1 Definitions—For definitions of terms used in this
agency, as applicable. The practice or standard used and its
practice, see Terminology E1316.
applicable revision shall be specified in the contractual agree-
ment between the using parties.
4. Summary of Practice
6.3 Qualification of Nondestructive Agencies—If specified
4.1 This practice consists of subjecting individual FRP fan
blades to increasing load while monitoring with sensors that in the contractual agreement, NDT agencies shall be qualified
and evaluated as described in Practice E543. The applicable
are sensitive to acoustic emission (transient stress waves)
caused by growing flaws. edition of Practice E543 shall be specified in the contractual
agreement.
4.2 This practice provides guidelines to determine the zonal
location of structural flaws in FRP fan blades. 6.4 Extent of Examination—The extent of examination shall
be in accordance with 10.2 unless otherwise specified.
4.3 The test load, applied at the blade tip is calculated to
provide 100 % of the maximum allowable operating (bending) 6.5 Reporting Criteria/Acceptance Criteria—Reporting cri-
load at the blade-hub interface.
teria for the examination results shall be in accordance with
Section 12 unless otherwise specified. Since acceptance
4.4 This practice is intended to simulate the bending load.
criteria, for example, for reference radiographs, are not speci-
Torsional and centrifugal loads are not simulated by this
fied in this practice, they shall be specified in the contractual
practice.
agreement.
4.5 Structurally insignificant flaws may produce acoustic
6.6 Reexamination of Repaired/Reworked Items—
emission.
Reexamination of repaired/reworked items is not addressed in
5. Significance and Use this practice, and if required, shall be specified in the contrac-
tual agreement.
5.1 TheAE examination method detects structurally signifi-
cant flaws in FRP structures via test loading. The damage 6.7 Personnel Training—It is recommended that personnel
mechanisms that are detected in FRP include resin cracking,
performing the examination have additional training on the
fiber debonding, fiber pullout, fiber breakage, delamination, following topics:
and secondary bond failure.
6.7.1 Basic technology of AE from FRP;
6.7.2 Failure mechanisms of FRP;
5.2 Flaws in unstressed areas will not generate detectable
6.7.3 AE instrument and sensor checkout on FRP;
AE.
6.7.4 Loading of FRP components for AE testing;
5.3 Flaws located with AE may be examined by other
6.7.5 Data collection and interpretation; and
methods.
6.7.6 Examination report preparation.
6. Basis of Application
7. Apparatus
6.1 The following items are subject to contractual agree-
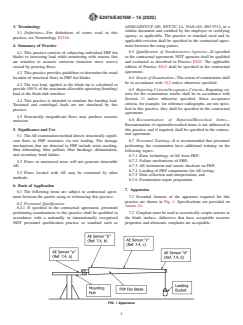
7.1 Essential features of the apparatus required for this
ment between the parties using or referencing this practice.
practice are shown in Fig. 1. Specifications are provided on
6.2 Personnel Qualification
Annex A1.
6.2.1 If specified in the contractual agreement, personnel
performing examinations to this practice shall be qualified in 7.2 Couplant must be used to acoustically couple sensors to
accordance with a nationally or internationally recognized the blade surface. Adhesives that have acceptable acoustic
NDT personnel qualification practice or standard such as properties and ultrasonic couplants are acceptable.
FIG. 1 Apparatus
E2076/E2076M − 15 (2022)
7.3 Sensors may be held in place with elastic straps, processor performance. An AE electronic waveform generator
adhesive tape, or other mechanical means. (See Guide E650.) should be used in routine electronic checks. Each signal
processor channel must respond with peak amplitude readings
7.4 Sensors are to be positioned on the fan mounting drive
within 62dB of the electronic waveform generator output.
AE
hub for background noise detection only; on the blade within
150 mm [6 in.] of the shank; on the blade midway between the 9.3 Routine sensor evaluations must be performed on a
shank and the blade tip; and within 150 mm [6 in.] of the blade monthly basis or at any time that there is concern about the
tip for background noise detection only. Additional sensors sensor performance. Peak amplitude response and electronic
may be added when more complete coverage is desired. noise level should be recorded. Sensors can be stimulated by a
pencil lead break in accordance with Guide E976. Sensors
NOTE1—ThesensorsindicatedinFig.1maybeplacedoneitherthetop
which are found to have peak amplitudes or electronic noise
or bottom surface of the blade.
morethan3dBgreaterthantheaverageofthegroupofsensors
7.5 Instrumentation shall be capable of recording AE hits
to be used during the examination shall be replaced.
above a low-amplitude threshold, AE hits above a high-
9.4 A system verification must be conducted immediately
amplitude threshold (both within a specific frequency range)
before and immediately after each examination. A system
andhavesufficientchannelstolocalizeAEsourcesinrealtime.
verification utilizes a mechanical device to induce stress waves
(See Practice E750.) Hit detection is required for each channel.
into the structure. The induced stress waves must be nonde-
An AE hit amplitude measurement is recommended for sensi-
structive and simulate emission from a flaw. System perfor-
tivity verification. Amplitude distributions are recommended
mance checks verify the sensitivity of each system channel,
for flaw characterization.
including the couplant. See Guide E2374.
7.6 Preamplifiers may be enclosed in the sensor housing or
9.4.1 The preferred technique for conducting a system
in a separate enclosure. If a separate preamplifier is used,
performance check utilizes a pencil lead break. Lead should be
sensor cable length, between the sensor and the preamplifier,
broken on the surface (see Fig. 5 of Guide E976) at a specified
must not result in a signal loss of greater than 3 dB. Typically,
distance, typically 100 mm [4 in.] from the sensor.
2 m [6 ft], is acceptable.
9.4.2 Systemchannelswhicharefoundtohaveperformance
7.7 Power/signal cable length (between preamplifier and
outside of specified values shall be repaired or replaced.Values
signal processor) shall not result in a signal loss of greater than
shall be specified such that the sensitivity of channels used in
3 dB. Typically, 150 m [500 ft] is acceptable.
the same test differ by no more than 3 dB.
7.8 Signal processors are computerized instruments with
10. Test Procedure
independent channels that filter, measure, and convert analog
10.1 General Guidelines—Each fan blade is subjected to
information into digital form for display and permanent stor-
programmed increasing tip load, up to a predetermined maxi-
age. A signal processor must have suf
...


Questions, Comments and Discussion
Ask us and Technical Secretary will try to provide an answer. You can facilitate discussion about the standard in here.
Loading comments...