ASTM D1708-96
(Test Method)Standard Test Method for Tensile Properties of Plastics By Use of Microtensile Specimens
Standard Test Method for Tensile Properties of Plastics By Use of Microtensile Specimens
SCOPE
1.1 This test method covers certain material specifications for which a history of data has been obtained using the standard microtensile specimen. The specimen geometry has been changed to be equivalent to that of ISO 12086-2:1955. In general, this test method is superseded for general use by either Test Methods D 882 or Test Method D 638. The very small Type V specimen in Test Method D 638 is the recommended specimen when limited amounts of material are available.
1.2 This test method covers the determination of the comparative tensile strength and elongation properties of plastics in the form of standard microtensile test specimens when tested under defined conditions of pretreatment, temperature, humidity, and testing machine speed. It can be used for specimens of any thickness up to 3.2 mm (1/8 in.), including thin films.
1.3 This test method cannot be used for the determination of modulus of elasticity. For the determination of modulus, see Test Method D 638 or Test Methods D 882.
1.4 Test data obtained by this test method are relevant and appropriate for use in engineering design.
1.5 The values stated in SI units are to be regarded as the standard. The values given in parentheses are for information only.
1.6 This standard does not purport to address all of the safety concerns, if any, associated with its use. It is the responsibility of the user of this standard to establish appropriate safety and health practices and determine the applicability of regulatory limitations prior to use.
Note 1—There is no equivalent or similar ISO standard.
General Information
Relations
Standards Content (Sample)
NOTICE: This standard has either been superseded and replaced by a new version or discontinued.
Contact ASTM International (www.astm.org) for the latest information.
Designation: D 1708 – 96
Standard Test Method for
Tensile Properties of Plastics By Use of Microtensile
Specimens
This standard is issued under the fixed designation D 1708; the number immediately following the designation indicates the year of
original adoption or, in the case of revision, the year of last revision. A number in parentheses indicates the year of last reapproval. A
superscript epsilon (e) indicates an editorial change since the last revision or reapproval.
This standard has been approved for use by agencies of the Department of Defense.
1. Scope D 882 Test Methods for Tensile Properties of Thin Plastic
Sheeting
1.1 This test method covers certain material specifications
D 883 Terminology Relating to Plastics
for which a history of data has been obtained using the standard
D 4000 Classification System for Specifying Plastic Mate-
microtensile specimen. The specimen geometry has been
rials
changed to be equivalent to that of ISO 12086-2:1955. In
D 4066 Specification for Nylon Injection and Extrusion
general, this test method is superseded for general use by either
Materials
Test Methods D 882 or Test Method D 638. The very small
E 691 Practice for Conducting an Interlaboratory Study to
Type V specimen in Test Method D 638 is the recommended
Determine the Precision of a Test Method
specimen when limited amounts of material are available.
2.2 ISO Standard:
1.2 This test method covers the determination of the com-
ISO 12086-2:1995 Plastics—Fluoropolymer Dispersion,
parative tensile strength and elongation properties of plastics in
Moulding, and Extrusion Materials—Part 2 Preparation of
the form of standard microtensile test specimens when tested
Test Specimens and Determination of Properties
under defined conditions of pretreatment, temperature, humid-
ity, and testing machine speed. It can be used for specimens of
3. Terminology
any thickness up to 3.2 mm ( ⁄8 in.), including thin films.
3.1 Definitions: Definitions of terms applying to this test
1.3 This test method cannot be used for the determination of
method appear in Terminology D 883 and Test Method D 638,
modulus of elasticity. For the determination of modulus, see
Annex A2.
Test Method D 638 or Test Methods D 882.
1.4 Test data obtained by this test method are relevant and
4. Significance and Use
appropriate for use in engineering design.
4.1 This test method provides data for quality control and
1.5 The values stated in SI units are to be regarded as the
acceptance or rejection under specifications.
standard. The values given in parentheses are for information
4.2 For many materials, there may be a specification that
only.
requires the use of this test method, but with some procedural
1.6 This standard does not purport to address all of the
modifications that take precedence when adhering to the
safety concerns, if any, associated with its use. It is the
specification. Therefore, it is advisable to refer to that material
responsibility of the user of this standard to establish appro-
specification before using this test method. Table 1 of Classi-
priate safety and health practices and determine the applica-
fication System D 4000 lists the ASTM materials standards that
bility of regulatory limitations prior to use.
currently exist.
NOTE 1—There is no equivalent or similar ISO standard.
5. Apparatus
2. Referenced Documents
5.1 The apparatus shall be as specified in Test Method
2.1 ASTM Standards:
D 638, with the following exceptions:
D 618 Practice for Conditioning Plastics and Electrical
5.1.1 Grips—Serrated grips should be used with care, since
Insulating Materials for Testing
yielding or tearing at the grips may interfere with measurement
D 638 Test Method for Tensile Properties of Plastics
of elongation even when the specimen breaks in the reduced
section. Rubber-faced grips are recommended for thin speci-
mens. Self-tightening grips of the “V”-design type are not
This test method is under the jurisdiction of ASTM Committee D-20 on Plastics
and is the direct responsibility of Subcommittee D20.10 on Mechanical Properties. Annual Book of ASTM Standards, Vol 08.02.
Current edition approved May 10, 1996. Published July 1996. Originally Annual Book of ASTM Standards, Vol 14.02.
published as D 1708 – 59 T. Last previous edition D 1708 – 95. Available from American National Standards Institute, 11 W. 42nd St., 13th
Annual Book of ASTM Standards, Vol 08.01. Floor, New York, NY 10036.
Copyright © ASTM International, 100 Barr Harbor Drive, PO Box C700, West Conshohocken, PA 19428-2959, United States.
D 1708
TABLE 1 Tensile Strength at Break for Seven Laboratories and
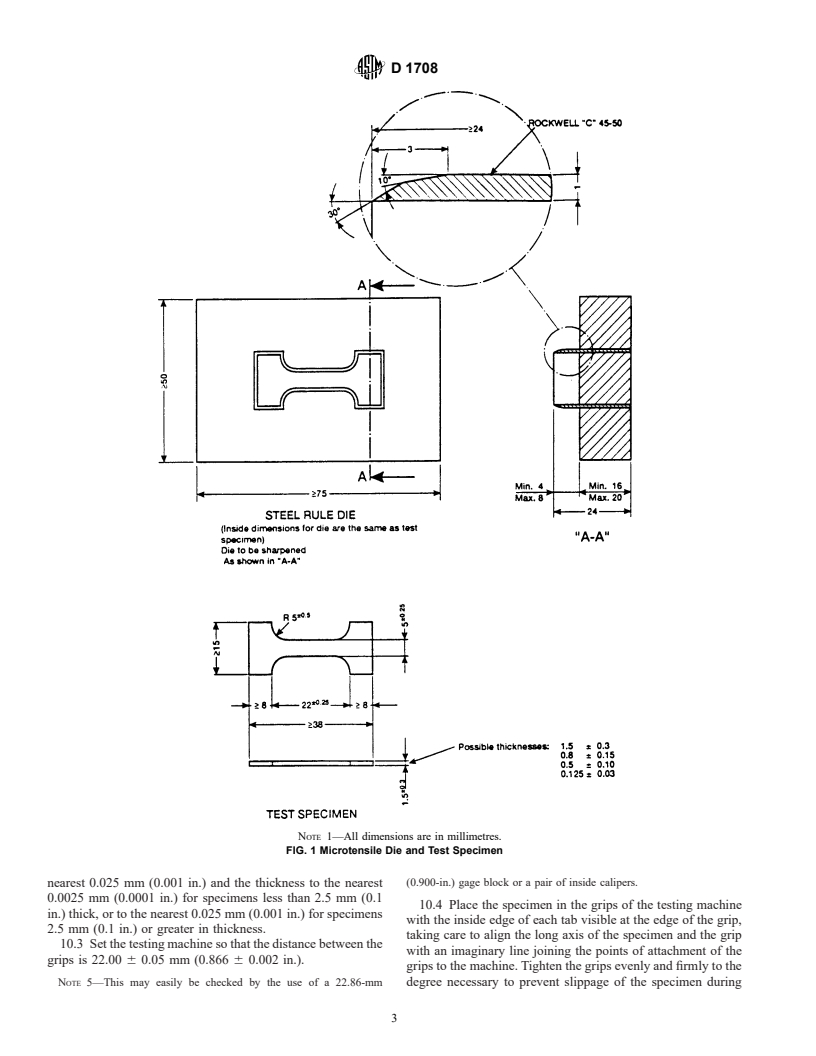
NOTE 4—Tabs shown in Fig. 1 are minimum size for adequate gripping.
Two Materials, MPa
Shims may be required with thicker specimens to keep grips from
cocking. Handling is facilitated and gripping improved by the use of larger
Test
A B C D
Material Speed, Average S S r R tabs wherever possible.
r R
mm/min
Polyamide(imide) 1.3 193.6 1.60 5.48 4.48 15.3
7. Number of Test Specimens
Polybutylene 12.7 31.3 0.80 2.75 9.12 9.12
7.1 At least five test specimens shall be tested for each
A
S is the within-laboratory standard deviation for the indicated material. It is
r
sample in the case of isotropic materials.
obtained by pooling the within-laboratory standard deviations of the test results
7.2 Ten test specimens, five normal to and five parallel to
from all of the participating laboratories:
2 2 2 1 2
/
S 5 @@~S ! 1 ~S ! 1 . 1 ~S ! #/n# . (1) the principal axis of anisotropy, shall be tested for each sample
r 1 2 n
B
S is the between-labortories reproducibility, expressed as a standard devia-
R
in the case of anisotropic materials.
tion, for the indicated material.
C
7.3 Results obtained on test specimens that break at some
r is the within-laboratory repeatability limit, r = 2.8 3 S .
r
D
R is the between-laboratory reproducibility limit, R = 2.8 3 S .
R obvious fortuitous flaw or at the edge of the grips shall be
discarded and retests made, unless such flaws constitute a
satisfactory for this test method because of the change in grip
variable, the effect of which it is desired to study.
separation that occurs as they bite on the specimen. If the
specimen tab is not long enough to prevent the grip faces from 8. Speed of Testing
cocking, shims should be inserted to provide more uniform
8.1 Speed of testing is the velocity of separation of the two
clamping.
members (or grips) of the testing machine when running idle
5.1.2 Drive Mechanism—The velocity of the drive mecha-
(under no load).
nism shall be regulated as specified in Section 8.
8.2 The speed of testing shall be chosen such that the rate of
5.1.3 The fixed and movable members, drive mechanism,
straining shall be approximately the same as the rate of
and grips should be constructed of such materials and in such
straining obtained when the material is tested at the designated
proportions that, after grip slack is taken up, the total elastic
speed according to Test Method D 638. Speeds giving rates of
longitudinal deformation of the system constituted by these
straining approximating those given in Test Method D 638 are
parts does not exceed 1 % of the total longitudinal deformation
as follows:
between the grips at any time during the test. If this is not
Speed A 0.25 mm (0.01 in.)/min
possible, appropriate corrections shall be made in the calcula-
Speed B 1 to 1.3 mm (0.04 to 0.05 in.)/min
Speed C 10 to 13 mm (0.4 to 0.5 in.)/min
tion of strain values.
Speed D 100 to 130 mm (4 to 5 in.)/min
5.1.4 Extension Indicator—The extension indicator shall be
These speeds are 0.20 to 0.25 times the speeds designated in
capable of determining the distance between grips at any time
during the test. The instrument shall be essentially free of Test Method D 638, since the effective gage length of bars
specified in the latter test method is 4 to 5 times that of the
inertia lag at the specified speed of testing, and shall be
accurate to 61 % of extension or better. microtensile test specimens. When the speed of testing is not
specified, Speed B shall be used.
NOTE 2—It is desirable that the load indicator and the extension
indicator be combined into one instrument, which automatically records 9. Conditioning
the load as a function of the extension or as a function of time. In the latter
9.1 Conditioning—Condition the test specimens at 23 6
case, the conversion to a load-extension record can readily be made
2°C (73.4 6 3.6°F) and 50 6 5 % relative humidity for not less
because extension is proportional to time after the take-up of the initial
than 40 h prior to test in accordance with Procedure A of
grip slack.
NOTE 3—Extension may also be measured by timing the test with a stop Practice D 618 for those tests where conditioning is required.
watch and calculating the distance of crosshead movement during that
In cases of disagreement, the tolerances shall be6 1°C
time. Time shall be taken from the instant that the machine records a load
(61.8°F) and6 2 % relative humidity.
on the specimen to the instant the specimen breaks.
9.1.1 Note that for some hygroscopic materials, such as
5.1.5 Micrometers—Micrometers shall read to 0.0025 mm
nylons, the material specifications (for exam
...


Questions, Comments and Discussion
Ask us and Technical Secretary will try to provide an answer. You can facilitate discussion about the standard in here.