ASTM F109-04
(Terminology)Standard Terminology Relating to Surface Imperfections on Ceramics
Standard Terminology Relating to Surface Imperfections on Ceramics
SCOPE
1.1 This terminology describes and illustrates imperfections observed on whitewares and related products. For additional definitions of terms relating to whitewares and related products, refer to Terminology C 242. To observe these defects, examination shall be performed visually, with or without the aid of a dye penetrant, as described in Test Method C 949. Agreement by the manufacturer and the purchaser regarding specific techniques of observation is strongly recommended.
General Information
Relations
Standards Content (Sample)
NOTICE: This standard has either been superseded and replaced by a new version or withdrawn.
Contact ASTM International (www.astm.org) for the latest information
Designation:F109–04
Standard Terminology Relating to
1
Surface Imperfections on Ceramics
This standard is issued under the fixed designation F 109; the number immediately following the designation indicates the year of
original adoption or, in the case of revision, the year of last revision. A number in parentheses indicates the year of last reapproval. A
superscript epsilon (´) indicates an editorial change since the last revision or reapproval.
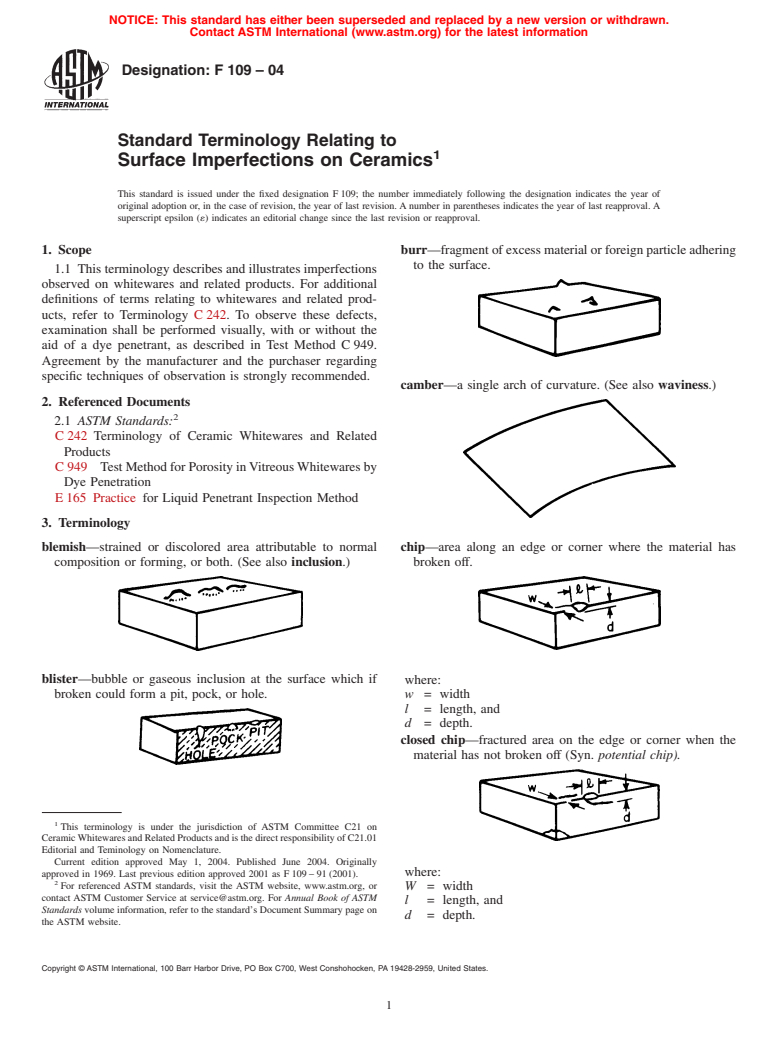
1. Scope burr—fragment of excess material or foreign particle adhering
to the surface.
1.1 This terminology describes and illustrates imperfections
observed on whitewares and related products. For additional
definitions of terms relating to whitewares and related prod-
ucts, refer to Terminology C 242. To observe these defects,
examination shall be performed visually, with or without the
aid of a dye penetrant, as described in Test Method C 949.
Agreement by the manufacturer and the purchaser regarding
specific techniques of observation is strongly recommended.
camber—a single arch of curvature. (See also waviness.)
2. Referenced Documents
2
2.1 ASTM Standards:
C 242 Terminology of Ceramic Whitewares and Related
Products
C 949 Test Method for Porosity inVitreousWhitewares by
Dye Penetration
E 165 Practice for Liquid Penetrant Inspection Method
3. Terminology
blemish—strained or discolored area attributable to normal chip—area along an edge or corner where the material has
composition or forming, or both. (See also inclusion.) broken off.
blister—bubble or gaseous inclusion at the surface which if
where:
broken could form a pit, pock, or hole. w = width
l = length, and
d = depth.
closed chip—fractured area on the edge or corner when the
material has not broken off (Syn. potential chip).
1
This terminology is under the jurisdiction of ASTM Committee C21 on
CeramicWhitewares and Related Products and is the direct responsibility of C21.01
Editorial and Teminology on Nomenclature.
Current edition approved May 1, 2004. Published June 2004. Originally
where:
approved in 1969. Last previous edition approved 2001 as F 109 – 91 (2001).
2
For referenced ASTM standards, visit the ASTM website, www.astm.org, or
W = width
contact ASTM Customer Service at service@astm.org. For Annual Book of ASTM
l = length, and
Standards volume information, refer to the standard’s Document Summary page on
d = depth.
the ASTM website.
Copyright © ASTM International, 100 Barr Harbor Drive, PO Box C700, West Conshohocken, PA 19428-2959, United States.
1
---------------------- Page: 1 ----------------------
F109–04
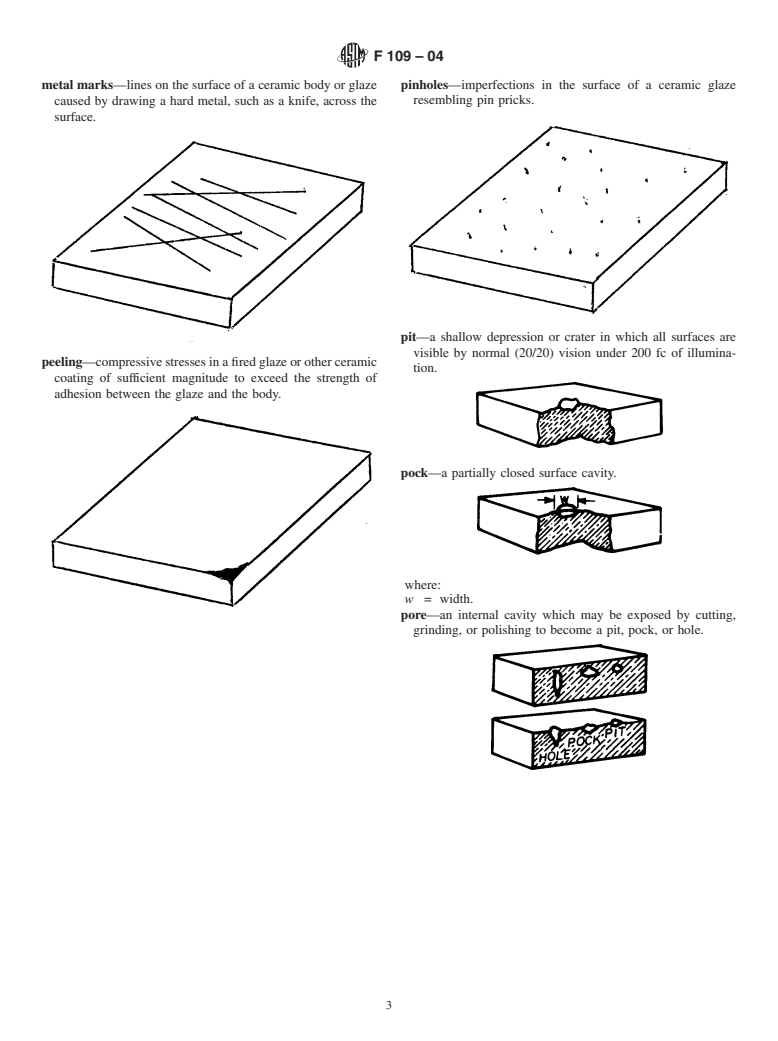
crack—line of fracture without complete separation. flow line—one or more streaks distinguished by a difference in
light reflectance from the surrounding area, charateristic of
injection-molded parts. (See also weld mark.)
crawling—apartingandcontractionoftheglazeonthesurface
of ceramic ware during drying or firing, resulting in un-
glazed areas bordered by coalesced glaze.
grinding mark—a pattern of fine striations or scoring, usually
directional, resulting from machining, as distinct from sur-
face marks
hole—a deep depression or void, the bottom of which is not
visible by normal (20/20) vision under 200 fc illumination.
crazing—the cracking that occurs in fired glazes or other
ceramic coatings as a result of tensile stresses, may also
occur in the surface portion of uncoated (unglazed) whitew-
inclusion—
...


Questions, Comments and Discussion
Ask us and Technical Secretary will try to provide an answer. You can facilitate discussion about the standard in here.