ASTM E539-11
(Test Method)Standard Test Method for Analysis of Titanium Alloys by X-Ray Fluorescence Spectrometry
Standard Test Method for Analysis of Titanium Alloys by X-Ray Fluorescence Spectrometry
SIGNIFICANCE AND USE
This method is suitable for providing data on the chemical composition of titanium alloys having compositions within the scope of the standard. It is intended for routine production control and for determination of chemical composition for the purpose of certifying material specification compliance. Additionally, the analytical performance data included with this method may be used as a benchmark to determine if similar X-ray spectrometers provide equivalent precision and accuracy.
SCOPE
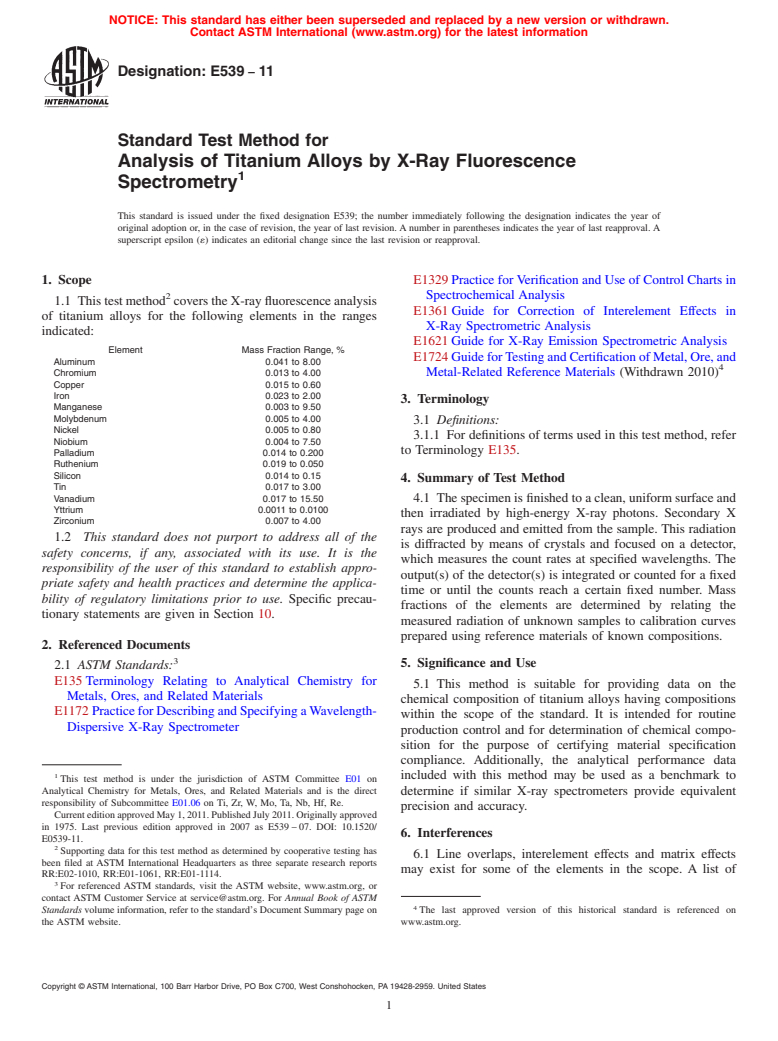
1.1 This test method covers the X-ray fluorescence analysis of titanium alloys for the following elements in the ranges indicated: ElementMass Fraction Range, % Aluminum0.041 to 8.00 Chromium0.013 to 4.00 Copper0.015 to 0.60 Iron0.023 to 2.00 Manganese0.003 to 9.50 Molybdenum0.005 to 4.00 Nickel0.005 to 0.80 Niobium0.004 to 7.50 Palladium0.014 to 0.200 Ruthenium0.019 to 0.050 Silicon0.014 to 0.15 Tin0.017 to 3.00 Vanadium0.017 to 15.50 Yttrium0.0011 to 0.0100 Zirconium0.007 to 4.00
1.2 This standard does not purport to address all of the safety concerns, if any, associated with its use. It is the responsibility of the user of this standard to establish appropriate safety and health practices and determine the applicability of regulatory limitations prior to use. Specific precautionary statements are given in Section 10.
General Information
Relations
Buy Standard
Standards Content (Sample)
NOTICE: This standard has either been superseded and replaced by a new version or withdrawn.
Contact ASTM International (www.astm.org) for the latest information
Designation: E539 − 11
Standard Test Method for
Analysis of Titanium Alloys by X-Ray Fluorescence
1
Spectrometry
This standard is issued under the fixed designation E539; the number immediately following the designation indicates the year of
original adoption or, in the case of revision, the year of last revision. A number in parentheses indicates the year of last reapproval. A
superscript epsilon (´) indicates an editorial change since the last revision or reapproval.
1. Scope E1329 Practice for Verification and Use of Control Charts in
2 Spectrochemical Analysis
1.1 Thistestmethod coverstheX-rayfluorescenceanalysis
E1361 Guide for Correction of Interelement Effects in
of titanium alloys for the following elements in the ranges
X-Ray Spectrometric Analysis
indicated:
E1621 Guide for X-Ray Emission Spectrometric Analysis
Element Mass Fraction Range, %
E1724 GuideforTestingandCertificationofMetal,Ore,and
Aluminum 0.041 to 8.00
4
Chromium 0.013 to 4.00 Metal-Related Reference Materials (Withdrawn 2010)
Copper 0.015 to 0.60
Iron 0.023 to 2.00
3. Terminology
Manganese 0.003 to 9.50
Molybdenum 0.005 to 4.00
3.1 Definitions:
Nickel 0.005 to 0.80
3.1.1 For definitions of terms used in this test method, refer
Niobium 0.004 to 7.50
to Terminology E135.
Palladium 0.014 to 0.200
Ruthenium 0.019 to 0.050
Silicon 0.014 to 0.15
4. Summary of Test Method
Tin 0.017 to 3.00
Vanadium 0.017 to 15.50
4.1 The specimen is finished to a clean, uniform surface and
Yttrium 0.0011 to 0.0100
then irradiated by high-energy X-ray photons. Secondary X
Zirconium 0.007 to 4.00
rays are produced and emitted from the sample. This radiation
1.2 This standard does not purport to address all of the
is diffracted by means of crystals and focused on a detector,
safety concerns, if any, associated with its use. It is the
which measures the count rates at specified wavelengths. The
responsibility of the user of this standard to establish appro-
output(s) of the detector(s) is integrated or counted for a fixed
priate safety and health practices and determine the applica-
time or until the counts reach a certain fixed number. Mass
bility of regulatory limitations prior to use. Specific precau-
fractions of the elements are determined by relating the
tionary statements are given in Section 10.
measured radiation of unknown samples to calibration curves
prepared using reference materials of known compositions.
2. Referenced Documents
3
5. Significance and Use
2.1 ASTM Standards:
E135 Terminology Relating to Analytical Chemistry for
5.1 This method is suitable for providing data on the
Metals, Ores, and Related Materials
chemical composition of titanium alloys having compositions
E1172 PracticeforDescribingandSpecifyingaWavelength-
within the scope of the standard. It is intended for routine
Dispersive X-Ray Spectrometer
production control and for determination of chemical compo-
sition for the purpose of certifying material specification
compliance. Additionally, the analytical performance data
1
included with this method may be used as a benchmark to
This test method is under the jurisdiction of ASTM Committee E01 on
Analytical Chemistry for Metals, Ores, and Related Materials and is the direct
determine if similar X-ray spectrometers provide equivalent
responsibility of Subcommittee E01.06 on Ti, Zr, W, Mo, Ta, Nb, Hf, Re.
precision and accuracy.
CurrenteditionapprovedMay1,2011.PublishedJuly2011.Originallyapproved
in 1975. Last previous edition approved in 2007 as E539 – 07. DOI: 10.1520/
6. Interferences
E0539-11.
2
Supporting data for this test method as determined by cooperative testing has
6.1 Line overlaps, interelement effects and matrix effects
been filed at ASTM International Headquarters as three separate research reports
may exist for some of the elements in the scope. A list of
RR:E02-1010, RR:E01-1061, RR:E01-1114.
3
For referenced ASTM standards, visit the ASTM website, www.astm.org, or
contact ASTM Customer Service at service@astm.org. For Annual Book of ASTM
4
Standards volume information, refer to the standard’s Document Summary page on The last approved version of this historical standard is referenced on
the ASTM website. www.astm.org.
Copyright © ASTM International, 100 Barr Harbor Drive, PO Box C700, West Conshohocken, PA 19428-2959. United States
1
---------------------- Page: 1 ----------------------
E539 − 11
potentiallineoverlapsisprovidedinsection6.2.ModernX-ray tions for interferences, especially when interference correc-
spectrometers provide software for generation of mathematical tions are estimated using only empirical data. See Guide
corrections to model the effects of line overlaps, interelement E1361.
and matrix interferences. The user of this method may choose
10. Hazards
to use these mathematical corrections for analysis. Guide
10.1 X-ray spectrometers produce ioni
...
This document is not anASTM standard and is intended only to provide the user of anASTM standard an indication of what changes have been made to the previous version. Because
it may not be technically possible to adequately depict all changes accurately, ASTM recommends that users consult prior editions as appropriate. In all cases only the current version
of the standard as published by ASTM is to be considered the official document.
Designation:E539–07 Designation:E539–11
Standard Test Method for
X-Ray Fluorescence Spectrometric Analysis of 6Al-4V
Titanium AlloyAnalysis of Titanium Alloys by X-Ray
1
Fluorescence Spectrometry
This standard is issued under the fixed designation E539; the number immediately following the designation indicates the year of
original adoption or, in the case of revision, the year of last revision. A number in parentheses indicates the year of last reapproval. A
superscript epsilon (´) indicates an editorial change since the last revision or reapproval.
1. Scope
2
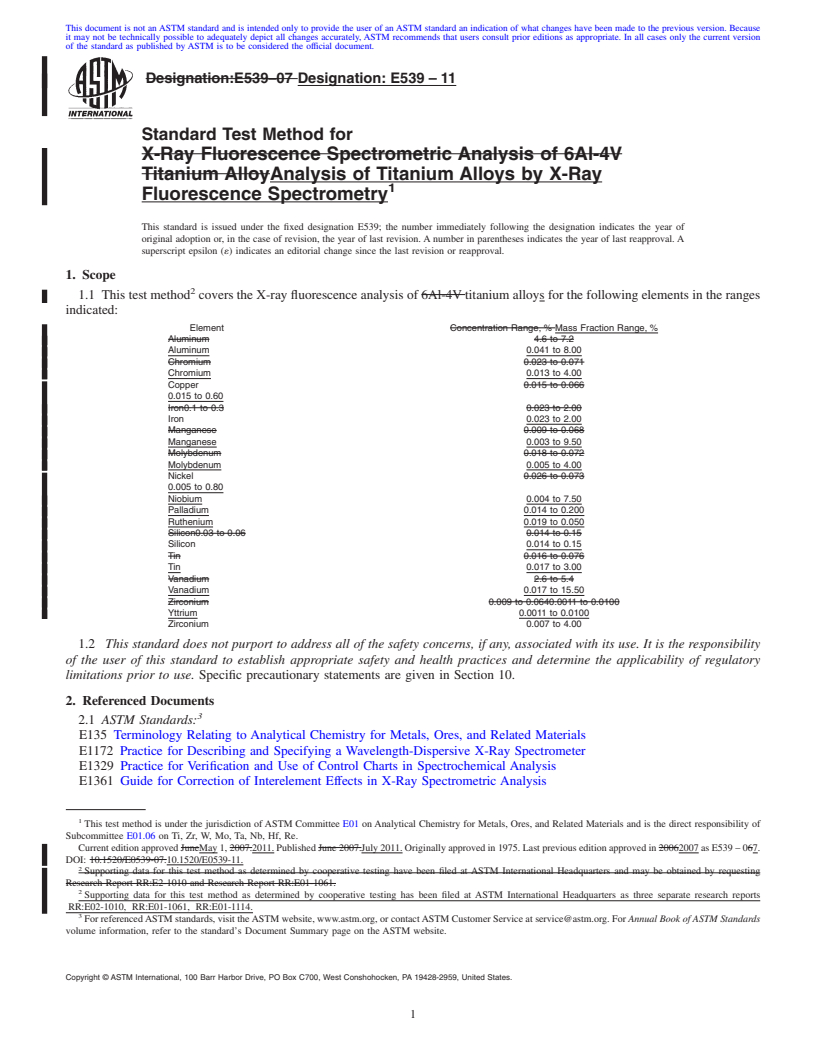
1.1 This test method covers the X-ray fluorescence analysis of 6Al-4Vtitanium alloys for the following elements in the ranges
indicated:
Element Concentration Range, % Mass Fraction Range, %
Aluminum 4.6to7.2
Aluminum 0.041 to 8.00
Chromium 0.023 to 0.071
Chromium 0.013 to 4.00
Copper 0.015 to 0.066
0.015 to 0.60
Iron0.1 to 0.3 0.023 to 2.00
Iron 0.023 to 2.00
Manganese 0.009 to 0.068
Manganese 0.003 to 9.50
Molybdenum 0.018 to 0.072
Molybdenum 0.005 to 4.00
Nickel 0.026 to 0.073
0.005 to 0.80
Niobium 0.004 to 7.50
Palladium 0.014 to 0.200
Ruthenium 0.019 to 0.050
Silicon0.03 to 0.06 0.014 to 0.15
Silicon 0.014 to 0.15
Tin 0.016 to 0.076
Tin 0.017 to 3.00
Vanadium 2.6to5.4
Vanadium 0.017 to 15.50
Zirconium 0.009 to 0.0640.0011 to 0.0100
Yttrium 0.0011 to 0.0100
Zirconium 0.007 to 4.00
1.2 This standard does not purport to address all of the safety concerns, if any, associated with its use. It is the responsibility
of the user of this standard to establish appropriate safety and health practices and determine the applicability of regulatory
limitations prior to use. Specific precautionary statements are given in Section 10.
2. Referenced Documents
3
2.1 ASTM Standards:
E135 Terminology Relating to Analytical Chemistry for Metals, Ores, and Related Materials
E1172 Practice for Describing and Specifying a Wavelength-Dispersive X-Ray Spectrometer
E1329 Practice for Verification and Use of Control Charts in Spectrochemical Analysis
E1361 Guide for Correction of Interelement Effects in X-Ray Spectrometric Analysis
1
This test method is under the jurisdiction of ASTM Committee E01 on Analytical Chemistry for Metals, Ores, and Related Materials and is the direct responsibility of
Subcommittee E01.06 on Ti, Zr, W, Mo, Ta, Nb, Hf, Re.
CurrenteditionapprovedJuneMay1,2007.2011.PublishedJune2007.July2011.Originallyapprovedin1975.Lastpreviouseditionapprovedin20062007asE539 – 067.
DOI: 10.1520/E0539-07.10.1520/E0539-11.
2
Supporting data for this test method as determined by cooperative testing have been filed at ASTM International Headquarters and may be obtained by requesting
Research Report RR:E2-1010 and Research Report RR:E01-1061.
2
Supporting data for this test method as determined by cooperative testing has been filed at ASTM International Headquarters as three separate research reports
RR:E02-1010, RR:E01-1061, RR:E01-1114.
3
For referencedASTM standards, visit theASTM website, www.astm.org, or contactASTM Customer Service at service@astm.org. For Annual Book of ASTM Standards
volume information, refer to the standard’s Document Summary page on the ASTM website.
Copyright © ASTM International, 100 Barr Harbor Drive, PO Box C700, West Conshohocken, PA 19428-2959, United States.
1
---------------------- Page: 1 ----------------------
E539–11
E1621 Guide for X-Ray Emission Spectrometric Analysis Guide for X-Ray Emission Spectrometric Analysis
E1724 Guide for Testing and Certification of Metal, Ore, and Metal-Related Reference Materials
3. Terminology
3.1 Definitions:
3.1.1 For definitions of terms used in this test method, refer to Terminology E135.
4. Summary of Test Method
4.1The specimen is finished to a clean, uniform surface and then irradiated by high energy X-ray photons. Secondary X- rays
are produced and emitted from the sample. This radiation is diffracted by means of analyzing crystals and focused on a detector
which measures the count rates at specified wavelengths. The outputs of the detectors in voltage pulses are integrated or counted.
Radiation measurements are made based on the time required to reach a fixed number of counts, or on the total counts obtained
for a fixed time (generally expressed in counts per unit time). Concentrations of the elements are determined by relating the
measured radiation of unknown samples to calibration curves prepared using reference materials of known compositions.
4.1 The specimen is finished to a clean, uniform surface and then irradiated by high-energy X-ray photons. Secondary X rays
ar
...


Questions, Comments and Discussion
Ask us and Technical Secretary will try to provide an answer. You can facilitate discussion about the standard in here.