ASTM D1062-02
(Test Method)Standard Test Method for Cleavage Strength of Metal-to-Metal Adhesive Bonds
Standard Test Method for Cleavage Strength of Metal-to-Metal Adhesive Bonds
ABSTRACT
This test method covers the determination of the comparative cleavage strength properties of metal-to-metal adhesive bonds. The testing machine shall be capable of maintaining the rate of loading and shall compose of fixed member, movable member, and grips. Test specimens shall consist of metal pieces glued together according to the prescribed dimensions indicated in this standard method. Recommended metal specimens are the following: brass, copper, aluminum, steel, and phosphor bronze. Bonding and conditioning of specimen shall be done according to the procedure specified by the manufacturer of the adhesive. Testing procedure shall be in accordance to the load rate limits specified in this standard method. Cleavage strength shall be expressed in pounds per inch and shall be reported in three significant figures in addition to the following information: adhesive identification, preparation method, adhesive layer thickness, conditioning procedure used, testing room condition, specimen number, and loading rate.
SCOPE
1.1 This test method covers the determination of the comparative cleavage properties of adhesive bonds when tested on standard shape metal specimens under specified conditions of preparation and testing. It may be used also to compare adhesives used with other metallic materials having any specified surface treatment.
1.2 The values stated in SI units are to be regarded as the standard. The values in parentheses are for information only.
1.3 This standard does not purport to address all of the safety concerns, if any, associated with its use. It is the responsibility of the user of this standard to establish appropriate safety and health practices and determine the applicability of regulatory limitations prior to use.
General Information
Relations
Standards Content (Sample)
NOTICE: This standard has either been superseded and replaced by a new version or withdrawn.
Contact ASTM International (www.astm.org) for the latest information
Designation:D1062–02
Standard Test Method for
1
Cleavage Strength of Metal-to-Metal Adhesive Bonds
This standard is issued under the fixed designation D 1062; the number immediately following the designation indicates the year of
original adoption or, in the case of revision, the year of last revision. A number in parentheses indicates the year of last reapproval. A
superscript epsilon (e) indicates an editorial change since the last revision or reapproval.
This standard has been approved for use by agencies of the Department of Defense.
INTRODUCTION
The accuracy of the results of strength tests of adhesive bonds will depend on the conditions under
which the bonding process is carried out. Unless otherwise agreed upon by the manufacturer and the
purchaser, the bonding conditions shall be prescribed by the manufacturer of the adhesive. In order to
ensure that complete information is available to the individual conducting the tests, the manufacturer
of the adhesive shall furnish numerical values and other specific information for each of the following
variables:
(1) Procedure for preparation of surfaces prior to application of the adhesive, the cleaning and
drying of metal surfaces, and special surface treatments such as sanding that are not specifically
limited by the pertinent test method.
(2) Complete mixing directions for the adhesive.
(3) Conditions for application of the adhesive, including the rate of spread or thickness of film,
number of coats to be applied, whether to be applied to one or both surfaces, and the conditions of
drying where more than one coat is required.
(4) Assembly conditions before application of pressure, including the room temperature, length of
time, and whether open or closed assembly is to be used.
(5) Curing conditions, including the amount of pressure to be applied, the length of time under
pressure, and the temperature of the assembly when under pressure. State whether this temperature is
that of the bond line or of the atmosphere at which the assembly is to be maintained.
(6) Conditioning procedure before testing, unless a standard procedure is specified, including the
length of time, temperature, and relative humidity.
Arange may be prescribed for any variable by the manufacturer of the adhesive if it can be assumed
by the test operator that any arbitrarily chosen value within such a range or any combination of such
values for several variables will be acceptable to both the manufacturer and the purchaser of the
adhesive.
1. Scope 1.3 This standard does not purport to address all of the
safety concerns, if any, associated with its use. It is the
1.1 This test method covers the determination of the com-
responsibility of the user of this standard to establish appro-
parative cleavage properties of adhesive bonds when tested on
priate safety and health practices and determine the applica-
standard shape metal specimens under specified conditions of
bility of regulatory limitations prior to use.
preparation and testing. It may be used also to compare
adhesives used with other metallic materials having any
2. Referenced Documents
specified surface treatment.
2.1 ASTM Standards:
1.2 The values stated in SI units are to be regarded as the
A 108 Specification for Steel Bars, Carbon, Cold-Finished,
standard. The values in parentheses are for information only.
2
Standard Quality
B 16/B 16M Specification for Free-Cutting Brass Rod, Bar,
1
This test method is under the jurisdiction of ASTM Committee D14 on
Adhesives and is the direct responsibility of Subcommittee D14.80 on Metal
Bonding Adhesives.
Current edition approved Sept. 10, 2002. Published November 2002. Originally
e1 2
published as D 1062 – 49 T. Last previous edition D 1062 – 96 . Annual Book of ASTM Standards, Vol 01.05.
Copyright © ASTM International, 100 Barr Harbor Drive, PO Box C700, West Conshohocken, PA 19428-2959, United States.
1
---------------------- Page: 1 ----------------------
D1062–02
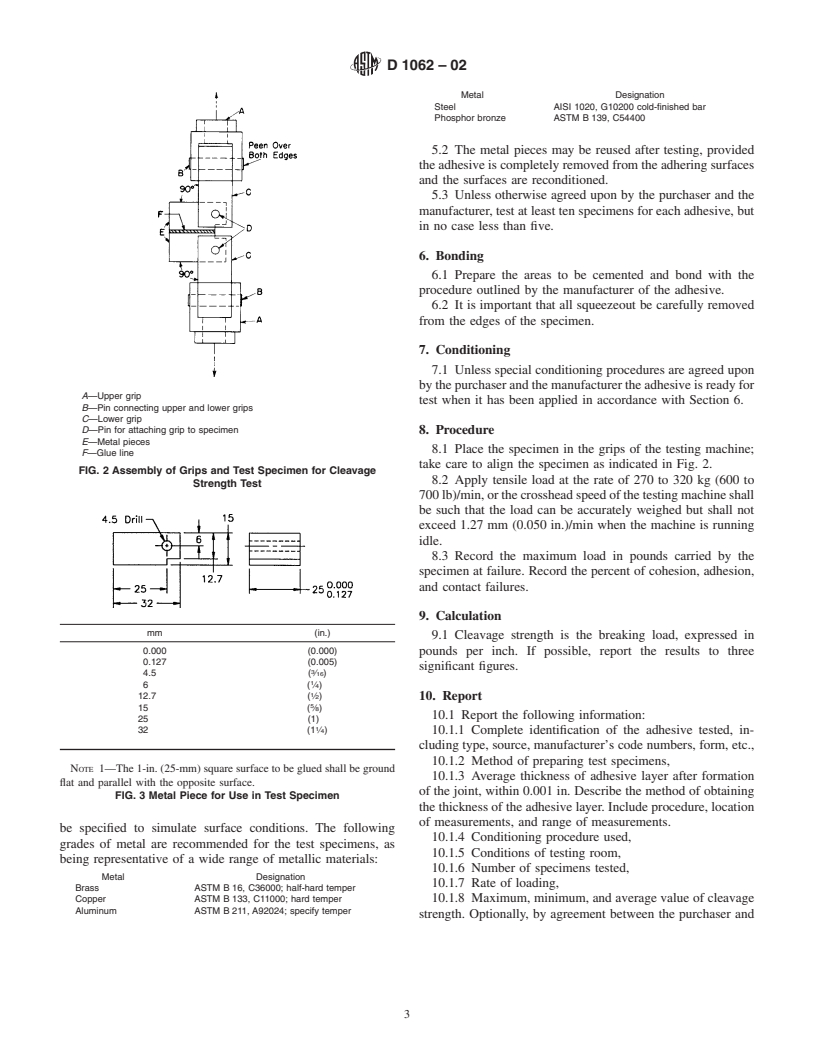
A—Upper grip C—Lower grip
B—Pin connecting upper and lower grips D—Pin for attaching grip to specimen
mm 2.3 4.5 6 7.5 9 10.5 12.7 18.5 19 21 28 30 38 44
3 3 1 5 3 7 1 13 3 7 1 3 1 3
(in.) ( ⁄32) ( ⁄16) ( ⁄4) ( ⁄16) ( ⁄8) ( ⁄16) ( ⁄2) ( ⁄16) ( ⁄4) ( ⁄8) (1 ⁄8) (1 ⁄16) (1 ⁄2) (1 ⁄4)
FIG. 1 Details of Test Grips
3
and Shapes for Use in Screw Machines 3.2.1.1 Discussion—Contact failure may be due to condi-
4
B 133 Specification for Copper Rod, Bar, and Shapes tions such as uneven surfaces, poor pressure distribution, or
B 139/B139M SpecificationforPhosphorBronzeRod,Bar, insufficient adhesive in the bondline.
3
and Shapes
B 211 Specification for Aluminum and Aluminum-Alloy 4. Apparatus
5
Bar, Rod, and Wire
4.1 Use a testing machine capable of maintaining the rate of
6
D 907 Terminology of Adhesives
loading specified in 8.2, and consisting essentially of the
2.2 Other Documents:
...


Questions, Comments and Discussion
Ask us and Technical Secretary will try to provide an answer. You can facilitate discussion about the standard in here.