ASTM E273-20
(Practice)Standard Practice for Ultrasonic Testing of the Weld Zone of Welded Pipe and Tubing
Standard Practice for Ultrasonic Testing of the Weld Zone of Welded Pipe and Tubing
ABSTRACT
This practice describes the general ultrasonic examination procedures for the detection of discontinuities in the weld and adjacent heat affected zones of welded pipe and tubing by scanning with relative motion between the search unit and pipe or tube. When contact or unfocused immersion search units are employed, this practice is intended for tubular products having specified outside diameters and wall thicknesses. And when properly focused immersion search units are employed, this practice may also be applied to material of smaller diameter and thinner wall. This practice does not establish acceptance criteria for this procedure. A pulsed ultrasonic angle beam shall be propagated in the wall of the pipe or tube by either the surface contact or immersion method. The weld line shall then be examined from both sides to ensure detection of imperfections with a shape or orientation that produces a preferential direction of reflection.
SIGNIFICANCE AND USE
5.1 The purpose of this practice is to outline a procedure for detecting weld discontinuities such as lack of fusion, pin holes, lack of penetration, longitudinal cracks, porosity and inclusions by the ultrasonic pulse-reflection method.
SCOPE
1.1 This practice2 describes general ultrasonic testing procedures for the detection of discontinuities in the weld and adjacent heat affected zones of welded pipe and tubing by scanning with relative motion between the search unit and pipe or tube. When contact or unfocused immersion search units are employed, this practice is intended for tubular products having specified outside diameters ≥2 in. (≥50 mm) and specified wall thicknesses of 1/8 to 11/16 in. (3 to 27 mm). When properly focused immersion search units are employed, this practice may also be applied to material of smaller diameter and thinner wall. When contact or immersion phased array search units are employed, this practice may also be applied to material of above-mentioned outside diameters and wall thicknesses.
Note 1: When contact or unfocused immersion search units are used, precautions should be exercised when examining pipes or tubes near the lower specified limits. Certain combinations of search unit size, frequency, thin–wall thicknesses, and small diameters could cause generation of unwanted sound waves that may produce erroneous examination results.
1.2 All surfaces of material to be examined in accordance with this practice shall be clean from scale, dirt, burrs, slag, spatter, or other conditions that would interfere with the examination results. The configuration of the weld must be such that interfering signals are not generated by reflections from it. Treatment of the inner surface and outer surface weld beads such as trimming (“scarfing”) or rolling is often required to remove protuberances that could result in spurious reflections.
1.3 This practice does not establish acceptance criteria; they must be specified by the using parties.
1.4 Units—The values stated in inch-pound units are to be regarded as standard. The values given in parentheses are mathematical conversions to SI units that are provided for information only and are not considered standard.
1.5 This standard does not purport to address all of the safety concerns, if any, associated with its use. It is the responsibility of the user of this standard to establish appropriate safety, health, and environmental practices and determine the applicability of regulatory limitations prior to use.
1.6 This international standard was developed in accordance with internationally recognized principles on standardization established in the Decision on Principles for the Development of International Standards, Guides and Recommendations issued by the World Trade Organization Technical Barriers to Trade (TBT) Committee.
General Information
- Status
- Published
- Publication Date
- 30-Nov-2020
- Technical Committee
- E07 - Nondestructive Testing
- Drafting Committee
- E07.06 - Ultrasonic Method
Relations
- Effective Date
- 01-Feb-2024
- Effective Date
- 01-Dec-2019
- Effective Date
- 01-Mar-2019
- Effective Date
- 01-Jan-2018
- Effective Date
- 15-Jun-2017
- Effective Date
- 01-Feb-2017
- Effective Date
- 01-Aug-2016
- Effective Date
- 01-Feb-2016
- Effective Date
- 01-Dec-2015
- Effective Date
- 01-Sep-2015
- Effective Date
- 01-Jun-2014
- Effective Date
- 01-Jun-2014
- Effective Date
- 01-Dec-2013
- Effective Date
- 15-Jun-2013
- Effective Date
- 01-Jun-2013
Overview
ASTM E273-20: Standard Practice for Ultrasonic Testing of the Weld Zone of Welded Pipe and Tubing provides a comprehensive methodology for the ultrasonic examination of the weld and adjacent heat-affected zones in welded pipes and tubes. Developed by ASTM International's E07 Committee on Nondestructive Testing, this standard outlines general ultrasonic testing procedures to detect discontinuities such as lack of fusion, pinholes, lack of penetration, cracks, porosity, and inclusions within weldments using pulse-reflection techniques.
This standard is intended for use with contact, unfocused immersion, focused immersion, and phased array ultrasonic testing search units, and is applicable to a wide range of pipe and tube diameters and wall thicknesses. However, the document does not establish acceptance criteria, which must be specified by the relevant contracting or using parties.
Key Topics
Ultrasonic Examination Procedures
The practice details the procedures for scanning welded pipe and tubing with ultrasonic equipment, including relative motion between the search unit and the test piece. It addresses both contact and immersion test methods.Types of Search Units
- Contact and unfocused immersion search units for larger diameters and wall thicknesses
- Properly focused immersion search units for smaller diameters and thinner wall materials
- Phased array transducers for versatile application across material sizes
Surface Preparation
All surfaces must be cleaned of contaminants like scale, dirt, burrs, slag, and spatter. The weld surface configuration should minimize spurious reflections, and surface protuberances may require removal.Reference Standards
Reference standards must be fabricated from material matching the pipe or tube under test. Standardization involves machined notches or drilled holes to simulate defects, ensuring examination sensitivity and reliability.Examination Sensitivity
System calibration requires clear and stable responses from reference reflectors located on both inner and outer surfaces. Regular sensitivity checks during continuous operation ensure repeatability and accuracy.Interpretation and Reporting
Indications matching or exceeding reference signal thresholds should be regarded as potential rejects, pending additional acceptance criteria as defined by contracting parties.
Applications
The ASTM E273-20 standard practice is widely implemented in industries where the reliability and integrity of welded pipes and tubes are non-negotiable. Typical applications include:
Oil and Gas
Assessment of pipeline welds to prevent leaks and failures in transmission systems.Power Generation
Inspection of boiler tubes and pressure vessel welds to comply with safety requirements.Petrochemical and Chemical Processing
Quality assurance of welded piping networks transporting aggressive chemicals.Automotive and Aerospace Manufacturing
Nondestructive testing (NDT) of structural tubing and critical components to meet stringent quality and safety standards.
By following ASTM E273-20, organizations can ensure consistent, effective, and reproducible ultrasonic examinations, reducing the risk of in-service failures and costly repairs.
Related Standards
For optimal results and compliance throughout the NDT process, ASTM E273-20 should be used in conjunction with related standards, including:
- ASTM E543 - Specification for Agencies Performing Nondestructive Testing
- ASTM E1316 - Terminology for Nondestructive Examinations
- ASNT SNT-TC-1A - Personnel Qualification and Certification in Nondestructive Testing
- ANSI/ASNT CP-189 - Standard for NDT Personnel Qualification and Certification
- ISO 9712 - Non-destructive Testing - Personnel Certification
- AIA NAS 410 - Certification of Nondestructive Testing Personnel
Keywords: ultrasonic testing of welds, nondestructive examination, welded pipe inspection, ultrasonic pulse-reflection, phased array ultrasonic testing, weld discontinuity detection, ASTM E273-20, welded tubing evaluation, NDT standards.
Buy Documents
ASTM E273-20 - Standard Practice for Ultrasonic Testing of the Weld Zone of Welded Pipe and Tubing
REDLINE ASTM E273-20 - Standard Practice for Ultrasonic Testing of the Weld Zone of Welded Pipe and Tubing
Get Certified
Connect with accredited certification bodies for this standard

Institut za varilstvo d.o.o. (Welding Institute)
Slovenia's leading welding institute since 1952. ISO 3834, EN 1090, pressure equipment certification, NDT personnel, welder qualification. Only IIW Au
Sponsored listings
Frequently Asked Questions
ASTM E273-20 is a standard published by ASTM International. Its full title is "Standard Practice for Ultrasonic Testing of the Weld Zone of Welded Pipe and Tubing". This standard covers: ABSTRACT This practice describes the general ultrasonic examination procedures for the detection of discontinuities in the weld and adjacent heat affected zones of welded pipe and tubing by scanning with relative motion between the search unit and pipe or tube. When contact or unfocused immersion search units are employed, this practice is intended for tubular products having specified outside diameters and wall thicknesses. And when properly focused immersion search units are employed, this practice may also be applied to material of smaller diameter and thinner wall. This practice does not establish acceptance criteria for this procedure. A pulsed ultrasonic angle beam shall be propagated in the wall of the pipe or tube by either the surface contact or immersion method. The weld line shall then be examined from both sides to ensure detection of imperfections with a shape or orientation that produces a preferential direction of reflection. SIGNIFICANCE AND USE 5.1 The purpose of this practice is to outline a procedure for detecting weld discontinuities such as lack of fusion, pin holes, lack of penetration, longitudinal cracks, porosity and inclusions by the ultrasonic pulse-reflection method. SCOPE 1.1 This practice2 describes general ultrasonic testing procedures for the detection of discontinuities in the weld and adjacent heat affected zones of welded pipe and tubing by scanning with relative motion between the search unit and pipe or tube. When contact or unfocused immersion search units are employed, this practice is intended for tubular products having specified outside diameters ≥2 in. (≥50 mm) and specified wall thicknesses of 1/8 to 11/16 in. (3 to 27 mm). When properly focused immersion search units are employed, this practice may also be applied to material of smaller diameter and thinner wall. When contact or immersion phased array search units are employed, this practice may also be applied to material of above-mentioned outside diameters and wall thicknesses. Note 1: When contact or unfocused immersion search units are used, precautions should be exercised when examining pipes or tubes near the lower specified limits. Certain combinations of search unit size, frequency, thin–wall thicknesses, and small diameters could cause generation of unwanted sound waves that may produce erroneous examination results. 1.2 All surfaces of material to be examined in accordance with this practice shall be clean from scale, dirt, burrs, slag, spatter, or other conditions that would interfere with the examination results. The configuration of the weld must be such that interfering signals are not generated by reflections from it. Treatment of the inner surface and outer surface weld beads such as trimming (“scarfing”) or rolling is often required to remove protuberances that could result in spurious reflections. 1.3 This practice does not establish acceptance criteria; they must be specified by the using parties. 1.4 Units—The values stated in inch-pound units are to be regarded as standard. The values given in parentheses are mathematical conversions to SI units that are provided for information only and are not considered standard. 1.5 This standard does not purport to address all of the safety concerns, if any, associated with its use. It is the responsibility of the user of this standard to establish appropriate safety, health, and environmental practices and determine the applicability of regulatory limitations prior to use. 1.6 This international standard was developed in accordance with internationally recognized principles on standardization established in the Decision on Principles for the Development of International Standards, Guides and Recommendations issued by the World Trade Organization Technical Barriers to Trade (TBT) Committee.
ABSTRACT This practice describes the general ultrasonic examination procedures for the detection of discontinuities in the weld and adjacent heat affected zones of welded pipe and tubing by scanning with relative motion between the search unit and pipe or tube. When contact or unfocused immersion search units are employed, this practice is intended for tubular products having specified outside diameters and wall thicknesses. And when properly focused immersion search units are employed, this practice may also be applied to material of smaller diameter and thinner wall. This practice does not establish acceptance criteria for this procedure. A pulsed ultrasonic angle beam shall be propagated in the wall of the pipe or tube by either the surface contact or immersion method. The weld line shall then be examined from both sides to ensure detection of imperfections with a shape or orientation that produces a preferential direction of reflection. SIGNIFICANCE AND USE 5.1 The purpose of this practice is to outline a procedure for detecting weld discontinuities such as lack of fusion, pin holes, lack of penetration, longitudinal cracks, porosity and inclusions by the ultrasonic pulse-reflection method. SCOPE 1.1 This practice2 describes general ultrasonic testing procedures for the detection of discontinuities in the weld and adjacent heat affected zones of welded pipe and tubing by scanning with relative motion between the search unit and pipe or tube. When contact or unfocused immersion search units are employed, this practice is intended for tubular products having specified outside diameters ≥2 in. (≥50 mm) and specified wall thicknesses of 1/8 to 11/16 in. (3 to 27 mm). When properly focused immersion search units are employed, this practice may also be applied to material of smaller diameter and thinner wall. When contact or immersion phased array search units are employed, this practice may also be applied to material of above-mentioned outside diameters and wall thicknesses. Note 1: When contact or unfocused immersion search units are used, precautions should be exercised when examining pipes or tubes near the lower specified limits. Certain combinations of search unit size, frequency, thin–wall thicknesses, and small diameters could cause generation of unwanted sound waves that may produce erroneous examination results. 1.2 All surfaces of material to be examined in accordance with this practice shall be clean from scale, dirt, burrs, slag, spatter, or other conditions that would interfere with the examination results. The configuration of the weld must be such that interfering signals are not generated by reflections from it. Treatment of the inner surface and outer surface weld beads such as trimming (“scarfing”) or rolling is often required to remove protuberances that could result in spurious reflections. 1.3 This practice does not establish acceptance criteria; they must be specified by the using parties. 1.4 Units—The values stated in inch-pound units are to be regarded as standard. The values given in parentheses are mathematical conversions to SI units that are provided for information only and are not considered standard. 1.5 This standard does not purport to address all of the safety concerns, if any, associated with its use. It is the responsibility of the user of this standard to establish appropriate safety, health, and environmental practices and determine the applicability of regulatory limitations prior to use. 1.6 This international standard was developed in accordance with internationally recognized principles on standardization established in the Decision on Principles for the Development of International Standards, Guides and Recommendations issued by the World Trade Organization Technical Barriers to Trade (TBT) Committee.
ASTM E273-20 is classified under the following ICS (International Classification for Standards) categories: 23.040.01 - Pipeline components and pipelines in general. The ICS classification helps identify the subject area and facilitates finding related standards.
ASTM E273-20 has the following relationships with other standards: It is inter standard links to ASTM E1316-24, ASTM E1316-19b, ASTM E1316-19, ASTM E1316-18, ASTM E1316-17a, ASTM E1316-17, ASTM E1316-16a, ASTM E1316-16, ASTM E1316-15a, ASTM E1316-15, ASTM E1316-14e1, ASTM E1316-14, ASTM E1316-13d, ASTM E1316-13c, ASTM E1316-13b. Understanding these relationships helps ensure you are using the most current and applicable version of the standard.
ASTM E273-20 is available in PDF format for immediate download after purchase. The document can be added to your cart and obtained through the secure checkout process. Digital delivery ensures instant access to the complete standard document.
Standards Content (Sample)
This international standard was developed in accordance with internationally recognized principles on standardization established in the Decision on Principles for the
Development of International Standards, Guides and Recommendations issued by the World Trade Organization Technical Barriers to Trade (TBT) Committee.
Designation: E273 − 20
Standard Practice for
Ultrasonic Testing of the Weld Zone of Welded Pipe and
Tubing
This standard is issued under the fixed designation E273; the number immediately following the designation indicates the year of
original adoption or, in the case of revision, the year of last revision. A number in parentheses indicates the year of last reapproval. A
superscript epsilon (´) indicates an editorial change since the last revision or reapproval.
This standard has been approved for use by agencies of the U.S. Department of Defense.
1. Scope* mathematical conversions to SI units that are provided for
2 information only and are not considered standard.
1.1 This practice describes general ultrasonic testing pro-
1.5 This standard does not purport to address all of the
cedures for the detection of discontinuities in the weld and
safety concerns, if any, associated with its use. It is the
adjacent heat affected zones of welded pipe and tubing by
responsibility of the user of this standard to establish appro-
scanning with relative motion between the search unit and pipe
priate safety, health, and environmental practices and deter-
or tube.When contact or unfocused immersion search units are
mine the applicability of regulatory limitations prior to use.
employed, this practice is intended for tubular products having
1.6 This international standard was developed in accor-
specified outside diameters≥2 in. (≥50 mm) and specified wall
1 1
dance with internationally recognized principles on standard-
thicknesses of ⁄8 to 1 ⁄16 in. (3 to 27 mm). When properly
ization established in the Decision on Principles for the
focused immersion search units are employed, this practice
Development of International Standards, Guides and Recom-
mayalsobeappliedtomaterialofsmallerdiameterandthinner
mendations issued by the World Trade Organization Technical
wall. When contact or immersion phased array search units are
Barriers to Trade (TBT) Committee.
employed, this practice may also be applied to material of
above-mentioned outside diameters and wall thicknesses.
2. Referenced Documents
NOTE 1—When contact or unfocused immersion search units are used,
precautions should be exercised when examining pipes or tubes near the 2.1 ASTM Standards:
lowerspecifiedlimits.Certaincombinationsofsearchunitsize,frequency,
E543 Specification forAgencies Performing Nondestructive
thin–wall thicknesses, and small diameters could cause generation of
Testing
unwanted sound waves that may produce erroneous examination results.
E1316 Terminology for Nondestructive Examinations
1.2 All surfaces of material to be examined in accordance
2.2 ASNT Documents:
with this practice shall be clean from scale, dirt, burrs, slag,
Recommended Practice SNT-TC-1A Personnel Qualifica-
spatter, or other conditions that would interfere with the
tion and Certification in Nondestructive Testing
examination results. The configuration of the weld must be
ANSI/ASNT CP-189 Standard for Qualification and Certifi-
such that interfering signals are not generated by reflections
cation of Nondesctructive Testing Personnel
from it. Treatment of the inner surface and outer surface weld
2.3 ISO Standard:
beads such as trimming (“scarfing”) or rolling is often required
ISO 9712 Non-destructive Testing—Qualification and Cer-
to remove protuberances that could result in spurious reflec-
tification of NDT Personnel
tions.
2.4 AIA Standard:
1.3 This practice does not establish acceptance criteria; they
NAS 410 Certification and Qualification of Nondestructive
must be specified by the using parties.
Testing Personnel
1.4 Units—The values stated in inch-pound units are to be
regarded as standard. The values given in parentheses are
For referenced ASTM standards, visit the ASTM website, www.astm.org, or
contact ASTM Customer Service at service@astm.org. For Annual Book of ASTM
This practice is under the jurisdiction of ASTM Committee E07 on Nonde- Standards volume information, refer to the standard’s Document Summary page on
structive Testing and is the direct responsibility of Subcommittee E07.06 on the ASTM website.
Ultrasonic Method. AvailablefromAmericanSocietyforNondestructiveTesting(ASNT),P.O.Box
Current edition approved Dec. 1, 2020. Published January 2021. Originally 28518, 1711 Arlingate Ln., Columbus, OH 43228-0518, http://www.asnt.org.
approved in 1965. Last previous edition approved in 2015 as E273 – 15. DOI: Available from International Organization for Standardization (ISO), 1, ch. de
10.1520/E0273-20. la Voie-Creuse, CP 56, CH-1211 Geneva 20, Switzerland, http://www.iso.org.
2 6
For ASME Boiler and Pressure Vessel Code applications, see related Practice Available from Aerospace Industries Association (AIA), 1000 Wilson Blvd.,
SE-273 in Section II of that Code. Suite 1700, Arlington, VA 22209, http://www.aia-aerospace.org.
*A Summary of Changes section appears at the end of this standard
Copyright © ASTM International, 100 Barr Harbor Drive, PO Box C700, West Conshohocken, PA 19428-2959. United States
E273 − 20
3. Terminology The practice or standard used and its applicable revision shall
be identified in the contractual agreement between the using
3.1 Definitions—For definitions of terms used in this
parties.
practice, see Terminology E1316.
6.3 Qualification of Nondestructive Agencies—If specified
4. Summary of Practice
in the contractual agreement, NDT agencies shall be qualified
4.1 A pulsed ultrasonic angle beam shall be propagated in and evaluated as described in Specification E543. The appli-
cable edition of Specification E543 shall be specified in the
the wall of the pipe or tube by either the surface contact or
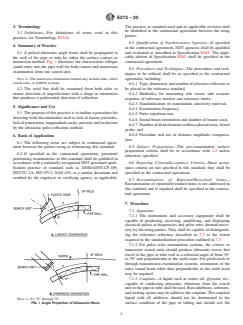
immersion method. Fig. 1 illustrates the characteristic oblique contractual agreement.
sound entry into the pipe wall for both contact and immersion
6.4 Procedures and Techniques—The procedures and tech-
examination from one search unit.
niques to be utilized shall be as specified in the contractual
agreement, including:
NOTE2—Theimmersionexaminationmethodmayincludetanks,wheel
search units, or bubbler systems.
6.4.1 Type,dimension,andnumberofreferencereflectorsto
be placed in the reference standard,
4.2 The weld line shall be examined from both sides to
ensure detection of imperfections with a shape or orientation
6.4.2 Method(s) for measuring side versus side acoustic
that produces a preferential direction of reflection.
response of reference notches and tolerance limits,
6.4.3 Standardization of examination sensitivity intervals,
5. Significance and Use
6.4.4 Examination frequency,
5.1 The purpose of this practice is to outline a procedure for
6.4.5 Pulse repetition rate,
detecting weld discontinuities such as lack of fusion, pin holes,
6.4.6 Sound beam orientation and number of beams used,
lackofpenetration,longitudinalcracks,porosityandinclusions
6.4.7 Numberofdeadelementswithinaphasedarrayvirtual
by the ultrasonic pulse-reflection method.
probe, and
6.4.8 Procedure and use of distance amplitude compensa-
6. Basis of Application
tion.
6.1 The following items are subject to contractual agree-
6.5 Surface Preparation—The pre-examination surface
ment between the parties using or referencing this standard.
preparation criteria shall be in accordance with 1.2 unless
6.2 If specified in the contractual agreement, personnel
otherwise specified.
performing examinations to this standard shall be qualified in
6.6 Reporting Criteria/Acceptance Criteria—Since accep-
accordance with a nationally recognized NDT personnel quali-
fication practice or standard such as ANSI/ASNT-CP-189, tance criteria are not specified in this standard, they shall be
specified in the contractual agreement.
SNT-TC-1A, ISO 9712, NAS 410, or a similar document and
certified by the employer or certifying agency, as applicable.
6.7 Reexamination of Repaired/Reworked Items—
Reexamination of repaired/reworked items is not addressed in
this standard and if required shall be specified in the contrac-
tual agreement.
7. Procedure
7.1 Apparatus
7.1.1 The instruments and accessory equipment shall be
capable of producing, receiving, amplifying, and displaying
electrical pulses at frequencies and pulse rates deemed neces-
sary by the using parties. They shall be capable of distinguish-
ing the reference reflectors described in 7.2 to the extent
required in the standardization procedure outlined in 7.3
7.1.2 For pulse echo examination systems, the contact or
immersion search units should produce ultrasonic waves that
travel in the pipe or tube wall at a refracted angle of from 35°
to 70° and perpendicular to the weld seam. For pitch/catch or
through transmission examination systems, orientation of the
entry sound beam other than perpendicular to the weld seam
may be required.
7.1.3 Couplant—A liquid such as water, oil, glycerin, etc.,
capable of conducting ultrasonic vibrations from the search
unit to the pipe or tube shall be used. Rust inhibitors, softeners,
and wetting agents may be added to the couplant.The couplant
liquid with all additives should not be detrimental to the
NOTE 1—θ = 35° through 70°.
FIG. 1 Angle Projection of Ultrasonic Wave surface condition of the pipe or tubing and should wet the
E273 − 20
also the signals originating from the reflections from discontinuities
surface. In examining electric-resistance-welded pipe, water-
anywhere in the weld seam itself.
soluble oil used in cooling the pipe serves as a satisfactory
couplant. 7.2.1.2 Fusion-Welded Pipe—The reference reflectors shall
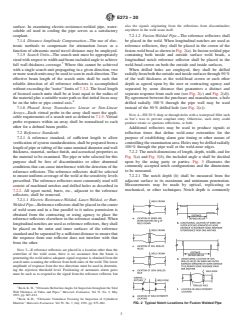
7.1.4 Distance Amplitude Compensation—The use of elec- be placed in the weld. When longitudinal notches are used as
tronic methods to compensate for attenuation losses as a reference reflectors, they shall be placed in the crown of the
function of ultrasonic metal travel distance may be employed. fusion-weld bead as shown in Fig. 2(a). In fusion-welded pipe
7.1.5 Search Units—The search unit must be appropriately containing both inside and outside surface weld beads, a
sized with respect to width and beam included angle to achieve longitudinal notch reference reflector shall be placed in the
full wall thickness coverage. Where this cannot be achieved weld-bead crown on both the outside and inside surfaces.
with a single search unit propagating in a given direction, two When drilled holes are employed, they shall be drilled
ormoresearchunitsmaybeusedtoscanineachdirection.The radiallyfromboththeoutsideandinsidesurfacesthrough50 %
effective beam length of the search units shall be such that of the wall thickness at the weld-bead crown or such other
reliable detection of all reference reflectors is accomplished depth as agreed upon by the user or contracting agency and
without exceeding the “noise” limits of 7.3.2. The focal length separated by some distance that guarantees a distinct and
of focused search units shall be at least equal to the radius of separate response from each one (see Fig. 2(c) and Fig. 2(d)).
the material plus a suitable water path so that initial focus may By agreement between the purchaser and manufacturer, a hole
be on the tube or pipe central axis. drilled radially 100 % through the pipe wall may be used
7.1.6 Phased Array Transducers: Linear or Non-Linear instead of the 50 % drilled hole (see Fig. 2(e)).
Arrays—Each virtual probe in the array shall meet the appli-
NO
...
This document is not an ASTM standard and is intended only to provide the user of an ASTM standard an indication of what changes have been made to the previous version. Because
it may not be technically possible to adequately depict all changes accurately, ASTM recommends that users consult prior editions as appropriate. In all cases only the current version
of the standard as published by ASTM is to be considered the official document.
Designation: E273 − 15 E273 − 20
Standard Practice for
Ultrasonic Testing of the Weld Zone of Welded Pipe and
Tubing
This standard is issued under the fixed designation E273; the number immediately following the designation indicates the year of
original adoption or, in the case of revision, the year of last revision. A number in parentheses indicates the year of last reapproval. A
superscript epsilon (´) indicates an editorial change since the last revision or reapproval.
This standard has been approved for use by agencies of the U.S. Department of Defense.
1. Scope*
1.1 This practice describes general ultrasonic testing procedures for the detection of discontinuities in the weld and adjacent heat
affected zones of welded pipe and tubing by scanning with relative motion between the search unit and pipe or tube. When contact
or unfocused immersion search units are employed, this practice is intended for tubular products having specified outside diameters
1 1
≥2 in. (≥50 mm) and specified wall thicknesses of ⁄8 to 1 ⁄16 in. (3 to 27 mm). When properly focused immersion search units are
employed, this practice may also be applied to material of smaller diameter and thinner wall. When contact or immersion phased
array search units are employed, this practice may also be applied to material of above-mentioned outside diameters and wall
thicknesses.
NOTE 1—When contact or unfocused immersion search units are used, precautions should be exercised when examining pipes or tubes near the lower
specified limits. Certain combinations of search unit size, frequency, thin–wall thicknesses, and small diameters could cause generation of unwanted sound
waves that may produce erroneous examination results.
1.2 All surfaces of material to be examined in accordance with this practice shall be clean from scale, dirt, burrs, slag, spatter, or
other conditions that would interfere with the examination results. The configuration of the weld must be such that interfering
signals are not generated by reflections from it. Treatment of the inner surface and outer surface weld beads such as trimming
(“scarfing”) or rolling is often required to remove protuberances that could result in spurious reflections.
1.3 This practice does not establish acceptance criteria,criteria; they must be specified by the using parties.
1.4 Units—The values stated in inch-pound units are to be regarded as the standard. The SI equivalents are in parentheses and may
be approximate.values given in parentheses are mathematical conversions to SI units that are provided for information only and
are not considered standard.
1.5 This standard does not purport to address all of the safety concerns, if any, associated with its use. It is the responsibility
of the user of this standard to establish appropriate safety safety, health, and healthenvironmental practices and determine the
applicability of regulatory limitations prior to use.
1.6 This international standard was developed in accordance with internationally recognized principles on standardization
established in the Decision on Principles for the Development of International Standards, Guides and Recommendations issued
by the World Trade Organization Technical Barriers to Trade (TBT) Committee.
This practice is under the jurisdiction of ASTM Committee E07 on Nondestructive Testing and is the direct responsibility of Subcommittee E07.06 on Ultrasonic Method.
Current edition approved June 1, 2015Dec. 1, 2020. Published June 2015January 2021. Originally approved in 1965. Last previous edition approved in 20102015 as
E273E273 – 15.-10. DOI: 10.1520/E0273-15.10.1520/E0273-20.
For ASME Boiler and Pressure Vessel Code applications, see related Practice SE-273 in Section II of that Code.
*A Summary of Changes section appears at the end of this standard
Copyright © ASTM International, 100 Barr Harbor Drive, PO Box C700, West Conshohocken, PA 19428-2959. United States
E273 − 20
2. Referenced Documents
2.1 ASTM Standards:
E543 Specification for Agencies Performing Nondestructive Testing
E1316 Terminology for Nondestructive Examinations
2.2 ASNT Documents:
Recommended Practice SNT-TC-1A Personnel Qualification and Certification in Nondestructive Testing
ANSI/ASNT CP-189 Standard for Qualification and Certification of Nondesctructive Testing Personnel
2.3 ISO Standard:
ISO 9712 Non-destructive Testing—Qualification and Certification of NDT Personnel
2.4 AIA Standard:
NAS 410 Certification and Qualification of Nondestructive Testing Personnel
3. Terminology
3.1 Definitions—For definitions of terms used in this practice, see Terminology E1316.
4. Summary of Practice
4.1 A pulsed ultrasonic angle beam shall be propagated in the wall of the pipe or tube by either the surface contact or immersion
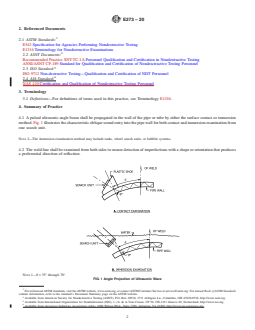
method. Fig. 1 illustrates the characteristic oblique sound entry into the pipe wall for both contact and immersion examination from
one search unit.
NOTE 2—The immersion examination method may include tanks, wheel search units, or bubbler systems.
4.2 The weld line shall be examined from both sides to ensure detection of imperfections with a shape or orientation that produces
a preferential direction of reflection.
NOTE 1—θ = 35° through 70°.
FIG. 1 Angle Projection of Ultrasonic Wave
For referenced ASTM standards, visit the ASTM website, www.astm.org, or contact ASTM Customer Service at service@astm.org. For Annual Book of ASTM Standards
volume information, refer to the standard’s Document Summary page on the ASTM website.
Available from American Society for Nondestructive Testing (ASNT), P.O. Box 28518, 1711 Arlingate Ln., Columbus, OH 43228-0518, http://www.asnt.org.
Available from International Organization for Standardization (ISO), 1, ch. de la Voie-Creuse, CP 56, CH-1211 Geneva 20, Switzerland, http://www.iso.org.
Available from Aerospace Industries Association (AIA), 1000 Wilson Blvd., Suite 1700, Arlington, VA 22209, http://www.aia-aerospace.org.
E273 − 20
5. Significance and Use
5.1 The purpose of this practice is to outline a procedure for detecting weld discontinuities such as lack of fusion, pin holes, lack
of penetration, longitudinal cracks, porosity and inclusions by the ultrasonic pulse-reflection method.
6. Basis of Application
6.1 The following items are subject to contractual agreement between the parties using or referencing this standard.
6.2 If specified in the contractual agreement, personnel performing examinations to this standard shall be qualified in accordance
with a nationally recognized NDT personnel qualification practice or standard such as ANSI/ASNT-CP-189, SNT-TC-1A, ISO
9712, NAS-410, NAS 410, or a similar document and certified by the employer or certifying agency, as applicable. The practice
or standard used and its applicable revision shall be identified in the contractual agreement between the using parties.
6.3 Qualification of Nondestructive Agencies—If specified in the contractual agreement, NDT agencies shall be qualified and
evaluated as described in E543.Specification E543. The applicable edition of E543Specification E543 shall be specified in the
contractual agreement.
6.4 Procedures and Techniques—The procedures and techniques to be utilized shall be as specified in the contractual agreement,
including:
6.4.1 Type, dimension, and number of reference reflectors to be placed in the reference standard,
6.4.2 Method(s) for measuring side versus side acoustic response of reference notches and tolerance limits,
6.4.3 Standardization of examination sensitivity intervals,
6.4.4 Examination frequency,
6.4.5 Pulse repetition rate,
6.4.6 Sound beam orientation and number of beams used, and
6.4.7 Number of dead elements within a phased array virtual probe, and
6.4.8 Procedure and use of distance amplitude compensation.
6.5 Surface Preparation—The pre-examination surface preparation criteria shall be in accordance with paragraph 1.2 unless
otherwise specified.
6.6 Reporting Criteria/Acceptance Criteria—Since acceptance criteria are not specified in this standard, they shall be specified in
the contractual agreement.
6.7 Reexamination of Repaired/Reworked Items—Reexamination of repaired/reworked items is not addressed in this standard and
if required shall be specified in the contractual agreement.
7. Procedure
7.1 Apparatus
7.1.1 The instruments and accessory equipment shall be capable of producing, receiving, amplifying, and displaying electrical
pulses at frequencies and pulse rates deemed necessary by the using parties. They shall be capable of distinguishing the reference
reflectors described in Section 7.2 to the extent required in the standardization procedure outlined in Section 7.3
7.1.2 For pulse echo examination systems, the contact or immersion search units should produce ultrasonic waves that travel in
E273 − 20
the pipe or tube wall at a refracted angle of from 35° to 70° and perpendicular to the weld seam. For pitch/catch or through
transmission examination systems, orientation of the entry sound beam other than perpendicular to the weld seam may be required.
7.1.3 Couplant—A liquid such as water, oil, glycerin, etc., capable of conducting ultrasonic vibrations from the search unit to the
pipe or tube shall be used. Rust inhibitors, softeners, and wetting agents may be added to the couplant. The couplant liquid with
all additives should not be detrimental to the surface condition of the pipe or tubing and should wet the surface. In examining
electric-resistance-welded pipe, water-soluble oil used in cooling the pipe serves as a satisfactory couplant.
7.1.4 Distance Amplitude Compensation—The use of electronic methods to compensate for attenuation losses as a function of
ultrasonic metal travel distance may be employed.
7.1.5 Search Units—The search unit must be appropriately sized with respect to width and beam included angle to achieve full
wall thickness coveragecoverage.( 1). Where this can not cannot be achieved with a single search unit propagating in a given
direction, two or more search units may be used to scan in each direction. The effective beam length of the search units shall be
such that reliable detection of all reference reflectors is accomplished without exceeding the “noise” limits of 7.3.2. The focal
length of focused search units shall be at least equal to the radius of the material plus a suitable water path so that initial focus
may be on the tube or pipe central axis axis.( 2).
7.1.6 Phased Array Transducers: Linear or Non-Linear Arrays—Each virtual probe in the array shall meet the applicable
requirements of a search unit as defined in 7.1.5. Virtual probe responses within an array shall be normalized to each other for a
defined beam profile.
7.2 Reference Standards
7.2.1 A reference standard, of sufficient length to allow verification of system standardization, shall be prepared from a length of
pipe or tubing of the same nominal diameter and wall thickness, material, surface finish, and acoustical properties as the material
to be examined. The pipe or tube selected for this purpose shall be free of discontinuities or other abnormal conditions that can
cause interference with the detection of the reference reflectors. The reference reflectors shall be selected to ensure uniform
coverage of the weld at the sensitivity levels prescribed. The reference reflectors most commonly used will consist of machined
notches and drilled holes as described in paragraph 7.2.2. All upset metal, burrs, etc., adjacent to the reference reflectors, shall be
removed.
7.2.1.1 Electric Resistance-Welded, Laser-WeldedLaser-Welded, or Butt-Welded Pipe—Reference reflectors shall be placed in the
center of weld seam and in a line parallel to it unless permission is obtained from the contracting or using agency to place the
reference reflectors elsewhere in the reference standard. When longitudinal notches ar
...
Questions, Comments and Discussion
Ask us and Technical Secretary will try to provide an answer. You can facilitate discussion about the standard in here.
Loading comments...