ASTM F49-68(1972)
(Specification)Specification for Molybdenum Strip for Electron Tubes (Withdrawn 1978)
Specification for Molybdenum Strip for Electron Tubes (Withdrawn 1978)
General Information
Standards Content (Sample)
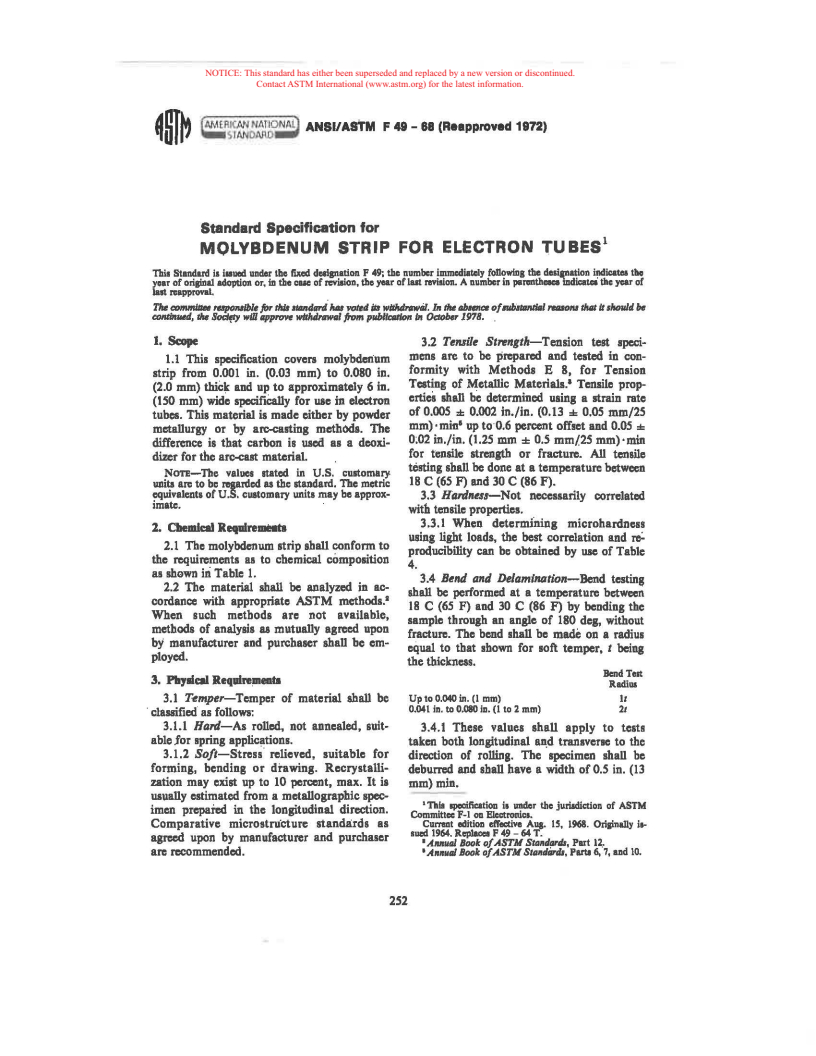
4~J~ er~~=~ ANSl/AsTM F 49 - 88 (Reapproved 1972)
Standard Specification for
1
MOLYBDENUM STRIP FOR ELECTRON TU BES
This Standard i1 i11ued under the fixed designation F 49; the number immcdiatdy fonowtng the de1~1.tlon indicates tllll
year of oriliJial adoption or, In the cue of rcviaion, the year of lut revision. A number in Jl"rellthaa iDdicata' the year of
!alt reappl'OYlll.
7Jr. comndltlJlr ~lbl1formu1t111tdllP'tl lull voted ila w#lulrnHil. In dM ""-m ofllflliatllndtll,.,,.,,,., dull It slloultl h
continwd, tM SodftY will 11pprrnt1 wltlulrtiw8l from publladlon Ill Ot:tobfl, 1978. .
l. Scope 3.2 Tensile Str11ngth-Tension test speci
mens are to be prepared and tested in con
1.1 This specification covers molybdclium
formity with Methods E 8, for Tension
strip from 0.001 in. (0.03 mm) to 0.080 in.
Testing of Metallic Materials.' Tensile prop
(2.0 mm) thic" and up to approximately 6 in.
erties shall be determined using a strain rate
(150 mm) wide spccifiCany for use in electron
of 0,005 :1:: 0.002 in./in. (0.13 :1:: 0.05 mm/25
tubes. This material is made either by powder
mm)· min' up to·0.6 percent offset and 0.05 ::1::
metallurgy or by an:-c:asting methGds. The
0;02 in./in. (1.25 mm :::e 0.5 mm/25 mm)· min
difference is that carbon is used as a deoxi
for tensile strength or fracture. All tensile
dizer for the arc-cast material.
testing shall be done at a temperature between
Non-The values stated in U.S. customary
18 C (65 F) and 30 C (86 F).
units arc to be reganlcd u the standard. The metric
equivalents of U.S. customary units may be approx
3.3 Hardness-Not necessarily correlated
imate.
with tensile properties.
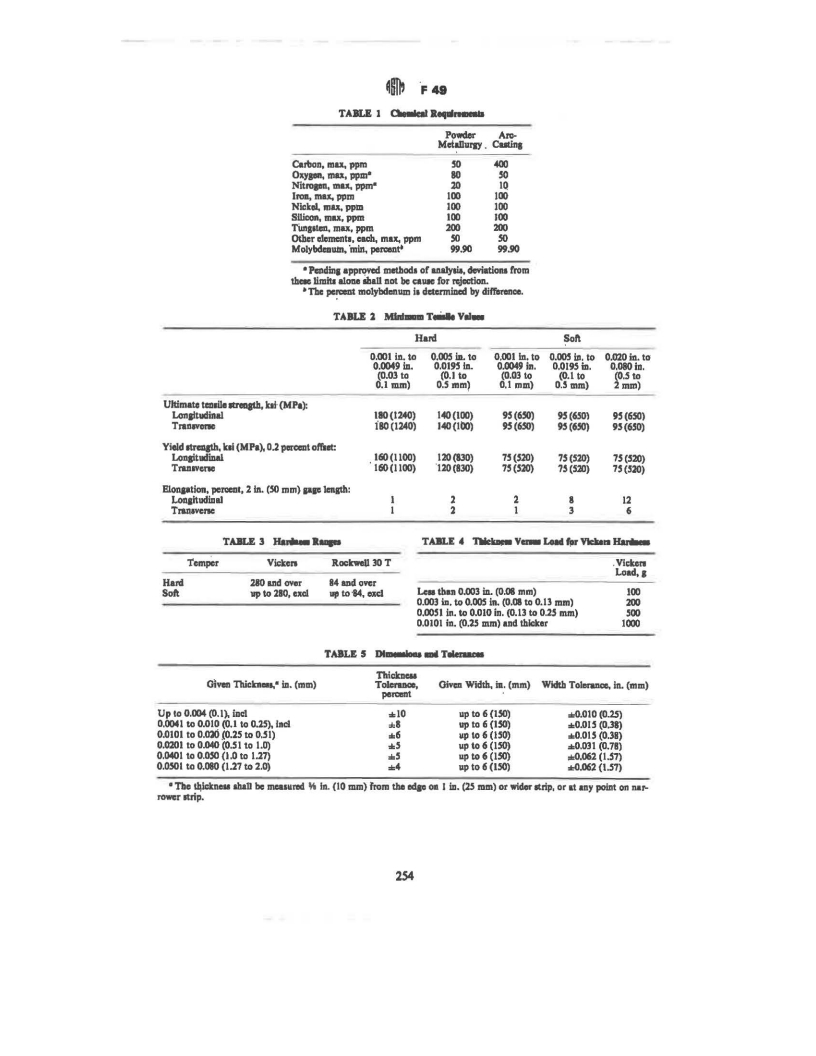
3.3.l When detcrmfoing microhardness
2. Cbemh:al Reqalre-.ta
using light loads, the best correlation and re:.
2.1 The molybdenum strip shall conform to
producibility can be obtained by use of Table
the requirements as to chemical composition
4.
as shown iri Table 1.
3.4 Bend and Delaminotion-Ben.d testing
2.2 The material shall be analyzed in ac
shall be performed at a temperature between
cordance with appropriate ASTM methods.•
18 C (65 F) and 30 C (86 F) by bending the
When such methods are not available,
angle of 180 deg, without
sample through an
methods of analysis as mutually agreed upon
fracture. The bend shall be ma.de on a radius
by manufacturer and purchaser shall be em
equal to that shown for soft temper, t being
ployed.
the thickness.
Bend Tell
3. PllyliC81 Reqalre~eau
Radius
3.1 T1'mper--Temper of material shall be Up to 0.040 in. (1 mm) Ir
0.04 l in. to 0.080 in. (I to 2 mm) 2t
· classified as follows:
3.1.l Hard-As rolled, not annealed, suit
3.4.l These values shall apply to tests
able Jor spring applications.
taken both longitudinal an,d transverse to the
3.1.2 Soft-Stress· relieved, suitable for
direction of rolling. The specimen shall be
forming, bending or drawing. Recrystalli
dcburred and shall have a width of 0.5 in. (13
zation may exist up to 10 percent, max. It is
mm) min.
usually estimated from a metallographic spec
' This specification i• under the jurildietion of ASTM
imen prepared in the longitudinal direction.
Committee F-1 on l!lectronic1.
Comparative microstnicture standards as Current edition eft'ective A111. 15, 1968. Onpnlllly i1-
1ued 1!164. Replaces F 49 - 64 T.
agreed upon by manufacturer and purchaser
•Annual Book of ASTM Standanb, Part 12.
are recommended. • An1111tll Book of A.STM Stanffrtb, Part.I 6, ·7, and 10.
252
---------------------- Page: 1 ----------------------
F 48
aa shown in Fig. 1.
3.4.2 The material shall not show dclami·
nations at the bcnda. If dcburrina ii neces
(H/L) x ·100 - percent out-of·Oatncu
sary, care shall be taken to preserve the edges
where:
for visual inspc,ction after bending.
H - maximum vertical distance between a
3.S Sprln1back-Thi1 test i.1 applicable to
flat reference surface and the lower sur
strip 0.020 in. (O.Sl mm) or leas in thickness
face of the sheet, and
and shall be performed in accordance with
L minimum horizontal distance ·between
ASTM Method F lSS, Teat for Temper of
the higlicst point on the sheet and the
Strip and Sheet Met811 for Electronic De-
point of contact with a flat reference
vic:es,4 with limits 11 agreed upon by prodUQCr
surface.
and consumer.
6.1.1.4 The· maximum percent out-of-flat·
ne11 shall be 4 pcnient for 0.020 in. (O.S 1 mm)
4. ftdall
thicknes1 and over and 5 percent for material
4.1 Union otherwise requcated, the molyb
lcs1 than 0.020 in. (0.Sl mm) thick.
denum finish shall be bright in thickncs1e1 up
7. PllcbPll
to O.OOS in. (0.13 mm), bright or matte be
twcen O.OOS in. (0.13 mm) and 0.060 in. (l.S 7 .1 Packagin1 shall be adequate to protect
mm), and matte finish ovor ~.060 in. (l.S the flat lengthi or coils from contamination
mm) in tbicknesi-. Tho· su'l'facw: mall be. or 'damage during shipmCJll.
smo.oih and free from dirt, oxide, pit•,
8. Mar.kjq·
1eratC:hca, seams, sta
...


Questions, Comments and Discussion
Ask us and Technical Secretary will try to provide an answer. You can facilitate discussion about the standard in here.