ASTM F1940-99
(Test Method)Standard Test Method for Process Control Verification to Prevent Hydrogen Embrittlement in Plated or Coated Fasteners
Standard Test Method for Process Control Verification to Prevent Hydrogen Embrittlement in Plated or Coated Fasteners
SCOPE
1.1 This test method covers a procedure to prevent, to the extent possible, internal hydrogen embrittlement (IHE) of fasteners by monitoring the plating or coating process, such as those described in Specifications F1137 and F1941. The process is quantitatively monitored on a periodic basis with a minimum number of specimens as compared to qualifying each lot of fasteners being plated or coated. Trend analysis is used to ensure quality as compared to statistical sampling analysis of each lot of fasteners. This test method consists of a mechanical test for the evaluation and control of the potential for IHE that may arise from various sources of hydrogen in a plating or coating process.
1.2 This test method applies to externally threaded tensile fasteners that can also be loaded in bending during installation.
1.3 This test method is limited to evaluating hydrogen induced embrittlement due only to processing (IHE) and not due to environmental exposure (EHE, see Test Method F1624).
1.4 This test method is not intended to measure the relative susceptibility of steels to either IHE or EHE.
1.5 This test method is limited to ferrous fasteners that are susceptible to time-delayed fracture caused by the diffusion of hydrogen under stress.
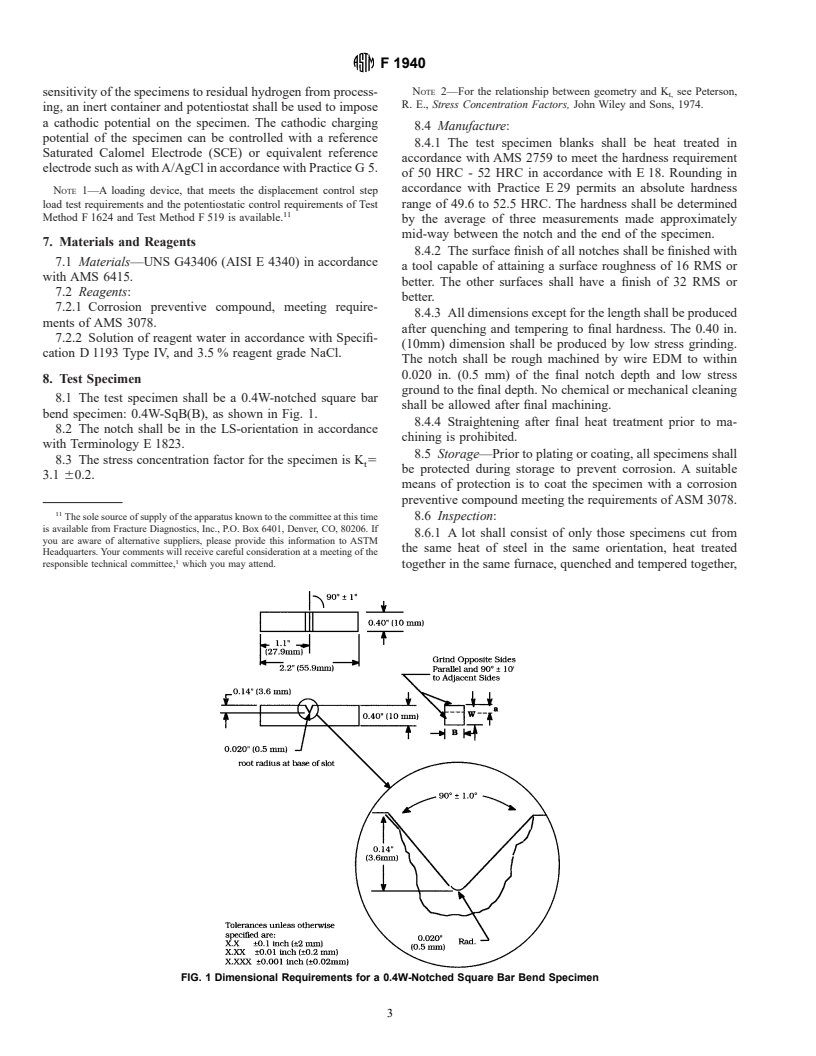
1.6 This test method uses a notched square bar specimen that conforms to Test Method F519, Type 1e, except that the radius is increased to accommodate the deposition of a larger range of platings and coatings. For the background on Test Method F519 testing, see publications ASTM STP543 and ASTM STP962. The stress concentration factor is at a Kt = 3.1 ± 0.2. The sensitivity is demonstrated with a constant imposed cathodic potential to control the amount of hydrogen. Both the sensitivity and the baseline for residual hydrogen will be established with tests on bare metal specimens in air.
1.7 The sensitivity of each lot of specimens to IHE shall be demonstrated. A specimen made of AISI E4340 steel heat treated to a hardness range of 50 to 52 HRC is used to produce a "worst case" condition and maximize sensitivity to IHE.
1.8 A notched four-point bend specimen undergoes sustained load and slow strain rate testing by using incremental loads and hold times under displacement control to measure a threshold stress in an accelerated manner in accordance with Test Method F1624. The test is an accelerated (24 h) incrementally increasing step load test method that measures the threshold for hydrogen stress cracking that is used to quantify the amount of residual hydrogen in the specimen.
1.9 In this test method, bending is used instead of tension because it produces the maximum local limit load tensile stress in a notched bar of up to 2.3 times the yield strength as measured in accordance with Test Method E 8. A fastener that is unintentionally exposed to bending on installation may attain this maximum local tensile stress.
1.10 The values stated in inch-pound units are to be regarded as standard. The values given in parentheses are mathematical conversions to SI units that are provided for information only and are not considered standard.
1.11 This standard does not purport to address all of the safety concerns, if any, associated with its use. It is the responsibility of the user of this standard to establish appropriate safety and health practices and determine the applicability of regulatory limitations prior to use.
General Information
Relations
Standards Content (Sample)
NOTICE: This standard has either been superseded and replaced by a new version or discontinued.
Contact ASTM International (www.astm.org) for the latest information.
Designation: F 1940 – 99
Standard Test Method for
Process Control Verification to Prevent Hydrogen
1
Embrittlement in Plated or Coated Fasteners
This standard is issued under the fixed designation F 1940; the number immediately following the designation indicates the year of
original adoption or, in the case of revision, the year of last revision. A number in parentheses indicates the year of last reapproval. A
superscript epsilon (e) indicates an editorial change since the last revision or reapproval.
1. Scope demonstrated. A specimen made of AISI E4340 steel heat
treated to a hardness range of 50–52 HRC is used to produce
1.1 This test method covers a procedure to prevent, to the
a “worst case” condition and maximize sensitivity to IHE.
extent possible, internal hydrogen embrittlement (IHE) of
1.8 A notched four point bend specimen undergoes sus-
fasteners by monitoring the plating or coating process, such as
tained load and slow strain rate testing by using incremental
those described in Specifications F 1137 and F 1941. The
loads and hold times under displacement control to measure a
process is quantitatively monitored on a periodic basis with a
threshold stress in an accelerated manner in accordance with
minimum number of specimens as compared to qualifying each
Test Method F 1624. The Test is an accelerated (# 24h)
lot of fasteners being plated or coated. Trend analysis is
incrementally increasing step load test method that measures
utilized to ensure quality as compared to statistical sampling
the threshold for hydrogen stress cracking that is used to
analysis of each lot of fasteners. This test method consists of a
quantify the amount of residual hydrogen in the specimen.
mechanical test for the evaluation and control of the potential
1.9 In this test method bending is used instead of tension
for IHE that may arise from various sources of hydrogen in a
because it produces the maximum local limit load tensile stress
plating or coating process.
in a notched bar of up to 2.3 times the yield strength as
1.2 This test method applies to externally threaded tensile
measured in accordance with Test Method E 8. A fastener that
fasteners that can also be loaded in bending during installation.
is unintentionally exposed to bending on installation may attain
1.3 This test method is limited to evaluating hydrogen
this maximum local tensile stress.
induced embrittlement due only to processing (IHE) and not
1.10 The values stated in inch-pound units are to be re-
due to environmental exposure (EHE, see Test Method
garded as standard. The values given in parentheses are
F 1624).
mathematical conversions to SI units that are provided for
1.4 This test method is not intended to measure the relative
information only and are not considered standard.
susceptibility of steels to either IHE or EHE.
1.11 This standard does not purport to address all of the
1.5 This test method is limited to ferrous fasteners that are
safety concerns, if any, associated with its use. It is the
susceptible to time-delayed fracture caused by the diffusion of
responsibility of the user of this standard to establish appro-
hydrogen under stress.
priate safety and health practices and determine the applica-
1.6 This test method uses a notched square bar specimen
bility of regulatory limitations prior to use.
that conforms to Test Method F 519, Type 1e, except that the
radius is increased to accommodate the deposition of a larger
2. Referenced Documents
range of platings and coatings. For the background on F 519
2 3 2.1 ASTM Standards:
testing see publications ASTM STP 543 and ASTM STP 962.
4
D 1193 Specification for Reagent Water
The stress concentration factor is at a K 5 3.1 6 0.2. The
t
5
E 4 Practices for Force Verifications of Testing Machines
sensitivity is demonstrated with a constant imposed cathodic
5
E 8 Test Methods for Tension Testing of Metallic Materials
potential to control the amount of hydrogen. Both the sensi-
E 18 Test Methods of Rockwell Hardness and Rockwell
tivity and the baseline for residual hydrogen will be established
5
Superficial Hardness of Metallic Materials
with tests on bare metal specimens in air.
E 29 Practice for Using Significant Digits in Test Data to
1.7 The sensitivity of each lot of specimens to IHE shall be
6
Determine Conformance with Specifications
E 399 Test Method for Plane-Strain Fracture Toughness of
1
5
This test method is under the jurisdiction of ASTM Committee F-16 on
Metallic Materials
Fasteners and is the direct responsibility of Subcommittee F16.93 on Quality
Assurance Provisions for Fasteners.
Current edition approved Oct. 10, 1999. Published December 1999. Originally
published as F 1940 – 98. Last previous edition F 1940 – 98.
2 4
Hydrogen Embrittlement Testing, ASTM STP 543, ASTM, 1974. Annual Book of ASTM Standards, Vol 11.01.
3 5
H
...


Questions, Comments and Discussion
Ask us and Technical Secretary will try to provide an answer. You can facilitate discussion about the standard in here.