ASTM D6208-07(2020)
(Test Method)Standard Test Method for Repassivation Potential of Aluminum and Its Alloys by Galvanostatic Measurement
Standard Test Method for Repassivation Potential of Aluminum and Its Alloys by Galvanostatic Measurement
SIGNIFICANCE AND USE
5.1 This test method is designed to measure the relative effectiveness of inhibitors to mitigate pitting corrosion of aluminum and its alloys, in particular AA3003-H14, rapidly and reproducibly. The measurements are not intended to correlate quantitatively with other test method values or with susceptibility to localized corrosion of aluminum observed in service. Qualitative correlation of the measurements and susceptibility in service has been established (1).
5.2 The maximum potential reached upon initial polarization, EB, is a measure of the resistance to breakdown of the aluminum oxide film. Lower susceptibility to initiation of pitting corrosion is indicated by a more noble potential. (See Practice G3 and Terminology G15.) This potential, as measured in this test method, is not very sensitive to the inhibitors present.
5.3 The minimum potential, EG, following the maximum potential is a measure of the protection against continued pitting corrosion by the inhibitors. Again, a more noble potential indicates better protection. This potential is sensitive to the inhibitors present.
5.4 Visual examination of the specimens can provide information about subtleties of the pitting and inhibition mechanisms. Number of pits, pit depth, amount of deposit, and surface discoloration are some examples of recordable observations, which can assist evaluation of inhibitor effectiveness.
5.5 The presence of chloride in the test solution is critical to observation of pitting corrosion. Also, a coolant/corrosive water solution in which gas bubbles evolve spontaneously on the aluminum (indicating general corrosion) is unlikely to have a significant amount of observable pitting corrosion.
SCOPE
1.1 A procedure to determine the repassivation potential of aluminum alloy 3003-H14 (UNS A93003) (1)2 as a measure of relative susceptibility to pitting corrosion by conducting a galvanostatic polarization is described. A procedure that can be used to check experimental technique and instrumentation is described, as well.
1.2 The test method serves as a guide for similar measurement on other aluminum alloys and metals (2-5).
1.3 The values stated in SI units are to be regarded as standard. The values given in parentheses after SI units are provided for information only and are not considered standard.
1.4 This standard does not purport to address all of the safety concerns, if any, associated with its use. It is the responsibility of the user of this standard to establish appropriate safety, health, and environmental practices and determine the applicability of regulatory limitations prior to use.
1.5 This international standard was developed in accordance with internationally recognized principles on standardization established in the Decision on Principles for the Development of International Standards, Guides and Recommendations issued by the World Trade Organization Technical Barriers to Trade (TBT) Committee.
General Information
- Status
- Published
- Publication Date
- 31-Jan-2020
- Technical Committee
- D15 - Engine Coolants and Related Fluids
- Drafting Committee
- D15.06 - Glassware Performance Tests
Relations
- Effective Date
- 01-Feb-2020
- Effective Date
- 01-Mar-2024
- Effective Date
- 01-Jan-2020
- Effective Date
- 01-May-2019
- Effective Date
- 15-Dec-2014
- Effective Date
- 01-Dec-2013
- Effective Date
- 01-May-2013
- Effective Date
- 01-May-2013
- Effective Date
- 01-May-2010
- Effective Date
- 01-Oct-2008
- Effective Date
- 01-May-2008
- Effective Date
- 01-Apr-2007
- Effective Date
- 01-Jul-2006
- Effective Date
- 01-Mar-2006
- Effective Date
- 15-Jun-2005
Overview
ASTM D6208-07(2020): Standard Test Method for Repassivation Potential of Aluminum and Its Alloys by Galvanostatic Measurement provides a reliable procedure to assess the effectiveness of corrosion inhibitors on aluminum and aluminum alloys, with primary focus on AA3003-H14. Developed by ASTM International, this standard outlines a galvanostatic method to determine the repassivation potential-an important indicator of susceptibility to pitting corrosion in aluminum. The procedure is especially valuable for rapid and reproducible laboratory screening of inhibitors used in engine coolants and related industrial applications.
Key Topics
- Repassivation Potential: The method measures critical electrochemical potentials such as the "break potential" (EB), indicating the breakdown of the protective oxide film on aluminum, and the "protection potential" (EG), reflecting ongoing protection by corrosion inhibitors.
- Pitting Corrosion Assessment: By simulating aggressive conditions (typically using chloride-containing solutions), the test allows qualitative evaluation of localized corrosion risks.
- Influence of Inhibitors: The test is sensitive to the presence and effectiveness of inhibitors, making it suited for comparative studies of different formulations.
- Visual Examination: After testing, specimens are visually inspected for number and depth of pits, surface discoloration, and deposits, supporting a more comprehensive assessment.
- Applicability to Various Alloys: While the method was initially developed for AA3003-H14, it serves as a guide for similar measurements on other aluminum alloys and possibly other metals.
Applications
This standard test method is widely used for:
- Coolant and Inhibitor Development: Laboratories and manufacturers leverage ASTM D6208 to screen and compare the performance of corrosion inhibitors in automotive engine coolants, HVAC systems, and industrial cooling systems.
- Quality Control: Regular testing using this method ensures consistent protection of aluminum components against pitting corrosion in service environments exposed to aggressive ions.
- Research and Product Validation: Academics and R&D teams use the standard to study inhibition mechanisms and validate new inhibitor compounds.
- Comparative Materials Testing: The method allows for benchmarking new alloys and surface treatments under controlled conditions, providing actionable data for materials selection.
- Regulatory and Certification Support: Results from ASTM D6208 are useful in product compliance and documentation for industrial clients and regulatory bodies.
Note: While rapid and consistent, the results from this method are not intended for rigorous quantitative prediction of field performance but offer qualitative correlation with service behavior.
Related Standards
Users of ASTM D6208-07(2020) may find these related standards useful:
- ASTM D1193: Specification for Reagent Water – outlines water quality for sample preparation.
- ASTM D3585: Specification for ASTM Reference Fluid for Coolant Tests – describes reference coolant formulations.
- ASTM G3: Practice for Conventions Applicable to Electrochemical Measurements in Corrosion Testing – provides terminology and conventions.
- ASTM G15: Terminology Relating to Corrosion and Corrosion Testing – offers standard definitions.
- ASTM G46: Guide for Examination and Evaluation of Pitting Corrosion – provides guidance on visual inspection of test specimens.
- ASTM G107: Guide for Formats for Collection and Compilation of Corrosion Data for Metals for Computerized Database Input – useful for data management.
Summary
The ASTM D6208-07(2020) standard provides a crucial, well-defined approach for evaluating the repassivation potential and pitting corrosion resistance of aluminum alloys using galvanostatic methods. Its primary use is in comparative testing and development of corrosion inhibitors, supporting corrosion-resistant design and maintenance of aluminum systems in diverse industries. This enhances the longevity and reliability of aluminum products subject to harsh environmental conditions, underscoring the practical value of implementing ASTM D6208 in testing protocols.
Buy Documents
ASTM D6208-07(2020) - Standard Test Method for Repassivation Potential of Aluminum and Its Alloys by Galvanostatic Measurement
Get Certified
Connect with accredited certification bodies for this standard

Element Materials Technology
Materials testing and product certification.

Inštitut za kovinske materiale in tehnologije
Institute of Metals and Technology. Materials testing, metallurgical analysis, NDT.
Sponsored listings
Frequently Asked Questions
ASTM D6208-07(2020) is a standard published by ASTM International. Its full title is "Standard Test Method for Repassivation Potential of Aluminum and Its Alloys by Galvanostatic Measurement". This standard covers: SIGNIFICANCE AND USE 5.1 This test method is designed to measure the relative effectiveness of inhibitors to mitigate pitting corrosion of aluminum and its alloys, in particular AA3003-H14, rapidly and reproducibly. The measurements are not intended to correlate quantitatively with other test method values or with susceptibility to localized corrosion of aluminum observed in service. Qualitative correlation of the measurements and susceptibility in service has been established (1). 5.2 The maximum potential reached upon initial polarization, EB, is a measure of the resistance to breakdown of the aluminum oxide film. Lower susceptibility to initiation of pitting corrosion is indicated by a more noble potential. (See Practice G3 and Terminology G15.) This potential, as measured in this test method, is not very sensitive to the inhibitors present. 5.3 The minimum potential, EG, following the maximum potential is a measure of the protection against continued pitting corrosion by the inhibitors. Again, a more noble potential indicates better protection. This potential is sensitive to the inhibitors present. 5.4 Visual examination of the specimens can provide information about subtleties of the pitting and inhibition mechanisms. Number of pits, pit depth, amount of deposit, and surface discoloration are some examples of recordable observations, which can assist evaluation of inhibitor effectiveness. 5.5 The presence of chloride in the test solution is critical to observation of pitting corrosion. Also, a coolant/corrosive water solution in which gas bubbles evolve spontaneously on the aluminum (indicating general corrosion) is unlikely to have a significant amount of observable pitting corrosion. SCOPE 1.1 A procedure to determine the repassivation potential of aluminum alloy 3003-H14 (UNS A93003) (1)2 as a measure of relative susceptibility to pitting corrosion by conducting a galvanostatic polarization is described. A procedure that can be used to check experimental technique and instrumentation is described, as well. 1.2 The test method serves as a guide for similar measurement on other aluminum alloys and metals (2-5). 1.3 The values stated in SI units are to be regarded as standard. The values given in parentheses after SI units are provided for information only and are not considered standard. 1.4 This standard does not purport to address all of the safety concerns, if any, associated with its use. It is the responsibility of the user of this standard to establish appropriate safety, health, and environmental practices and determine the applicability of regulatory limitations prior to use. 1.5 This international standard was developed in accordance with internationally recognized principles on standardization established in the Decision on Principles for the Development of International Standards, Guides and Recommendations issued by the World Trade Organization Technical Barriers to Trade (TBT) Committee.
SIGNIFICANCE AND USE 5.1 This test method is designed to measure the relative effectiveness of inhibitors to mitigate pitting corrosion of aluminum and its alloys, in particular AA3003-H14, rapidly and reproducibly. The measurements are not intended to correlate quantitatively with other test method values or with susceptibility to localized corrosion of aluminum observed in service. Qualitative correlation of the measurements and susceptibility in service has been established (1). 5.2 The maximum potential reached upon initial polarization, EB, is a measure of the resistance to breakdown of the aluminum oxide film. Lower susceptibility to initiation of pitting corrosion is indicated by a more noble potential. (See Practice G3 and Terminology G15.) This potential, as measured in this test method, is not very sensitive to the inhibitors present. 5.3 The minimum potential, EG, following the maximum potential is a measure of the protection against continued pitting corrosion by the inhibitors. Again, a more noble potential indicates better protection. This potential is sensitive to the inhibitors present. 5.4 Visual examination of the specimens can provide information about subtleties of the pitting and inhibition mechanisms. Number of pits, pit depth, amount of deposit, and surface discoloration are some examples of recordable observations, which can assist evaluation of inhibitor effectiveness. 5.5 The presence of chloride in the test solution is critical to observation of pitting corrosion. Also, a coolant/corrosive water solution in which gas bubbles evolve spontaneously on the aluminum (indicating general corrosion) is unlikely to have a significant amount of observable pitting corrosion. SCOPE 1.1 A procedure to determine the repassivation potential of aluminum alloy 3003-H14 (UNS A93003) (1)2 as a measure of relative susceptibility to pitting corrosion by conducting a galvanostatic polarization is described. A procedure that can be used to check experimental technique and instrumentation is described, as well. 1.2 The test method serves as a guide for similar measurement on other aluminum alloys and metals (2-5). 1.3 The values stated in SI units are to be regarded as standard. The values given in parentheses after SI units are provided for information only and are not considered standard. 1.4 This standard does not purport to address all of the safety concerns, if any, associated with its use. It is the responsibility of the user of this standard to establish appropriate safety, health, and environmental practices and determine the applicability of regulatory limitations prior to use. 1.5 This international standard was developed in accordance with internationally recognized principles on standardization established in the Decision on Principles for the Development of International Standards, Guides and Recommendations issued by the World Trade Organization Technical Barriers to Trade (TBT) Committee.
ASTM D6208-07(2020) is classified under the following ICS (International Classification for Standards) categories: 77.150.10 - Aluminium products. The ICS classification helps identify the subject area and facilitates finding related standards.
ASTM D6208-07(2020) has the following relationships with other standards: It is inter standard links to ASTM D6208-07(2014), ASTM D3585-24, ASTM D3585-08(2020), ASTM G3-14(2019), ASTM G3-14, ASTM G3-13, ASTM D3585-08(2013), ASTM G46-94(2013), ASTM G3-89(2010), ASTM D3585-08, ASTM G107-95(2008), ASTM G15-07, ASTM G15-06, ASTM D1193-06, ASTM G15-05. Understanding these relationships helps ensure you are using the most current and applicable version of the standard.
ASTM D6208-07(2020) is available in PDF format for immediate download after purchase. The document can be added to your cart and obtained through the secure checkout process. Digital delivery ensures instant access to the complete standard document.
Standards Content (Sample)
This international standard was developed in accordance with internationally recognized principles on standardization established in the Decision on Principles for the
Development of International Standards, Guides and Recommendations issued by the World Trade Organization Technical Barriers to Trade (TBT) Committee.
Designation: D6208 − 07 (Reapproved 2020)
Standard Test Method for
Repassivation Potential of Aluminum and Its Alloys by
Galvanostatic Measurement
This standard is issued under the fixed designation D6208; the number immediately following the designation indicates the year of
original adoption or, in the case of revision, the year of last revision.Anumber in parentheses indicates the year of last reapproval.A
superscript epsilon (´) indicates an editorial change since the last revision or reapproval.
1. Scope Measurements in Corrosion Testing
G15TerminologyRelatingtoCorrosionandCorrosionTest-
1.1 A procedure to determine the repassivation potential of
2 ing (Withdrawn 2010)
aluminumalloy3003-H14(UNSA93003) (1) asameasureof
G46Guide for Examination and Evaluation of Pitting Cor-
relative susceptibility to pitting corrosion by conducting a
rosion
galvanostaticpolarizationisdescribed.Aprocedurethatcanbe
G107Guide for Formats for Collection and Compilation of
used to check experimental technique and instrumentation is
Corrosion Data for Metals for Computerized Database
described, as well.
Input
1.2 The test method serves as a guide for similar measure-
ment on other aluminum alloys and metals (2-5).
3. Terminology
1.3 The values stated in SI units are to be regarded as
3.1 Definitions—Terms used in this test method can be
standard. The values given in parentheses after SI units are
found in Practice G3 and Terminology G15.
providedforinformationonlyandarenotconsideredstandard.
3.2 Symbols:
1.4 This standard does not purport to address all of the
3.2.1 E —break potential; potential at which the passive
B
safety concerns, if any, associated with its use. It is the
aluminum oxide layer breaks down.
responsibility of the user of this standard to establish appro-
3.2.2 E —protectionpotential,asmeasuredinthisgalvano-
G
priate safety, health, and environmental practices and deter-
static method; potential at which oxide layer repassivates.
mine the applicability of regulatory limitations prior to use.
3.2.3 J—current density, in A/m .
1.5 This international standard was developed in accor-
dance with internationally recognized principles on standard-
4. Summary of Test Method
ization established in the Decision on Principles for the
4.1 The test method described is an adaptation of the
Development of International Standards, Guides and Recom-
method described in FORD Motor Company standards (6).
mendations issued by the World Trade Organization Technical
Barriers to Trade (TBT) Committee.
4.2 An aluminum alloy specimen is polarized at fixed
current density for 20 min. in a solution of coolant and
2. Referenced Documents
corrosivewatercontainingchloride.Thepotentialasafunction
2.1 ASTM Standards:
of time is recorded.
D1193Specification for Reagent Water
4.3 The maximum potential, E , reached upon polarization
B
D3585Specification forASTM Reference Fluid for Coolant
is determined, as is the minimum potential following the
Tests
maximum potential, E .
G
G3Practice for Conventions Applicable to Electrochemical
4.4 Visual examination of the specimen may be made using
Guide G46 as a guide after disassembly and rinsing.
This test method is under the jurisdiction ofASTM Committee D15 on Engine
Coolants and Related Fluids and is the direct responsibility of Subcommittee 5. Significance and Use
D15.06 on Glassware Performance Tests.
5.1 This test method is designed to measure the relative
Current edition approved Feb. 1, 2020. Published February 2020. Originally
approved in 1997. Last previous edition approved in 2014 as D6208–07(2014). effectiveness of inhibitors to mitigate pitting corrosion of
DOI: 10.1520/D6208–07R20.
aluminum and its alloys, in particular AA3003-H14, rapidly
Theboldfacenumbersinparenthesesrefertothelistofreferencesattheendof
and reproducibly. The measurements are not intended to
this standard.
For referenced ASTM standards, visit the ASTM website, www.astm.org, or
contact ASTM Customer Service at service@astm.org. For Annual Book of ASTM
Standards volume information, refer to the standard’s Document Summary page on The last approved version of this historical standard is referenced on
the ASTM website. www.astm.org.
Copyright © ASTM International, 100 Barr Harbor Drive, PO Box C700, West Conshohocken, PA 19428-2959. United States
D6208 − 07 (2020)
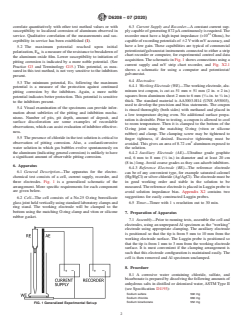
correlate quantitatively with other test method values or with 6.3 Current Supply and Recorder—A constant current sup-
susceptibility to localized corrosion of aluminum observed in plycapableofgenerating872µAcontinuouslyisrequired.The
service. Qualitative correlation of the measurements and sus- recorder must have a high input impedance (>10 Ohms), be
ceptibility in service has been established (1). capableofrecordingpotentialsof 62VwithmVaccuracy,and
have a low gain. These capabilities are typical of commercial
5.2 The maximum potential reached upon initial
potentiostat/galvanostat instruments connected to either a strip
polarization,E isameasureoftheresistancetobreakdownof
B,
chart recorder or computer, for experimental control and data
the aluminum oxide film. Lower susceptibility to initiation of
acquisition.TheschematicinFig.1showsconnectionsusinga
pitting corrosion is indicated by a more noble potential. (See
current supply and mV strip chart recorder, and Fig. X2.1
Practice G3 and Terminology G15.) This potential, as mea-
shows a schematic for using a computer and potentiostat/
sured in this test method, is not very sensitive to the inhibitors
galvanostat.
present.
6.4 Electrodes:
5.3 The minimum potential, E following the maximum
G,
6.4.1 Working Electrode (WE)—Theworkingelectrode,alu-
potential is a measure of the protection against continued
minum test coupon, is cut as 51 mm × 51 mm (2 in. × 2 in.)
pitting corrosion by the inhibitors. Again, a more noble
1 1
squares from aluminum sheet 2 mm to 6 mm ( ⁄16 in. to ⁄4 in.)
potential indicates better protection. This potential is sensitive
thick. The standard material is AA3003-H14 (UNS A93003),
to the inhibitors present.
used to develop the precision and bias statements. The coupon
5.4 Visual examination of the specimens can provide infor-
is rinsed thoroughly (both sides) with methanol and placed in
mation about subtleties of the pitting and inhibition mecha-
a low temperature drying oven. No additional surface prepa-
nisms. Number of pits, pit depth, amount of deposit, and
ration is desirable. Prior to testing, a coupon is allowed to cool
surface discoloration are some examples of recordable
to room temperature. Then it is clamped to the bottom of the
observations,whichcanassistevaluationofinhibitoreffective-
O-ring joint using the matching O-ring (viton or silicone
ness.
rubber) and clamp. The clamping screw may be tightened to
5.5 Thepresenceofchlorideinthetestsolutioniscriticalto
finger tightness, if desired. Excessive tightening must be
observation of pitting corrosion. Also, a coolant/corrosive
avoided. This gives an area of 8.72 cm aluminum exposed to
water solution in which gas bubbles evolve spontaneously on
the solution.
thealuminum(indicatinggeneralcorrosion)isunlikelytohave
6.4.2 Auxiliary Electrode (AE)—Ultrafine grade graphite
a significant amount of observable pitting corrosion.
rod,6mmto8mm( ⁄4 in.) in diameter and at least 20 cm
(8in.) long.Avoid coarse grades as they can adsorb inhibitors.
6. Apparatus
6.4.3 Reference Electrode (RE)—The reference electrode
6.1 General Description—The apparatus for the electro-
can be of any convenient type, for example saturated calomel
chemical test consists of a cell, current supply, recorder, and
(Hg/HgCl)orsilverchloride(Ag/AgCl).Theelectrodemustbe
three electrodes. Fig. 1 is a generalized schematic of the
in good working order and stable in the solution to be
arrangement. More specific requirements for each component
measured.ThereferenceelectrodeisplacedinLugginprobeto
are given below.
avoid solution impedance bias. Appendix X2 contains two
suggestions for easily constructed Luggin probes.
6.2 Cell—The cell consists of a No.25 O-ring borosilicate
glassjointheldverticallyusingstandardlaboratoryclampsand
6.5 Timer—Timer with 1 s resolution out to 30 min.
ring stand. The working electrode will be clamped to the
bottom using the matching O-ring clamp and viton or silicone
7. Preparation of Apparatus
rubber gasket.
7.1 Assembly—Prior to running tests, assemble the cell and
electrodes, using an unpreparedAl specimen as the “working”
electrode using appropriate clamping. The auxiliary electrode
is positioned so that the tip is from 5 mm to 10 mm from the
working electrode surface. The Luggin probe is positioned so
that the tip is from 1 mm to 3 mm from the working electrode
surface. It is most convenient if the clamping arrangement is
such that this electrode configuration is maintained easily. The
cell is then removed and Al specimen unclamped.
8. Procedure
8.1 A corrosive water containing chloride, sulfate, and
bicarbonateispreparedbydissolvingthefollowingamountsof
anhydrous salts in distilled or deionized water,ASTM Type II
(see Specification D1193):
Sodium sulfate 592 mg
Sodium chloride 660 mg
Sodium bicarbonate 552 mg
FIG. 1 Generalized Experimental Set-up
D6208 − 07 (2020)
The solution is made up to a total weight of 1 kg with
distilled or deionized water at 20°C. A 4 kg batch size is
convenientifmanytestsaretoberun,multiplyamountsabove
byfour.Thiswillgiveasolution,whichis400ppminchloride,
sulfate, and bicarbonate.
8.2 Rinse cell, O-ring, Luggin probe (inside and out),
auxilliary electrode, and reference electrode thoroughly with
Type II water.
8.3 Prepare the aluminum specimen as the working elec-
trode (see 5.4.2). Clamp to cell, using O-ring, and set to one
side.
8.4 Preparethetestsolutionas25vol%ofthecoolanttobe
tested, 25 vol% of the corrosive water from 6.1, and the
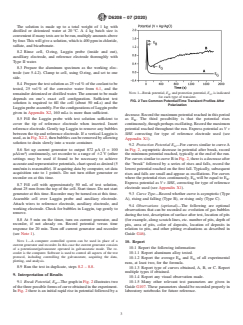
NOTE 1—Break potential, E , and protection potential, E , is indicated
remainder deionized or distilled water.The amount to be made B G
for each type of transient.
depends on one’s exact cell configuration. Sufficient test
FIG. 2 Two Common Potential/Time Transient Profiles After
solution is required to fill the cell (about 50 mLs) and the
Polarization
Lugginprobeassembly.FortheconfigurationsofLugginprobe
given in Appendix X2, 160 mLs is more than sufficient.
decrease.Recordthemaximumpotentialreachedinthisperiod
8.5 Fill the Luggin probe with test solution sufficient to as E . The third possibility is that the potential rises
B
cover the tip of reference electrode when inserted. Insert
continuously,thoughperhapsoscillating.Recordthemaximum
reference electrode. Gently tap Luggin to remove any bubbles potential reached throughout the run. Express potential asVv
between the tip and reference electrode. If a vertical Luggin is
SHE correcting for type of reference electrode used (see
used,asinFig.X2.2,thenbubblescanberemovedbyallowing Appendix X1).
solution to drain slowly into a waste container.
9.2 Protection Potential E —For curves similar to curveA
G
8.6 Set up current generator to output 872 µA (J = 100 in Fig. 2, asymptotic decrease in potential after break, record
µA/cm ) continuously, set recorder to a range of 62 V (other
the minimum potential reached, typically at the end of the run.
settings may be used if found to be necessary to achieve ForcurvessimilartocurveBinFig.2,thereisadecreaseafter
accurateandrepresentativepotentials,chartspeedasdesired(5 the “break” followed by a series of rises and falls, record the
mm/min is reasonable). If acquiring data by computer, set data lowest potential reached on the first fall. Typically, subsequent
acquisition rate to 1 point/s. Do not turn either generator or rises and falls are small and appear as oscillations. For curves
recorder on at this time. where the potential rises con
...


Questions, Comments and Discussion
Ask us and Technical Secretary will try to provide an answer. You can facilitate discussion about the standard in here.
Loading comments...